


提示:文章写完后,目录可以自动生成,如何生成可参考右边的帮助文档
前言
学习谷粒商城的前端部分
0.0 全笔记链接(链接给出)
谷粒商城笔记(详细版) IDEA2021 基础篇(1/3).
谷粒商城笔记(详细版) IDEA2021 基础篇(2/3).
谷粒商城笔记(详细版) IDEA2021 基础篇(3/3).
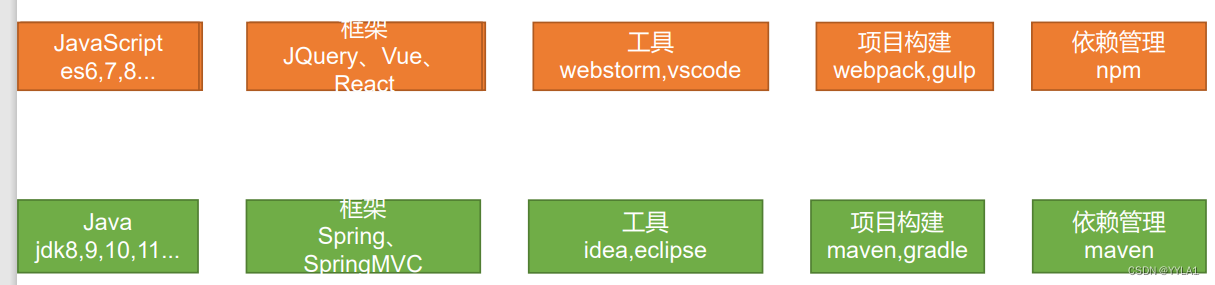
0 前后端技术栈简单对比
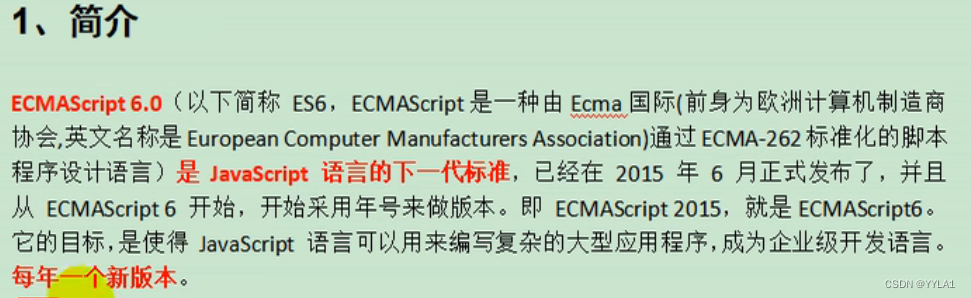
一、ES6特性
1 let && constant
1 let声明的变量有严格的作用域
2 var 可以声明多次 let 只能声明一次
3 var 会变量提升(定义之前打印undefiend)
let 不存在变量提升(定义之前打印报错)
4 constant声明后不允许改变
<!DOCTYPE html>
<html lang="en">
<head>
    <meta charset="UTF-8">
    <meta name="viewport" content="width=device-width, initial-scale=1.0">
    <meta http-equiv="X-UA-Compatible" content="ie=edge">
    <title>Document</title>
</head>
<body>


    <script>
       // var 声明的变量往往会越域
       // let 声明的变量有严格局部作用域
//         {
//             var a = 1;
//             let b = 2;
//         }
//         console.log(a);  // 1
//         console.log(b);  // ReferenceError: b is not defined

    // var 可以声明多次
            // let 只能声明一次
//         var m = 1
//         var m = 2
//         let n = 3
// //         let n = 4
//         console.log(m)  // 2
//         console.log(n)  // Identifier 'n' has already been declared

        // var 会变量提升
        // let 不存在变量提升
//         console.log(x);  // undefined
//         var x = 10;
//         console.log(y);   //ReferenceError: y is not defined
//         let y = 20;

        // let
        // 1. 声明之后不允许改变
                // 2. 一但声明必须初始化,否则会报错
        const a = 1;
        a = 3; //Uncaught TypeError: Assignment to constant variable.

    </script>

</body>
</html>
2 解构&字符串
<!DOCTYPE html>
<html lang="en">

<head>
    <meta charset="UTF-8">
    <meta name="viewport" content="width=device-width, initial-scale=1.0">
    <meta http-equiv="X-UA-Compatible" content="ie=edge">
    <title>Document</title>
</head>

<body>


    <script>

        // 数组解构
        let arr = [1,2,3];
        // let a = arr[0];
        // let b = arr[1];
        // let c = arr[2];

        let [a,b,c] = arr;

        console.log(a,b,c)


        const person = {
            name: "jack",
            age: 21,
            language: ['java', 'js', 'css']
        }


        //         const name = person.name;
        //         const age = person.age;
        //         const language = person.language;


        //对象解构
        const { name: abc, age, language } = person;

        console.log(abc, age, language)

        //4、字符串扩展

        let str = "hello.vue";
        console.log(str.startsWith("hello"));//true
        console.log(str.endsWith(".vue"));//true
        console.log(str.includes("e"));//true
        console.log(str.includes("hello"));//true


        //字符串模板
        let ss = `<div>
                    <span>hello world<span>
                </div>`;
        console.log(ss);

        //  // 2、字符串插入变量和表达式。变量名写在 ${} 中,${} 中可以放入 JavaScript 表达式。

        function fun() {
            return "这是一个函数"
        }

        let info = `我是${abc},今年${age + 10}了, 我想说: ${fun()}`;
        console.log(info);


    </script>
</body>
</html>
3 ES6-箭头函数
1 直接给函数默认值
function add2(a, b = 1)
2 不定参数
function fun(…values) {
console.log(values.length)
}
3 箭头函数写法
		const person = {
            name: "jack",
            age: 21,
            language: ['java', 'js', 'css']
        }
      var hello2 = ({name}) => console.log("hello," +name);
      hello2(person);
<!DOCTYPE html>
<html lang="en">

<head>
    <meta charset="UTF-8">
    <meta name="viewport" content="width=device-width, initial-scale=1.0">
    <meta http-equiv="X-UA-Compatible" content="ie=edge">
    <title>Document</title>
</head>

<body>

    <script>
        //在ES6以前,我们无法给一个函数参数设置默认值,只能采用变通写法:
        function add(a, b) {
            // 判断b是否为空,为空就给默认值1
            b = b || 1;
            return a + b;
        }
        // 传一个参数
        console.log(add(10));


        //现在可以这么写:直接给参数写上默认值,没传就会自动使用默认值
        function add2(a, b = 1) {
            return a + b;
        }
        console.log(add2(20));


        //2)、不定参数
        function fun(...values) {
            console.log(values.length)
        }
        fun(1, 2)      //2
        fun(1, 2, 3, 4)  //4

        //3)、箭头函数
        //以前声明一个方法
        // var print = function (obj) {
        //     console.log(obj);
        // }
        var print = obj => console.log(obj);
        print("hello");

        var sum = function (a, b) {
            c = a + b;
            return a + c;
        }

        var sum2 = (a, b) => a + b;
        console.log(sum2(11, 12));

        var sum3 = (a, b) => {
            c = a + b;
            return a + c;
        }
        console.log(sum3(10, 20))


        const person = {
            name: "jack",
            age: 21,
            language: ['java', 'js', 'css']
        }

        function hello(person) {
            console.log("hello," + person.name)
        }

        //箭头函数+解构
        var hello2 = ({name}) => console.log("hello," +name);
        hello2(person);

    </script>
</body>

</html>
4 ES6-对象优化
1 object新的api
console.log(Object.keys(person));//[“name”, “age”, “language”]
console.log(Object.values(person));//[“jack”, 21, Array(3)]
console.log(Object.entries(person));//[Array(2), Array(2), Array(2)]
Object.assign(target, source1, source2);
把sorucre1,2的属性给target
2 声明对象简写
    onst person1 = { age: age, name: name }

    const person2 = { age, name }
3 函数属性简写
let person3 = {
            name: "jack",
            // 以前:
            eat: function (food) {
                console.log(this.name + "在吃" + food);
            },
            //箭头函数this不能使用,对象.属性
            eat2: food => console.log(person3.name + "在吃" + food),
            eat3(food) {
                console.log(this.name + "在吃" + food);
            }
        }
4 对象拓展运算符
// 1、拷贝对象(深拷贝)
        let p1 = { name: "Amy", age: 15 }
        let someone = { ...p1 }
        console.log(someone)  //{name: "Amy", age: 15}

        // 2、合并对象
        let age1 = { age: 15 }
        let name1 = { name: "Amy" }
        let p2 = {name:"zhangsan"}
        p2 = { ...age1, ...name1 }
        console.log(p2)
<!DOCTYPE html>
<html lang="en">

<head>
    <meta charset="UTF-8">
    <meta name="viewport" content="width=device-width, initial-scale=1.0">
    <meta http-equiv="X-UA-Compatible" content="ie=edge">
    <title>Document</title>
</head>

<body>

    <script>
        const person = {
            name: "jack",
            age: 21,
            language: ['java', 'js', 'css']
        }

        console.log(Object.keys(person));//["name", "age", "language"]
        console.log(Object.values(person));//["jack", 21, Array(3)]
        console.log(Object.entries(person));//[Array(2), Array(2), Array(2)]

        const target = { a: 1 };
        const source1 = { b: 2 };
        const source2 = { c: 3 };

        //{a:1,b:2,c:3}
        Object.assign(target, source1, source2);

        console.log(target);//["name", "age", "language"]

        //2)、声明对象简写
        const age = 23
        const name = "张三"
        const person1 = { age: age, name: name }

        const person2 = { age, name }
        console.log(person2);

        //3)、对象的函数属性简写
        let person3 = {
            name: "jack",
            // 以前:
            eat: function (food) {
                console.log(this.name + "在吃" + food);
            },
            //箭头函数this不能使用,对象.属性
            eat2: food => console.log(person3.name + "在吃" + food),
            eat3(food) {
                console.log(this.name + "在吃" + food);
            }
        }

        person3.eat("香蕉");

        person3.eat2("苹果")

        person3.eat3("橘子");

        //4)、对象拓展运算符

        // 1、拷贝对象(深拷贝)
        let p1 = { name: "Amy", age: 15 }
        let someone = { ...p1 }
        console.log(someone)  //{name: "Amy", age: 15}

        // 2、合并对象
        let age1 = { age: 15 }
        let name1 = { name: "Amy" }
        let p2 = {name:"zhangsan"}
        p2 = { ...age1, ...name1 }
        console.log(p2)


    </script>
</body>

</html>
5 ES6 数组中新增的map reduce方法
1 map
//数组中新增了map和reduce方法。
        //map():接收一个函数,将原数组中的所有元素用这个函数
        处理后放入新数组返回。
         let arr = ['1', '20', '-5', '3'];

        //  arr = arr.map((item)=>{
        //     return item*2
        //  });
         arr = arr.map(item=> item*2);


         console.log(arr);
2 reduce
//reduce() 为数组中的每一个元素依次执行回调函数,不包括数组中被删除或从未被赋值的元素,
        //[2, 40, -10, 6]
        //arr.reduce(callback,[initialValue])
        /**
         1、previousValue (上一次调用回调返回的值,或者是提供的初始值(initialValue))
    2、currentValue (数组中当前被处理的元素)
    3、index (当前元素在数组中的索引)
    4、array (调用 reduce 的数组)*/
        let result = arr.reduce((a,b)=>{
            console.log("上一次处理后:"+a);
            console.log("当前正在处理:"+b);
            return a + b;
        },100);
6 promise异步编排
<!DOCTYPE html>
<html lang="en">

<head>
    <meta charset="UTF-8">
    <meta name="viewport" content="width=device-width, initial-scale=1.0">
    <meta http-equiv="X-UA-Compatible" content="ie=edge">
    <title>Document</title>
    <script src="https://cdn.bootcss.com/jquery/3.4.1/jquery.min.js"></script>
</head>

<body>

    <script>
        //1、查出当前用户信息
        //2、按照当前用户的id查出他的课程
        //3、按照当前课程id查出分数
        // $.ajax({
        //     url: "mock/user.json",
        //     success(data) {
        //         console.log("查询用户:", data);
        //         $.ajax({
        //             url: `mock/user_corse_${data.id}.json`,
        //             success(data) {
        //                 console.log("查询到课程:", data);
        //                 $.ajax({
        //                     url: `mock/corse_score_${data.id}.json`,
        //                     success(data) {
        //                         console.log("查询到分数:", data);
        //                     },
        //                     error(error) {
        //                         console.log("出现异常了:" + error);
        //                     }
        //                 });
        //             },
        //             error(error) {
        //                 console.log("出现异常了:" + error);
        //             }
        //         });
        //     },
        //     error(error) {
        //         console.log("出现异常了:" + error);
        //     }
        // });


        //1、Promise可以封装异步操作
        // let p = new Promise((resolve, reject) => {
        //     //1、异步操作
        //     $.ajax({
        //         url: "mock/user.json",
        //         success: function (data) {
        //             console.log("查询用户成功:", data)
        //             resolve(data);
        //         },
        //         error: function (err) {
        //             reject(err);
        //         }
        //     });
        // });

        // p.then((obj) => {
        //     return new Promise((resolve, reject) => {
        //         $.ajax({
        //             url: `mock/user_corse_${obj.id}.json`,
        //             success: function (data) {
        //                 console.log("查询用户课程成功:", data)
        //                 resolve(data);
        //             },
        //             error: function (err) {
        //                 reject(err)
        //             }
        //         });
        //     })
        // }).then((data) => {
        //     console.log("上一步的结果", data)
        //     $.ajax({
        //         url: `mock/corse_score_${data.id}.json`,
        //         success: function (data) {
        //             console.log("查询课程得分成功:", data)
        //         },
        //         error: function (err) {
        //         }
        //     });
        // })

        function get(url, data) {
            return new Promise((resolve, reject) => {
                $.ajax({
                    url: url,
                    data: data,
                    success: function (data) {
                        resolve(data);
                    },
                    error: function (err) {
                        reject(err)
                    }
                })
            });
        }

        get("mock/user.json")
            .then((data) => {
                console.log("用户查询成功~~~:", data)
                return get(`mock/user_corse_${data.id}.json`);
            })
            .then((data) => {
                console.log("课程查询成功~~~:", data)
                return get(`mock/corse_score_${data.id}.json`);
            })
            .then((data)=>{
                console.log("课程成绩查询成功~~~:", data)
            })
            .catch((err)=>{
                console.log("出现异常",err)
            });

    </script>
</body>

</html>
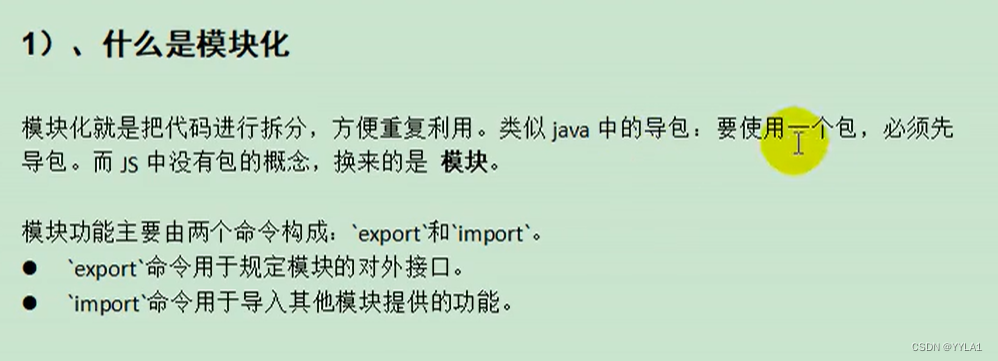
7 ES6 模块化
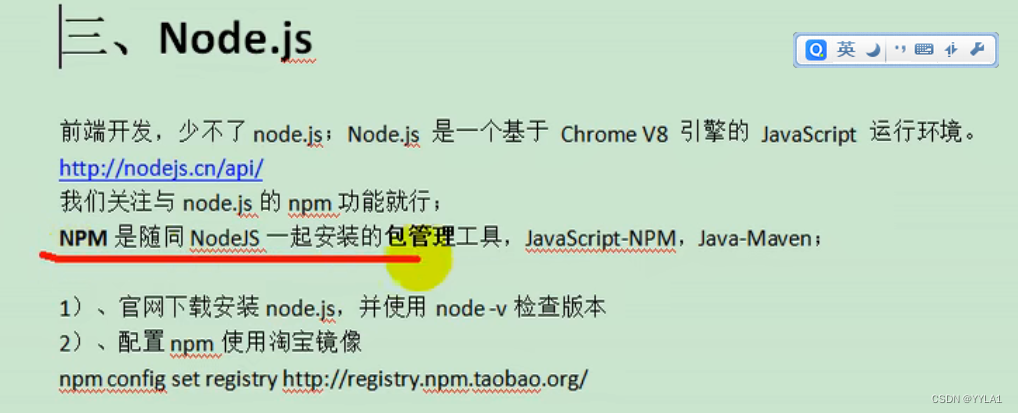
二 Node
三 Babel

三 webpack
四、 VUE
0 IDEA使用VUE
相信很多后端的小伙伴用不习惯Vscode
那我们使用IDEA来进行开发
1 安装vue插件

2 配置vue模板

<template>
#[[$END$]]#
</template>

<script>
export default {
name: "${COMPONENT_NAME}",
data() {
  return {
  }
},
methods: {
}
}
</script>

<style scoped>

</style>
1 概念入门


总结一下就是VUE的MVVM模式
让开发人员从繁杂的
DOM操作(VIEW层和Model层交互)中解放
只关心数据放在前端的什么位置
2 vue-指令 单向绑定-双向绑定
1.v-text v-html 插值表达式
v-text 直接拿出原数据
v-html 拿出数据之前以html进行渲染
插值表达式主要写在标签体当中呀
<!DOCTYPE html>
<html lang="en">
<head>
    <meta charset="UTF-8">
    <meta name="viewport" content="width=device-width, initial-scale=1.0">
    <meta http-equiv="X-UA-Compatible" content="ie=edge">
    <title>Document</title>
</head>
<body>

    <div id="app">
        {{msg}}  {{1+1}}  {{hello()}}<br/>
        <span v-html="msg"></span>
        <br/>
        <span v-text="msg"></span>


    </div>

    <script src="../node_modules/vue/dist/vue.js"></script>

    <script>
        new Vue({
            el:"#app",
            data:{
                msg:"<h1>Hello</h1>",
                link:"http://www.baidu.com"
            },
            methods:{
                hello(){
                    return "World"
                }
            }
        })
    </script>

</body>
</html>
2.v-bind(单向绑定)
主要是给Html标签的属性进行绑定
形式
v-bind:属性名=“data中的数据”
:属性名=“data中的数据”
例子
:style=“{color:datacolor,fontsize:datafontsize}”
<!DOCTYPE html>
<html lang="en">
<head>
    <meta charset="UTF-8">
    <meta name="viewport" content="width=device-width, initial-scale=1.0">
    <meta http-equiv="X-UA-Compatible" content="ie=edge">
    <title>Document</title>
</head>
<body>

    <!-- 给html标签的属性绑定 -->
    <div id="app">

        <a v-bind:href="link">gogogo</a>

        <!-- class,style  {class名:加上?}-->
        <span v-bind:class="{active:isActive,'text-danger':hasError}"
          :style="{color: color1,fontSize: size}">你好</span>


    </div>

    <script src="../node_modules/vue/dist/vue.js"></script>

    <script>
        let vm = new Vue({
            el:"#app",
            data:{
                link: "http://www.baidu.com",
                isActive:true,
                hasError:true,
                color1:'red',
                size:'36px'
            }
        })
    </script>

</body>
</html>
3 v-model(双向绑定)
与单向绑定的主要区别就是视图数据改变
vue中的data数据也跟着改变
如果注册登录会经常用吧
<!DOCTYPE html>
<html lang="en">
<head>
    <meta charset="UTF-8">
    <meta name="viewport" content="width=device-width, initial-scale=1.0">
    <meta http-equiv="X-UA-Compatible" content="ie=edge">
    <title>Document</title>
</head>
<body>


    <!-- 表单项,自定义组件 -->
    <div id="app">

        精通的语言:
            <input type="checkbox" v-model="language" value="Java"> java<br/>
            <input type="checkbox" v-model="language" value="PHP"> PHP<br/>
            <input type="checkbox" v-model="language" value="Python"> Python<br/>
        选中了 {{language.join(",")}}
    </div>

    <script src="../node_modules/vue/dist/vue.js"></script>

    <script>
        let vm = new Vue({
            el:"#app",
            data:{
                language: []
            }
        })
    </script>

</body>
</html>
4 v-on 事件绑定
使用
通常放在按钮上
形式(这里以单击事件为例)
v-on:click=“vue中的date数据操作或是函数”
@clicl=“vue中的date数据操作或是函数”
事件修饰符可以阻止事件冒泡(大Div包裹小div 点击小div同时也触发了大div的事件) 阻止默认行为等
按键修饰符

<!DOCTYPE html>
<html lang="en">

<head>
    <meta charset="UTF-8">
    <meta name="viewport" content="width=device-width, initial-scale=1.0">
    <meta http-equiv="X-UA-Compatible" content="ie=edge">
    <title>Document</title>
</head>

<body>
    <div id="app">

        <!--事件中直接写js片段-->
        <button v-on:click="num++">点赞</button>
        <!--事件指定一个回调函数,必须是Vue实例中定义的函数-->
        <button @click="cancle">取消</button>
        <!--  -->
        <h1>有{{num}}个赞</h1>


        <!-- 事件修饰符 -->
        <div style="border: 1px solid red;padding: 20px;" v-on:click.once="hello">
            大div
            <div style="border: 1px solid blue;padding: 20px;" @click.stop="hello">
                小div <br />
                <a href="http://www.baidu.com" @click.prevent.stop="hello">去百度</a>
            </div>
        </div>


        <!-- 按键修饰符: -->
        <input type="text" v-model="num" v-on:keyup.up="num+=2" @keyup.down="num-=2" @click.ctrl="num=10"><br />

        提示:

    </div>
    <script src="../node_modules/vue/dist/vue.js"></script>

    <script>
        new Vue({
            el:"#app",
            data:{
                num: 1
            },
            methods:{
                cancle(){
                    this.num--;
                },
                hello(){
                    alert("点击了")
                }
            }
        })
    </script>
</body>

</html>
5 v-for循环展示
形式
1
v-for=“(item,index) in items” :key=“唯一不重复元素”
这里的:key能加快vue的渲染效率 加不加都可以
2
遍历对象:
v-for=“value in object”
v-for=“(value,key) in object”
v-for=“(value,key,index) in object”
<!DOCTYPE html>
<html lang="en">

<head>
    <meta charset="UTF-8">
    <meta name="viewport" content="width=device-width, initial-scale=1.0">
    <meta http-equiv="X-UA-Compatible" content="ie=edge">
    <title>Document</title>
</head>

<body>

    <div id="app">
        <ul>
            <li v-for="(user,index) in users" :key="user.name" v-if="user.gender == '女'">
                <!-- 1、显示user信息:v-for="item in items" -->
               当前索引:{{index}} ==> {{user.name}}  ==>   {{user.gender}} ==>{{user.age}} <br>
                <!-- 2、获取数组下标:v-for="(item,index) in items" -->
                <!-- 3、遍历对象:
                        v-for="value in object"
                        v-for="(value,key) in object"
                        v-for="(value,key,index) in object"
                -->
                对象信息:
                <span v-for="(v,k,i) in user">{{k}}=={{v}}=={{i}};</span>
                <!-- 4、遍历的时候都加上:key来区分不同数据,提高vue渲染效率 -->
            </li>


        </ul>

        <ul>
            <li v-for="(num,index) in nums" :key="index"></li>
        </ul>
    </div>
    <script src="../node_modules/vue/dist/vue.js"></script>
    <script>
        let app = new Vue({
            el: "#app",
            data: {
                users: [{ name: '柳岩', gender: '女', age: 21 },
                { name: '张三', gender: '男', age: 18 },
                { name: '范冰冰', gender: '女', age: 24 },
                { name: '刘亦菲', gender: '女', age: 18 },
                { name: '古力娜扎', gender: '女', age: 25 }],
                nums: [1,2,3,4,4]
            },
        })
    </script>
</body>
</html>
6 v-if和v-show
形式
v-if=“”
v-show-“”
他们两个区别是v-if为false的话F12是看不到对应代码的
这样做会改变DOM树
因此v-show效率更高些
<!DOCTYPE html>
<html lang="en">

<head>
    <meta charset="UTF-8">
    <meta name="viewport" content="width=device-width, initial-scale=1.0">
    <meta http-equiv="X-UA-Compatible" content="ie=edge">
    <title>Document</title>
</head>

<body>
    <!--
        v-if,顾名思义,条件判断。当得到结果为true时,所在的元素才会被渲染。
        v-show,当得到结果为true时,所在的元素才会被显示。
    -->
    <div id="app">
        <button v-on:click="show = !show">点我呀</button>
        <!-- 1、使用v-if显示 -->
        <h1 v-if="show">if=看到我....</h1>
        <!-- 2、使用v-show显示 -->
        <h1 v-show="show">show=看到我</h1>
    </div>

    <script src="../node_modules/vue/dist/vue.js"></script>

    <script>
        let app = new Vue({
            el: "#app",
            data: {
                show: true
            }
        })
    </script>

</body>

</html>
7 v-else和v-else-if
<!DOCTYPE html>
<html lang="en">
<head>
<meta charset="UTF-8">
<meta name="viewport" content="width=device-width, initial-scale=1.0">
<meta http-equiv="X-UA-Compatible" content="ie=edge">
<title>Document</title>
</head>
<body>
<div id="app">
<button v-on:click="random=Math.random()">点我呀</button>
<span>{{random}}</span>
<h1 v-if="random>=0.75">
看到我啦?! >= 0.75
</h1>
<h1 v-else-if="random>=0.5">
看到我啦?! >= 0.5
</h1>
<h1 v-else-if="random>=0.2">
看到我啦?! >= 0.2
</h1>
<h1 v-else>
看到我啦?! < 0.2
</h1>
</div>
<script src="../node_modules/vue/dist/vue.js"></script>
<script>
let app = new Vue({
el: "#app",
data: { random: 1 }
})
</script>
</body>
</html>
8 计算属性和侦听器
1 computed 和 watch
computed在其中一个元素变化时就会调用
watch在它监听的元素变化时会被调用
<!DOCTYPE html>
<html lang="en">

<head>
    <meta charset="UTF-8">
    <meta name="viewport" content="width=device-width, initial-scale=1.0">
    <meta http-equiv="X-UA-Compatible" content="ie=edge">
    <title>Document</title>
</head>

<body>
    <div id="app">
        <!-- 某些结果是基于之前数据实时计算出来的,我们可以利用计算属性。来完成 -->
        <ul>
            <li>西游记; 价格:{{xyjPrice}},数量:<input type="number" v-model="xyjNum"> </li>
            <li>水浒传; 价格:{{shzPrice}},数量:<input type="number" v-model="shzNum"> </li>
            <li>总价:{{totalPrice}}</li>
            {{msg}}
        </ul>
    </div>
    <script src="../node_modules/vue/dist/vue.js"></script>

    <script>
        //watch可以让我们监控一个值的变化。从而做出相应的反应。
        new Vue({
            el: "#app",
            data: {
                xyjPrice: 99.98,
                shzPrice: 98.00,
                xyjNum: 1,
                shzNum: 1,
                msg: ""
            },
            computed: {
                totalPrice(){
                    return this.xyjPrice*this.xyjNum + this.shzPrice*this.shzNum
                }
            },
            watch: {
                xyjNum(newVal,oldVal){
                    if(newVal>=3){
                        this.msg = "库存超出限制";
                        this.xyjNum = 3
                    }else{
                        this.msg = "";
                    }
                }
            },
        })
    </script>

</body>

</html>
2 过滤器(全局和非全局)
<!DOCTYPE html>
<html lang="en">

<head>
    <meta charset="UTF-8">
    <meta name="viewport" content="width=device-width, initial-scale=1.0">
    <meta http-equiv="X-UA-Compatible" content="ie=edge">
    <title>Document</title>
</head>

<body>
    <!-- 过滤器常用来处理文本格式化的操作。过滤器可以用在两个地方:双花括号插值和 v-bind 表达式 -->
    <div id="app">
        <ul>
            <li v-for="user in userList">
                {{user.id}} ==> {{user.name}} ==> {{user.gender == 1?"男":"女"}} ==>
                {{user.gender | genderFilter}} ==> {{user.gender | gFilter}}
            </li>
        </ul>
    </div>
    <script src="../node_modules/vue/dist/vue.js"></script>

    <script>

        Vue.filter("gFilter", function (val) {
            if (val == 1) {
                return "男~~~";
            } else {
                return "女~~~";
            }
        })

        let vm = new Vue({
            el: "#app",
            data: {
                userList: [
                    { id: 1, name: 'jacky', gender: 1 },
                    { id: 2, name: 'peter', gender: 0 }
                ]
            },
            filters: {
                 filters 定义局部过滤器,只可以在当前vue实例中使用
                genderFilter(val) {
                    if (val == 1) {
                        return "男";
                    } else {
                        return "女";
                    }
                }
            }
        })
    </script>
</body>

</html>
9 vue组件化概念

<!DOCTYPE html>
<html lang="en">

<head>
    <meta charset="UTF-8">
    <meta name="viewport" content="width=device-width, initial-scale=1.0">
    <meta http-equiv="X-UA-Compatible" content="ie=edge">
    <title>Document</title>
</head>

<body>

    <div id="app">
        <button v-on:click="count++">我被点击了 {{count}} 次</button>

        <counter></counter>
        <counter></counter>
        <counter></counter>
        <counter></counter>
        <counter></counter>

        <button-counter></button-counter>
    </div>
    <script src="../node_modules/vue/dist/vue.js"></script>


    <script>
        //1、全局声明注册一个组件
        Vue.component("counter", {
            template: `<button v-on:click="count++">我被点击了 {{count}} 次</button>`,
            data() {
                return {
                    count: 1
                }
            }
        });

        //2、局部声明一个组件
        const buttonCounter = {
            template: `<button v-on:click="count++">我被点击了 {{count}} 次~~~</button>`,
            data() {
                return {
                    count: 1
                }
            }
        };

        new Vue({
            el: "#app",
            data: {
                count: 1
            },
            components: {
                'button-counter': buttonCounter
            }
        })
    </script>
</body>

</html>
10 vue生命周期和钩子函数

简单进行总结
create 加载数据模型和方法 加载html模板
mount 渲染Html
update 更新html模板
<!DOCTYPE html>
<html lang="en">

<head>
    <meta charset="UTF-8">
    <meta name="viewport" content="width=device-width, initial-scale=1.0">
    <meta http-equiv="X-UA-Compatible" content="ie=edge">
    <title>Document</title>
</head>

<body>
    <div id="app">
        <span id="num">{{num}}</span>
        <button @click="num++">赞!</button>
        <h2>{{name}},有{{num}}个人点赞</h2>
    </div>

    <script src="../node_modules/vue/dist/vue.js"></script>

    <script>
        let app = new Vue({
            el: "#app",
            data: {
                name: "张三",
                num: 100
            },
            methods: {
                show() {
                    return this.name;
                },
                add() {
                    this.num++;
                }
            },
            beforeCreate() {
                console.log("=========beforeCreate=============");
                console.log("数据模型未加载:" + this.name, this.num);
                console.log("方法未加载:" + this.show());
                console.log("html模板未加载:" + document.getElementById("num"));
            },
            created: function () {
                console.log("=========created=============");
                console.log("数据模型已加载:" + this.name, this.num);
                console.log("方法已加载:" + this.show());
                console.log("html模板已加载:" + document.getElementById("num"));
                console.log("html模板未渲染:" + document.getElementById("num").innerText);
            },
            beforeMount() {
                console.log("=========beforeMount=============");
                console.log("html模板未渲染:" + document.getElementById("num").innerText);
            },
            mounted() {
                console.log("=========mounted=============");
                console.log("html模板已渲染:" + document.getElementById("num").innerText);
            },
            beforeUpdate() {
                console.log("=========beforeUpdate=============");
                console.log("数据模型已更新:" + this.num);
                console.log("html模板未更新:" + document.getElementById("num").innerText);
            },
            updated() {
                console.log("=========updated=============");
                console.log("数据模型已更新:" + this.num);
                console.log("html模板已更新:" + document.getElementById("num").innerText);
            }
        });
    </script>
</body>

</html>
10 使用vue脚手架进行模块化开发
# 安装webpack
npm install webpack -g

# 安装vue脚手架
npm install -g @vue/cli-init

# 初始化vue项目
vue init webpack vue-demo

# 访问8080端口
npm run dev
初始化时的选项参考

路由的两种写法  第一种不用再Import导入了
{
      path: '/hello',
      name: 'Hello',
      component: () => import(/* webpackChunkName: "about" */ '../components/Hello')
    },

    // {
    //   path: '/hello',
    //   name: 'Hello',
    //   component: Hello
    // },
 }
11 vue中使用element-ui
在自己的项目目录下输入

npm i element-ui -S

把这三个内容引入到main.js当中
import Vue from 'vue';
import ElementUI from 'element-ui';
import 'element-ui/lib/theme-chalk/index.css';
import App from './App.vue';

Vue.use(ElementUI);

new Vue({
  el: '#app',
  render: h => h(App)
});
总结
前端无限好


 3365
3365

 被折叠的 条评论
为什么被折叠?
被折叠的 条评论
为什么被折叠?
 到【灌水乐园】发言


