


图像分类案例
- 了解 CIFAR10 数据集
- 搭建卷积神经网络
- 编写训练函数
- 编写预测函数
1 CIFAR10 数据集
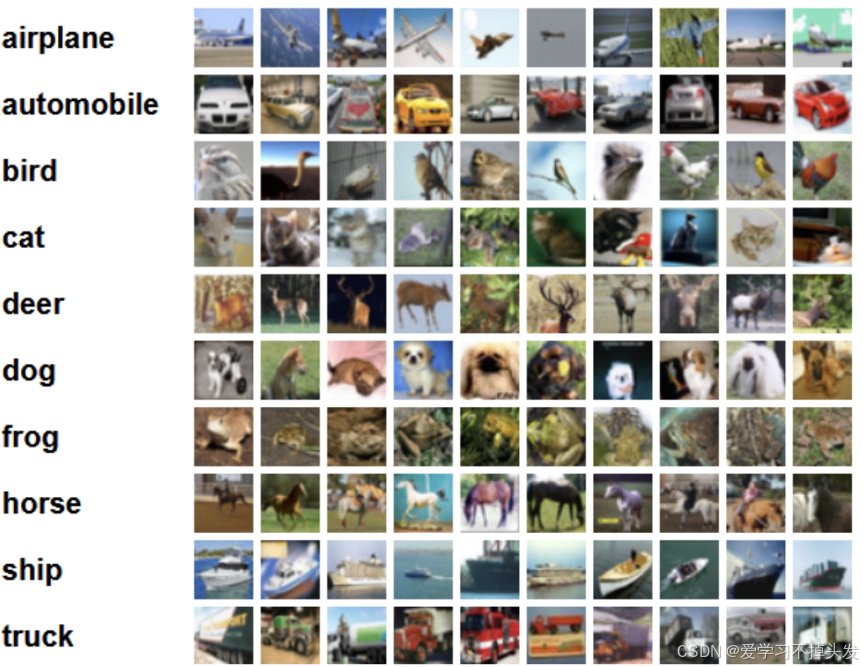
CIFAR-10数据集5万张训练图像、1万张测试图像、10个类别、每个类别有6k个图像,图像大小32×32×3。下图列举了10个类,每一类随机展示了10张图片:
PyTorch 中的 torchvision.datasets 计算机视觉模块封装了 CIFAR10 数据集, 使用方法如下:
from torchvision.datasets import CIFAR10
from torchvision.transforms import Compose
from torchvision.transforms import ToTensor
from torch.utils.data import DataLoader


# 1. 数据集基本信息
def test01():

    # 加载数据集
    # root - 指定数据路径
    # train - True表示训练集。False表示测试集
    # transform=Compose([ToTensor()])
    # Compose用于构造流水线操作,这里直接将数据转换为张量
    train = CIFAR10(root='data', train=True, transform=Compose([ToTensor()]))
    valid = CIFAR10(root='data', train=False, transform=Compose([ToTensor()]))

    # 数据集数量
    print('训练集数量:', len(train.targets))
    print('测试集数量:', len(valid.targets))

    # 数据集形状
    print("数据集形状:", train[0][0].shape)

    # 数据集类别
    print("数据集类别:", train.class_to_idx)


# 2. 数据加载器
def test02():

    train = CIFAR10(root='data', train=True, transform=Compose([ToTensor()]))
    dataloader = DataLoader(train, batch_size=8, shuffle=True)
    for x, y in dataloader:
        print(x.shape)
        print(y)
        break


if __name__ == '__main__':
    test01()
    test02()
程序输出结果:
训练集数量: 50000
测试集数量: 10000
数据集形状: torch.Size([3, 32, 32])
数据集类别: {‘airplane’: 0, ‘automobile’: 1, ‘bird’: 2, ‘cat’: 3, ‘deer’: 4, ‘dog’: 5, ‘frog’: 6, ‘horse’: 7, ‘ship’: 8, ‘truck’: 9}
torch.Size([8, 3, 32, 32])
tensor([4, 7, 8, 4, 0, 6, 2, 9])
2. 搭建图像分类网络
我们要搭建的网络结构如下:
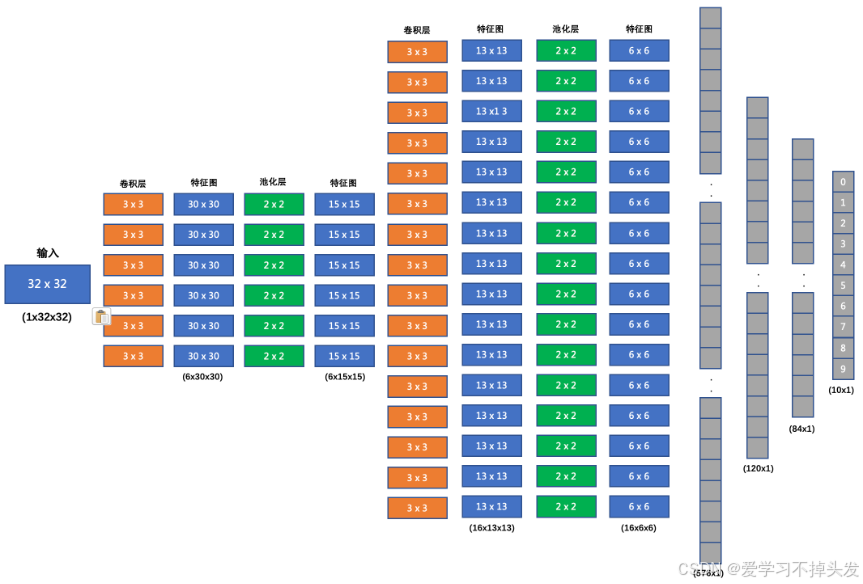
- 输入形状: 32x32
- 第一个卷积层输入 3 个 Channel, 输出 6 个 Channel(6个特征图), Kernel Size 为: 3x3
- 第一个池化层输入 30x30, 输出 15x15, Kernel Size 为: 2x2, Stride 为: 2
- 第二个卷积层输入 6 个 Channel, 输出 16 个 Channel, Kernel Size 为 3x3
- 第二个池化层输入 13x13, 输出 6x6, Kernel Size 为: 2x2, Stride 为: 2
- 第一个全连接层输入 576 维, 输出 120 维
- 第二个全连接层输入 120 维, 输出 84 维
- 最后的输出层输入 84 维, 输出 10 维
我们在每个卷积计算之后应用 relu 激活函数来给网络增加非线性因素。
网络代码实现如下:
class ImageClassification(nn.Module):


    def __init__(self):

        super(ImageClassification, self).__init__()

        self.conv1 = nn.Conv2d(3, 6, stride=1, kernel_size=3)
        self.pool1 = nn.MaxPool2d(kernel_size=2, stride=2)
        self.conv2 = nn.Conv2d(6, 16, stride=1, kernel_size=3)
        self.pool2 = nn.MaxPool2d(kernel_size=2, stride=2)

		# 16*6*6
        self.linear1 = nn.Linear(576, 120)
        self.linear2 = nn.Linear(120, 84)
        self.out = nn.Linear(84, 10)


    def forward(self, x):

        x = F.relu(self.conv1(x))
        x = self.pool1(x)

        x = F.relu(self.conv2(x))
        x = self.pool2(x)

        # 由于最后一个批次可能不够 32,所以需要根据批次数量来 flatten
        x = x.reshape(x.size(0), -1)
        x = F.relu(self.linear1(x))
        x = F.relu(self.linear2(x))

        return self.out(x)
3 编写训练函数
我们的训练时,使用多分类交叉熵损失函数,Adam 优化器. 具体实现代码如下:
def train():

    # 加载 CIFAR10 训练集, 并将其转换为张量
    transgform = Compose([ToTensor()])
    cifar10 = torchvision.datasets.CIFAR10(root='data', train=True, download=True, transform=transgform)

    # 构建图像分类模型
    model = ImageClassification()
    # 构建损失函数
    criterion = nn.CrossEntropyLoss()
    # 构建优化方法
    optimizer = optim.Adam(model.parameters(), lr=1e-3)
    # 训练轮数
    epoch = 100

    for epoch_idx in range(epoch):

        # 构建数据加载器
        dataloader = DataLoader(cifar10, batch_size=BATCH_SIZE, shuffle=True)
        # 样本数量
        sam_num = 0
        # 损失总和
        total_loss = 0.0
        # 开始时间
        start = time.time()
        correct = 0

        for x, y in dataloader:
            # 送入模型
            output = model(x)
            # 计算损失
            loss = criterion(output, y)
            # 梯度清零
            optimizer.zero_grad()
            # 反向传播
            loss.backward()
            # 参数更新
            optimizer.step()

            correct += (torch.argmax(output, dim=-1) == y).sum()
            total_loss += (loss.item() * len(y))
            sam_num += len(y)

        print('epoch:%2s loss:%.5f acc:%.2f time:%.2fs' %
              (epoch_idx + 1,
               total_loss / sam_num,
               correct / sam_num,
               time.time() - start))

    # 序列化模型
    torch.save(model.state_dict(), 'model/image_classification.bin')
4 编写预测函数
我们加载训练好的模型,对测试集中的 1 万条样本进行预测,查看模型在测试集上的准确率.
def test():

    # 加载 CIFAR10 测试集, 并将其转换为张量
    transgform = Compose([ToTensor()])
    cifar10 = torchvision.datasets.CIFAR10(root='data', train=False, download=True, transform=transgform)
    # 构建数据加载器
    dataloader = DataLoader(cifar10, batch_size=BATCH_SIZE, shuffle=True)
    # 加载模型
    model = ImageClassification()
    model.load_state_dict(torch.load('model/image_classification.bin'))
    model.eval()


    total_correct = 0
    total_samples = 0
    for x, y in  dataloader:
        output = model(x)
        total_correct += (torch.argmax(output, dim=-1) == y).sum()
        total_samples += len(y)

    print('Acc: %.2f' % (total_correct / total_samples))
程序输出结果:
Acc: 0.57
5 网络优化
本小节主要学习如何使用卷积层、池化层来设计、构建一个卷积神经网络。从程序的运行结果来看,网络模型在测试集上的准确率并不高。我们可以从以下几个方面来调整网络:
- 增加卷积核输出通道数
- 增加全连接层的参数量
- 调整学习率
- 调整优化方法
- 修改激活函数
等等…
把学习率由 1e-3 修改为 1e-4, 并网络参数量增加如下代码所示:
class ImageClassification(nn.Module):


    def __init__(self):

        super(ImageClassification, self).__init__()

        self.conv1 = nn.Conv2d(3, 32, stride=1, kernel_size=3)
        self.pool1 = nn.MaxPool2d(kernel_size=2, stride=2)
        self.conv2 = nn.Conv2d(32, 128, stride=1, kernel_size=3)
        self.pool2 = nn.MaxPool2d(kernel_size=2, stride=2)

        self.linear1 = nn.Linear(128 * 6 * 6, 2048)
        self.linear2 = nn.Linear(2048, 2048)
        self.out = nn.Linear(2048, 10)


    def forward(self, x):

        x = F.relu(self.conv1(x))
        x = self.pool1(x)

        x = F.relu(self.conv2(x))
        x = self.pool2(x)

        # 由于最后一个批次可能不够 32,所以需要根据批次数量来 flatten
        x = x.reshape(x.size(0), -1)

        x = F.relu(self.linear1(x))
        x = F.dropout(x, p=0.5)

        x = F.relu(self.linear2(x))
        x = F.dropout(x, p=0.5)

        return self.out(x)
经过训练,模型在测试集的准确率由 0.57,提升到了 0.93,同学们也可以自己修改相应的网络结构、训练参数等来提升模型的性能。


 877
877

 被折叠的 条评论
为什么被折叠?
被折叠的 条评论
为什么被折叠?
 到【灌水乐园】发言


