


 本文深入讲解了静态代理与动态代理在Spring AOP中的应用,包括静态代理的代码实现、动态代理(JDK动态代理)的原理与示例,以及AOP在Spring中的核心作用和实现方式,如声明式事务和切面编程。
1、代理模式
为什么要学习代理模式?因为这就是Spring AOP 的底层 !【SrpingAOP 和 SpringMVC】这两个面试重点!
代理模式分类:
-
静态代理
-
动态代理

1.1静态代理
角色分析:
- 抽象角色:一般会使用接口或抽象类来解决
- 真实角色:被代理的角色
- 代理角色:代理真实角色,代理真实角色后,我们一般会做一些附属操作
- 客户:访问代理对象的人!
代码步骤:
- 接口
//租房
public interface Rent {
    public void rent();
}
- 真实角色
//房东
public class Host implements Rent {
    public void rent() {
        System.out.println("房东要出租房子!");
    }
}
- 代理角色
public class Proxy implements Rent {
    private Host host;

    public Proxy() {
    }

    public Proxy(Host host) {
        this.host = host;
    }

    public void rent() {
        seeHouse();
        host.rent();
        hetong();
        fare();
    }
    //看房
    public void seeHouse(){
        System.out.println("中介带你看房!");
    }
    //合同
    public void hetong(){
        System.out.println("签租赁合同");
    }
    //收中介费
    public void fare(){
        System.out.println("收中介费!");
    }
}
- 客户端访问代理角色
public class Client {
    public static void main(String[] args) {
        //房东要出租房子
        Host host=new Host();
        //代理,中介帮房东出租房子,但是呢,代理角色一般会有一些附属操作
        Proxy proxy = new Proxy(host);
        //你不用面对房东,直接找中介租房即可
        proxy.rent();
    }
}
代理模式的好处:
- 可以使真实角色的操作更加纯粹!不用去关注一些公共的业务!
- 公共业务就交给了代理角色!实现了业务的分工!
- 公共业务发生拓展的时候,方便集中管理!
缺点:
- 一个真实角色就会产生一个代理角色;代码量会翻倍,开发效率会变低
1.2、动态代理
- 动态代理和静态代理角色一样
- 动态代理的代理类是动态生成的,不是我们直接写好的
- 动态代理分为两大类:基于接口的动态代理,基于动态类的动态代理
- 基于接口的----JDK的动态代理【我们在这里使用】
- 基于类:cglib
- Java字节码实现:Javassist
需要了解两个类:Proxy:代理,InvocationHandler:调用处理程序
- 接口
//租房
public interface Rent {
    public void rent();
}
- 真实角色
//房东
public class Host implements Rent {
    public void rent() {
        System.out.println("房东要出租房子!");
    }
}
- 代理角色
package com.gzh.demo02;

import java.lang.reflect.InvocationHandler;
import java.lang.reflect.Method;
import java.lang.reflect.Proxy;

//我们用这个类自动生成代理类
public class ProxyInvocationHandler implements InvocationHandler {

    //被代理的接口
    private Rent rent;

    public void setRent(Rent rent) {
        this.rent = rent;
    }

    //生成得到代理类
    public Object getProxy(){
        return Proxy.newProxyInstance(this.getClass().getClassLoader(),rent.getClass().getInterfaces(),this);
    }
    //处理代理实例,并返回结果
    public Object invoke(Object proxy, Method method, Object[] args) throws Throwable {
        seeHouse();
        //动态代理的本质,就是使用反射机制实现
        System.out.println(args);
        Object result = method.invoke(rent, args);
        hetong();
        fare();
        return result;
    }
    //看房
    public void seeHouse(){
        System.out.println("中介带你看房!");
    }
    //合同
    public void hetong(){
        System.out.println("签租赁合同");
    }
    //收中介费
    public void fare(){
        System.out.println("收中介费!");
    }
}
- 客户端访问代理角色
public class Client {
    public static void main(String[] args) {
        //真实角色
        Host host=new Host();
        //代理角色
        ProxyInvocationHandler pih = new ProxyInvocationHandler();
        //通过调用程序处理角色来处理我们要调用的接口对象!
        pih.setRent(host);
        Rent proxy = (Rent) pih.getProxy();//这里的proxy是动态生成的,我们并没有写
        proxy.rent();
    }
}
动态代理的好处:
- 可以使真实角色的操作更加纯粹!不用去关注一些公共的业务!
- 公共业务就交给了代理角色!实现了业务的分工!
- 公共业务发生拓展的时候,方便集中管理!
- 一个动态代理类代理的是一个接口,一般就是对应的一类业务
- 一个动态代理类可以代理多个类,只要是实现了同一个接口即可
2.AOP
2.1什么是AOP
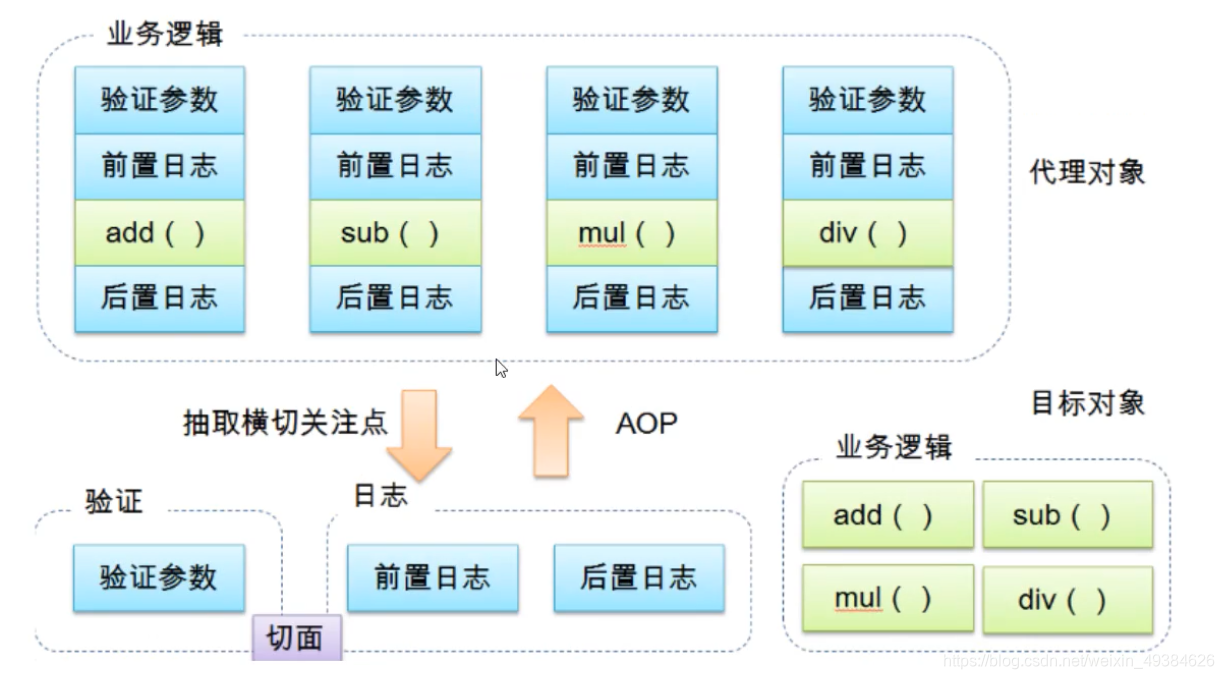
AOP(Aspect Oriented Programming)意为:面向切面编程,通过预编译方式和运行期动态代理实现程序功能的统一
维护的一种技术。AOP是OOP的延续,是软件开发的一个热点,也是Spring框架的一个很重要的内容,是函数式编程的
一种衍生范型。利用AOP可以对业务逻辑的各个部分进行隔离,从而使得业务逻辑各个部分之间的耦合度降低,提高程序
的可重用性,同时提高了开发的效率。
2.2 AOP在Spring中的作用
提供声明式事物;允许用户自定义切面
-
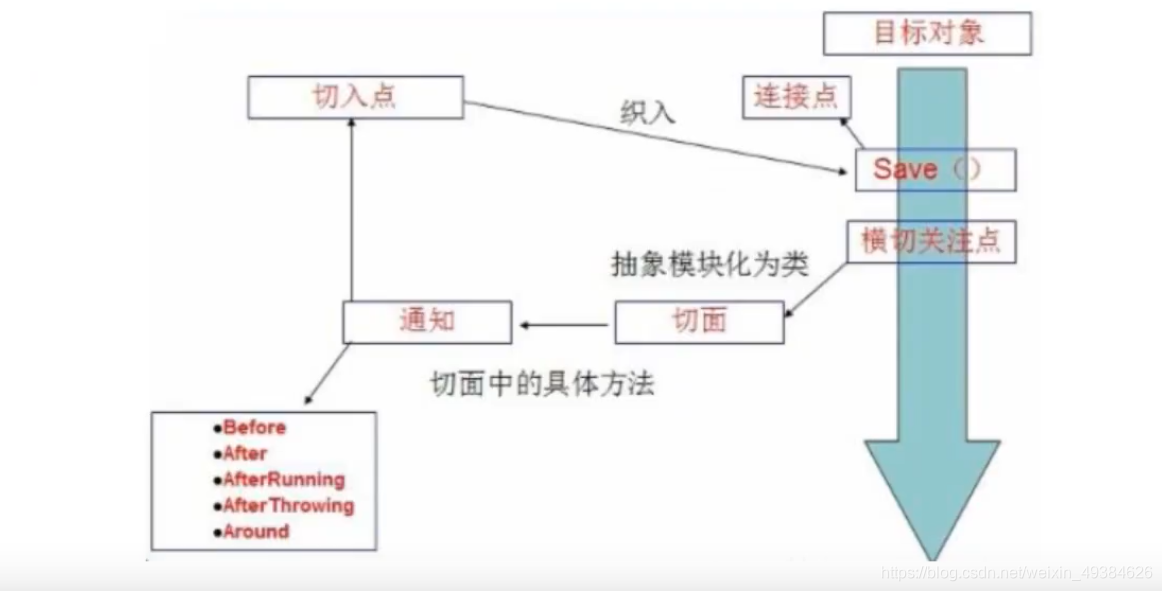
横切关注点:跨越应用程序多个模块的方法或功能。即是,与我们业务逻辑无关的,但是我们需要关注的部分
就是横切关注点。如日志,安全,缓存,事物等等。。。
-
切面(ASPECT):横切面关注点 被模块化 的特殊对象。即,它是一个类
-
通知(Advice):切面必须要完成的工作,即,它是一个方法
-
目标(Target):被通知对象
-
代理(Proxy):向目标对象应用通知之后创建的对象
-
切入点(PointCut):切面通知执行的 ”地点“ 的定义
-
连接点(Jo’i’ntPoint):与切入点匹配的执行点
2.3 使用Spring实现AOP
【重点】使用AOP,先导入个依赖
<!-- https://mvnrepository.com/artifact/org.springframework/spring-webmvc -->
        <dependency>
            <groupId>org.aspectj</groupId>
            <artifactId>aspectjweaver</artifactId>
            <version>1.9.5</version>
        </dependency>
方式一:使用Spring的API接口【主要是SPring接口实现】
- 测试方法接口
public interface UserService {
    public void add();
    public void delete();
    public void update();
    public void select();
}
- 实现类
public class UserServiceImpl implements UserService {
    public void add() {
        System.out.println("新增了一个用户");
    }

    public void delete() {
        System.out.println("删除了一个用户");
    }

    public void update() {
        System.out.println("修改了一个用户");
    }

    public void select() {
        System.out.println("查询了一个用户");
    }
}
- 执行前类
public class Log implements MethodBeforeAdvice {

    //method:要执行的目标对象的方法
    //args:参数
    //target:目标对象
    public void before(Method method, Object[] args, Object target) throws Throwable {
        System.out.println(target.getClass().getName()+"的"+method.getName()+"被执行了");
    }
}
- 执行后类
public class AfterLog implements AfterReturningAdvice {
    public void afterReturning(Object returnValue, Method method, Object[] args, Object target) throws Throwable {
        System.out.println("执行了"+target.getClass().getName()+"的"+method.getName()+"方法,返回结果为:"+returnValue);
    }
}
- bean
    <bean id="userService" class="com.gzh.service.Impl.UserServiceImpl"/>
    <bean id="log" class="com.gzh.log.Log"/>
    <bean id="afterLog" class="com.gzh.log.AfterLog"/>
    <!--方式一:使用原生Spring API接口-->
    <!--配置AOP:需要导入aop的约束-->
    <aop:config>
        <!--切入点:expression:表达式-->
        <aop:pointcut id="pointuct" expression="execution(* com.gzh.service.*.*(..))"/>
        <!--执行环绕增加-->
        <aop:advisor advice-ref="log" pointcut-ref="pointuct"/>
        <aop:advisor advice-ref="afterLog" pointcut-ref="pointuct"/>
    </aop:config>
- 测试类
public class MyTest {
    public static void main(String[] args) {
        ApplicationContext context = new ClassPathXmlApplicationContext("applictionContext.xml");
        UserService userService = context.getBean("userService", UserService.class);
        userService.add();
        Sington sington = Sington.newInstant();
        sington.show();
    }
}
方式二:自定义类来实现AOP 【主要是切面定义】
- 测试方法接口
public interface UserService {
    public void add();
    public void delete();
    public void update();
    public void select();
}
- 实现类
public class UserServiceImpl implements UserService {
    public void add() {
        System.out.println("新增了一个用户");
    }

    public void delete() {
        System.out.println("删除了一个用户");
    }

    public void update() {
        System.out.println("修改了一个用户");
    }

    public void select() {
        System.out.println("查询了一个用户");
    }
}
- 切面类
public class DiyPointCut {
    public void before(){
        System.out.println("方法执行前");
    }

    public void after(){
        System.out.println("方法执行后");
    }
}
- bean
    <bean id="userService" class="com.gzh.service.Impl.UserServiceImpl"/>
<!--    方式二:自定义类-->
    <bean id="diy" class="com.gzh.diy.DiyPointCut"/>
    <aop:config>

<!--        自定义切面ref要引用的类-->
        <aop:aspect ref="diy">
            <aop:pointcut id="pointuct" expression="execution(* com.gzh.service.*.*(..))"/>
            <aop:before method="before" pointcut-ref="pointuct"/>
            <aop:after method="after" pointcut-ref="pointuct"/>
        </aop:aspect>
    </aop:config>
- 测试类
public class MyTest {
    public static void main(String[] args) {
        ApplicationContext context = new ClassPathXmlApplicationContext("applictionContext.xml");
        UserService userService = context.getBean("userService", UserService.class);
        userService.select();
    }
}
方式三:使用注解实现!【注意要开启注解支持】
方法接口和以上两个一样
- 切面类
package com.gzh.diy;

import org.aspectj.lang.annotation.After;
import org.aspectj.lang.annotation.Aspect;
import org.aspectj.lang.annotation.Before;
import org.springframework.context.annotation.Bean;

//方式三:使用注解实现AOP
@Aspect //标注这一个类为一个切面
public class AnnotationPointCut {
    @Before("execution(* com.gzh.service.*.*(..))")
    public void before(){
        System.out.println("方法执行前");
    }
    @After("execution(* com.gzh.service.*.*(..))")
    public void after(){
        System.out.println("方法执行后");
    }
        //在环绕增强中,我们可以给定一个参数,代表我们要获取处理切入的点
    @Around("execution(* com.gzh.service.*.*(..))")
    public void around(ProceedingJoinPoint jp) throws Throwable {
        System.out.println("环绕前");
        Signature signature = jp.getSignature();//获得签名
        System.out.println("signature:"+signature);
        //执行方法
        Object proceed = jp.proceed();
        System.out.println("环绕后");
        System.out.println(proceed);
    }
}
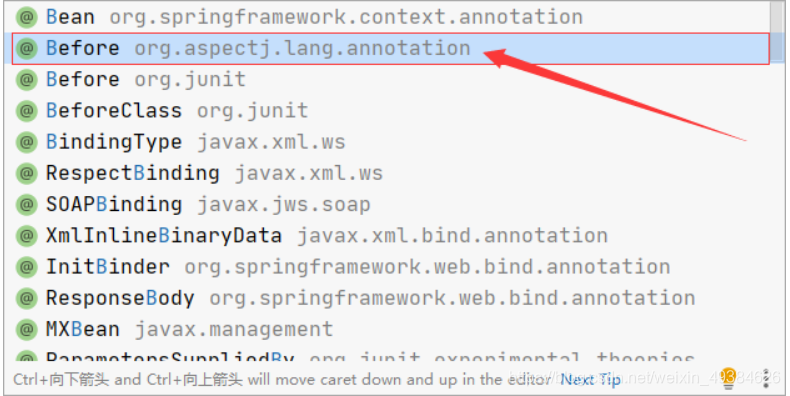
注意@Before和@After都是在aspectj.lang.annotation下的,不要导错了
- bean
 <bean id="userService" class="com.gzh.service.Impl.UserServiceImpl"/>
<!--    方式三:注解实现AOP-->
    <bean id="annotationPointCut" class="com.gzh.diy.AnnotationPointCut"/>
<!--     开启注解支持 JDK(默认 proxy-target-class="false") cglib(proxy-target-class="true")-->
    <aop:aspectj-autoproxy proxy-target-class="false"/>
- 测试类
public class MyTest {
    public static void main(String[] args) {
        ApplicationContext context = new ClassPathXmlApplicationContext("applictionContext.xml");
        UserService userService = context.getBean("userService", UserService.class);
        userService.select();
    }
}


 被折叠的 条评论
为什么被折叠?
被折叠的 条评论
为什么被折叠?
 到【灌水乐园】发言


