


 Apache Atlas 是一个用于Hadoop环境的元数据管理和治理工具,本文详细介绍了在Apache Hadoop环境下,如何安装配置Atlas 2.0,包括集成外部HBase、Solr、Kafka、Hive等步骤,并提供了启动和使用教程。
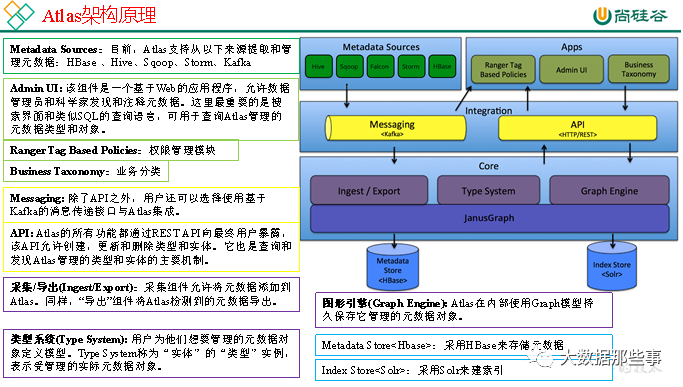
Apache Atlas为组织提供开放式元数据管理和治理功能,用以构建其数据资产目录,对这些资产进行分类和管理,并为数据分析师和数据治理团队,提供围绕这些数据资产的协作功能。本文就介绍Atlas在Apache Hadoop环境下的安装。
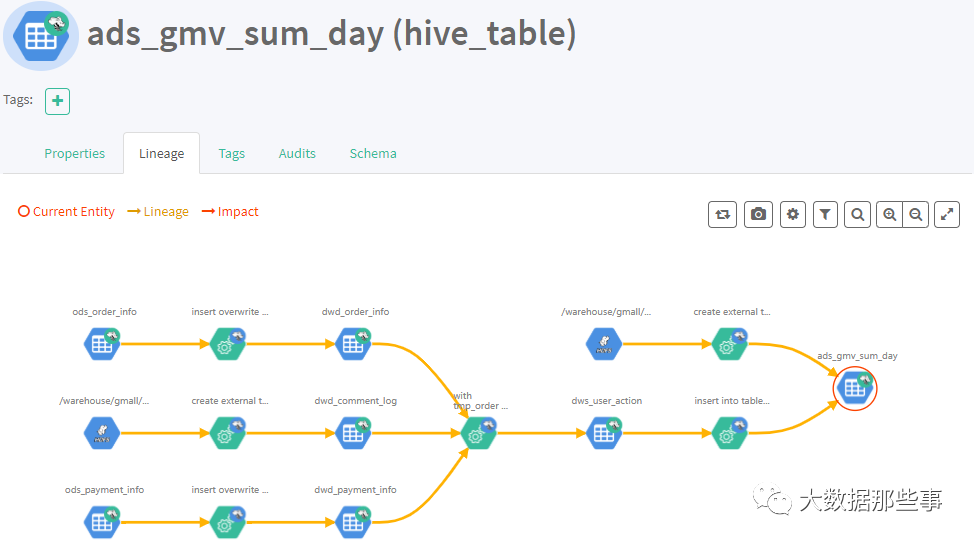
1)表与表之间的血缘依赖
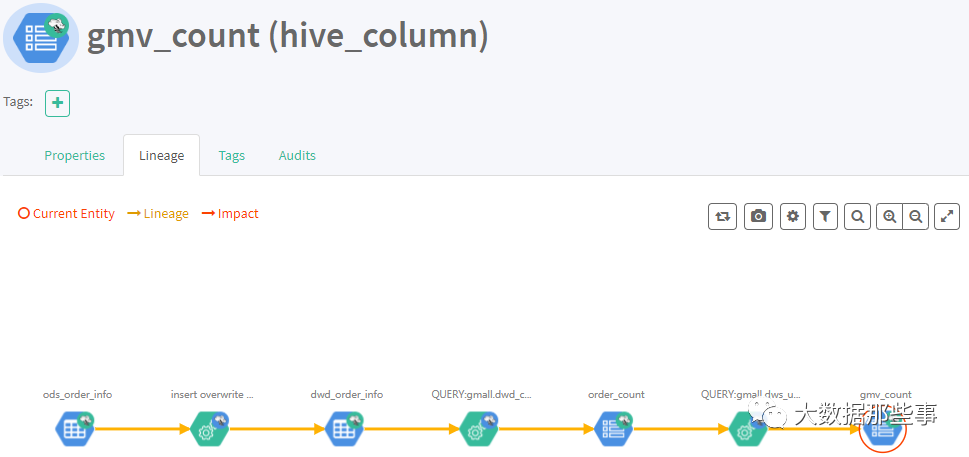
2)字段与字段之间的血缘依赖
02
PART
特性与环境准备
Atlas2.0特性
(1)更新了组件可以使用
Hadoop3.1,Hive3.1,Hive3.0,Hbase2.0,Solr7.5和Kafka2.0
(2)将JanusGraph版本更新为0.3.1
(3)更新了身份验证支持可信代理
(4)更新了指标模块收集通知
(5)支持Atlas增量导出元数据
准备3台主机,hadoop101,hadoop102,hadoop103。
Atlas安装分为:集成自带的HBase + Solr;集成外部的HBase + Solr。
这里安装采用集成外部Hase+Solr。环境准备如下图
|
服务名称 |
子服务 |
服务器 hadoop101 |
服务器 hadoop102 |
服务器 hadoop103 |
|
HDFS |
NameNode |
√ | ||
|
DataNode |
√ |
√ |
√ | |
|
SecondaryNameNode |
√ | |||
|
Yarn |
NodeManager |
√ |
√ |
√ |
|
Resourcemanager |
√ | |||
|
Zookeeper |
QuorumPeerMain |
√ |
√ |
√ |
|
Kafka |
Kafka |
√ |
√ |
√ |
|
HBase |
HMaster |
√ | ||
|
HRegionServer |
√ |
√ |
√ | |
|
Solr |
Jar |
√ |
√ |
√ |
|
Hive |
Hive |
√ | ||
|
MySQL |
MySQL |
√ | ||
|
Azkaban |
AzkabanWebServer |
√ | ||
|
AzkabanExecutorServer |
√ | |||
|
Atlas |
atlas |
√ | ||
|
服务数总计 |
13 |
7 |
7 |
03
PART
安装Atlas
前置的一些环境,Hadoop,Zookeeper,MySql这些服务就不演示安装了,准备好Atlas压缩包,进行安装
(1)把apache-atlas-2.0.0-server.tar.gz 上传到hadoop101的/opt/software目录下
(2)解压apache-atlas-2.0.0-server.tar.gz
到/opt/module/目录下面
[root@hadoop101 software]# tar -zxvf apache-atlas-2.0.0-server.tar.gz -C /opt/module/
(3)修改apache-atlas-2.0.0的名称为atlas
[root@hadoop101 module]# mv apache-atlas-2.0.0/ atlas
04
PART
集成HBase
(1)集成外部HBase,进入/opt/module/atlas/conf/目录,修改配置文件
[root@hadoop101 conf]$ vim atlas-application.properties#修改atlas存储数据主机atlas.graph.storage.hostname=hadoop101:2181,hadoop102:2181,hadoop103:2181
(2)进入到/opt/module/atlas/conf/hbase路径,
添加Hbase集群的配置文件到${Atlas_Home}
[root@hadoop101 conf]# ln -s /opt/module/hbase-2.2.4/conf/ /opt/module/atlas/conf/hbase/
(3)在/opt/module/atlas/conf/atlas-env.sh中添加HBASE_CONF_DIR
[root@hadoop101 conf]$ vim atlas-env.sh#添加HBase配置文件路径export HBASE_CONF_DIR=/opt/module/hbase-2.2.4/conf
05
PART
集成Solr
(1)安装Solr,上传并解压solr-7.7.3.tgz
到/opt/module/目录下面
[root@hadoop101 software]# tar -zxvf solr-7.7.3.tgz -C /opt/module/[root@hadoop101 module]# cd solr-7.7.3/[root@hadoop101 solr-7.7.3]# vim bin/solr.in.shZK_HOST="hadoop101:2181,hadoop102:2181,hadoop103:2181"SOLR_PORT=8983SOLR_ULIMIT_CHECKS=flase
(2)分发
[root@hadoop101 module]# scp -r solr-7.7.3/ hadoop103:/opt/module/[root@hadoop101 module]# scp -r solr-7.7.3/ hadoop103:/opt/module/
(3)修改限制
[root@hadoop101 solr-7.7.3]# vim /etc/security/limits.conf* hard nproc 65000* soft nproc 65000[root@hadoop101 solr-7.7.3]# ulimit -u 65000
(4)启动solr集群,启动后访问端口8983,UI界面出现Cloud模式即成功
[root@hadoop101 solr-7.7.3]# bin/solr start -force[root@hadoop102 solr-7.7.3]# bin/solr start -force[root@hadoop103 solr-7.7.3]# bin/solr start -force
(5)atlas集成solr,进入/opt/module/atlas/conf目录下,修改配置文件
[root@hadoop101 conf]$ vim atlas-application.properties#修改如下配置atlas.graph.index.search.backend=solratlas.graph.index.search.solr.mode=cloudatlas.graph.index.search.solr.zookeeper-url=hadoop101:2181,hadoop102:2181,hadoop103:2181
(6)将atlas自带的solr文件夹拷贝到外部solr集群的各个节点
[root@hadoop101 conf]# cp -r solr/ /opt/module/solr-7.7.3/[root@hadoop101 conf]# cd /opt/module/solr-7.7.3/scp -r solr-7.7.3/ hadoop102:/opt/module/scp -r solr-7.7.3/ hadoop103:/opt/module/[root@hadoop101 solr-7.7.3]# bin/solr start -force[root@hadoop102 solr-7.7.3]# bin/solr start -force[root@hadoop103 solr-7.7.3]# bin/solr start -force[root@hadoop101 solr-7.7.3]# bin/solr create -force -c vertex_index -d /opt/module/solr-7.7.3/atlas_conf -shards 3 -replicationFactor 2[root@hadoop101 solr-7.7.3]# bin/solr create -force -c edge_index -d /opt/module/solr-7.7.3/atlas_conf -shards 3 -replicationFactor 2[root@hadoop101 solr-7.7.3]# bin/solr create -force -c fulltext_index -d /opt/module/solr-7.7.3/atlas_conf -shards 3 -replicationFactor 2
06
PART
集成Kafka
(1)进入/opt/module/atlas/conf/目录,
修改配置文件atlas-application.properties
[root@hadoop101 conf]$ vim atlas-application.propertiesatlas.notification.embedded=falseatlas.kafka.data=/opt/module/kafka_2.11-2.4.1/logsatlas.kafka.zookeeper.connect=hadoop101:2181,hadoop102:2181,hadoop103:2181atlas.kafka.bootstrap.servers=hadoop101:9092,hadoop102:9092,hadoop103:9092atlas.kafka.zookeeper.session.timeout.ms=400atlas.kafka.zookeeper.connection.timeout.ms=200atlas.kafka.zookeeper.sync.time.ms=20atlas.kafka.auto.commit.interval.ms=1000atlas.kafka.hook.group.id=atlas
07
PART
其他配置
(1)进入/opt/module/atlas/conf/目录,修改配置文件atlas-application.properties
[root@hadoop101 conf]$ vim atlas-application.properties######### Server Properties #########atlas.rest.address=http://hadoop101:21000# If enabled and set to true, this will run setup steps when the server startsatlas.server.run.setup.on.start=false######### Entity Audit Configs #########atlas.audit.hbase.zookeeper.quorum=hadoop101:2181,hadoop102:2181,hadoop103:2181
(2)进入/opt/module/atlas/conf/路径,
修改当前目录下的atlas-log4j.xml
[root@hadoop101 conf]$ vim atlas-log4j.xml#去掉如下代码的注释<appender name="perf_appender" class="org.apache.log4j.DailyRollingFileAppender"><param name="file" value="${atlas.log.dir}/atlas_perf.log" /><param name="datePattern" value="'.'yyyy-MM-dd" /><param name="append" value="true" /><layout class="org.apache.log4j.PatternLayout"><param name="ConversionPattern" value="%d|%t|%m%n" /></layout></appender><logger name="org.apache.atlas.perf" additivity="false"><level value="debug" /><appender-ref ref="perf_appender" /></logger>
08
PART
集成Hive
(1)进入/opt/module/atlas/conf/目录,
修改配置文件atlas-application.properties
[root@hadoop101 conf]$ vim atlas-application.properties######### Hive Hook Configs #######atlas.hook.hive.synchronous=falseatlas.hook.hive.numRetries=3atlas.hook.hive.queueSize=10000atlas.cluster.name=primary
(2)在/opt/module/hive/conf/hive-site.xml文件中设置Atlas hook
[root@hadoop101 conf]# cd /opt/module/apache-hive-3.1.2-bin/conf/[atguigu@hadoop102 conf]$ vim hive-site.xml<property><name>hive.exec.post.hooks</name><value>org.apache.atlas.hive.hook.HiveHook</value></property>
[root@hadoop101 atlas]# cd /opt/software/[root@hadoop101 software]# tar zxvf apache-atlas-2.0.0-hive-hook.tar.gz -C /opt/module/[root@hadoop101 conf]# mv hive-env.sh.template hive-env.sh[root@hadoop101 module]# cd apache-atlas-hive-hook-2.0.0/[root@hadoop101 apache-atlas-hive-hook-2.0.0]# cp -r hook /opt/module/atlas/[root@hadoop101 module]# cd /opt/module/apache-hive-3.1.2-bin/conf/[root@hadoop101 conf]$ vim hive-env.shexport HIVE_AUX_JARS_PATH=/opt/module/atlas/hook/hive[root@hadoop101 atlas]# zip -u /opt/module/atlas/hook/hive/atlas-plugin-classloader-2.0.0.jar /opt/module/atlas/conf/atlas-application.properties[root@hadoop101 atlas]# cp /opt/module/atlas/conf/atlas-application.properties /opt/module/apache-hive-3.1.2-bin/conf/
09
PART
启动集群
(1)启动Hadoop
[root@hadoop101 hadoop-2.7.2]$ sbin/start-dfs.sh[root@hadoop102 hadoop-2.7.2]$ sbin/start-yarn.sh
(2)启动Zookeeper
[root@hadoop101 zookeeper-3.4.10]$ zk.sh start
(3)启动Kafka
[root@hadoop101 kafka]$ kf.sh start
(4)启动Hbase
[root@hadoop101 hbase]$ bin/start-hbase.sh
(5)启动Solr
[root@hadoop101 solr]$ bin/solr start[root@hadoop102 solr]$ bin/solr start[root@hadoop103 solr]$ bin/solr start
(6)进入/opt/module/atlas路径,重新启动Atlas服务
[root@hadoop101 atlas]$ bin/atlas_stop.py[root@hadoop101 atlas]$ bin/atlas_start.py
提示:错误信息查看路径:/opt/module/atlas/logs/*.out和application.log
访问地址:http://hadoop101:21000
注意:等待时间大概2分钟。
账户:admin
密码:admin
10
PART
导入Hive元数据
(1)配置Hive环境变量
[root@hadoop101 hive]$ sudo vim /etc/profile#配置Hive环境变量export HIVE_HOME=/opt/module/apache-hive-3.1.2-binexport PATH=$PATH:$HIVE_HOME/bin[root@hadoop101 hive]$ source /etc/profile
(2)启动Hive,如果Hive能正常启动说明环境OK,就可以退出Hive客户端
[root@hadoop101 hive]$ hivehive (default)> show databases;hive (default)> use gmall;
(3)在/opt/module/atlas/路径,将Hive元数据导入到Atlas
[root@hadoop101 conf]# pwd/opt/module/atlas/conf[root@hadoop101 conf]#cp atlas-application.properties /opt/module/apache-atlas-hive-hook-2.0.0/hook[root@hadoop101 conf]# cd /opt/module/apache-atlas-hive-hook-2.0.0/[root@hadoop101 apache-atlas-hive-hook-2.0.0]# cd hook-bin/[root@hadoop101 hook-bin]# ./import-hive.sh输入用户名:admin;输入密码:adminEnter username for atlas :- adminEnter password for atlas :-Hive Meta Data import was successful!!!
11
PART
使用
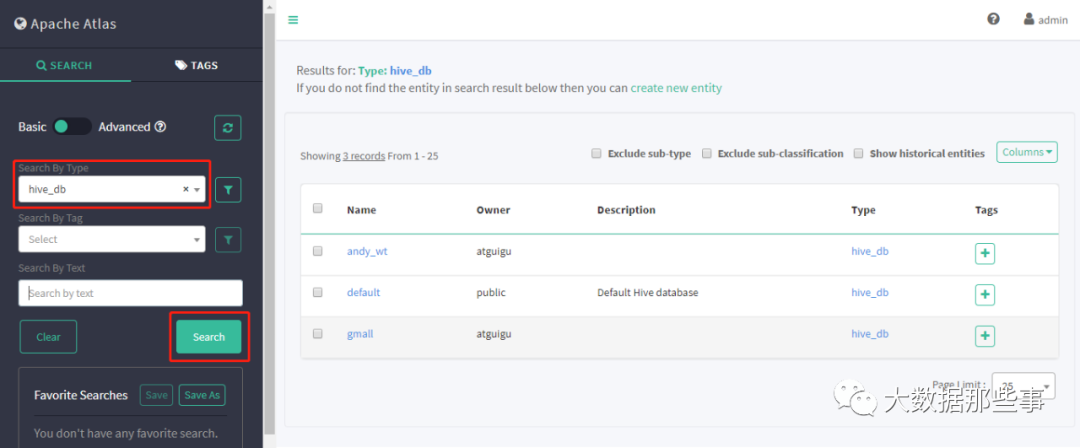
(1)访问http://hadoop101:21000端口号 进行登录

(2)账号密码默认admin
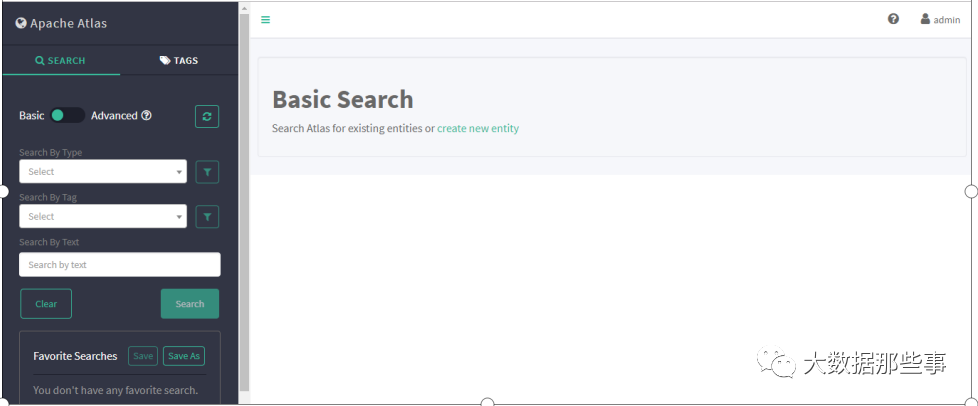
(3)查询相应Hive库,选择hive_db
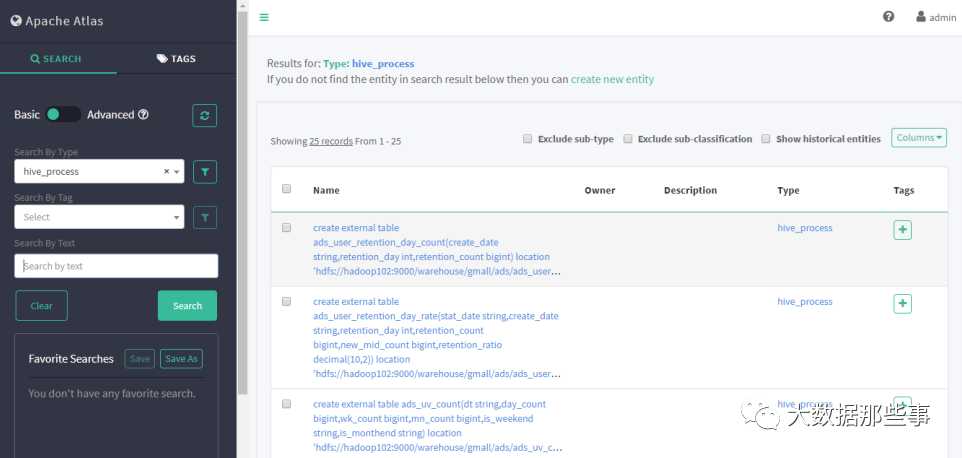
(4)查询hive进程
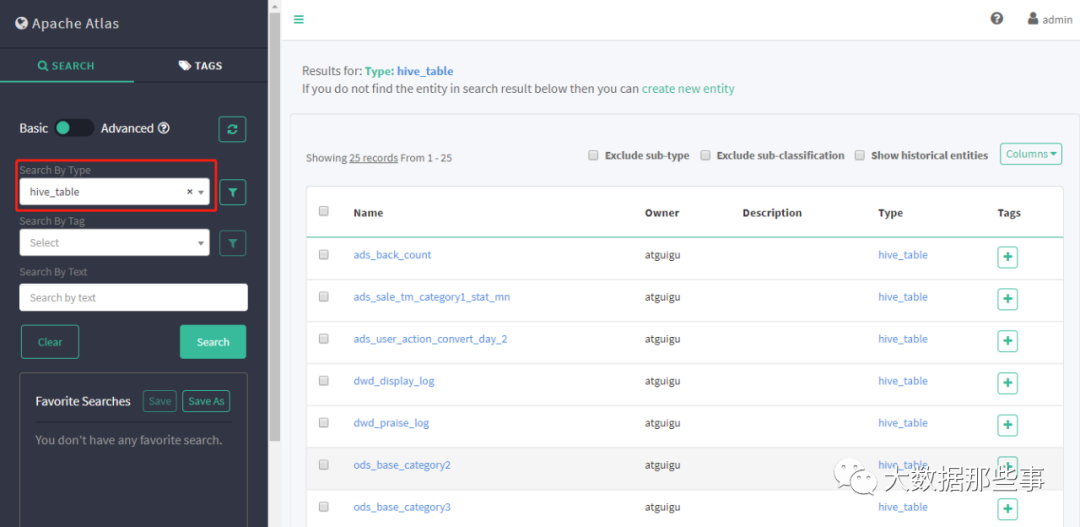
(5)查询hive表
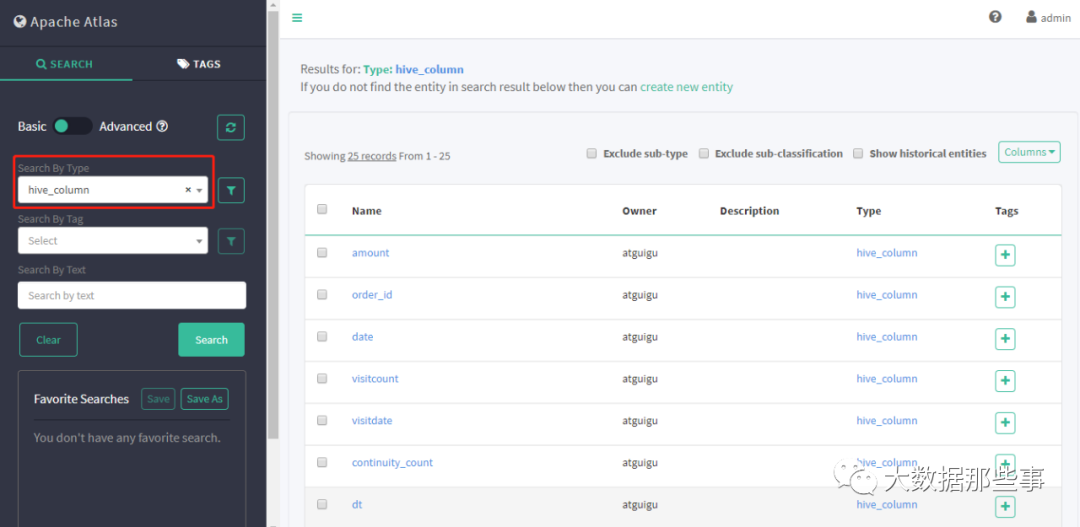
(6)查询hive列
(7)执行每日Sql任务,查看表的血缘关系


 1490
1490

 被折叠的 条评论
为什么被折叠?
被折叠的 条评论
为什么被折叠?
 到【灌水乐园】发言


