


基于正点原子LVGL教程
移植工程
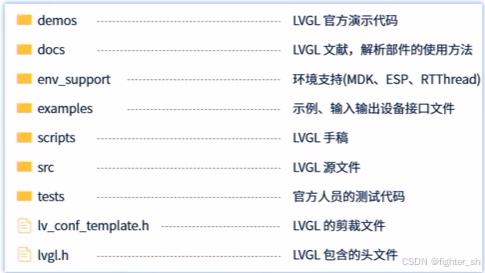

examples文件夹下只保留porting文件夹
将lv_conf_template.h文件改为lv_conf.h
将lv_conf.h的#if 0改为#if 1
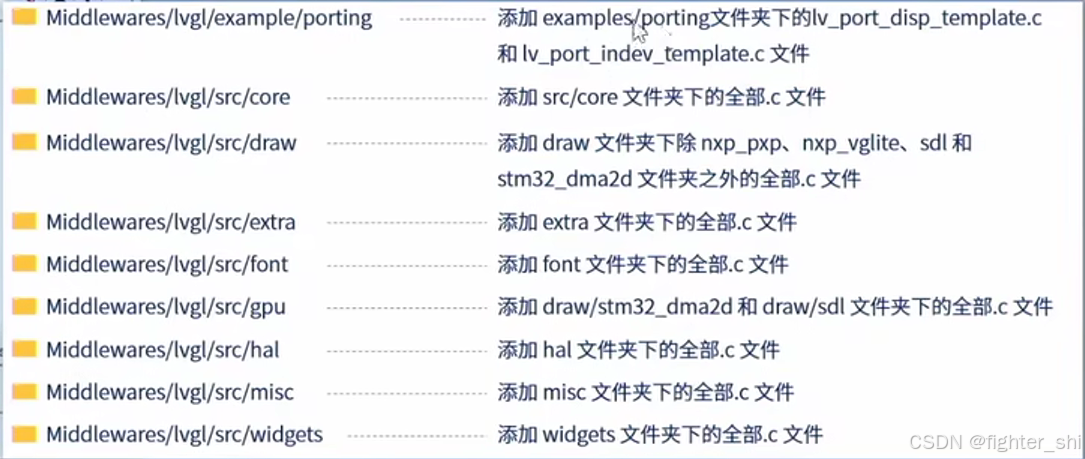
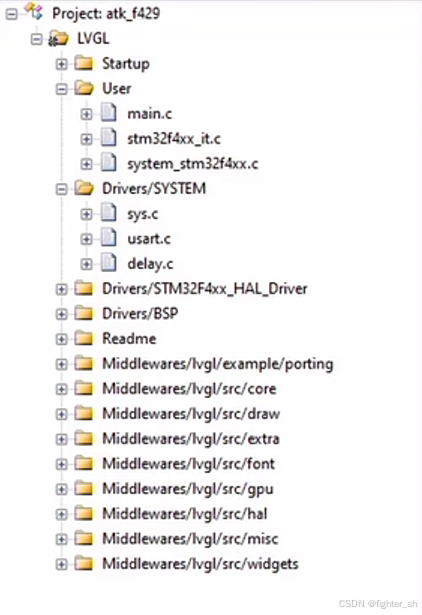
注意:因为LVGL官方库引用头文件使用了相对路径,因此在移植官方文件时,要将文件放在名为lvgl文件下

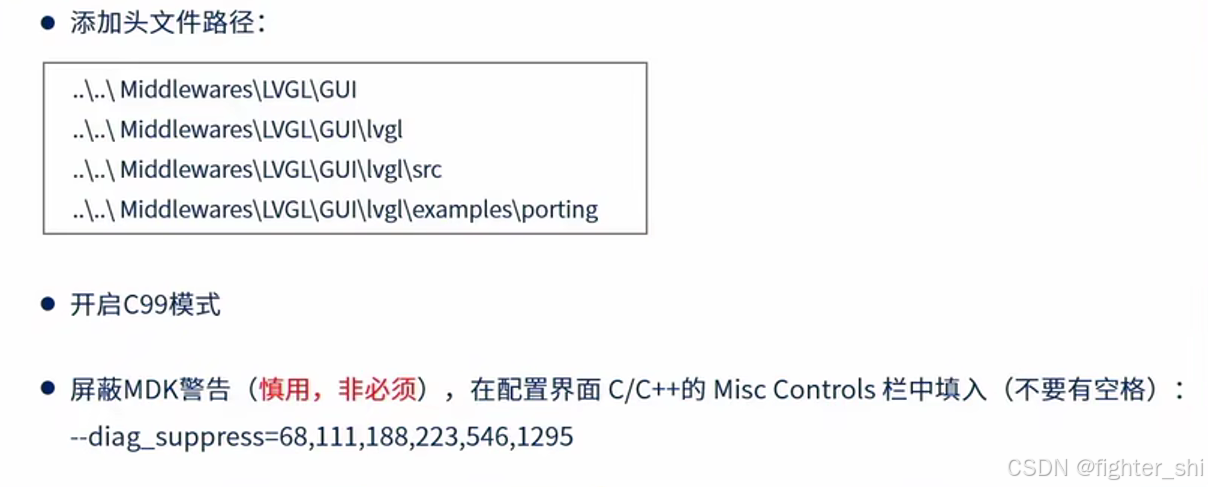
--diag_suppress=68,111,188,223,546,1295
问题1:添加完工程之后如果有很多的报错
解决:查看自己有没有将lv_conf_template.h文件改为lv_conf.h
问题2:断言函数错误
解决1:取消Use MicroLIB选项
解决2:有人说自己写一个断言函数,但是我很菜不会。
问题3:取消使用微库(MicroLIB)选项之后没有报错但是程序无法运行,调试运行总是卡在BKPT 0XAB
解决:
网上说由于没有引入微库,使用了printf,打开编译器提供的标准输入输出补丁、就是使用printf()等函数后是直接返回而不是进入一个断电。
经过实验确实是因为没有使用微库使用了printf函数导致系统停在BKPT 0xAB
添加输出设备(显示器)
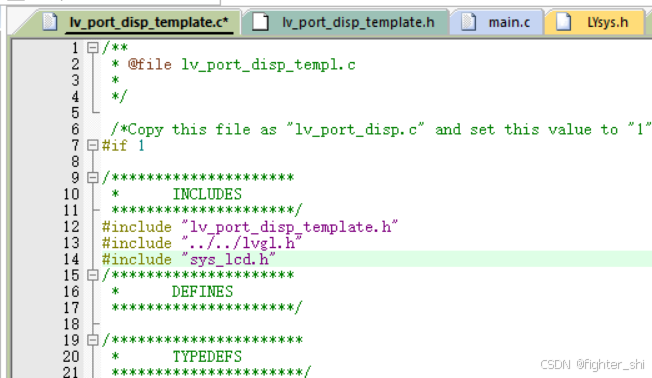
1、把examples下的porting文件下的lv_port_disp_template.c/h的条件编译指令#if 0改为#if 1
2、包含输出设备驱动头文件
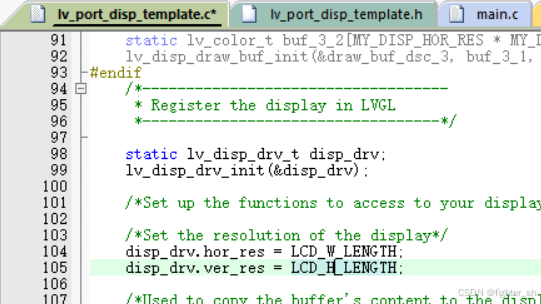
3、在disp_init函数中初始化屏幕设备,设置横屏
4、配置图形数据缓冲模式
1、单缓冲

使用宏将屏幕宽度的像素输入
2、双缓冲
3、全屏双缓冲
其他两种注释掉

5、设置屏幕尺寸
6、在disp_flush函数中配置打点输出
添加输入设备
1、把lv_port_indev_template.c/h的条件编译指令#if 0改为#if 1
2、按需求裁剪输入设备
3、包含输入设备驱动头文件
4、在对应输入设备初始化函数中初始化输入设备驱动
5、添加获取输入设备状态
用编码器作为输入设备
待添加
用触摸屏作为输入设备
/**
 * @brief       初始化触摸屏
 * @param       无
 * @retval      无
 */
static void touchpad_init(void)
{
    /*Your code comes here*/
    tp_dev.init();

    /* 电阻屏坐标矫正 */
    if (key_scan(0) == KEY0_PRES)           /* KEY0按下,则执行校准程序 */
    {
        lcd_clear(WHITE);                   /* 清屏 */
        tp_adjust();                        /* 屏幕校准 */
        tp_save_adjust_data();
    }
}


/**
 * @brief       获取触摸屏设备的状态
 * @param       无
 * @retval      返回触摸屏设备是否被按下
 */
static bool touchpad_is_pressed(void)
{
    /*Your code comes here*/
    tp_dev.scan(0);//获取触摸状态并设置触摸标志

    if (tp_dev.sta & TP_PRES_DOWN)//根据触摸状态是否被触摸
    {
        return true;
    }

    return false;
}

/**
 * @brief       在触摸屏被按下的时候读取 x、y 坐标
 * @param       x   : x坐标的指针
 *   @arg       y   : y坐标的指针
 * @retval      无
 */
static void touchpad_get_xy(lv_coord_t * x, lv_coord_t * y)
{
    /*Your code comes here*/
    (*x) = tp_dev.x[0];
    (*y) = tp_dev.y[0];
}
用按钮作为输入设备
待添加
提供时基
裸机
1、添加定时器驱动
2、在定时器驱动中包含:#include "lvgl.h"
3、在定时器中断函数中调用:lv_tick_inc(x);
4、初始化定时器时,需保证:进入中断的时间间隔 = x(ms)
注意:裸机需要我们自己提供时基,宏LV_TICK_CUSTOM需要置0,如果使用RTOS宏LV_TICK_CUSTOM需要置1,RTOS下面再讲

FreeRTOS
1、在工程中添加RTOS文件目录
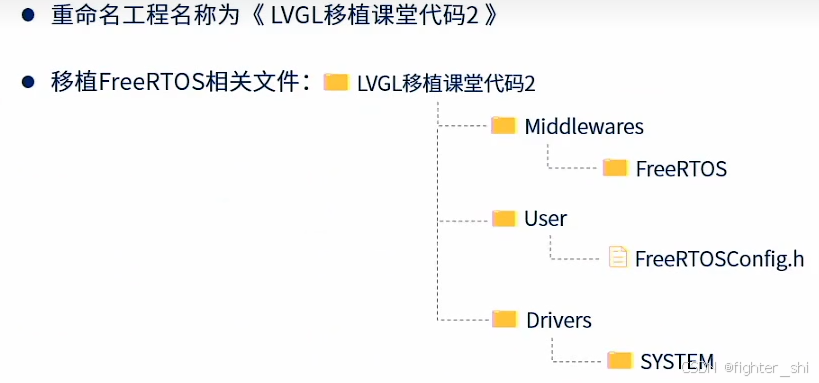
2、根据FreeRTOS移植将rtos一直到工程中
3、修改LVGL相关
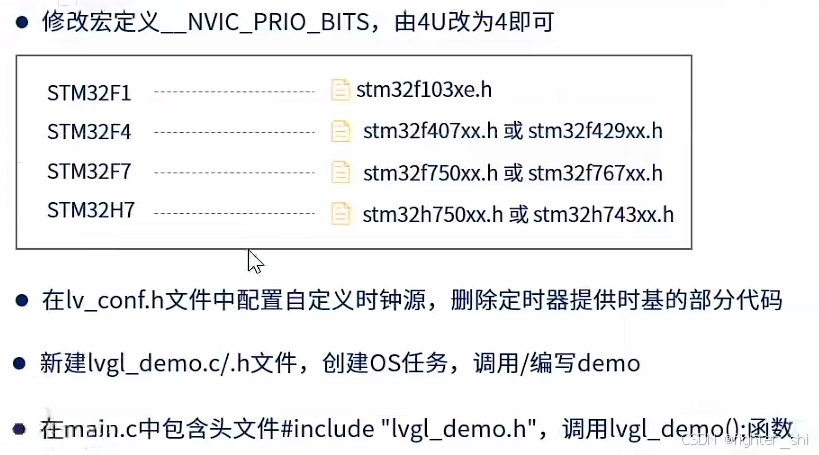 (2)自定义时钟源

删除裸机提供时基部分代码
main函数
1、包含头文件
timer,lvgl.h,lv_port_disp_template.h,lv_port_indev_template.h
2、初始化定时器,LVGL库,输入输出设备
3、在while(1)中每隔5ms调用一次lv_timer_handler();
4、编写测试代码:
int main()
{
    systick_config();//开启Tick中断
    delay_init(); //延时初始化
    MyledInit();//系统led初始化
    drv_uart_init(115200);// nvic_irq_enable(s_uart_info.irq, 0, 0);
   // LCD_Init();
    timer5_config(199,999);//1ms
    lv_init();
    lv_port_disp_init();
    lv_port_indev_init();

    lv_obj_t*switch_obj = lv_switch_create(lv_scr_act());
    lv_obj_set_size(switch_obj,120,60);
    lv_obj_align(switch_obj,LV_ALIGN_CENTER,0,0);

    printf("继续学习编程FreeRTOS,加油jiejie\r\n");
    while(1)
    {


        delay_ms(5);
        lv_timer_handler();
    }


}
压力测试实验
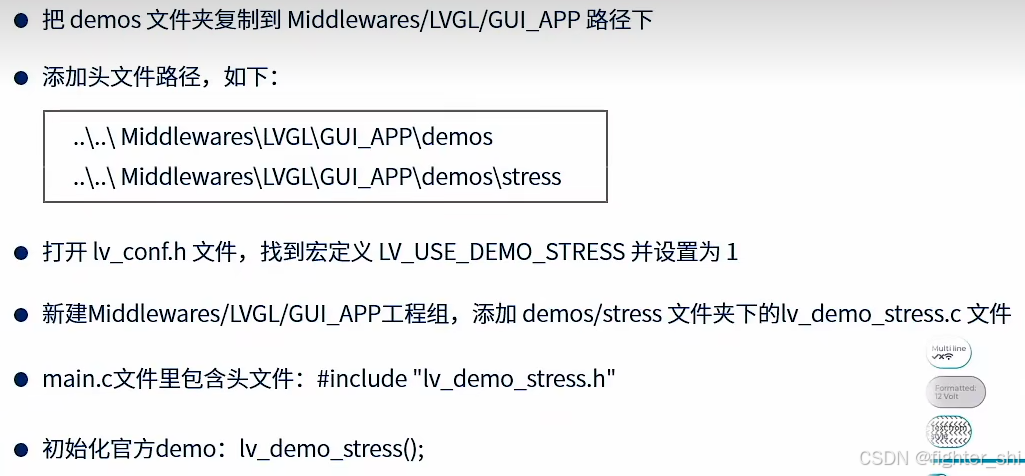
int main()
{
    systick_config();//开启Tick中断
    delay_init(); //延时初始化
    MyledInit();//系统led初始化
    drv_uart_init(115200);// nvic_irq_enable(s_uart_info.irq, 0, 0);
   // LCD_Init();
    timer5_config(199,999);//1ms
    lv_init();
    lv_port_disp_init();
    lv_port_indev_init();

    lv_demo_stress();//压力测试函数

//    lv_obj_t*switch_obj = lv_switch_create(lv_scr_act());
//    lv_obj_set_size(switch_obj,120,60);
//    lv_obj_align(switch_obj,LV_ALIGN_CENTER,0,0);

    printf("继续学习编程FreeRTOS,加油jiejie\r\n");
    while(1)
    {


        delay_ms(5);
        lv_timer_handler();
    }


}
问题与解决
问题1:添加完工程之后如果有很多的报错
解决:查看自己有没有将lv_conf_template.h文件改为lv_conf.h
问题2:断言函数错误
解决1:取消Use MicroLIB选项
解决2:有人说自己写一个断言函数,但是我很菜不会。
问题3:取消使用微库(MicroLIB)选项之后没有报错但是程序无法运行,调试运行总是卡在BKPT 0XAB
解决:
网上说由于没有引入微库,使用了printf,打开编译器提供的标准输入输出补丁、就是使用printf()等函数后是直接返回而不是进入一个断电。
经过实验确实是因为没有使用微库使用了printf函数导致系统停在BKPT 0xAB
问题3:为什么调试的时候点击运行,我没有打断点,为什么代码自动停下来了?
解决:同问题2,这是因为取消了微库使用,还使用了printf函数导致的。
问题4:为什么按照正点原子教程,屏幕啥都没有
解决:
第一种:优化中景园电子的颜色填充函数
在头文件中加入#include “lvgl.h”
/******************************************************************************
      函数说明:在指定区域填充颜色
      入口数据:xsta,ysta   起始坐标
                xend,yend   终止坐标
								color       要填充的颜色
      返回值:  无
******************************************************************************/
#if !LVGL_SYSTEM
void LCD_Fill(u16 xsta,u16 ysta,u16 xend,u16 yend,u16 color)
{
	u16 i,j;
	LCD_Address_Set(xsta,ysta,xend-1,yend-1);//设置显示范围
	for(i=ysta;i<yend;i++)
	{
		for(j=xsta;j<xend;j++)
		{
			LCD_WR_DATA16(color);
		}
	}
}
#endif

void LCD_Fill(u16 sx, u16 sy, u16 ex, u16 ey, lv_color_t *color)
{

	uint32_t y=0;
	u16 height, width;
	width = ex - sx + 1;            //得到填充的宽度
  height = ey - sy + 1;           //高度

	LCD_Address_Set(sx,sy,ex,ey);

	for(y = 0; y <width*height; y++)
	{
		LCD_WR_DATA16(color->full);
		color++;
  }
}
修改官方颜色填充函数
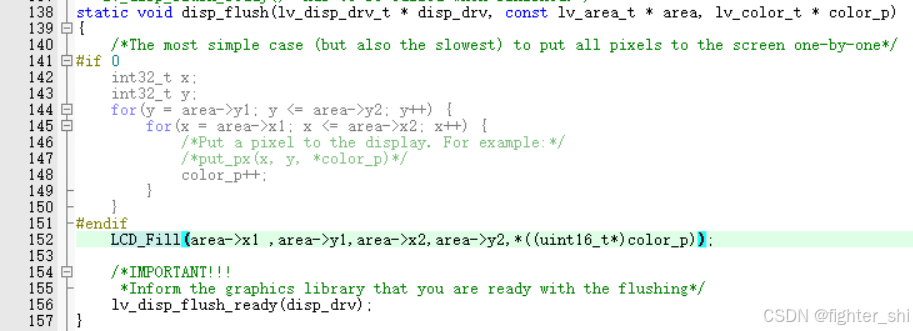
static void disp_flush(lv_disp_drv_t * disp_drv, const lv_area_t * area, lv_color_t * color_p)
{
    /*The most simple case (but also the slowest) to put all pixels to the screen one-by-one*/
#if 0
    int32_t x;
    int32_t y;
    for(y = area->y1; y <= area->y2; y++) {
        for(x = area->x1; x <= area->x2; x++) {
            /*Put a pixel to the display. For example:*/
            /*put_px(x, y, *color_p)*/
            color_p++;
        }
    }
#endif
    LCD_Fill(area->x1 ,area->y1,area->x2,area->y2,color_p);

    /*IMPORTANT!!!
     *Inform the graphics library that you are ready with the flushing*/
    lv_disp_flush_ready(disp_drv);
}
方法二:使用打点函数,不使用区域填充函数
/******************************************************************************
函数说明:在指定位置画点
入口数据:x,y 画点坐标
color 点的颜色
返回值: 无
******************************************************************************/
void LCD_DrawPoint(u16 x,u16 y,u16 color)
{
LCD_Address_Set(x,y,x,y);//设置光标位置
LCD_WR_DATA16(color);
}
//官方颜色填充函数
static void disp_flush(lv_disp_drv_t * disp_drv, const lv_area_t * area, lv_color_t * color_p)
{
/*The most simple case (but also the slowest) to put all pixels to the screen one-by-one*/
#if 1
int32_t x;
int32_t y;
for(y = area->y1; y <= area->y2; y++) {
for(x = area->x1; x <= area->x2; x++) {
/*Put a pixel to the display. For example:*/
/*put_px(x, y, *color_p)*/
LCD_DrawPoint(x,y,color_p->full);//添加自己的打点函数即可
color_p++;
}
}
#else
LCD_Fill(area->x1 ,area->y1,area->x2,area->y2,color_p);
#endif
// /*IMPORTANT!!!
// *Inform the graphics library that you are ready with the flushing*/
lv_disp_flush_ready(disp_drv);
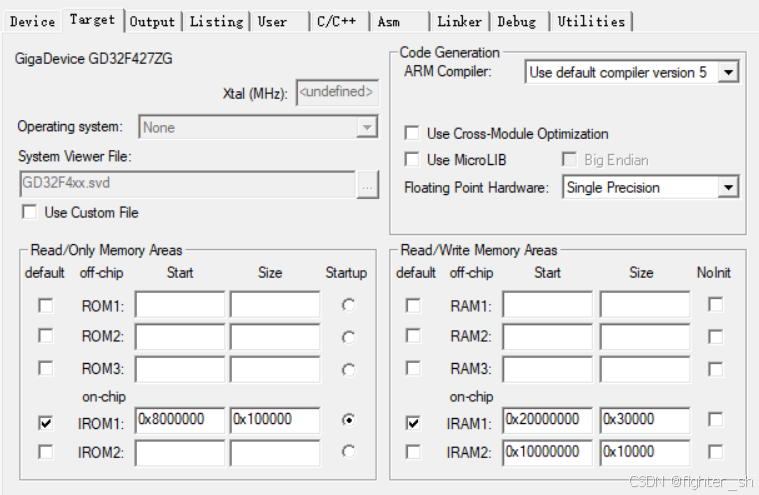
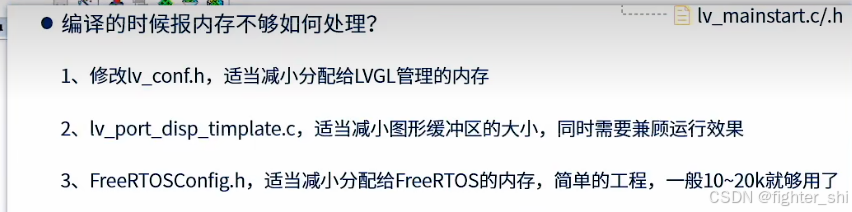
}问题5:如果使用SRAM比较小的会出现内存不足,报错
在lv_conf.h里将48改为20即可

![]()


 2894
2894

 被折叠的 条评论
为什么被折叠?
被折叠的 条评论
为什么被折叠?
 到【灌水乐园】发言


