


 本文提供两种在不同环境下安装Graph-tool的方法。一种是通过conda在WSL中安装,另一种是在Ubuntu服务器上安装。针对服务器安装失败的情况,给出了更换镜像源的具体步骤。
方法1. conda安装
> 本地wsl安装成功,安装命令为以下两种命令皆可:
conda create --name gt -c conda-forge graph-toolconda install -c conda-forge graph-tool安装速度还可以
> 服务器安装:
尝试过以下两条命令,
conda create --name gt -c conda-forge graph-toolconda install -c conda-forge graph-tool在漫长的等待过程后均报错:
Collecting package metadata (current_repodata.json): failed

CondaHTTPError: HTTP 000 CONNECTION FAILED for url <https://conda.anaconda.org/conda-forge/linux-64/current_repodata.json>
Elapsed: -

An HTTP error occurred when trying to retrieve this URL.
HTTP errors are often intermittent, and a simple retry will get you on your way.
'https://conda.anaconda.org/conda-forge/linux-64'
经过各处查询,找到了起效的解决方案。参考链接为:
https://segmentfault.com/q/1010000008668178
以下是解决步骤,首先打开condarx,将内容直接替换为下面的内容,保存退出;关闭terminal,重新打开即可。
vi ~/.condarc channels:
- defaults
show_channel_urls: true
default_channels:
- http://mirrors.tuna.tsinghua.edu.cn/anaconda/pkgs/main
- http://mirrors.tuna.tsinghua.edu.cn/anaconda/pkgs/free
- http://mirrors.tuna.tsinghua.edu.cn/anaconda/pkgs/r
custom_channels:
conda-forge: http://mirrors.tuna.tsinghua.edu.cn/anaconda/cloud
msys2: http://mirrors.tuna.tsinghua.edu.cn/anaconda/cloud
bioconda: http://mirrors.tuna.tsinghua.edu.cn/anaconda/cloud
menpo: http://mirrors.tuna.tsinghua.edu.cn/anaconda/cloud
pytorch: http://mirrors.tuna.tsinghua.edu.cn/anaconda/cloud
simpleitk: http://mirrors.tuna.tsinghua.edu.cn/anaconda/cloud方法2.
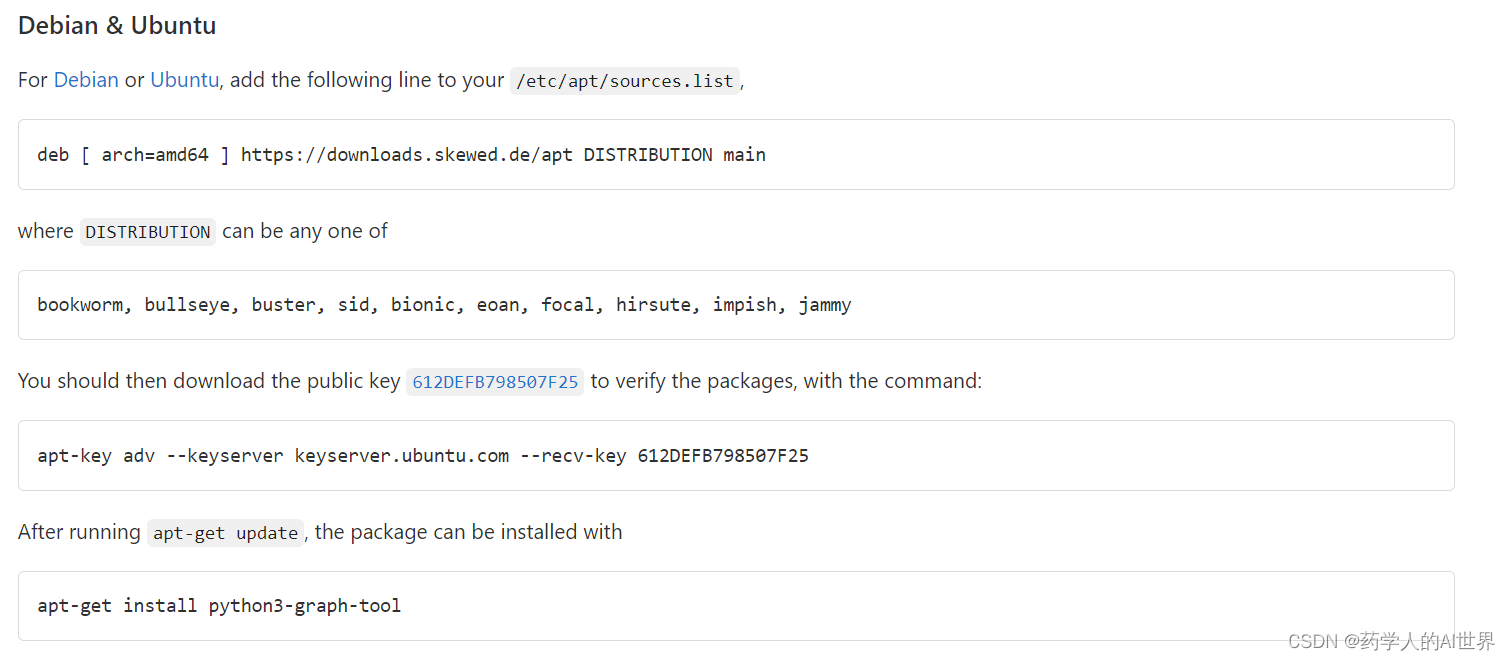
参考教程链接:
installation instructions · Wiki · Tiago Peixoto / graph-tool · GitLab
安装步骤:
执行如下命令,查看Ubuntu版本为bionic
lsb_release -a然后依次执行如下命令,需要注意的是,这些命令前面都要加上sudo,否则会没有permission
但是安装完成后依旧会提示无法导入包的错误!!!


 1712
1712

 被折叠的 条评论
为什么被折叠?
被折叠的 条评论
为什么被折叠?
 到【灌水乐园】发言


