


前言
如果在弹窗中单独增设一些选项或者少部分的数据,可用如下的方式
(不用单独创建专门的表单样式)
如果单纯可以通过基本的按钮传输给后端,可用如下知识点
对于弹窗的基本知识推荐阅读:
1. Vue2
此处涉及avue的知识点,推荐阅读:【vue】avue-crud表单属性配置(表格以及列)
基本的功能如下:
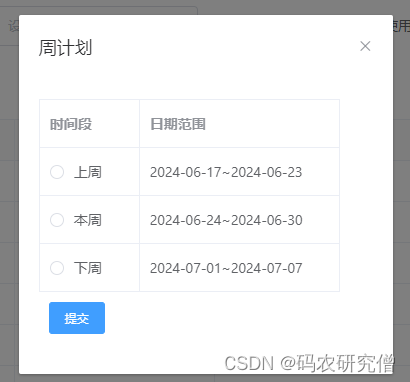
对应的template部分(以下代码为从实战中抽取)
<template>
  <avue-crud :option="option"
               :table-loading="loading"
               :data="data"
               :page="page"
               :permission="permissionList"
               :before-open="beforeOpen"
               :cell-style="cellStyle"
               v-model="form"
               ref="crud"
               @row-update="rowUpdate"
               @row-save="rowSave"
               @row-del="rowDel"
               @search-change="searchChange"
               @search-reset="searchReset"
               @selection-change="selectionChange"
               @current-change="currentChange"
               @size-change="sizeChange"
               @refresh-change="refreshChange"
               @on-load="onLoad">
      <template slot="menuLeft">
      <el-button type="primary" size="small" plain @click="showWeekPlanDialog">生成周计划</el-button>

      <el-dialog title="周计划" :visible.sync="showWeekPlanDialogBox" :append-to-body="true" width="20%">
            <el-radio-group v-model="selectedPeriod" @change="handlePeriodChange">
                <el-table :data="weekPeriods" border>
                    <el-table-column label="时间段" width="100">
                        <template slot-scope="scope">
                          <el-radio :label="scope.row.label" ></el-radio>
                        </template>
                    </el-table-column>
                    <el-table-column prop="dateRange" label="日期范围" width=200></el-table-column>
                </el-table>
            </el-radio-group>
            <el-button type="primary" size="small" @click="submitWeekPlan" style="margin: 10px;">提交</el-button>
        </el-dialog>
      </template>
对应的功能部分如下:
<script>
  import { doCheckWeekPlan } from "@/api/equipment/basicInfo/inforunningdata";
  import moment from 'moment';

  export default {
    data() {
      return {
        showWeekPlanDialogBox: false, // 控制弹窗显示
        selectedPeriod: '', // 选中的时间段
        weekPeriods: [], // 时间段数组
        loading: true,
        page: {
          pageSize: 100,
          currentPage: 1,
          total: 0
        },
        selectionList: []
      };
    },
    methods: {
      // 显示周月计划弹窗
      showWeekPlanDialog() {
        if (this.selectionList.length === 0) {
          this.$message.warning("请选择至少一条数据");
          return;
        }
        this.calculateWeekPeriods();
        this.showWeekPlanDialogBox = true;
      },
      // 计算时间段
      calculateWeekPeriods() {
        const today = moment();
        const startDateThisWeek = today.clone().startOf('isoWeek');
        const endDateThisWeek = today.clone().endOf('isoWeek');
        const startDateLastWeek = startDateThisWeek.clone().subtract(1, 'week');
        const endDateLastWeek = startDateLastWeek.clone().endOf('isoWeek');
        const startDateNextWeek = startDateThisWeek.clone().add(1, 'week');
        const endDateNextWeek = startDateNextWeek.clone().endOf('isoWeek');

        const formatDateRange = (startDate, endDate) => {
            return `${startDate.format('YYYY-MM-DD')}~${endDate.format('YYYY-MM-DD')}`;
        };

        this.weekPeriods = [
            { label: '上周', dateRange: formatDateRange(startDateLastWeek, endDateLastWeek) },
            { label: '本周', dateRange: formatDateRange(startDateThisWeek, endDateThisWeek) },
            { label: '下周', dateRange: formatDateRange(startDateNextWeek, endDateNextWeek) }
        ];
      },
      // 提交周月计划
      submitWeekPlan() {
        if (this.selectedPeriod === '') {
          this.$message.warning("请选择一个时间段");
          return;
        }
        doCheckWeekPlan(this.ids, this.selectedPeriod).then(() => {
          this.onLoad(this.page);
          this.$message({
            type: "success",
            message: "操作成功!"
          });
          this.showWeekPlanDialogBox = false;
        }).catch(error => {
          console.log(error);
        });
      }
    }
  };
</script>
- showWeekPlanDialogBox:控制弹窗显示的布尔值
- selectedPeriod:存储用户选择的时间段
- weekPeriods:存储计算后的时间段数组
- showWeekPlanDialog:显示弹窗的方法,并在没有选中数据时提示用户
- calculateWeekPeriods:计算并格式化上周、本周、下周的时间段
- submitWeekPlan:提交选中的时间段并调用API,成功后刷新数据并关闭弹窗
对于Js的日期,推荐阅读:js获取上周本周下周的日期(附Demo)
同理,如果是月计划

整体逻辑如下:
<template slot="menuLeft">
  <el-button type="primary" size="small" plain @click="showWeekPlanDialog">生成周计划</el-button>
  <el-button type="primary" size="small" plain @click="showMonthPlanDialog">生成月计划</el-button>

  <el-dialog title="周计划" :visible.sync="showWeekPlanDialogBox" :append-to-body="true" width="20%">
    <el-radio-group v-model="selectedPeriod" @change="handlePeriodChange">
      <el-table :data="weekPeriods" border>
        <el-table-column label="时间段" width="100">
          <template slot-scope="scope">
            <el-radio :label="scope.row.label"></el-radio>
          </template>
        </el-table-column>
        <el-table-column prop="dateRange" label="日期范围" width=200></el-table-column>
      </el-table>
    </el-radio-group>
    <el-button type="primary" size="small" @click="submitWeekPlan" style="margin: 10px;">提交</el-button>
  </el-dialog>

  <el-dialog title="月计划" :visible.sync="showMonthPlanDialogBox" :append-to-body="true" width="20%">
    <el-radio-group v-model="selectedMonthPeriod" @change="handleMonthPeriodChange">
      <el-table :data="monthPeriods" border>
        <el-table-column label="时间段" width="100">
          <template slot-scope="scope">
            <el-radio :label="scope.row.label"></el-radio>
          </template>
        </el-table-column>
        <el-table-column prop="dateRange" label="日期范围" width=200></el-table-column>
      </el-table>
    </el-radio-group>
    <el-button type="primary" size="small" @click="submitMonthPlan" style="margin: 10px;">提交</el-button>
  </el-dialog>
</template>

<script>
export default {
  data() {
    return {
      showWeekPlanDialogBox: false,
      showMonthPlanDialogBox: false,
      selectedPeriod: '',
      selectedMonthPeriod: '',
      weekPeriods: [],
      monthPeriods: [],
    };
  },
  methods: {
    showWeekPlanDialog() {
      if (this.selectionList.length === 0) {
        this.$message.warning("请选择至少一条数据");
        return;
      }
      this.calculateWeekPeriods();
      this.showWeekPlanDialogBox = true;
    },
    showMonthPlanDialog() {
      if (this.selectionList.length === 0) {
        this.$message.warning("请选择至少一条数据");
        return;
      }
      this.calculateMonthPeriods();
      this.showMonthPlanDialogBox = true;
    },
    calculateWeekPeriods() {
      const today = moment();
      const startDateThisWeek = today.clone().startOf('isoWeek');
      const endDateThisWeek = today.clone().endOf('isoWeek');
      const startDateLastWeek = startDateThisWeek.clone().subtract(1, 'week');
      const endDateLastWeek = startDateLastWeek.clone().endOf('isoWeek');
      const startDateNextWeek = startDateThisWeek.clone().add(1, 'week');
      const endDateNextWeek = startDateNextWeek.clone().endOf('isoWeek');
      const formatDateRange = (startDate, endDate) => `${startDate.format('YYYY-MM-DD')}~${endDate.format('YYYY-MM-DD')}`;
      this.weekPeriods = [
        { label: '上周', dateRange: formatDateRange(startDateLastWeek, endDateLastWeek) },
        { label: '本周', dateRange: formatDateRange(startDateThisWeek, endDateThisWeek) },
        { label: '下周', dateRange: formatDateRange(startDateNextWeek, endDateNextWeek) }
      ];
    },
    calculateMonthPeriods() {
	 const today = moment();
	  const startDateThisMonth = today.clone().startOf('month');
	  const endDateThisMonth = today.clone().endOf('month');
	  const startDateLastMonth = startDateThisMonth.clone().subtract(1, 'month');
	  const endDateLastMonth = startDateLastMonth.clone().endOf('month');
	  const startDateNextMonth = startDateThisMonth.clone().add(1, 'month');
	  const endDateNextMonth = startDateNextMonth.clone().endOf('month');

	  const formatMonthYear = (date) => date.format('YYYY-MM');

	  this.monthPeriods = [
	    { label: '上月', dateRange: formatMonthYear(startDateLastMonth) },
	    { label: '本月', dateRange: formatMonthYear(startDateThisMonth) },
	    { label: '下月', dateRange: formatMonthYear(startDateNextMonth) }
	  ];
	},
    submitWeekPlan() {
      if (this.selectedPeriod == '') {
        this.$message.warning("请选择一个时间段");
        return;
      }
      doWeekPlan(this.ids, this.selectedPeriod).then(() => {
        this.onLoad(this.page);
        this.$message({
          type: "success",
          message: "操作成功!"
        });
        this.showWeekPlanDialogBox = false;
      }, error => {
        console.log(error);
      });
    },
    submitMonthPlan() {
      if (this.selectedMonthPeriod == '') {
        this.$message.warning("请选择一个时间段");
        return;
      }
      doMonthPlan(this.ids, this.selectedMonthPeriod).then(() => {
        this.onLoad(this.page);
        this.$message({
          type: "success",
          message: "操作成功!"
        });
        this.showMonthPlanDialogBox = false;
      }, error => {
        console.log(error);
      });
    }
  }
};
</script>
2. Vue3
整体界面如下:
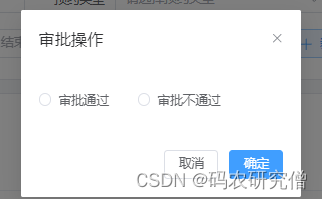
增加一个AuditDialog.vue文件
<template>
  <el-dialog :model-value="modelValue" @update:model-value="updateVisible" title="审批操作" width="15%">
    <el-radio-group v-model="selectedResult">
      <el-radio label="通过">审批通过</el-radio>
      <el-radio label="不通过">审批不通过</el-radio>
    </el-radio-group>
    <template #footer>
      <el-button @click="handleCancel">取消</el-button>
      <el-button type="primary" @click="handleConfirm">确定</el-button>
    </template>
  </el-dialog>
</template>

<script setup>
import { ref, watch } from 'vue';
import { ElMessage } from 'element-plus';

const props = defineProps({
  modelValue: {
    type: Boolean,
    required: true
  }
});

const emit = defineEmits(['confirm', 'update:modelValue']);

const selectedResult = ref('');

const handleConfirm = () => {
  if (!selectedResult.value) {
    ElMessage.error('请选择审批结果');
    return;
  }
  emit('confirm', selectedResult.value);
  emit('update:modelValue', false);
};

const handleCancel = () => {
  emit('update:modelValue', false);
};

const updateVisible = (value) => {
  emit('update:modelValue', value);
};

watch(() => props.modelValue, (newVal) => {
  if (!newVal) {
    selectedResult.value = ''; // 重置选择
  }
});
</script>
对应的父组件如下:
<template>
  <ContentWrap>
    <!-- 列表 -->
    <el-row justify="center" class="table-title">
      <el-col :span="24" class="text-center">
        委托单列表
      </el-col>
    </el-row>
    <el-table v-loading="loading" :data="list" :stripe="true" :show-overflow-tooltip="true">
      <el-table-column label="预约编号" align="center" prop="appointmentId" />
      <el-table-column label="操作" align="center" width="180px">
        <template #default="scope">
          <div class="action-buttons">
            <el-button
              link
              type="primary"
              @click="openAuditDialog(scope.row.id)"
              v-if="scope.row.appointmentStatus === '待码头确认'"
              v-hasPermi="['dangerous:appointment-commission:audit']"
            >
              审核
            </el-button>
          </div>
        </template>
      </el-table-column>
    </el-table>
    <!-- 分页 -->
    <Pagination
      :total="total"
      v-model:page="queryParams.pageNo"
      v-model:limit="queryParams.pageSize"
      @pagination="getList"
    />
    <!-- 审核对话框 -->
    <AuditDialog v-model:modelValue="isAuditDialogVisible" @confirm="handleAudit" />
  </ContentWrap>
</template>

<script setup>
import { ref } from 'vue';
import { ElMessage } from 'element-plus';
import AuditDialog from './AuditDialog.vue'; // 导入自定义对话框组件
import AppointmentCommissionApi from './api'; // 假设你有一个 API 模块
import { getList } from './utils'; // 假设你有一个获取列表的工具函数

const loading = ref(false);
const list = ref([]);
const total = ref(0);
const queryParams = ref({
  pageNo: 1,
  pageSize: 10
});
const isAuditDialogVisible = ref(false);
const currentAuditId = ref(null);

const openAuditDialog = (id) => {
  currentAuditId.value = id;
  isAuditDialogVisible.value = true;
};

const handleAudit = async (result) => {
  try {
    const response = await AppointmentCommissionApi.auditAppointmentCommission(currentAuditId.value, result === '通过');
    if (response === true) {
      ElMessage.success('审批成功');
      await getList(); // 成功后刷新列表
    } else {
      ElMessage.error('审批失败'); // 处理失败情况
    }
  } catch (error) {
    ElMessage.error('审批操作失败'); // 处理任何错误
  } finally {
    isAuditDialogVisible.value = false; // 关闭对话框
  }
};

// 模拟获取列表数据
const getList = async () => {
  loading.value = true;
  // 模拟异步请求
  setTimeout(() => {
    list.value = [
      { id: 1, appointmentId: 'A123', appointmentStatus: '待码头确认' },
      { id: 2, appointmentId: 'A456', appointmentStatus: '已确认' },
      // 添加更多数据
    ];
    total.value = list.value.length;
    loading.value = false;
  }, 1000);
};

getList();
</script>

<style scoped>
.table-title {
  margin: 20px 0;
}
.action-buttons {
  display: flex;
  justify-content: center;
  gap: 10px;
}
</style>
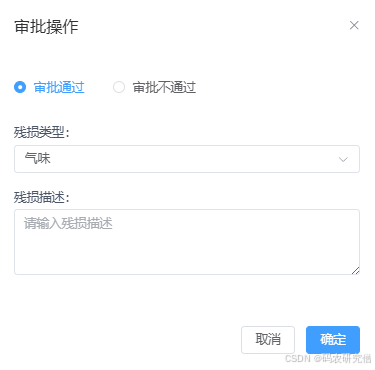
3. 拓展
弹窗中需要按钮,数据回显等交互:
下述同样是vue3的界面:
主界面:
<el-button
  link
  type="success"
  @click="openAuditDialog(scope.row.id,scope.row.damCod)"
  v-if="scope.row.checkStatus === 0"
  v-hasPermi="['gate:cabinet-swap:audit']"
>
  审核
</el-button>

 <!-- 单个审核对话框 -->
 <AuditDialog v-model:modelValue="isAuditDialogVisible" @confirm="handleAudit" :damcod="selectedDamcod"/>
对应的js:
import AuditDialog from './AuditDialog.vue' // 审核结果弹窗


const isAuditDialogVisible = ref(false);
const selectedCheckId = ref(null);
const selectedDamcod = ref(null); // 新增变量,用于存储 damcod 的值
const openAuditDialog = (id,damCod) => {
  selectedCheckId.value = id;
  selectedDamcod.value = damCod; // 传递 damcod 的值
  isAuditDialogVisible.value = true;
};

/** 审核按钮操作 */
const handleAudit = async ({ result, reason, damageType }) => {
  isAuditDialogVisible.value = true;
  try {

    console.log(result)
    console.log(damageType)
    const response = await CabinetSwapApi.completeAuditCheck({
      id: selectedCheckId.value,
      result: result === '通过', // 转换为布尔值
      damageType: damageType || '', // 传递残损类型
      reason: reason || ''
    });

    if (response === true) {
      message.success(t('common.withAuditSuccess'));
    }
    await getList();
  } catch {}
  finally {
    isAuditDialogVisible.value = false;
  }
};
专门的弹窗界面逻辑:(主要是某些数据回显,以及弹窗的定制化)
<template>
  <el-dialog :model-value="modelValue" @update:model-value="updateVisible" title="审批操作" width="20%">
    <el-radio-group v-model="selectedResult" class="mb-4">
      <el-radio label="通过">审批通过</el-radio>
      <el-radio label="不通过">审批不通过</el-radio>
    </el-radio-group>

    <!-- 审核不通过时,显示输入框 -->
    <el-input
      v-if="selectedResult === '不通过'"
      v-model="rejectionReason"
      type="textarea"
      rows="5"
      placeholder="请输入不通过的原因"
      class="mt-2"
    />

    <!-- 审核通过时,显示残损类型和残损描述 -->
    <div v-if="selectedResult === '通过'" class="mt-2">
      <div class="mb-4">
        <label for="damageTypeSelect" class="block text-sm font-medium text-gray-700">残损类型:</label>
        <el-select
          id="damageTypeSelect"
          v-model="damageType"
          placeholder="请选择残损类型"
          class="w-full mt-1"
        >
          <el-option
            v-for="dict in getStrDictOptions(DICT_TYPE.GATE_DAMAGE_DICT)"
            :key="dict.value"
            :label="dict.label"
            :value="dict.value"
          />
        </el-select>
      </div>

      <div class="mb-4">
        <label for="damageDescription" class="block text-sm font-medium text-gray-700">残损描述:</label>
        <el-input
          id="damageDescription"
          v-model="damageDescription"
          type="textarea"
          rows="3"
          placeholder="请输入残损描述"
          class="w-full mt-1"
        />
      </div>
    </div>

    <template #footer>
      <el-button @click="handleCancel">取消</el-button>
      <el-button type="primary" @click="handleConfirm">确定</el-button>
    </template>
  </el-dialog>
</template>

<script setup>
import { ref, watch } from 'vue';
import { ElMessage } from 'element-plus';
import { getStrDictOptions, DICT_TYPE } from '@/utils/dict';

const props = defineProps({
  modelValue: {
    type: Boolean,
    required: true
  },
  damcod: { // 新增 props,用于接收 damcod 的值
    type: String,
    default: null
  }
});

const emit = defineEmits(['confirm', 'update:modelValue']);

const selectedResult = ref('');
const rejectionReason = ref('');
const damageType = ref(''); // 记录选中的残损类型
const damageDescription = ref(''); // 新增残损描述

// 监听 damcod 的值,进行回显
watch(() => props.damcod, (newVal) => {
  if (newVal) {
    damageType.value = newVal; // 直接赋值
  }
}, { immediate: true });


const handleConfirm = () => {
  if (!selectedResult.value) {
    ElMessage.error('请选择审批结果');
    return;
  }
  if (selectedResult.value === '不通过' && !rejectionReason.value) {
    ElMessage.error('请输入不通过的原因');
    return;
  }
  if (selectedResult.value === '通过' && !damageType.value) {
    ElMessage.error('请选择残损类型');
    return;
  }
  if (selectedResult.value === '通过' && !damageDescription.value) {
    ElMessage.error('请输入残损描述');
    return;
  }

  emit('confirm', {
    result: selectedResult.value,
    reason: rejectionReason.value,
    damageType: damageType.value,
    damageDescription: damageDescription.value
  });
  emit('update:modelValue', false);
};

const handleCancel = () => {
  emit('update:modelValue', false);
};

const updateVisible = (value) => {
  emit('update:modelValue', value);
};

watch(() => props.modelValue, (newVal) => {
  if (!newVal) {
    selectedResult.value = '';
    rejectionReason.value = '';
    damageType.value = '';
    damageDescription.value = ''; // 清空残损描述
  }
});
</script>

<style scoped>
.mt-2 {
  margin-top: 0.5rem;
}

.mb-4 {
  margin-bottom: 1rem;
}

.w-full {
  width: 100%;
}

.block {
  display: block;
}

.text-sm {
  font-size: 0.875rem;
}

.font-medium {
  font-weight: 500;
}

.text-gray-700 {
  color: #4a5568;
}
</style>


 8308
8308

 被折叠的 条评论
为什么被折叠?
被折叠的 条评论
为什么被折叠?
 到【灌水乐园】发言


