


playbook
1、playbook概述
Ansible Playbooks 提供了一个可重复、可重用、简单的配置管理和多机部署系统,非常适合部署复杂的应用程序。如果您需要多次使用 Ansible 执行任务,请编写剧本并将其置于源代码控制之下。然后您可以使用 playbook 推送新配置或确认远程系统的配置。
2、Ansible playbook.与AD-Hoc的关系
-
playbook是AD-Hoc的一种编排方式。
-
playbook可以持久运行(重复),而Ad-Hoc只能临时运行。
-
playbook适合复杂的任务,而Ad-Hoc适合做快速简单的任务。
-
playbook能控制任务执行的先后顺序。
3、Ansible Playbook书写格式
playbook是由yaml语法书写,结构清晰,可读性强,所以心须掌握yml基础语法
| 语法 | 描述 |
|---|---|
| 缩进 | YAML使用固定的缩进风格表示层级结构,每个缩进由两个空格组成,不能使用tab |
| 冒号 | 以冒号结尾的除外,其他所有冒号后面所有必须有空格 |
| 短横线 | 表示列表项,使用一个短横杠加一个空格。多个项使用同样的缩进级别作为同一列表。 |
1. 安装Apache
[root@ansible1 opt]# mkdir /opt/playbook   # 建议playbook都放在一个目录里面,工程化
[root@ansible1 opt]# cd /opt/playbook/
[root@ansible1 playbook]# cat /opt/playbook/first.yml   # 严格要求格式,缩进(两个空格)
---
- hosts: all
  tasks:
    - name: install http
      yum:
        name: httpd
        state: present
    - name: start server
      systemd:
        name: httpd
        state: started
[root@ansible1 playbook]# ansible-playbook --syntax-check first.yml   # 语法检测

playbook: first.yml

# 可以使用网站检测工具检查语法是否错误
# https://www.bejson.com/validators/yaml_editor/
playbook执行语法:
ansible-playbook  -i 主机清单  playbook文件  -C 测试
[root@ansible1 playbook]# ansible-playbook -C /opt/playbook/first.yml   # 模拟执行
[root@ansible1 playbook]# ansible-playbook /opt/playbook/first.yml # 正式执行
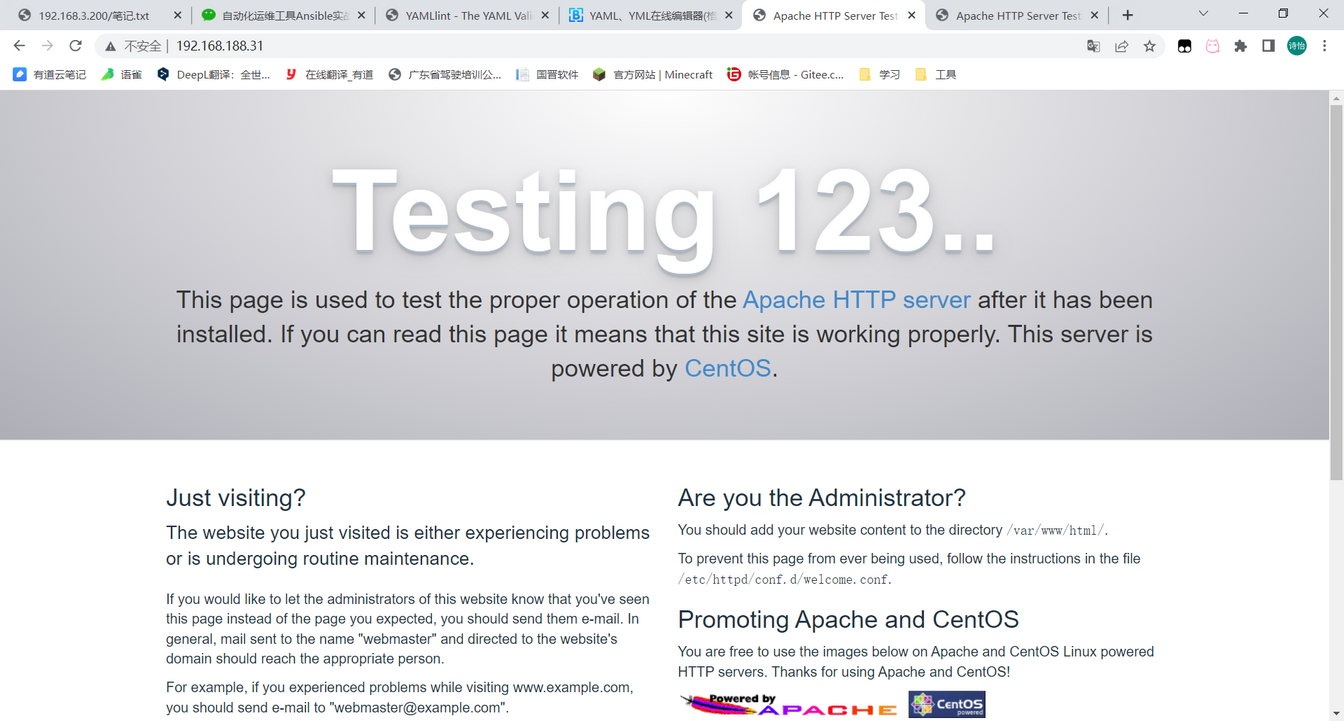
# 验证,浏览器输入远程主机的ip,成功如下图
2. 不同web页面
修改不同机子的html页面
[root@ansible1 playbook]# cat /opt/playbook/first.yml
---
- hosts: all
  tasks:
    - name: install http
      yum:
        name: httpd
        state: present
    - name: start server
      systemd:
        name: httpd
        state: started

- hosts: web1
  tasks:
    - name: config web
      copy:
        content: "This is web1"
        dest: /var/www/html/index.html
- hosts: web2
  tasks:
    - name: config web
      copy:
        content: "This is web2"
        dest: /var/www/html/index.html


# 语法检测
[root@ansible1 playbook]# ansible-playbook --syntax-check first.yml

playbook: first.yml

# 开始执行
[root@ansible1 playbook]# ansible-playbook /opt/playbook/first.yml

3.paly多语法示例
[root@m01 project1]# cat p1.yml
#play
---
- hosts: webservers
  tasks:
    - name: Installed Httpd Server
      yum: name=httpd state=present		#在一行内写时,需要用命令行的格式

    - name: Start Httpd Server
      systemd: name=httpd state=started enabled=yes

    - name: Start Firewalld Server
      systemd: name=firewalld state=started enabled=yes

- hosts: web01
  tasks:
    - name: Configure web01 Website
      copy: content='This is Web01' dest=/var/www/html/index.html

- hosts: web02
  tasks:
    - name: Cofnigure web02 weisite
      copy: content='This is Web02' dest=/var/www/html/index.html
4. 编写一个ansible搭建lamp和nfs
3.1 lamp
[root@ansible1 playbook]# cat /opt/playbook/lamp.yml
---
- hosts all
  tasks:
    - name: install lamp
      yum:
        name:
          - httpd
          - mariadb-server
          - php
          - php-fpm
          - php-mysql

    - name: start httpd server
      systemd:
        name: httpd
        state: started
        enabled: yes
    - name: start mariadb-server server
      systemd:
        name: mariadb
        state: started
        enabled: yes
    - name: start php-fpm server
      systemd:
        name: php-fpm
        state: started
        enabled: yes
    - name: get index.php
      copy:
        src: /opt/playbook/index.php
        dest: /var/www/html/index.php
      notify:
        - restart httpd                         # 当文件发生变动重启httpd在handlers执行
  handlers:
    - name: restart httpd
      systemd:
        name: httpd
        state: restarted
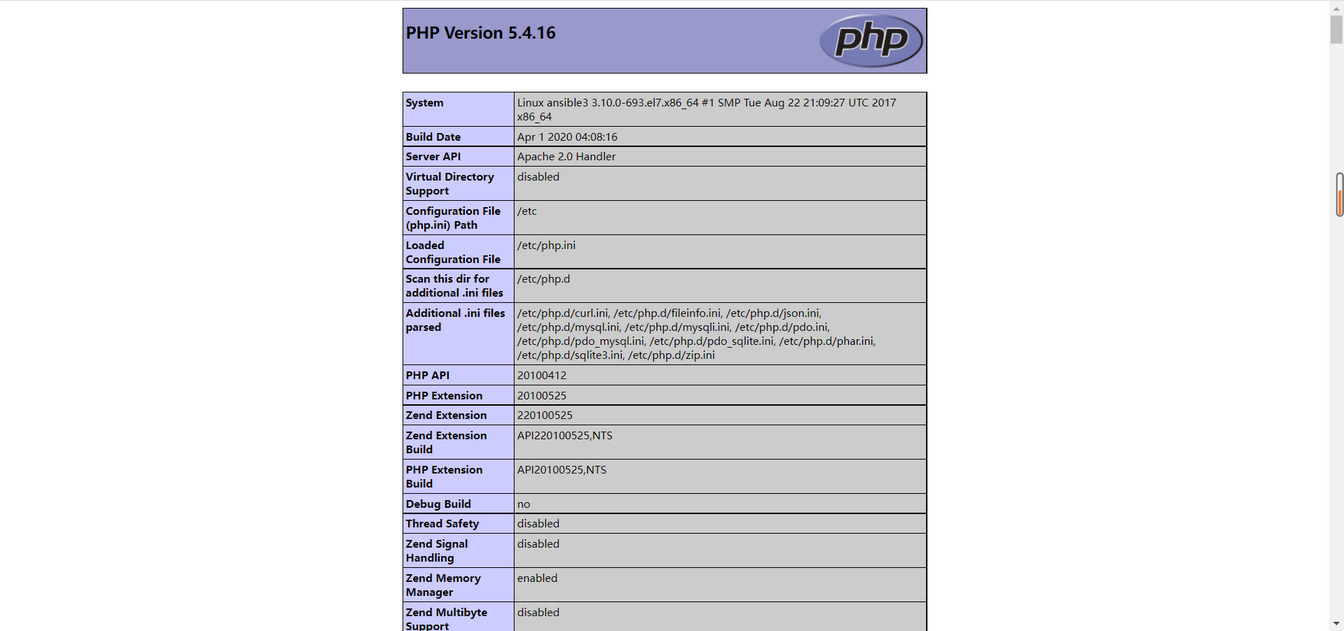
[root@ansible1 playbook]# cat index.php
<?php
phpinfo();
?>

# 浏览器打开输入ip/index.php,如下图
3.2 nfs
# 流程
# 1.安装
# 2.配置
#    组  nfsg
#    用户  nfs
#    共享文件夹
# 3.启动

# web1组的机子做挂载源,挂去web2组的机子
# 被


[root@ansible1 playbook]# cat /opt/playbook/nfs.yml
---
- hosts all
  tasks:
    - name: create NFS group
      group:
        name: nfsg
        gid: 666
    - name: create NFS user
      user:
        name: nfs
        uid: 777
        group: nfsg
        create_home: no
        shell: /sbin/nologin
    - name: install nfs
      yum:
        name:
          - rpcbind
          - nfs-utils
    - name: config nfs
      copy:
        src: /opt/playbook/exports.j2
        dest: /etc/exports
    - name: start rpcbind
      systemd:
        name: rpcbind
        state: started
        enabled: yes
    - name: start nfs-server
      systemd:
        name: nfs-server
        state: started
        enabled: yes
- hosts: web1
  tasks:
    - name: Create Data Directory
      file:
        path: /opt/nfstest/
        state: directory
        owner: nfs
        group: nfsg
        mode: 0775
        recurse: yes
- hosts: web2
  tasks:
    - name: Mount NFS Server
      mount:
        path: /opt   # web2组的机子挂载点
        src: 192.168.188.31:/opt/nfstest   # 挂载源
        fstype: nfs
        opts: defaults
        state: mounted   # 挂载的同时并写进/etc/fstab


[root@ansible1 playbook]# cat /opt/playbook/exports
/opt/nfstest 192.168.188.0/24(rw,sync,no_root_squash)


[root@ansible1 playbook]# ansible-playbook --syntax-check /opt/playbook/nfs.yml   # 语法检测

playbook: /opt/playbook/nfs.yml

[root@ansible1 playbook]# ansible-playbook -C /opt/playbook/nfs.yml   # 模拟执行
[root@ansible1 playbook]# ansible-playbook /opt/playbook/nfs.yml   # 正式执行
# 验证
[root@ansible3 ~]# df -h
文件系统                     容量  已用  可用 已用% 挂载点
/dev/sda3                     17G  2.3G   15G   14% /
devtmpfs                     903M     0  903M    0% /dev
tmpfs                        912M     0  912M    0% /dev/shm
tmpfs                        912M  8.7M  903M    1% /run
tmpfs                        912M     0  912M    0% /sys/fs/cgroup
/dev/sr0                     4.3G  4.3G     0  100% /mnt
/dev/sda1                   1014M  135M  880M   14% /boot
tmpfs                        183M     0  183M    0% /run/user/0
192.168.188.31:/opt/nfstest   17G  2.3G   15G   14% /opt
3.3 一键部署discuz论坛
# 下载链接是云服务器的仓库,其实应该用git的
[root@ansible1 playbook]# cat /opt/playbook/Discuz.yml
---
- hosts: all
  tasks:
    - name: install lamp
      yum:
        name:
          - httpd
          - mariadb-server
          - php
          - php-fpm
          - php-mysql
          - php-pdo
        state: present
    - name: start httpd server
      systemd:
        name: httpd
        state: started
    - name: start mariadb-server
      systemd:
        name: mariadb
        state: started
    - name: start php-fpm server
      systemd:
        name: php-fpm
        state: started
    - name: get Discuz-DiscuzX-master.zip
      get_url:
        url: http://106.55.16.110:8001/Discuz-X3.4-SC-UTF8-v20210816.zip
        dest: /data
    - name: unzip Discuz-DiscuzX-master.zip
      unarchive:
        src: /data/Discuz-DiscuzX-master.zip
        dest: /var/www/html/
        copy: no
    - name: get index.php
      copy:
        src: index.php
        dest: /var/www/html/index.php
      notify:
        - restart httpd
  handlers:
    - name: restart httpd
      systemd:
        name: httpd
        state: restarted
变量
1.变量概述
变量提供了便捷的方式来管理ansible项目中的动态值
在ansible中,定义变量分为如下三种方式:
1.通过命令行进行变量定义
2.在playbook文件中进行定义变量
3.通过主机清单在主机组或单个主机中设置变量
如果定义的变量出现重复,且造成冲突,优先级如下:
命令行定义的变量 >> playbook文件定义的变量 >> 主机清单定义的变量
2.变量定义
1.playbook的开头hosts下面通过vars进行定义
# 安装两个软件包使用变量方式
[root@ansible1 opt]# cd
[root@ansible1 ~]# cd /opt/playbook/
[root@ansible1 playbook]# cat /opt/playbook/p2.yml
---
- hosts: web2
  vars:
    - web_package: httpd
    - ftp_package: vsftpd
  tasks:
    - name:
      yum:
        name:
          - "{{ web_package }}"
          - "{{ ftp_package }}"
        state: present

[root@ansible1 playbook]# ansible-playbook --syntax-check /opt/playbook/p2.yml

playbook: /opt/playbook/p2.yml
[root@ansible1 playbook]# ansible-playbook /opt/playbook/p2.yml
2.playbook中使用vars_files指定文件作为变量文件
这种方法的好处就是其他的playbook也可以调
[root@ansible1 playbook]# cat vars.yml 		#一定要是yml结尾的
web_package: httpd
ftp_package: vsftpd

[root@ansible1 playbook]# vim p2.yml
---
- hosts: web2
  vars_files: ./vars.yml
  tasks:
    - name:
      yum:
        name:
          - "{{ web_package }}"
          - "{{ ftp_package }}"
        state: present

[root@ansible1 playbook]# ansible-playbook --syntax-check /opt/playbook/p2.yml

playbook: /opt/playbook/p2.yml
[root@ansible1 playbook]# ansible-playbook /opt/playbook/p2.yml
3.在主机清单中定义变量
主机变量优先级高于主机组变量(但是容易将环境弄的特别乱)
[test]
192.168.245.181
192.168.245.182

[web1]
192.168.245.181

[web2]
192.168.245.182

[web2:vars]						#local3只能是web2群组的变量,其它群组不能使用
local3=nc


[root@ansible1 playbook]# cat p3.yml
---
- hosts: web2						#playbook调用变量需要主机清单定义,否则报错
  tasks:
    - name: install package
      yum:
        name:
          - "{{ local3  }}"
      #    - "{{ local1 }}"


---
- hosts: web2
  tasks:
    - name: install package
      file:
        path: "/opt/{{ local3 }}.txt"				#路径调用变量的示例
        state: touch
        #    - "{{ local1 }}"
4.host_vars和group_vars
更好的方式是在ansible的项目目录中创建额外的两个变量目录,分别是host_vars和group_vars(一定名字是这两个不能改)
4.1、group_vars
[root@ansible1 playbook]# grep -Ev "#|^$"  /etc/ansible/hosts
[web1]
web01 ansible_ssh_host=192.168.188.31
[web2]
web02 ansible_ssh_host=192.168.188.32
[server:children]
web1
web2
[root@ansible1 playbook]# mkdir /opt/playbook/host_vars
[root@ansible1 playbook]# mkdir /opt/playbook/group_vars

# group_vars目录下必须存放和主机清单文件中定义的组名一致,如下
[root@ansible1 playbook]# cat /opt/playbook/group_vars/server # 指定组来执行,在group_vars目录里创建对应的组名一致的文件,再编写内容,如果不符合,则报错
web_package: httpd
ftp_package: vsftpd
[root@ansible1 playbook]# cat /opt/playbook/p4.yml
---
- hosts: server
  tasks:
    - name: Installed Packages
      yum:
        name:
          - "{{ web_package }}"
          - "{{ ftp_package }}"
        state: present
[root@ansible1 playbook]# ansible-playbook --syntax-check /opt/playbook/p4.yml

playbook: /opt/playbook/p4.yml
[root@ansible1 playbook]# ansible-playbook /opt/playbook/p4.yml


# 注意:系统提供了特殊的组,all,也就说在group_vars目录下创建一个all文件,定义变量对所有的主机都生效
4.2、host_vars
[root@ansible1 playbook]# grep -Ev "#|^$"  /etc/ansible/hosts
[web1]
web01 ansible_ssh_host=192.168.188.31
[web2]
web02 ansible_ssh_host=192.168.188.32
[server:children]
web1
web2
[root@ansible1 playbook]# cat /opt/playbook/host_vars/web01   # 指定机子别名来执行,在host_vars写对应的机名再写内容
web_package: zlib-static
ftp_package: zmap
[root@ansible1 playbook]# cat /opt/playbook/p5.yml
---
- hosts: all
  tasks:
    - name: Installed Packages
      yum:
        name:
          - "{{ web_package }}"
          - "{{ ftp_package }}"
        state: present
[root@ansible1 playbook]# ansible-playbook --syntax-check /opt/playbook/p5.yml

playbook: /opt/playbook/p5.yml
[root@ansible1 playbook]# ansible-playbook /opt/playbook/p5.yml
[root@ansible1 playbook]# grep -Ev "#|^$" /etc/ansible/hosts
[webservers]
web01 ansible_ssh_host=192.168.188.31 ansible_ssh_port=22
web02 ansible_ssh_host=192.168.188.32
[root@ansible1 playbook]# cat /opt/playbook/p6.yml   # 主机清单里面的也是变量
---
- hosts: all
  tasks:
    - name: touch file
      file:
        path: /tmp/{{ ansible_ssh_port }}.txt
        state: touch
# 将原有Playbook中的变量覆盖掉,使其自行使用新的变量
[root@ansible1 playbook]# cat /opt/playbook/p2.yml
---
- hosts: web2
  vars:
    - web_package: httpd
    - ftp_package: vsftpd
  tasks:
    - name:
      yum:
        name:
          - "{{ web_package }}"
          - "{{ ftp_package }}"
        state: present
[root@ansible1 playbook]# ansible-playbook /opt/playbook/p2.yml -e 'web_package=nginx'
# 变量优先级测试
#命令行变量--->play中的vars_files--->play中的vars变量-->host_vars中定义的变量--->group_vars/组--->group_vars/all
[root@m01 project1]# cat p5.yml
---
- hosts: webservers
#  vars:
#    filename: play_vars
#  vars_files:
#    - ./vars.yml
  tasks:

    - name: Create
      shell: mkdir -pv /tmp/{{ filename }}
      register: mk_test

    - name: debug
      debug: msg={{ mk_test }}
5.变量注册register
register关键字可以将某个task任务结果存储至变量中,最后使用debug输出变量内容,可以用于后续排障

类似于命令行的$?
当我们需要判断对执行了某个操作或者某个命令后,如何做相应的响应处理,也就是说在ansible的playbook中task之间的相互传递变量
[root@ansible1 playbook]# grep -Ev "#|^$"  /etc/ansible/hosts
[web1]
web01 ansible_ssh_host=192.168.188.31
[web2]
web02 ansible_ssh_host=192.168.188.32
[server:children]
web1
web2
[root@ansible1 playbook]# grep -Ev "#|^$" /opt/playbook/p7.yml
---
- hosts: web1
  tasks:
    - name: Get Network Port Status
      shell: netstat -lntp
      register: net_port
    - name: OutPut Network Port Status
      debug:
        msg: "{{ net_port.stdout_lines }}"

# 第一个任务就是用shell模块,执行netstat
# 通过shell模块执行netstat,把这个执行结果传递给register
# 第三个任务,将第二个任务捕获到的结果,赋值给变量通过变量net_port调用register结果中stdout_lines

register应用场景小结
	用于调试配合bebug模块msg输出
	用于与when一起使用实现判断功能
# 变量也支持层级定义,使用"."可能会有问题,建议使用"[]"代替。
[root@m01 project1]# cat vars1.yml
rainbow:
  web:
    web_package: httpd
    db_package: mariadb


code:
  web:
    filename: code_web_filename


[root@m01 project1]# cat p8.yml
---
- hosts: webservers
  vars_files: ./vars1.yml
  tasks:
    - name: Install Package
      yum: name= "{{ rainbow['web']['web_package'] }}"

    - name: create filename
      file:
        path: /tmp/{{ code.web.filename }}
        state: touch
6. Facts 变量
Ansible facts 用来自动采集,”被控端主机“ 自身的状态信息。
比如: 主机名、IP地址、系统版本、CPU数量、内存状态、磁盘状态等等。
facts使用场景
1.通过facts检查cpu,来生成对应的nginx配置文件
2.通过facts检杳内存的情况,来设置tomcat的配置文件
3.通过facts检杳内存的情况来自定义mysql的配置文件
1.1 facts的获取方法
被控节点的facts信息需要使用ansible的setup模块进行获取,使用filter参数可以过滤特定的Facts变量:
facts中的变量可以直接引用,无需获取。
通过系统采集获取变量。facts (setup模块)
# 获取被控主机的信息
[root@ansible1 playbook]# ansible all -m setup

# 模糊匹配,获取主机名
[root@ansible1 playbook]# ansible all -m setup -a 'filter=*name'

# 查看系统版本信息
[root@ansible1 playbook]# ansible all -m setup -a 'filter=*version*'
# 通过fact变量获取主机地址
[root@ansible1 playbook]# cat ip.yaml
---
- hosts: test
  tasks:
    - name: get system info
      debug:
        msg: "This is '{{ ansible_default_ipv4.address }}'"

- hosts: test
#  gather_facts: no
  tasks:
    - name: get system info
      debug:
        msg: "This is {{ ansible_default_ipv4['address'] }}"


[root@ansible1 playbook]# ansible-playbook --syntax-check /opt/playbook/ip.yaml

playbook: /opt/playbook/ip.yaml
[root@ansible1 playbook]# ansible-playbook /opt/playbook/ip.yaml
几个常用的facts
ansible_default_ipv4.adress		#默认的网卡IP
ansible_distribution			#系统发行版本名字
ansible_memtotal_mb				#内存大小
ansible_processor_vcpus			#cpu个数
ansible_processor_cores			#cpu核心数
ansilbe_date_time.date			#时间
facts开启后会影响ansible主机的性能,如果没有采集被控端主机需求可选择关闭
[root@ansible1 playbook]# cat ip.yaml
---
- hosts: all
  gather_facts: no	#关闭信息采集,但模块不能使用facts采集的变量
  tasks:
    - name: get system info
      debug:
        msg: "This is '{{ ansible_default_ipv4.address }}'"


[root@ansible1 playbook]# ansible-playbook a1.yml

PLAY [test] **************************************************************************************************************************

TASK [get system info] ***************************************************************************************************************
fatal: [192.168.245.181]: FAILED! => {"msg": "The task includes an option with an undefined variable. The error was: 'ansible_default_ipv4' is undefined\n\nThe error appears to be in '/etc/ansible/playbook/a1.yml': line 5, column 7, but may\nbe elsewhere in the file depending on the exact syntax problem.\n\nThe offending line appears to be:\n\n  tasks:\n    - name: get system info\n      ^ here\n"}
fatal: [192.168.245.182]: FAILED! => {"msg": "The task includes an option with an undefined variable. The error was: 'ansible_default_ipv4' is undefined\n\nThe error appears to be in '/etc/ansible/playbook/a1.yml': line 5, column 7, but may\nbe elsewhere in the file depending on the exact syntax problem.\n\nThe offending line appears to be:\n\n  tasks:\n    - name: get system info\n      ^ here\n"}

PLAY RECAP ***************************************************************************************************************************
192.168.245.181            : ok=0    changed=0    unreachable=0    failed=1    skipped=0    rescued=0    ignored=0
192.168.245.182            : ok=0    changed=0    unreachable=0    failed=1    skipped=0    rescued=0    ignored=0
playbook安装一个memcached
[root@ansible1 playbook]# yum -y install memcached
[root@ansible1 playbook]# cat /etc/sysconfig/memcached  # 配置文件
PORT="11211"
USER="memcached"
MAXCONN="1024"
CACHESIZE="{{ ansible_memtotal_mb /2 }}"		#根据内存状态生成不同的配置(支持+-*/运算)
OPTIONS=""
[root@ansible1 playbook]# grep -Ev "#|^$" /opt/playbook/memcached.yml
---
- hosts: all
  tasks:
    - name: install memcached
      yum:
        name: memcached
        state: present
    - name: Configure Memcached
      template:
        src: /opt/playbook/memcached.txt
        dest: /etc/sysconfig/memcached
    - name: Start Memcached
      service:
        name: memcached
        state: started
        enabled: yes


# template:模块可以将带有参数的配置文件传递到目标地址
# 文章:https://www.cnblogs.com/puremans/p/6512005.html https://blog.youkuaiyun.com/qq_35887546/article/details/105266675
# 验证
[root@ansible2 ~]# cat /etc/sysconfig/memcached
PORT="11211"
USER="memcached"
MAXCONN="1024"
CACHESIZE="488"
OPTIONS=""
判断语句when用法
实践案例一
# 实践案例一、根据不同操作系统,安装相同的软件包
[root@ansible1 playbook]# cat when.yaml
---
- hosts: all
  tasks:
    - name: install httpd server
      yum:
        name: httpd
        state: present
      when: ansible_distribution == "CentOS"
    - name: install httpd server
      apt:
        name: httpd2
        state: present
      when: ansible_distribution == "Ubuntu"
[root@ansible1 playbook]# ansible-playbook --syntax-check /opt/playbook/when.yaml

playbook: /opt/playbook/when.yaml
[root@ansible1 playbook]# ansible-playbook /opt/playbook/when.yaml
实践案例二
# 实践案例二、所有为web主机名的添加nginx仓库,其余的都跳过添加
#	1.如何添加yum仓库
#	2.如何判断,判断什么内容
[root@ansible1 playbook]# cat nginx.yaml
---
- hosts: all
  tasks:
    - name: config nginx repo
      yum_repository:
        name: nginx
        description: "nginx repo"
        baseurl: "http://nginx.org/packages/centos/$releasever/$basearch/"
        gpgcheck: no
        enabled: yes
      when: (ansible_hostname is match ("web*")) or (ansible_hostname is match ("ansible*"))
[root@ansible1 playbook]# ansible-playbook --syntax-check /opt/playbook/nginx.yaml

playbook: /opt/playbook/nginx.yaml
[root@ansible1 playbook]# ansible-playbook /opt/playbook/nginx.yaml
# 验证
[root@ansible2 ~]# ls /etc/yum.repos.d/
bak  CentOS-Base.repo  epel.repo  local.repo  nginx.repo
实践案例三
# 可以应用在检测服务是否宕掉,如果宕掉,手动执行playbook拉起
# 通过register将命令执行结果保存至变量,然后通过when语句进行判断,符合条件执行,不符合跳过
[root@ansible1 playbook]# cat pan.yaml
---
- hosts: all
  tasks:
    - name: check httpd server
      command: systemctl is-active httpd
      ignore_errors: yes
      register: check_httpd
    - name: debug outprint
      debug:
        msg: "{{ check_httpd }}"    # 获取结果
    - name: Httpd Restart
      service:
        name: httpd
        state: restarted
      when: (check_httpd.rc != 0)                           # 结合setup模块然后获取到结果取rc那一层结果判断不等于0重启
[root@ansible1 playbook]# ansible-playbook --syntax-check pan.yaml

playbook: pan.yaml
[root@ansible1 playbook]# ansible-playbook pan.yaml
实践案例四
# 2. 判断重启nginx
[root@ansible1 playbook]# cat pan2.yaml
---
- hosts: all
  tasks:
    - name: check nginx server
      command: nginx -t
      ignore_errors: yes    # 忽略错误
      register: check_nginx
    - name: debug outprint
      debug:
        msg: "{{ check_nginx }}"
    - name: nginx Restart
      service:
        name: nginx
        state: restarted
      when: (check_nginx.rc == 0)
[root@ansible1 playbook]# ansible-playbook --syntax-check pan2.yaml

playbook: pan2.yaml
[root@ansible1 playbook]# ansible-playbook pan2.yaml
循环语句
实践案例一
# 实践案例一、使用循环重启多个服务
[root@ansible1 playbook]# cat with.yml
---
- hosts: web1
  tasks:
    - name: restart httpd mariadb
      systemd:
        name: "{{ item }}"
        state: restarted
      with_items:				#可以使用loop参数代替
        - httpd
        - mariadb
[root@ansible1 playbook]# ansible-playbook --syntax-check with.yml

playbook: with.yml
[root@ansible1 playbook]# ansible-playbook with.yml
实践案例二
# 案例二、使用定义变量方式循环安装软件包
[root@ansible1 playbook]# cat with2.yaml
---
- hosts: all
  tasks:
    - name: ensure a list of packages installed
      yum:
        name: "{{ packages }}"
        state: present
      vars:
        packages:
          - httpd
          - httpd-tools
[root@ansible1 playbook]# ansible-playbook --syntax-check /opt/playbook/with2.yaml

playbook: /opt/playbook/with2.yaml
[root@ansible1 playbook]# ansible-playbook /opt/playbook/with2.yaml
# 不推荐使用此方法
- hosts: all
  tasks:
    - name: ensure a list of packages installed
      yum:
        name= "{{ item }}"
        state=present
      with_items:
        - httpd
        - httpd-tools
实践案例三
# 实践案例三、使用字典循环方式创建用户和批量拷贝文件
[root@manager ~]# cat loop-user.yml
---
- hosts: webservers
  tasks:
    - name: Add Users
      user:
        name={{ item.name }}
        groups={{ item.groups }}
        state=present
      with_items:
        - { name: 'testuser1', groups: 'bin' }
        - { name: 'testuser2', groups: 'root' }


[root@m01 project2]# cat with4.yml
- hosts: webservers
  tasks:
    - name: Copy Rsync configure and Rsync passwd
      copy:
        src={{ item.a1 }}
        dest={{ item.dest }}
        mode={{ item.mode }}
      with_items:
        - { a1: "./rsyncd.conf", dest: "/etc/rsyncd.conf", mode: "0644" }
        - { : "./rsync.passwd", dest: "/tmp/rsync.passwd", mode: "0600" }
[root@ansible1 playbook]# cat /opt/playbook/list.yaml
---
- hosts: all
  tasks:
    - name: loop create file
      file:
        path: /opt/{{ item.name }}
        mode: "{{ item.num }}"
        state: touch
      with_items:
        - { name: 'shy1', num: '0777' }
        - { name: 'shy2', num: '0666' }
        - { name: 'shy2', num: '0555' }
[root@ansible1 playbook]# ansible-playbook --syntax-check /opt/playbook/list.yaml

playbook: /opt/playbook/list.yaml
[root@ansible1 playbook]# ansible-playbook /opt/playbook/list.yaml
handlers触发器
[root@ansible1 playbook]# yum -y install httpd
[root@ansible1 playbook]# cp /etc/httpd/conf/httpd.conf ./httpd.j2
[root@ansible1 playbook]# cat httpd.yaml
---
- hosts: all
  tasks:
    - name: test handlers
      yum:
        name: httpd
        state: present
    - name: config httpd
      template:
        src: httpd.j2
        dest: /etc/httpd/conf/httpd.conf
      notify:
        - restart httpd
    - name: start httpd
      systemd:
        name: httpd
        state: started
  handlers:
    - name: restart httpd
      systemd:
        name: httpd
        state: restarted
[root@ansible1 playbook]# vim httpd.yaml
[root@ansible1 playbook]# ansible-playbook --syntax-check /opt/playbook/httpd.yaml

playbook: /opt/playbook/httpd.yaml
[root@ansible1 playbook]# ansible-playbook /opt/playbook/httpd.yaml   # 这时候httpd.j2模板还是原来的样子不会触发handlers
# 修改模板触发handlers
[root@ansible1 playbook]# cat httpd.yaml   # 增加变量 跟前面安装memcached一样在模板里面引用这里的变量
---
- hosts: all
  vars:
    - httpd_port: 6666
  tasks:
    - name: test handlers
      yum:
        name: httpd
        state: present
    - name: config httpd
      template:
        src: httpd.j2
        dest: /etc/httpd/conf/httpd.conf
      notify:
        - restart httpd
    - name: start httpd
      systemd:
        name: httpd
        state: started
  handlers:
    - name: restart httpd
      systemd:
        name: httpd
        state: restarted
[root@ansible1 playbook]# ansible-playbook --syntax-check /opt/playbook/httpd.yaml

playbook: /opt/playbook/httpd.yaml
[root@ansible1 playbook]# vim httpd.j2
改: Listen 80
为: Listen {{ httpd_port }}
[root@ansible1 playbook]# ansible-playbook /opt/playbook/httpd.yaml   # 这时候会发现触发handlers
handlers注意事项
1.无论多少个task通知了相同的handlers,handlers仅会在所有tasks结束后运行一次。
2.只有task发生改变了才会通知handlers,没有改变则不会触发handlers
3.不能使用handlers替代tasks
tags标签
如果你有一个很大的剧本,那么只运行它的特定部分而不是运行整个剧本可能会很有用。主要是用来调试,只执行一个指定模块,方便使用
单标签
# 每个模块单标签
[root@ansible1 playbook]# cat httpd.yml
- hosts: all
  vars:
    - httpd_port: 6666
  tasks:
    - name: test handlers
      yum:
        name: httpd
        state: present
      tags:
        - install_httpd
    - name: config httpd
      template:
        src: httpd.conf						#不写绝对路径,默认在yml文件所在目录
        dest: /etc/httpd/conf/httpd.conf
      notify:
        - restart httpd
      tags:
        - config_httpd
    - name: start httpd
      systemd:
        name: httpd
        state: started
      tags:
        - start_httpd
  handlers:
    - name: restart httpd
      systemd:
        name: httpd
        state: restarted
[root@ansible1 playbook]# ansible-playbook --syntax-check /opt/playbook/httpd.yaml
[root@ansible1 playbook]# ansible-playbook /opt/playbook/httpd.yaml --list-tags   # 查看有多少个tags

playbook: /opt/playbook/httpd.yaml

  play #1 (all): all	TAGS: []
      TASK TAGS: [config_httpd, install_httpd, start_httpd]


[root@ansible1 playbook]# ansible-playbook /opt/playbook/httpd.yaml -t install_httpd   # -t 标 只运行某一tags


[root@ansible1 playbook]# ansible-playbook /opt/playbook/httpd.yaml -t install_httpd,start_httpd   # 运行指定多个tags


[root@ansible1 playbook]# ansible-playbook /opt/playbook/httpd.yaml --skip-tags config_httpd   # 跳过指定tags


[root@ansible1 playbook]# ansible-playbook /opt/playbook/httpd.yaml --skip-tags config_httpd,install_httpd   # 跳过指定多个tags
单模块多标签
# 一个标签执行多个模块任务
[root@ansible1 playbook]# cat httpd.yaml
- hosts: all
  vars:
    - httpd_port: 6666
  tasks:
    - name: test handlers
      yum:
        name: httpd
        state: present
      tags:
        - install_httpd
        - start_httpd
    - name: config httpd
      template:
        src: httpd.j2
        dest: /etc/httpd/conf/httpd.conf
      notify:
        - restart httpd
      tags:
        - config_httpd
    - name: start httpd
      systemd:
        name: httpd
        state: started
      tags:
        - start_httpd
  handlers:
    - name: restart httpd
      systemd:
        name: httpd
        state: restarted
[root@ansible1 playbook]# ansible-playbook --syntax-check /opt/playbook/httpd.yaml

playbook: /opt/playbook/httpd.yaml
[root@ansible1 playbook]# ansible-playbook /opt/playbook/httpd.yaml -t start_httpd
playbook复用(include)(了解)
Include包含
include(import_playbook)
include_tasks
[root@ansible1 playbook]# cat install.yaml
- name: test handlers
  yum:
    name: httpd
    state: present

[root@ansible1 playbook]# cat config.yaml
- name: config httpd
  template:
    src: httpd.j2
    dest: /etc/httpd/conf/httpd.conf
  notify:
    - restart httpd

[root@ansible1 playbook]# cat start.yaml
- name: start httpd
  systemd:
    name: httpd
    state: started

[root@ansible1 playbook]# cat in.yaml
- hosts: all
  vars:
    - httpd_port: 77
  tasks:
    - include_tasks: install.yaml
    - include_tasks: config.yaml
    - include_tasks: start.yaml
  handlers:
    - name: restart httpd
      systemd:
        name: httpd
        state: restarted


[root@ansible1 playbook]# ansible-playbook --syntax-check /opt/playbook/in.yaml

playbook: /opt/playbook/in.yaml
[root@ansible1 playbook]# ansible-playbook /opt/playbook/in.yaml
# include,使用这个会报警因为在新版中使用的是import_playbook
[root@ansible1 playbook]# cat include.yaml
- include: in.yaml
[root@ansible1 playbook]# ansible-playbook --syntax-check /opt/playbook/include.yaml   # 有警告,但是能运行


[root@ansible1 playbook]# cat include.yaml
- import_playbook: in.yaml
[root@ansible1 playbook]# ansible-playbook --syntax-check /opt/playbook/include.yaml   # 无警告

playbook: /opt/playbook/include.yaml

忽略错误ignore_errors
[root@manager ~]# cat f9.yml
---
- hosts: webservers
  tasks:
    - name: Ignore False
      command: /bin/false
      ignore_errors: yes

    - name: touch new file
      file: path=/tmp/bgx_ignore state=touch
异常处理
force_handlers: yes		#强制调用handlers
changed_when: false		#被管理主机没有发生变化,可以使用参数将change状态改为ok  也就是变成静态(绿色),那么不会触发handlers,如果是修改配置文件之类的不适用,那就不会触发handlers
changed_when: httpd_check.stdout.find('OK')			#查看变量中的某个字符串
[root@ansible1 playbook]# cat changed_when.yaml
- hosts: all
  vars:
    - httpd_port: 8083
  tasks:
    - name: configure httpd server
      template:
        src: httpd.j2
        dest: /etc/httpd/conf/httpd.conf
      notify: Restart Httpd Server
    - name: Check HTTPD
      shell: /usr/sbin/httpd -t
      register: httpd_check
      changed_when:
        - httpd_check.stdout.find('OK')   # 区分大小写
        - false
    - name: start httpd server
      service:
        name: httpd
        state: started
        enabled: yes
  handlers:
    - name: Restart Httpd Server
      systemd:
        name: httpd
        state: restarted
[root@ansible1 playbook]# ansible-playbook --syntax-check /opt/playbook/changed_when.yaml

playbook: /opt/playbook/changed_when.yaml
[root@ansible1 playbook]# ansible-playbook /opt/playbook/changed_when.yaml

# 判断失败如下图

# 测试yaml,把需要的取消注释
- hosts: all
  vars:
    - httpd_port: 8080
  force_handlers: yes		#如果不触发handlers,也强制执行handlers
  tasks:
    - name: install httpd
      yum:
        name: httpd
        state: present
      tags:
        - install_httpd
        - start_httpd
    - name: config httpd
      template:
        src: httpd.j2
        dest: /etc/httpd/conf/httpd.conf
      notify:
        - restart httpd
      tags:
        - config_httpd
      #changed_when: false
    #- name: get errro
      #command: /bin/false
      #ignore_errors: yes
    - name: check httpd
      shell: /usr/sbin/httpd -t
      register: check
      changed_when:
        - check.stdout.find("OK")
        - false
    #- name: debug
      #debug:
        #msg: "{{ check }}"
    - name: start httpd
      systemd:
        name: httpd
        state: started
      tags:
        - start_httpd
  handlers:
    - name: restart httpd
      systemd:
        name: httpd
        state: restarted
pd Server
systemd:
name: httpd
state: restarted
[root@ansible1 playbook]# ansible-playbook --syntax-check /opt/playbook/changed_when.yaml
playbook: /opt/playbook/changed_when.yaml
[root@ansible1 playbook]# ansible-playbook /opt/playbook/changed_when.yaml
判断失败如下图
[外链图片转存中...(img-2DuG2ejr-1673706851090)]

```shell
# 测试yaml,把需要的取消注释
- hosts: all
  vars:
    - httpd_port: 8080
  force_handlers: yes		#如果不触发handlers,也强制执行handlers
  tasks:
    - name: install httpd
      yum:
        name: httpd
        state: present
      tags:
        - install_httpd
        - start_httpd
    - name: config httpd
      template:
        src: httpd.j2
        dest: /etc/httpd/conf/httpd.conf
      notify:
        - restart httpd
      tags:
        - config_httpd
      #changed_when: false
    #- name: get errro
      #command: /bin/false
      #ignore_errors: yes
    - name: check httpd
      shell: /usr/sbin/httpd -t
      register: check
      changed_when:
        - check.stdout.find("OK")
        - false
    #- name: debug
      #debug:
        #msg: "{{ check }}"
    - name: start httpd
      systemd:
        name: httpd
        state: started
      tags:
        - start_httpd
  handlers:
    - name: restart httpd
      systemd:
        name: httpd
        state: restarted


 1519
1519

 被折叠的 条评论
为什么被折叠?
被折叠的 条评论
为什么被折叠?
 到【灌水乐园】发言


