


先贴跑通的代码与对应输出
# -*- coding: utf-8 -*-
import os
import sys
import random
import math
import numpy as np
import skimage.io
import matplotlib
import matplotlib.pyplot as plt
import cv2
import time
from mrcnn.config import Config
from datetime import datetime
# Root directory of the project
ROOT_DIR = os.path.abspath("C:\\Users\\91078\\Desktop\\Mask_RCNN\\Mask_RCNN-master")
# Import Mask RCNN
sys.path.append(ROOT_DIR) # To find local version of the library
from mrcnn import utils
import mrcnn.model as modellib
from mrcnn import visualize
# Import COCO config
# sys.path.append(os.path.join(ROOT_DIR, "samples/coco/")) # To find local version
# from samples.coco import coco
# Directory to save logs and trained model
MODEL_DIR = os.path.join(ROOT_DIR, "logs")
print(MODEL_DIR)
# Local path to trained weights file
COCO_MODEL_PATH = os.path.join(MODEL_DIR ,"mask_rcnn_shapes_0001.h5")
# !!!注意.h5文件的路径
# Download COCO trained weights from Releases if needed
if not os.path.exists(COCO_MODEL_PATH):
utils.download_trained_weights(COCO_MODEL_PATH)
print("cuiwei***********************")
# Directory of images to run detection on
IMAGE_DIR = os.path.join(ROOT_DIR, "images")
class ShapesConfig(Config):
"""Configuration for training on the toy shapes dataset.
Derives from the base Config class and overrides values specific
to the toy shapes dataset.
"""
# Give the configuration a recognizable name
NAME = "shapes"
# Train on 1 GPU and 8 images per GPU. We can put multiple images on each
# GPU because the images are small. Batch size is 8 (GPUs * images/GPU).
GPU_COUNT = 1
IMAGES_PER_GPU = 1
# Number of classes (including background)
NUM_CLASSES = 1 + 3 # background + 3 shapes
# Use small images for faster training. Set the limits of the small side
# the large side, and that determines the image shape.
IMAGE_MIN_DIM = 480
IMAGE_MAX_DIM = 640
# Use smaller anchors because our image and objects are small
RPN_ANCHOR_SCALES = (8 * 6, 16 * 6, 32 * 6, 64 * 6, 128 * 6) # anchor side in pixels
# Reduce training ROIs per image because the images are small and have
# few objects. Aim to allow ROI sampling to pick 33% positive ROIs.
TRAIN_ROIS_PER_IMAGE =100
# Use a small epoch since the data is simple
STEPS_PER_EPOCH = 100
# use small validation steps since the epoch is small
VALIDATION_STEPS = 50
#import train_tongue
#class InferenceConfig(coco.CocoConfig):
class InferenceConfig(ShapesConfig):
# Set batch size to 1 since we'll be running inference on
# one image at a time. Batch size = GPU_COUNT * IMAGES_PER_GPU
GPU_COUNT = 1
IMAGES_PER_GPU = 1
config = InferenceConfig()
model = modellib.MaskRCNN(mode="inference", model_dir=MODEL_DIR, config=config)
# Create model object in inference mode.
model = modellib.MaskRCNN(mode="inference", model_dir=MODEL_DIR, config=config)
# Load weights trained on MS-COCO
# model.load_weights(COCO_MODEL_PATH, by_name=True)
model.load_weights(COCO_MODEL_PATH, by_name=True, exclude=["mrcnn_class_logits", "mrcnn_bbox_fc","mrcnn_bbox", "mrcnn_mask"])
# COCO Class names
# Index of the class in the list is its ID. For example, to get ID of
# the teddy bear class, use: class_names.index('teddy bear')
class_names = ['BG', 'ball', 'triangle', 'rectangle']
# Load a random image from the images folder
file_names = next(os.walk(IMAGE_DIR))[2]
image = skimage.io.imread(os.path.join(IMAGE_DIR, random.choice(file_names)))
a=datetime.now()
# Run detection
results = model.detect([image], verbose=1)
b=datetime.now()
# Visualize results
print("shijian",(b-a).seconds)
r = results[0]
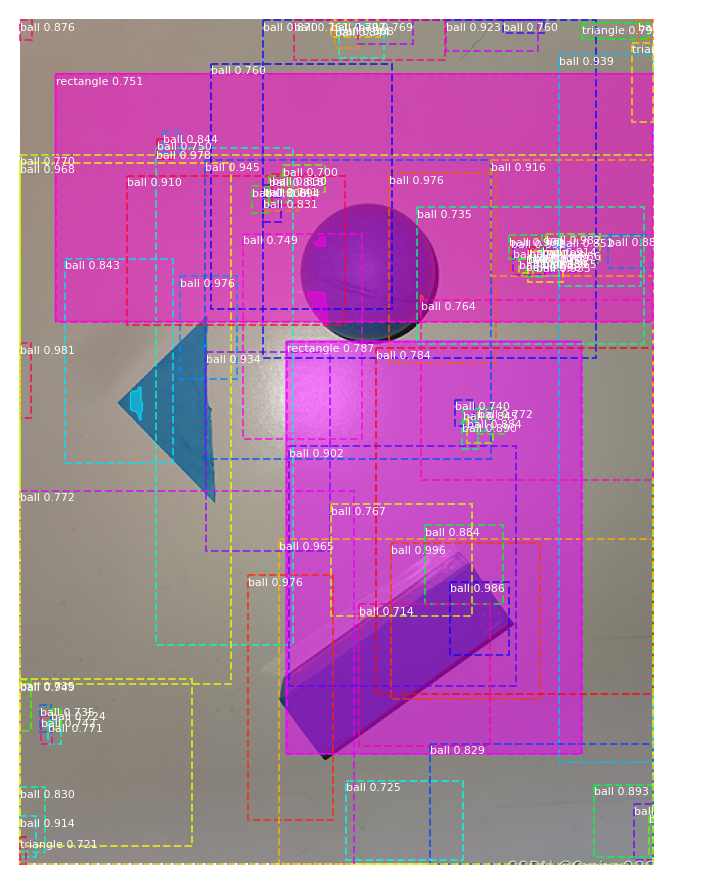
visualize.display_instances(image, r['rois'], r['masks'], r['class_ids'],
class_names, r['scores'])
输出:

ERROR
ERROR1:
ValueError: Layer #389 (named "mrcnn_bbox_fc"), weight <tf.Variable 'mrcnn_bbox_fc/kernel:0' shape=(1024, 8) dtype=float32_ref> has shape (1024, 8), but the saved weight has shape (1024, 324).
把model.load_weights(COCO_MODEL_PATH, by_name=True)改为:
model.load_weights(COCO_MODEL_PATH, by_name=True, exclude=["mrcnn_class_logits", "mrcnn_bbox_fc","mrcnn_bbox", "mrcnn_mask"])参考文章:
mask rcnn测试中遇到的问题解决_ilinda的博客-优快云博客 https://blog.youkuaiyun.com/qq_34713831/article/details/85797622
ERROR2:
OSError: Unable to open file (truncated file: eof = 22118400, sblock->base_addr = 0, stored_eof = 152662144)
将下载未完成的.h5文件删除
参考文章:
 https://blog.youkuaiyun.com/liupeng19970119/article/details/108963671


 4586
4586

 被折叠的 条评论
为什么被折叠?
被折叠的 条评论
为什么被折叠?
 到【灌水乐园】发言


