


 这篇博客详细记录了在Ubuntu16.04环境下,使用TensorFlow和Keras训练Mask R-CNN模型的过程,包括配置、数据集创建、模型加载和训练等步骤。作者分享了从标注数据到训练和测试的全教程,特别适合那些想要在自定义数据集上使用Mask R-CNN的读者。
参考文章
Mask R-CNN tensorflow 训练自己的数据【从标注数据到最终训练和测试】超全教程,呕血踩坑,Ubuntu 16.04 完美运行_Somafish的博客-优快云博客前言楼主由于工作需要,必须使用Mask-Rcnn 去训练自己的数据,写这篇博客之前楼主从百度搜索了各种训练的方法,但是搜索到的博文 写的都比较有歧义,最终我通过各种尝试 终于让训练跑了起来,也特在此处 写上这篇博文 送给大家。本教程 适用于 Ubuntu 系统的用户、Windows 系统的用户我使用的Mask RCNN-->https://github.com/matterpor... https://blog.youkuaiyun.com/doudou_here/article/details/87855273Mask RCNN训练自己的数据集_一呆飞仙的博客-优快云博客_maskrcnn训练自己的数据集该版本为tensorflow+keras版本的,官方版本刚开源10个小时(caffe2),以后再更新..一、工具cuda与cudnn安装请参考我之前博客: http://blog.youkuaiyun.com/l297969586/article/details/53320706 http://blog.youkuaiyun.com/l297969586/article/details/67632608 ...https://blog.youkuaiyun.com/l297969586/article/details/79140840MaskRCNN训练自己的数据集 小白篇 - 灰信网(软件开发博客聚合)
 https://www.freesion.com/article/1999844623/
先把跑通的代码以及对应输出贴上(部分参数有待调整)
import os
import sys
import random
import math
import re
import time
import numpy as np
import cv2
import matplotlib

import tensorflow as tf
import matplotlib.pyplot as plt
from PIL import Image
import yaml

# Root directory of the project
ROOT_DIR = os.path.abspath("../../")

# Import Mask RCNN
sys.path.append(ROOT_DIR)  # To find local version of the library
from mrcnn.config import Config
from mrcnn import utils
import mrcnn.model as modellib
from mrcnn import visualize
from mrcnn.model import log

%matplotlib inline

# Directory to save logs and trained model
MODEL_DIR = os.path.join(ROOT_DIR, "logs")

iter_num = 0

# Local path to trained weights file
COCO_MODEL_PATH = os.path.join(ROOT_DIR, "mask_rcnn_coco.h5")
# Download COCO trained weights from Releases if needed
if not os.path.exists(COCO_MODEL_PATH):
    utils.download_trained_weights(COCO_MODEL_PATH)
输出:
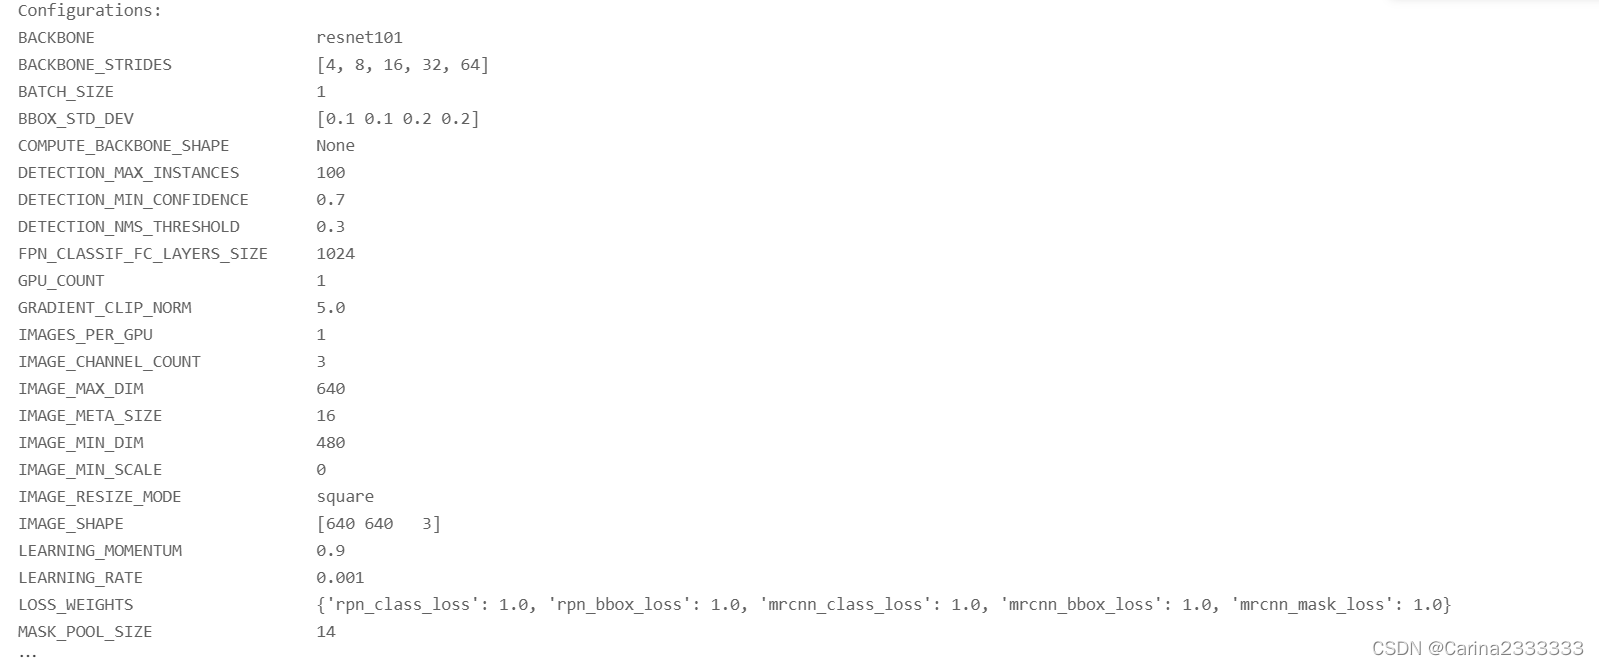
Configuration
class ShapesConfig(Config):
    """Configuration for training on the toy shapes dataset.
    Derives from the base Config class and overrides values specific
    to the toy shapes dataset.
    """
    # Give the configuration a recognizable name
    NAME = "shapes"

    # Train on 1 GPU and 8 images per GPU. We can put multiple images on each
    # GPU because the images are small. Batch size is 8 (GPUs * images/GPU).
    GPU_COUNT = 1
    IMAGES_PER_GPU = 1

    # Number of classes (including background)
    NUM_CLASSES = 1 + 3  # background + 3 shapes

    # Use small images for faster training. Set the limits of the small side
    # the large side, and that determines the image shape.
    IMAGE_MIN_DIM = 480
    IMAGE_MAX_DIM = 640

    # Use smaller anchors because our image and objects are small
    RPN_ANCHOR_SCALES = (8*6, 16*6, 32*6, 64*6, 128*6)  # anchor side in pixels

    # Reduce training ROIs per image because the images are small and have
    # few objects. Aim to allow ROI sampling to pick 33% positive ROIs.
    TRAIN_ROIS_PER_IMAGE = 32

    # Use a small epoch since the data is simple
    STEPS_PER_EPOCH = 100

    # use small validation steps since the epoch is small
    VALIDATION_STEPS = 5


config = ShapesConfig()
config.display()
输出:
Dataset
class DrugDataset(utils.Dataset):
    """Generates the shapes synthetic dataset. The dataset consists of simple
    shapes (triangles, squares, circles) placed randomly on a blank surface.
    The images are generated on the fly. No file access required.
    """

    #得到该图中有多少个实例(物体)
    def get_obj_index(self, image):
        n = np.max(image)
        return n


    #解析labelme中得到的yaml文件,从而得到mask每一层对应的实例标签
    def from_yaml_get_class(self,image_id):
        info=self.image_info[image_id]
        with open(info['yaml_path']) as f:
            temp=yaml.load(f.read())
            labels=temp['label_names']
            del labels[0]
        return labels


    #重新写draw_mask
    def draw_mask(self, num_obj, mask, image, image_id):
        info = self.image_info[image_id]
        for index in range(num_obj):
            for i in range(info['width']):
                for j in range(info['height']):
                    at_pixel = image.getpixel((i, j))
                    if at_pixel == index + 1:
                        mask[j, i, index] = 1
        return mask


    def load_shapes(self, count, height, width, img_floder, mask_floder, imglist,dataset_root_path):
            """Generate the requested number of synthetic images.
            count: number of images to generate.
            height, width: the size of the generated images.
            """
            # Add classes
            self.add_class("shapes", 1, "rectangle")
            self.add_class("shapes", 2, "ball")
            self.add_class("shapes", 3, "triangle")

            # Add images
            # Generate random specifications of images (i.e. color and
            # list of shapes sizes and locations). This is more compact than
            # actual images. Images are generated on the fly in load_image().
            for i in range(count):
                filestr = imglist[i].split(".")[0]
                # filestr = filestr.split("_")[1]
                mask_path = mask_floder + "\\" + filestr + ".png"
                yaml_path=dataset_root_path+"labelme_json\\"+filestr+"_json\\info.yaml"

                cv_img = cv2.imread(dataset_root_path+"labelme_json\\"+filestr+"_json\\img.png")

                self.add_image("shapes", image_id=i, path=img_floder + "\\" + imglist[i],
                            width=cv_img.shape[1], height=cv_img.shape[0], mask_path=mask_path,yaml_path=yaml_path)
                # print(mask_path)

    def load_mask(self, image_id):
        """Generate instance masks for shapes of the given image ID.
        """
        global iter_num
        info = self.image_info[image_id]

        count = 1  # number of object
        img = Image.open(info['mask_path'])
        num_obj = self.get_obj_index(img)

        mask = np.zeros([info['height'], info['width'], num_obj], dtype=np.uint8)
        mask = self.draw_mask(num_obj, mask, img, image_id)
        # Handle occlusions
        occlusion = np.logical_not(mask[:, :, -1]).astype(np.uint8)
        for i in range(count-2, -1, -1):
            mask[:, :, i] = mask[:, :, i] * occlusion
            occlusion = np.logical_and(occlusion, np.logical_not(mask[:, :, i]))
        labels=[]
        labels=self.from_yaml_get_class(image_id)
        labels_form=[]
        for i in range(len(labels)):
            if labels[i].find("rectangle")!= -1:
                #print "box"
                labels_form.append("rectangle")
            elif labels[i].find("ball")!= -1:
                #print "column"
                labels_form.append("ball")
            elif labels[i].find("triangle")!= -1:
                #print "package"
                labels_form.append("triangle")
        # Map class names to class IDs.


        class_ids = np.array([self.class_names.index(s) for s in labels_form])
        return mask, class_ids.astype(np.int32)
def get_ax(rows=1, cols=1, size=8):
    """Return a Matplotlib Axes array to be used in
    all visualizations in the notebook. Provide a
    central point to control graph sizes.
    Change the default size attribute to control the size
    of rendered images
    """
    _, ax = plt.subplots(rows, cols, figsize=(size * cols, size * rows))
    return ax
#基础设置
dataset_root_path="C:\\Users\\91078\\Desktop\\testImg\\"
img_floder = dataset_root_path+"pic"
mask_floder = dataset_root_path+"cv2_mask"
#yaml_floder = dataset_root_path
imglist = os.listdir(img_floder)
count = len(imglist)
width = 480
height = 640
# Training dataset
dataset_train = DrugDataset()
# dataset_train.load_shapes(500, config.IMAGE_SHAPE[0], config.IMAGE_SHAPE[1])
dataset_train.load_shapes(count, 640, 480, img_floder, mask_floder, imglist,dataset_root_path)
dataset_train.prepare()
# Validation dataset
dataset_val = DrugDataset()
# dataset_val.load_shapes(50, config.IMAGE_SHAPE[0], config.IMAGE_SHAPE[1])
dataset_val.load_shapes(count, 640, 480, img_floder, mask_floder, imglist,dataset_root_path)
dataset_val.prepare()Create Model
# Create model in training mode
model = modellib.MaskRCNN(mode="training", config=config,
                          model_dir=MODEL_DIR)
输出:
# Which weights to start with?
init_with = "coco"  # imagenet, coco, or last

if init_with == "imagenet":
    model.load_weights(model.get_imagenet_weights(), by_name=True)
elif init_with == "coco":
    # Load weights trained on MS COCO, but skip layers that
    # are different due to the different number of classes
    # See README for instructions to download the COCO weights
    model.load_weights(COCO_MODEL_PATH, by_name=True,
                       exclude=["mrcnn_class_logits", "mrcnn_bbox_fc",
                                "mrcnn_bbox", "mrcnn_mask"])
elif init_with == "last":
    # Load the last model you trained and continue training
    model.load_weights(model.find_last()[1], by_name=True)
Training
# Train the head branches
# Passing layers="heads" freezes all layers except the head
# layers. You can also pass a regular expression to select
# which layers to train by name pattern.
model.train(dataset_train, dataset_val,
            learning_rate=config.LEARNING_RATE,
            epochs=1,
            layers='heads')
输出:

训练好的.h5文件在项目logs里面找

ERROR
AttributeError: ‘Model‘ object has no attribute ‘metrics_tensors‘


 被折叠的 条评论
为什么被折叠?
被折叠的 条评论
为什么被折叠?
 到【灌水乐园】发言


