


SpringCloud进行Ribbon配置
负载均衡算法: rest接口第几次请求数 % 服务器集群总数量 = 实际调用服务器位置下标,每次服务重启后rest接口计数从1开始
注:测试时可以新建多个服务,有多个ribbon服务时,每个微服务最好连接各自的数据库,端口号,注意这几个微服务的配置文件中对外暴露的统一实例名称不允许修改
1.在eureka客户端添加pom依赖
 <!-- spring-boot每一个框架的集成都是一个starter -->
        <dependency>
            <groupId>org.springframework.boot</groupId>
            <artifactId>spring-boot-starter-web</artifactId>
        </dependency>
        <!-- 添加ribbon的依赖jar包 -->
        <dependency>
            <groupId>org.springframework.cloud</groupId>
            <artifactId>spring-cloud-starter-netiflix-ribbon-ribbon</artifactId>
        </dependency>
        <!-- 客户端用来发送送请求到注册中心 依赖的jar包 该服务端依赖添加到客户端与客户端相整合 -->
        <dependency>
            <groupId>org.springframework.cloud</groupId>
            <artifactId>spring-cloud-starter-eureka</artifactId>
        </dependency>
         <dependency>
            <groupId>org.springframework.cloud</groupId>
            <artifactId>spring-cloud-starter-config</artifactId>
        </dependency>
2.配置application.yml
server:
** 指定一个端口**
  port: 8092
spring:
  application:
**  指定一个服务名**
    name: ribbon-center

eureka:
  client:
    service-url:
#   指定注册中心的地址
      defaultZone: http://10.0.1.65:8081/eureka/  #可以配置集群
3.创建一个启动类
package cn;

import org.springframework.boot.SpringApplication;
import org.springframework.boot.autoconfigure.SpringBootApplication;
import org.springframework.cloud.client.loadbalancer.LoadBalanced;
import org.springframework.cloud.netflix.eureka.EnableEurekaClient;
import org.springframework.cloud.netflix.ribbon.RibbonClient;
import org.springframework.context.annotation.Bean;
import org.springframework.context.annotation.Configuration;
import org.springframework.web.client.RestTemplate;
@Configuration
// 加载我们自定义的Ribbon配置类 MySelfRule自定义配置类不能放在@ComponentScan
// 所扫描的当前包以及子包下面,否则这个配置类就会被所有的Ribbon客户端所共享
// @RibbonClient(name = "mail-center",configuration=MySelfRule.class)
public class configBean{
    @LoadBalanced  //spring cloud ribbon是基于Netflix ribbon实现的一套客户端 负载均衡工具
    @Bean
    RestTemplate restTemplate() {
        return new RestTemplate();
    }

}
初始化的时候就需要创建一个RestTemplate 的bean
4.在主启动类添加注解 @EnableEurekaClient
5.创建测试类
package cn.et;
import org.springframework.beans.factory.annotation.Autowired;
import org.springframework.cloud.client.ServiceInstance;
import org.springframework.cloud.client.loadbalancer.LoadBalancerClient;
import org.springframework.http.HttpEntity;
import org.springframework.http.HttpHeaders;
import org.springframework.http.MediaType;
import org.springframework.web.bind.annotation.RequestMapping;
import org.springframework.web.bind.annotation.RestController;
import org.springframework.web.client.RestTemplate;
import java.util.Collections;
import java.util.HashMap;
import java.util.Map;

@RestController
public class RibbonController {
/** 使用restTemplate访问restful接口简单粗暴,(url,requestMap,responseBean.class)
分别代表rest请求地址,请求参数,http响应转换被转换的对象类型
*/
    @Autowired
    RestTemplate restTemplate;

    /**
     * 用来测试是什么算法
     */
    @Autowired
    private LoadBalancerClient loadBalancer;

    /**
     * 用来测试用ribbon通过post调用服务
     * @return
     */
    @RequestMapping("/test1")
    public String test1(){
        try {
//          设置请求头
            HttpHeaders headers =new HttpHeaders();
            headers.setContentType(MediaType.APPLICATION_JSON);
            headers.setAccept(Collections.singletonList(MediaType.APPLICATION_JSON));

//          设置请求体
            Map map =new HashMap();
            map.put("receiveName", "2574405253@qq.com");
            map.put("title", "测试ribbon发送邮件");
            map.put("content", "ribbon hello");
            HttpEntity request = new HttpEntity(map,headers);
 				// getForEntity方法
            String result = restTemplate.postForObject("http://mail-center/test1", request, String.class);
            return result;
        } catch (Exception e) {
            e.printStackTrace();
            return "ERROR";
        }
    }

    /**
     * 用来测试时什么算法
     * @return
     */
    @RequestMapping("test2")
    public String Test2(){
        StringBuffer sb=new StringBuffer();
        for (int i = 0; i < 10; i++) {
            //从两个idServer中选择一个  这里涉及到选择算法
            ServiceInstance ss = loadBalancer.choose("mail-center");
            sb.append(ss.getUri().toString()+"<br/>");
        }
        return sb.toString();
    }

    @RequestMapping("test3")
    public String test3(String name){
   //     String forObject = restTemplate.getForObject("http://mail-center/test2/{name}", String.class,name);
     String forObject = restTemplate.getForObject("http://ribbon-center/test2/{name}", String.class,name);
        return forObject;
    }
}
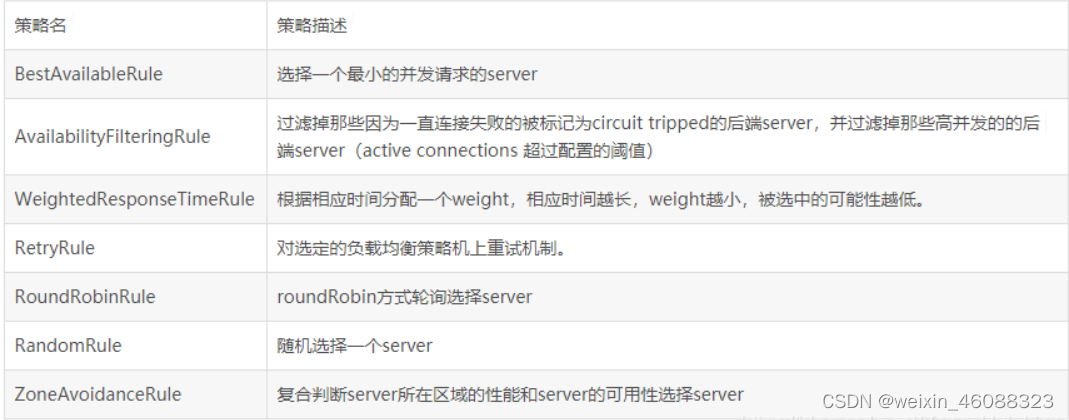
Ribbon的核心算法组件:IRule
Ribbon默认采用的是轮询算法,如果不想用轮询算法,下面我来介绍怎么使用其他的算法
在application.yml中加入配置文件
#配置算法
#被调用服务的名称
mail-center:
  ribbon:
   ***配置算法的名称,在这里我用的是随机的算法***
    NFLoadBalancerRuleClassName: com.netflix.loadbalancer.RandomRule
和
@Configuration
public class configBean{
    @LoadBalanced  //spring cloud ribbon是基于Netflix ribbon实现的一套客户端 负载均衡工具
    @Bean
    public  RestTemplate restTemplate() {
        return new RestTemplate();
    }
       @Bean
public  IRul myrul() {
        return new RandomRule();
    }

}
手写负载均衡算法:
1.配置类去掉注解@LoadBalanced
2.新建LoadBalance接口,收集eureka上活着的总数
public interface LoadBalancer{
	ServiceInstance instance(List<ServiceInstance> serviceInstances);
}
3.public class MyLB implements LoadBalancer{
private AtomicInteger atomicInteger = new AtomicInteger(0);
public final int getAndIncrement(){
int current;
int next;
do{
current = this.atomicInteger.get();
next = current >= 2147483647 ? 0 : current + 1;
}while(!this.atomicInteger.compareAndSet(current,next));
system.out.println(“第几次访问,次数:”+next);
return next;
}
@Override
public ServiceInstance instances(List<ServiceInstance> serviceInstances){
int index = getAndIncrement() % serviceInstances.size();
return serviceInstances.get(index );
}
}
4.修改controller
@Resource
private LoadBalancer loadBalancer;

@GetMapping(value = ""/consumer/payment/lb)
public String getPaymentLB(){
		List<ServiceInstance> instances = discoveryClient.getInstances("微服务名称");
		if(instances == null || instances.size() <= 0){return null;}
		ServiceInstance ServiceInstance = loadBalancer.instances(instances );
		URI uri = ServiceInstance .getUri();
		return resTemplate.getForObject(uri+"/payment/lb",String.class);
}
最后启动测试自己的负载均衡功能


 1221
1221

 被折叠的 条评论
为什么被折叠?
被折叠的 条评论
为什么被折叠?
 到【灌水乐园】发言


