


dev-tools依赖
使用这个依赖,修改项目或者依赖之后按 Ctrl + F9 即可重建项目,不用重新运行启动类。
<dependency>
      <groupId>org.springframework.boot</groupId>
      <artifactId>spring-boot-devtools</artifactId>
      <optional>true</optional>
</dependency>
项目初始化
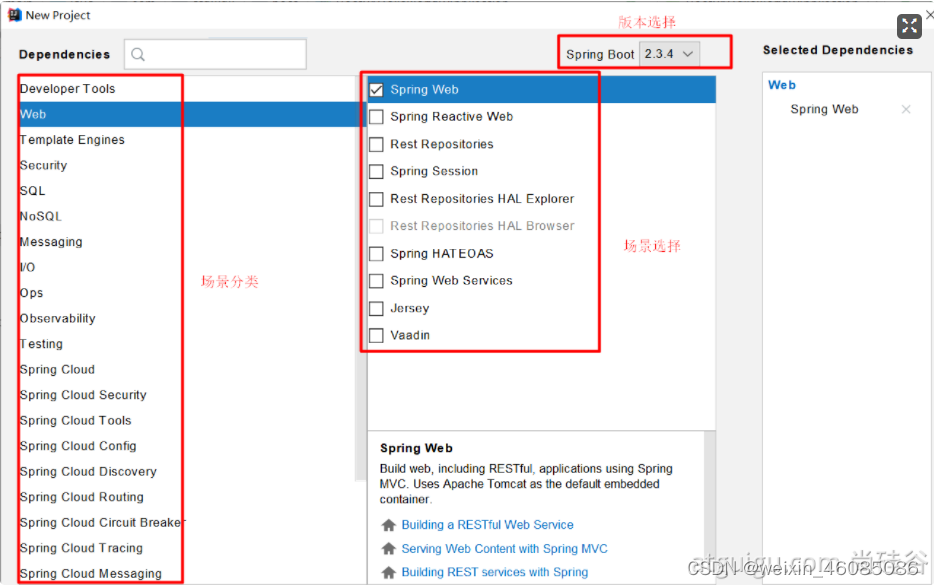
自动创建项目结构
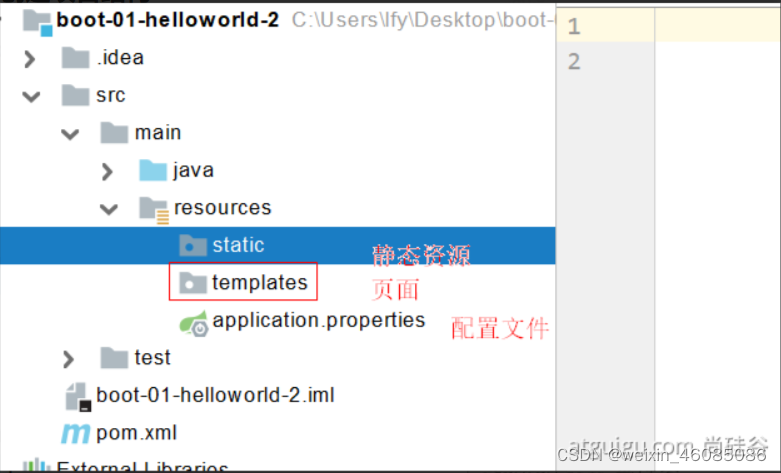
静态资源访问
静态资源目录
/META-INF/resources
/public
/static
/resources
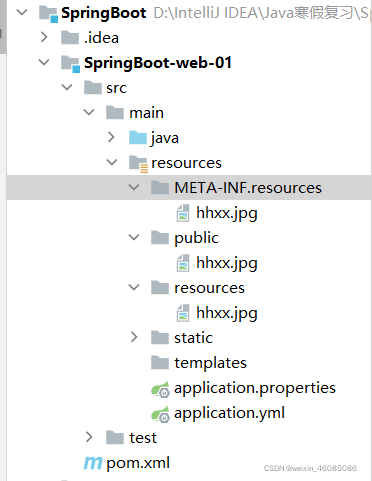
我们将静态资源放到这四个静态资源目录下面,访问静态资源时访问:
当前项目根路径/ + 静态资源名
例如:localhost:8080/hhxx.jpg
原理:静态映射/**
请求进来,先去找Controller看能不能处理。不能处理的所有请求又都交给静态资源处理器。静态资源也找不到则响应404页面
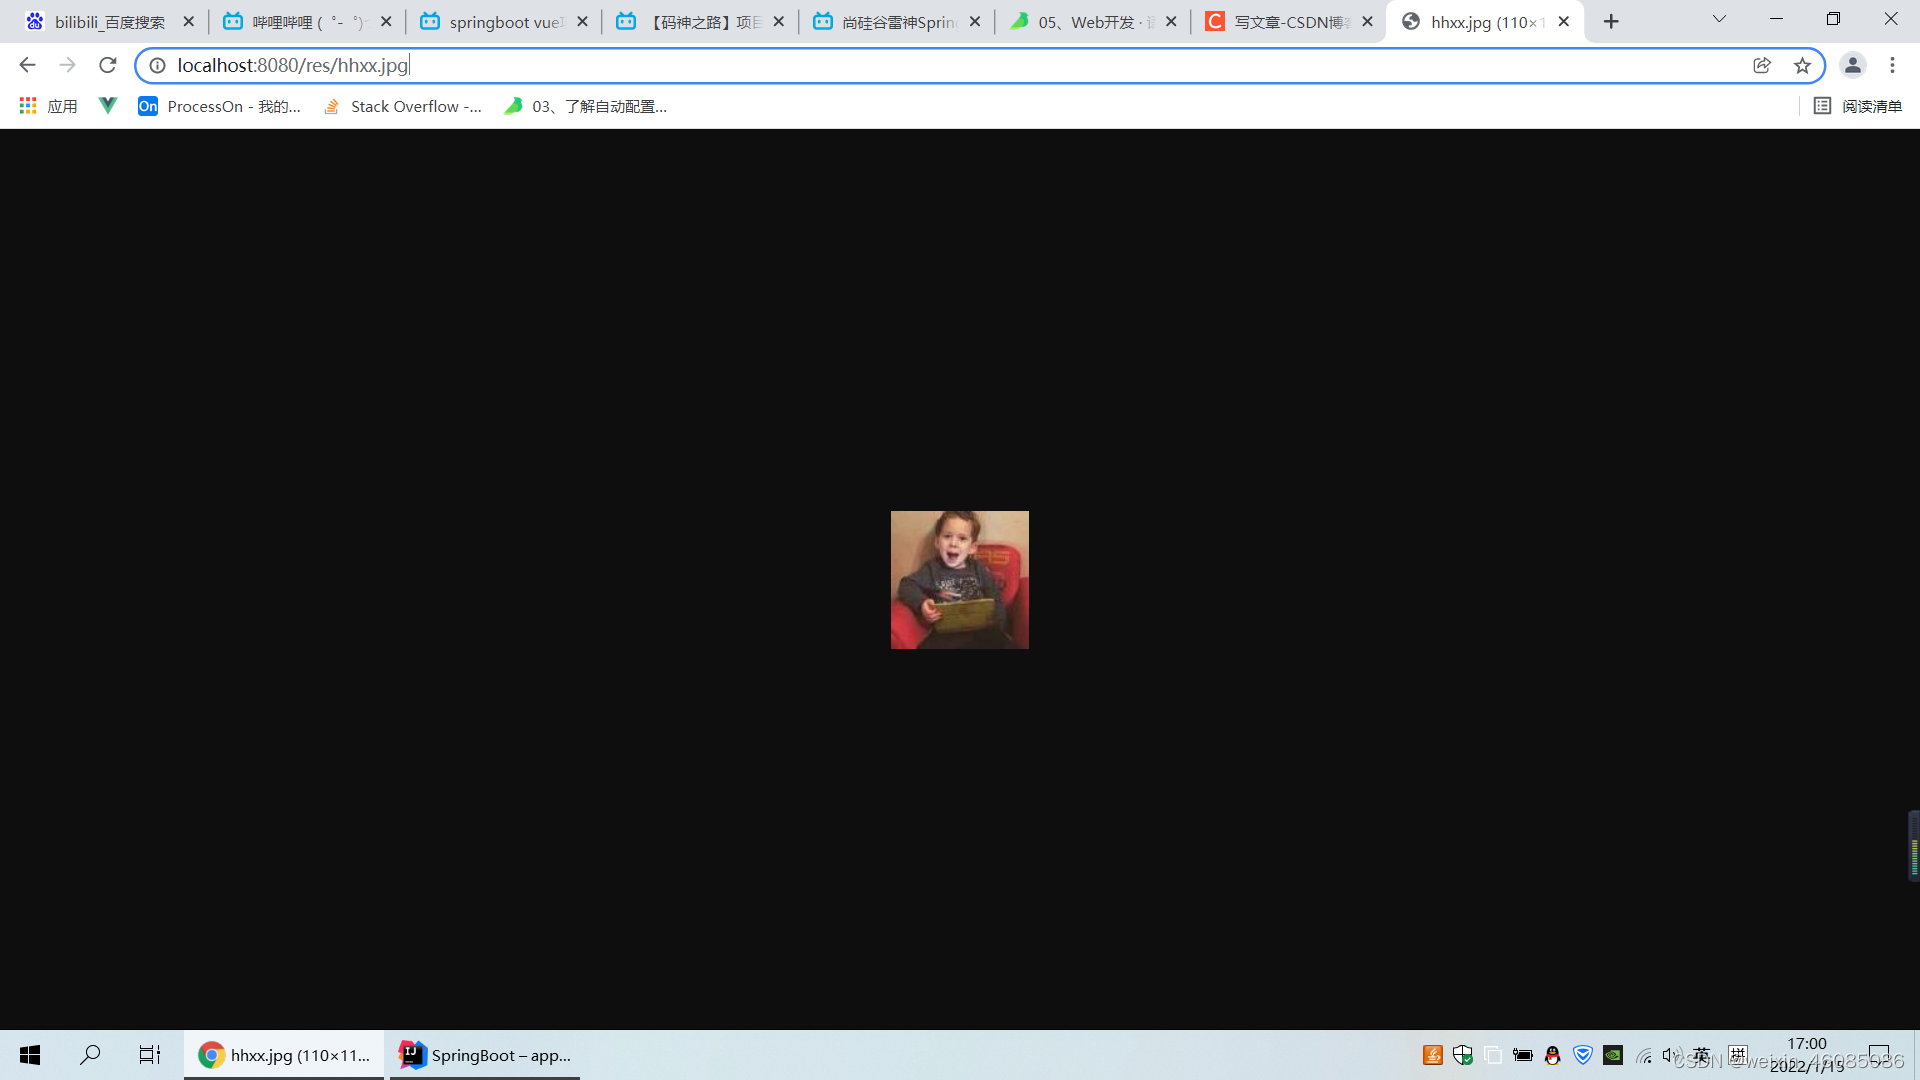
改变默认的静态资源路径
在application.yml中加入下面语句
spring:
  mvc:
    static-path-pattern: /res/**
再一次访问静态资源时,访问路径就变成
当前项目 + static-path-pattern + 静态资源名
例如:localhost:8080/res/hhxx.jpg
SpringBoot多环境配置
在Resources目录下创建多个.properties文件,对应多个环境
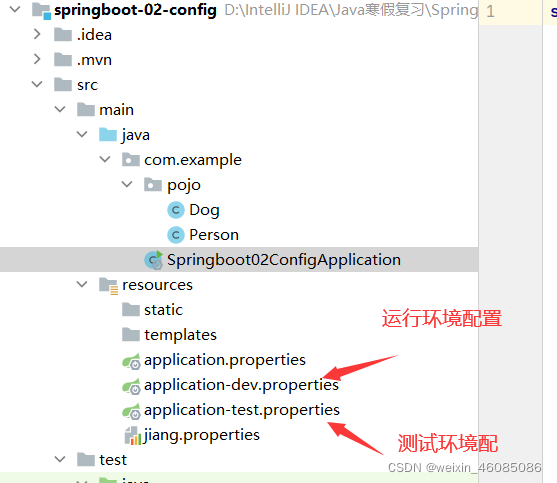
应对不同环境,使用不同配置
如果使用运行环境下的配置,使用语句,使用测试环境下的配置,将dev换成test即可。
spring.profiles.active=dev
application.properties 和 application.yaml不一样
使用application.yml使用以下写法:
server:
  port: 8080
spring:
  profiles:
    active: dev
---
server:
  port: 8081
spring:
  profiles: dev
---
server:
  port: 8082
spring:
  profiles: test
该语句表示使用dev环境下的配置。
SpringBoot启动扫描配置文件的优先级
优先级1:项目路径下config文件夹下的配置文件
优先级2:项目路径下的配置文件
优先级3:资源路径下config文件夹下的配置文件
优先级4:资源路径下的配置文件
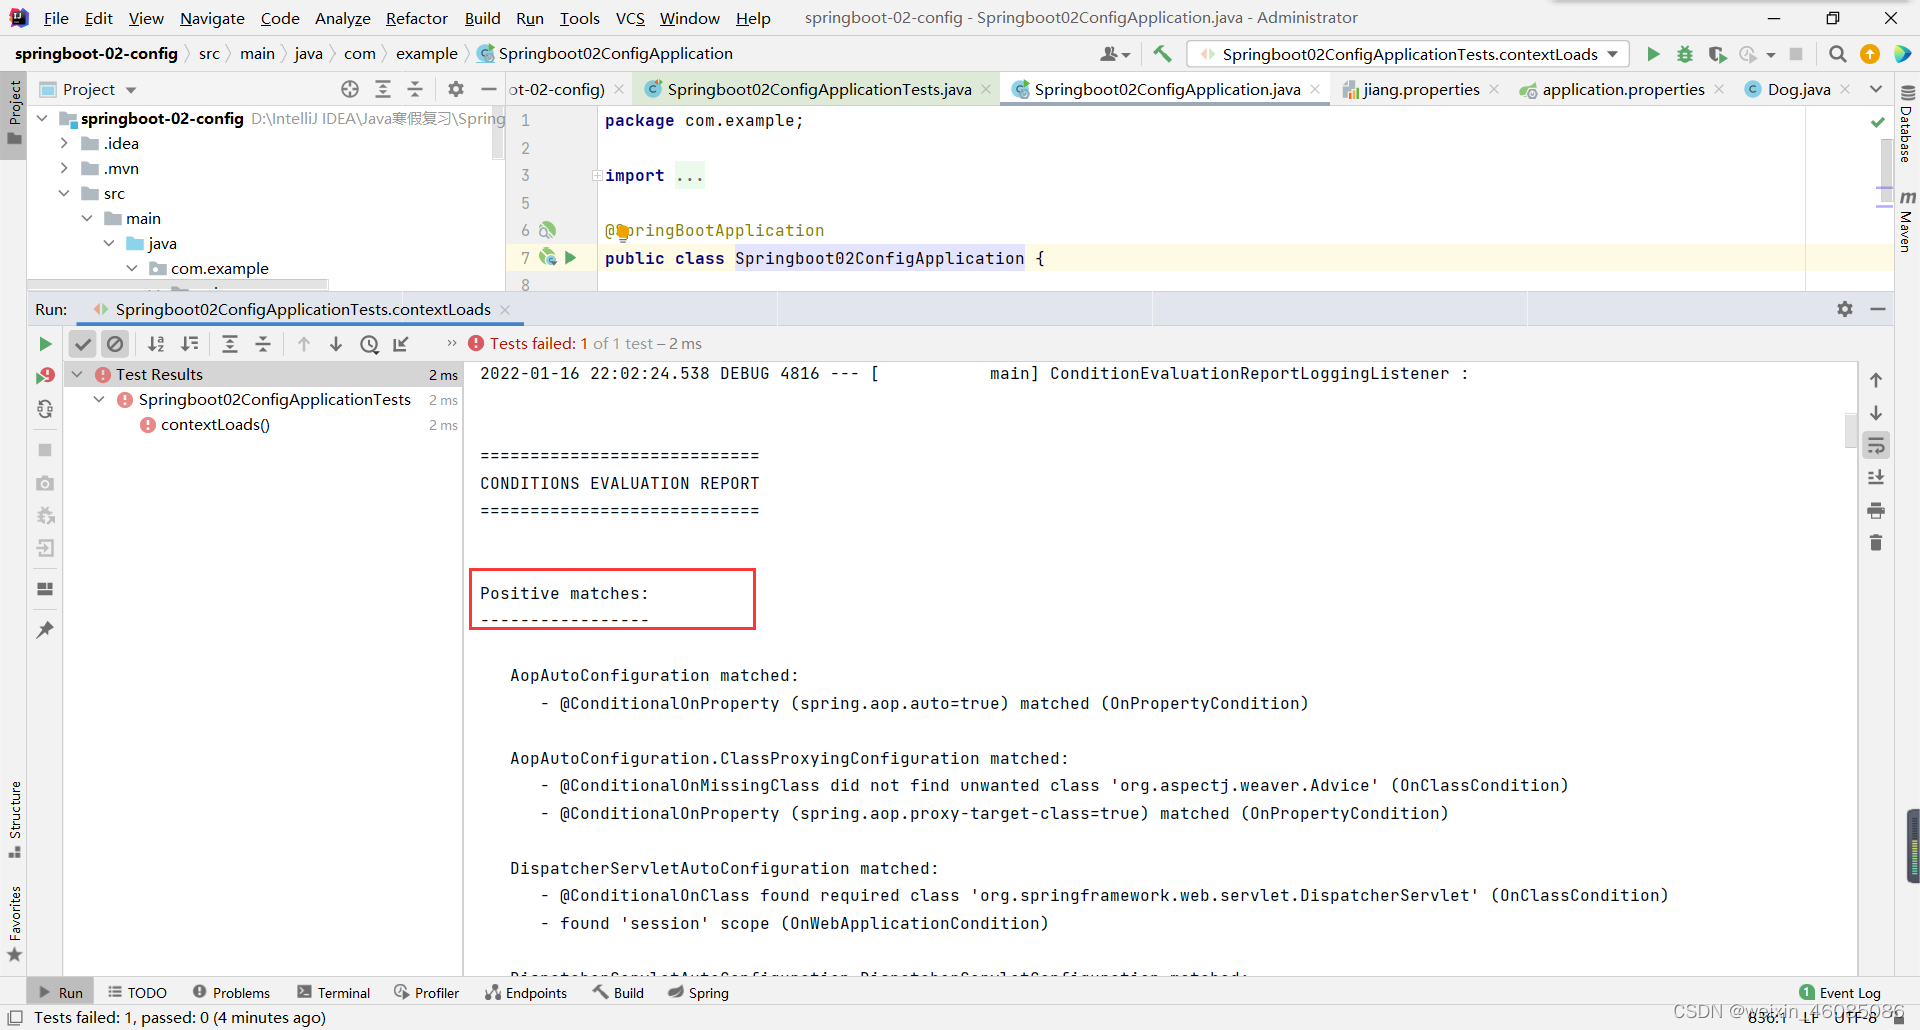
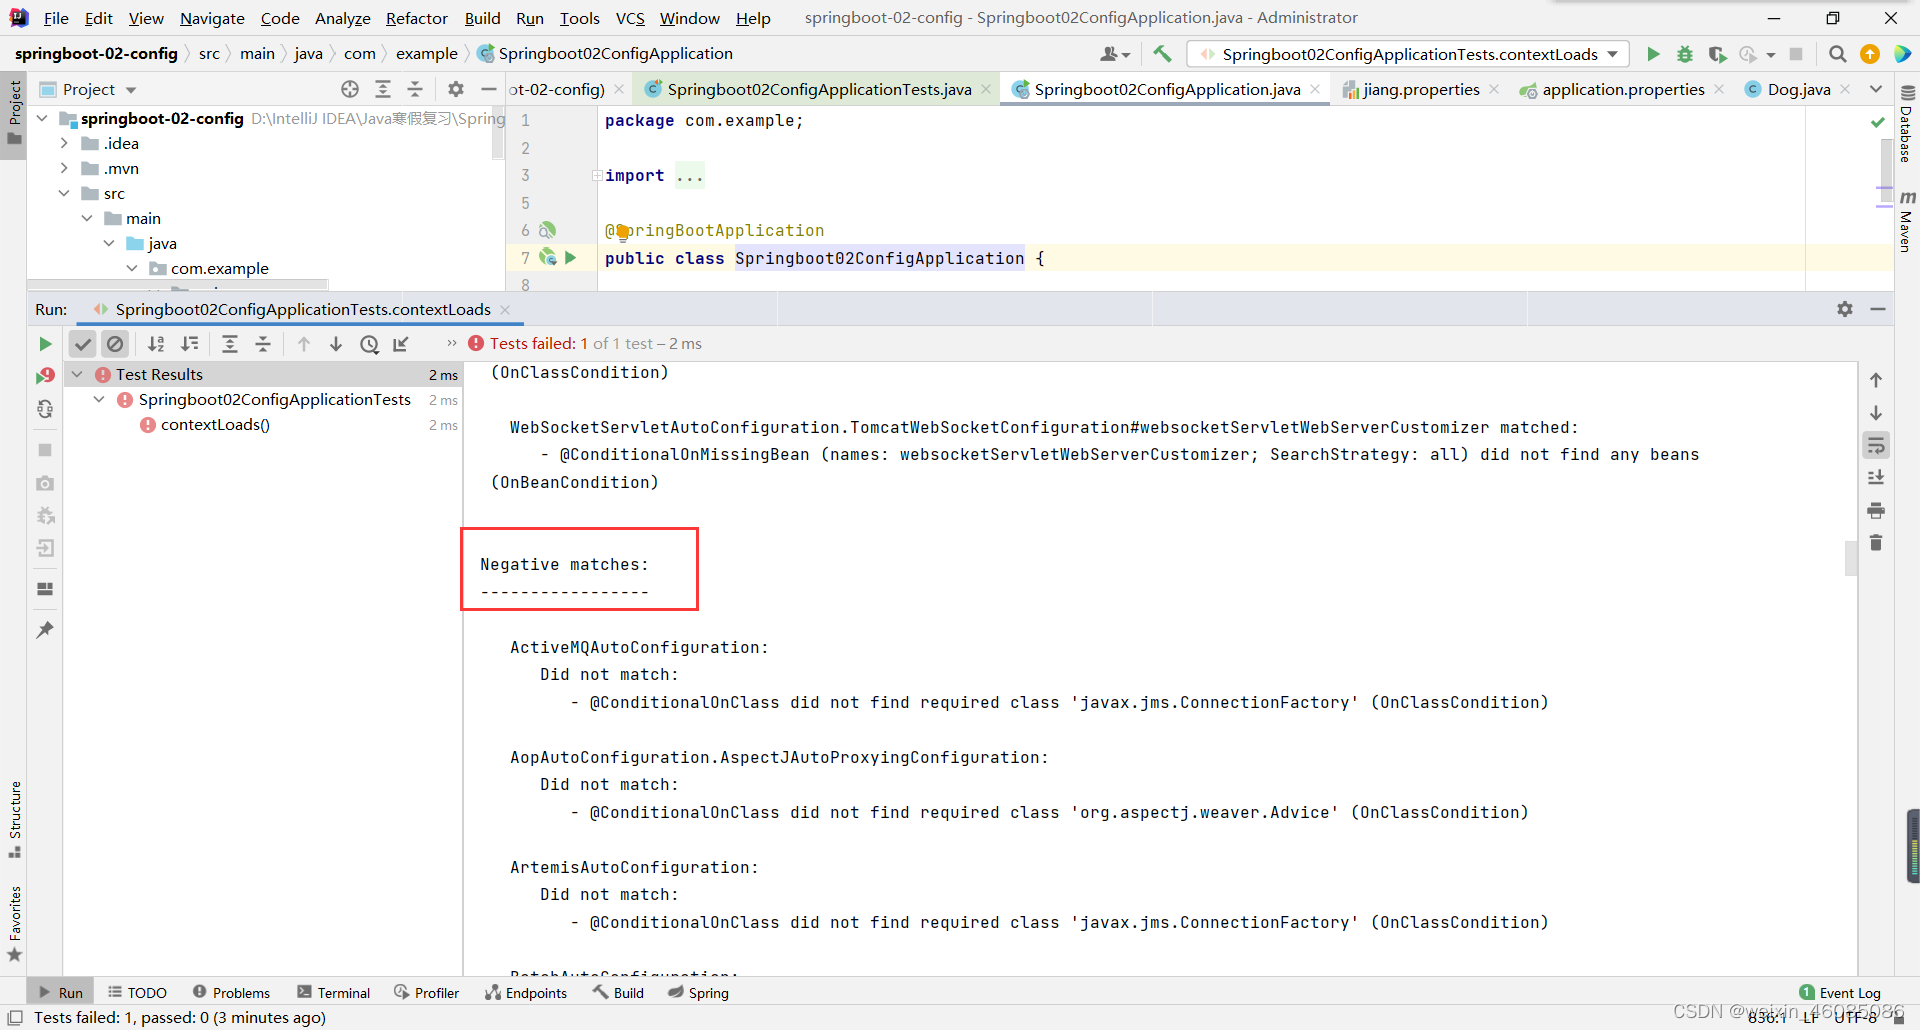
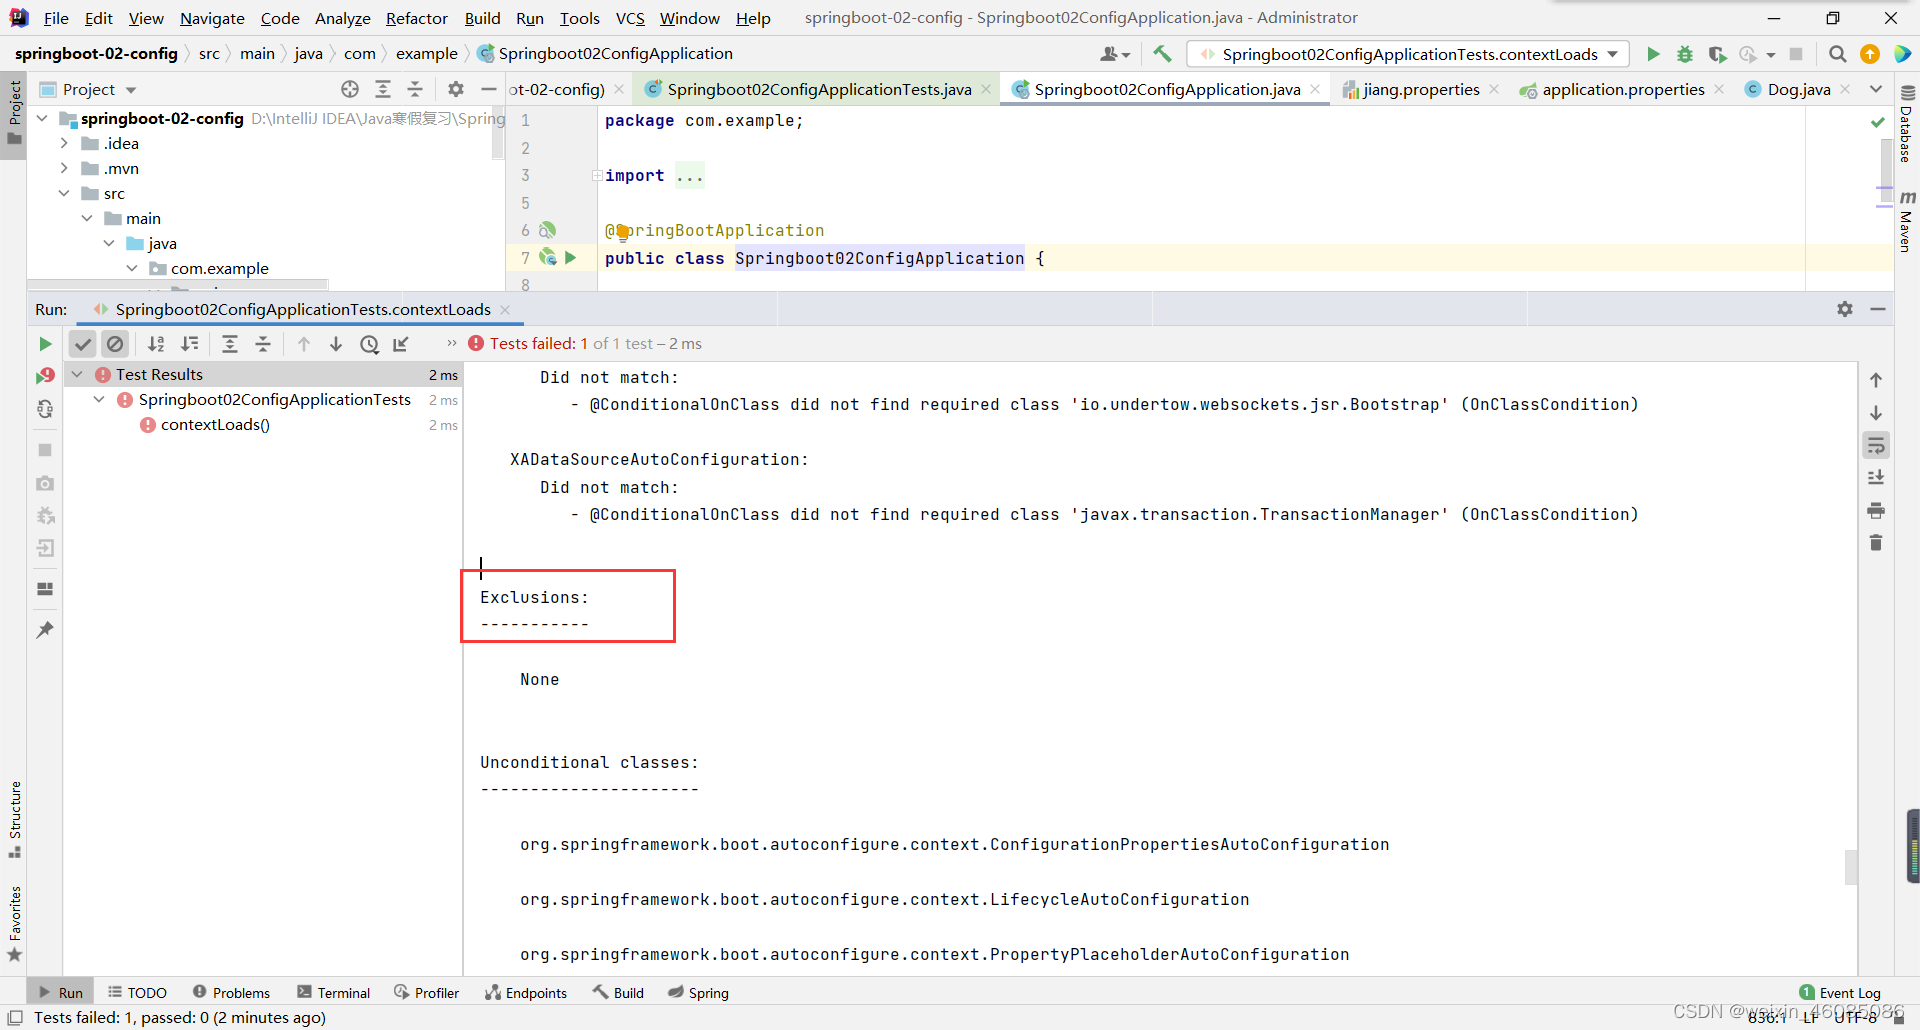
如何知道SpringBoot启动时哪些配置类生效
在配置文件中加入
debug = true
启动项目会有三个类别
生效的配置类:Positive matches:
未生效的配置类:Negative matches:
Exclusions
模板引擎Thymeleaf
什么是模板引擎?
前端交给我们的页面,是html页面。如果是我们以前开发,我们需要把他们转成jsp页面,jsp好处就是当我们查出一些数据转发到JSP页面以后,我们可以用jsp轻松实现数据的显示,及交互等。
jsp支持非常强大的功能,包括能写Java代码,但是呢,我们现在的这种情况,SpringBoot这个项目首先是以jar的方式,不是war,像第二,我们用的还是嵌入式的Tomcat,所以呢,他现在默认是不支持jsp的。
那不支持jsp,如果我们直接用纯静态页面的方式,那给我们开发会带来非常大的麻烦,那怎么办呢?
SpringBoot推荐使用模板引擎
模板引擎,我们其实大家听到很多,其实jsp就是一个模板引擎,还有用的比较多的freemarker,包括SpringBoot给我们推荐的Thymeleaf,模板引擎有非常多,但再多的模板引擎,他们的思想都是一样的,什么样一个思想呢我们来看一下这张图:
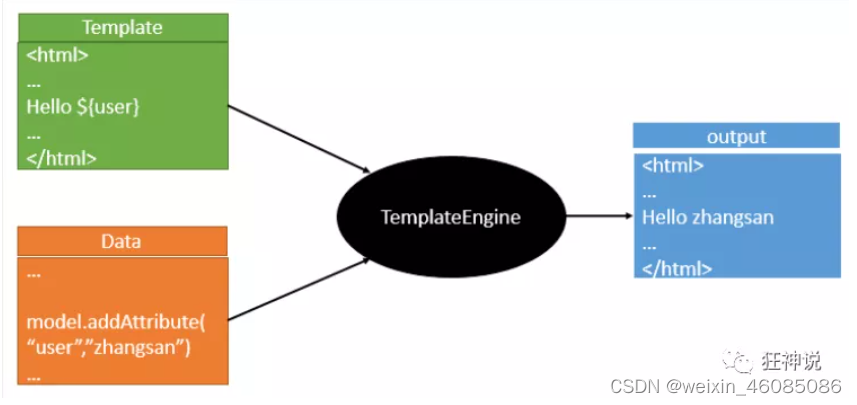
模板引擎的作用就是我们来写一个页面模板,比如有些值呢,是动态的,我们写一些表达式。而这些值,从哪来呢,就是我们在后台封装一些数据。然后把这个模板和这个数据交给我们模板引擎,模板引擎按照我们这个数据帮你把这表达式解析、填充到我们指定的位置,然后把这个数据最终生成一个我们想要的内容给我们写出去,这就是我们这个模板引擎,不管是jsp还是其他模板引擎,都是这个思想。只不过呢,就是说不同模板引擎之间,他们可能这个语法有点不一样。其他的我就不介绍了,我主要来介绍一下SpringBoot给我们推荐的Thymeleaf模板引擎,这模板引擎呢,是一个高级语言的模板引擎,他的这个语法更简单。而且呢,功能更强大。
我们呢,就来看一下这个模板引擎,那既然要看这个模板引擎。首先,我们来看SpringBoot里边怎么用。
1、引入Thymeleaf
<!--thymeleaf-->
<dependency>
    <groupId>org.springframework.boot</groupId>
    <artifactId>spring-boot-starter-thymeleaf</artifactId>
</dependency>
Maven会自动下载jar包,我们可以去看下下载的东西;

2、Thymeleaf分析
前面呢,我们已经引入了Thymeleaf,那这个要怎么使用呢?
我们首先得按照SpringBoot的自动配置原理看一下我们这个Thymeleaf的自动配置规则,在按照那个规则,我们进行使用。
我们去找一下Thymeleaf的自动配置类:ThymeleafProperties
@ConfigurationProperties(prefix = "spring.thymeleaf")
public class ThymeleafProperties {
    private static final Charset DEFAULT_ENCODING;
    public static final String DEFAULT_PREFIX = "classpath:/templates/";
    public static final String DEFAULT_SUFFIX = ".html";
    private boolean checkTemplate = true;
    private boolean checkTemplateLocation = true;
    private String prefix = "classpath:/templates/";
    private String suffix = ".html";
    private String mode = "HTML";
    private Charset encoding;
}
我们可以在其中看到默认的前缀和后缀!
我们只需要把我们的html页面放在类路径下的templates下,thymeleaf就可以帮我们自动渲染了。
使用thymeleaf什么都不需要配置,只需要将他放在指定的文件夹下即可!
3、测试
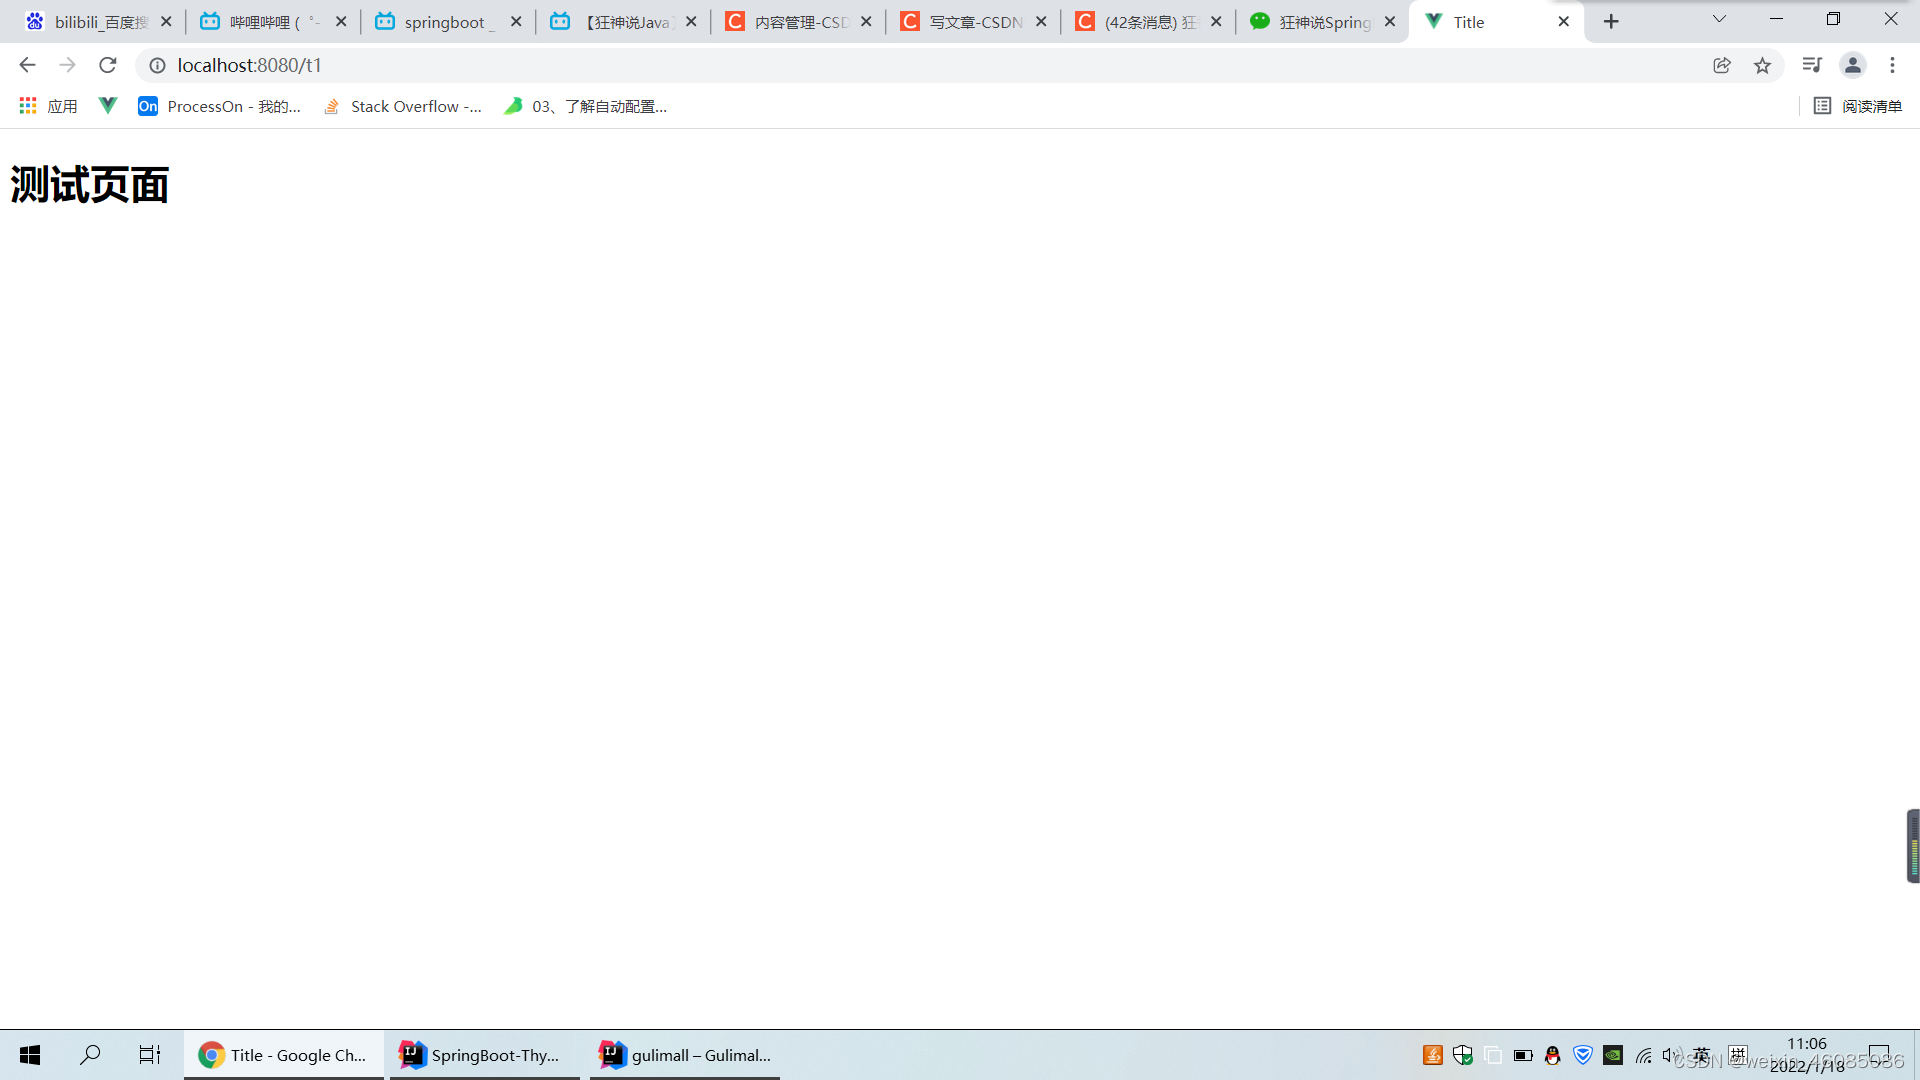
1、编写一个testController
@Controller
public class TestController {

    @RequestMapping("/t1")
    public String test(){
        return "test";
    }
}
2、编写一个测试页面test.html放在templates 目录下
<!DOCTYPE html>
<html lang="en">
<head>
    <meta charset="UTF-8">
    <title>Title</title>
</head>
<body>
<h1>测试页面</h1>
</body>
</html>
3、启动项目请求测试
Thymeleaf语法学习
主要学习查看Thymeleaf官方文档:https://www.thymeleaf.org/
练习:查出一些数据,在页面显示出来
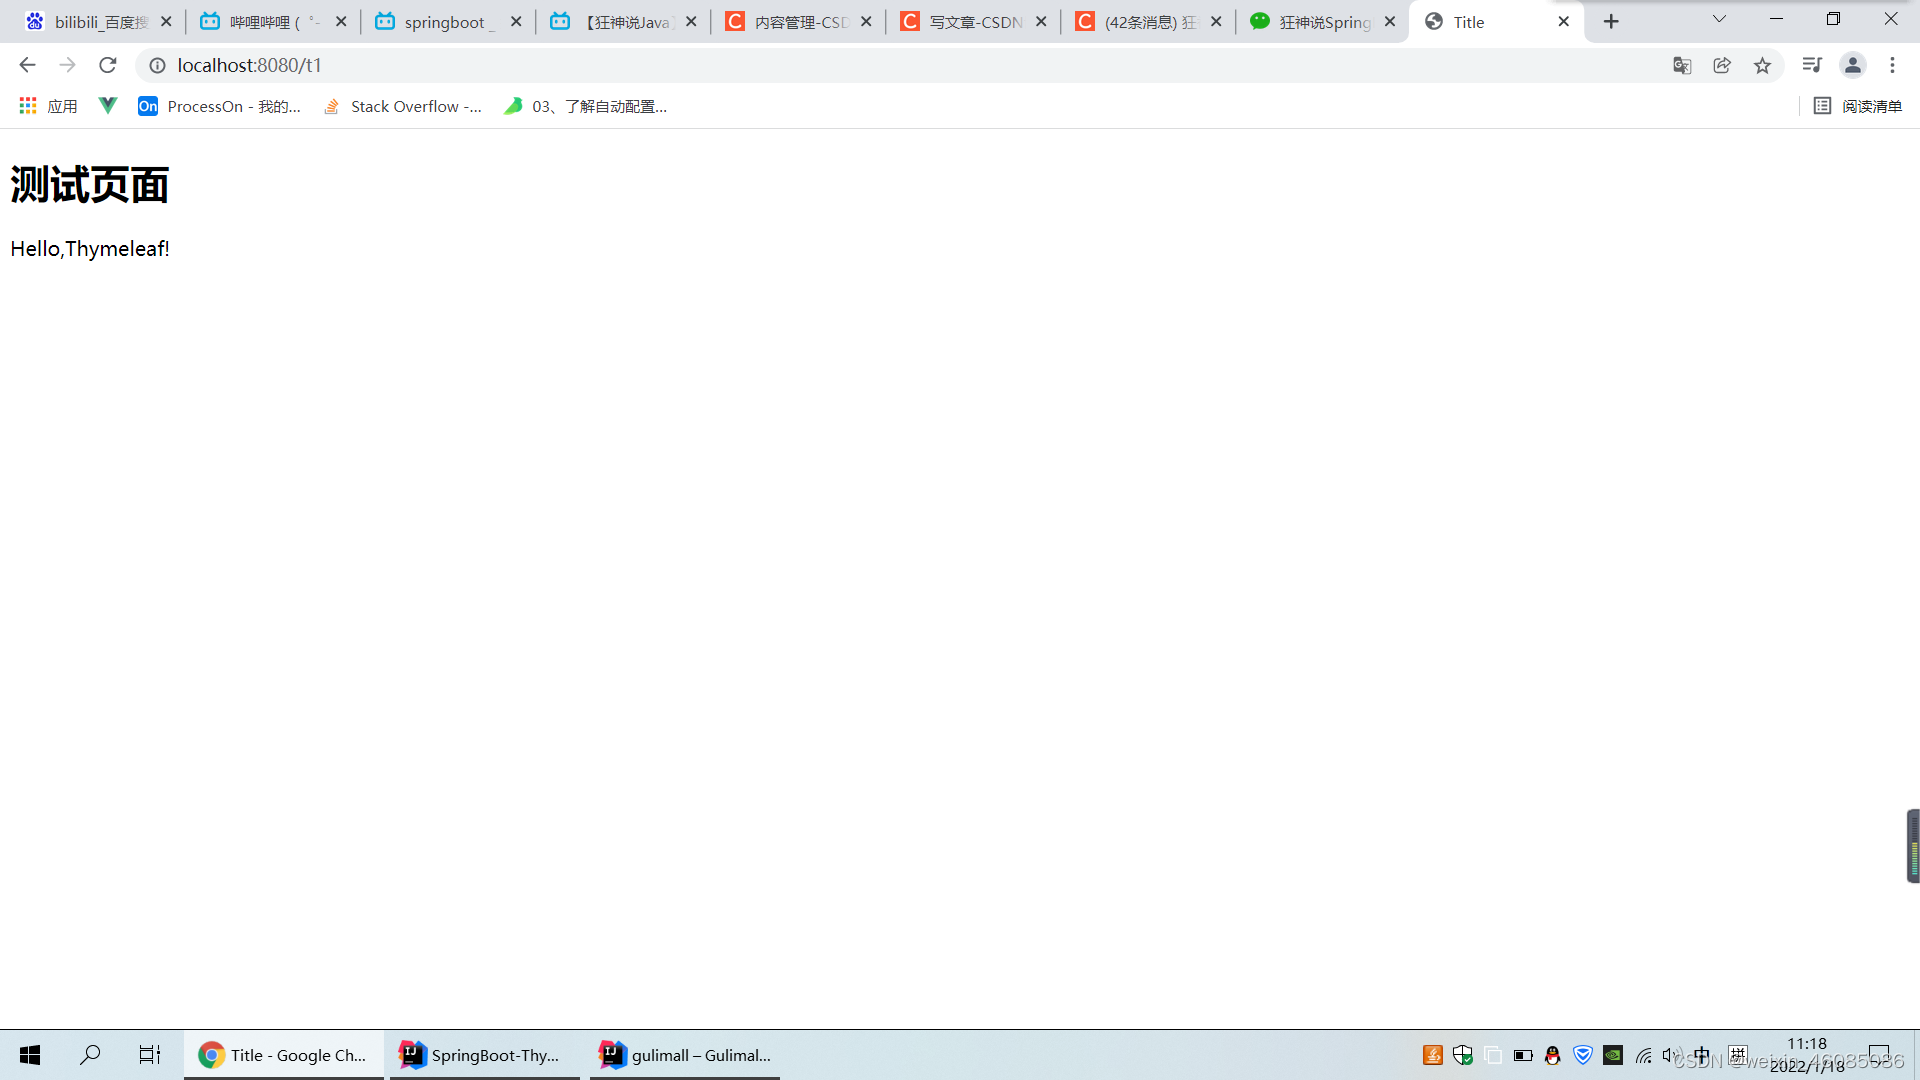
1、修改testController,增加数据传输
@Controller
public class TestController {

    @RequestMapping("/t1")
    public String test(Model model){
        model.addAttribute("msg","Hello,Thymeleaf!");
        return "test";   // classpath:/templates/test.html
    }
}
2、要使用Thymeleaf,需要在html文件中导入命名空间的约束。
xmlns:th="http://www.thymeleaf.org"
3、修改test.html
<!DOCTYPE html>
<html lang="en" xmlns:th="http://www.thymeleaf.org">
<head>
    <meta charset="UTF-8">
    <title>Title</title>
</head>
<body>
<h1>测试页面</h1>
<!--/*@thymesVar id="msg" type=""*/-->
<div th:text="${msg}"></div>
</body>
</html>
4、启动测试
练习
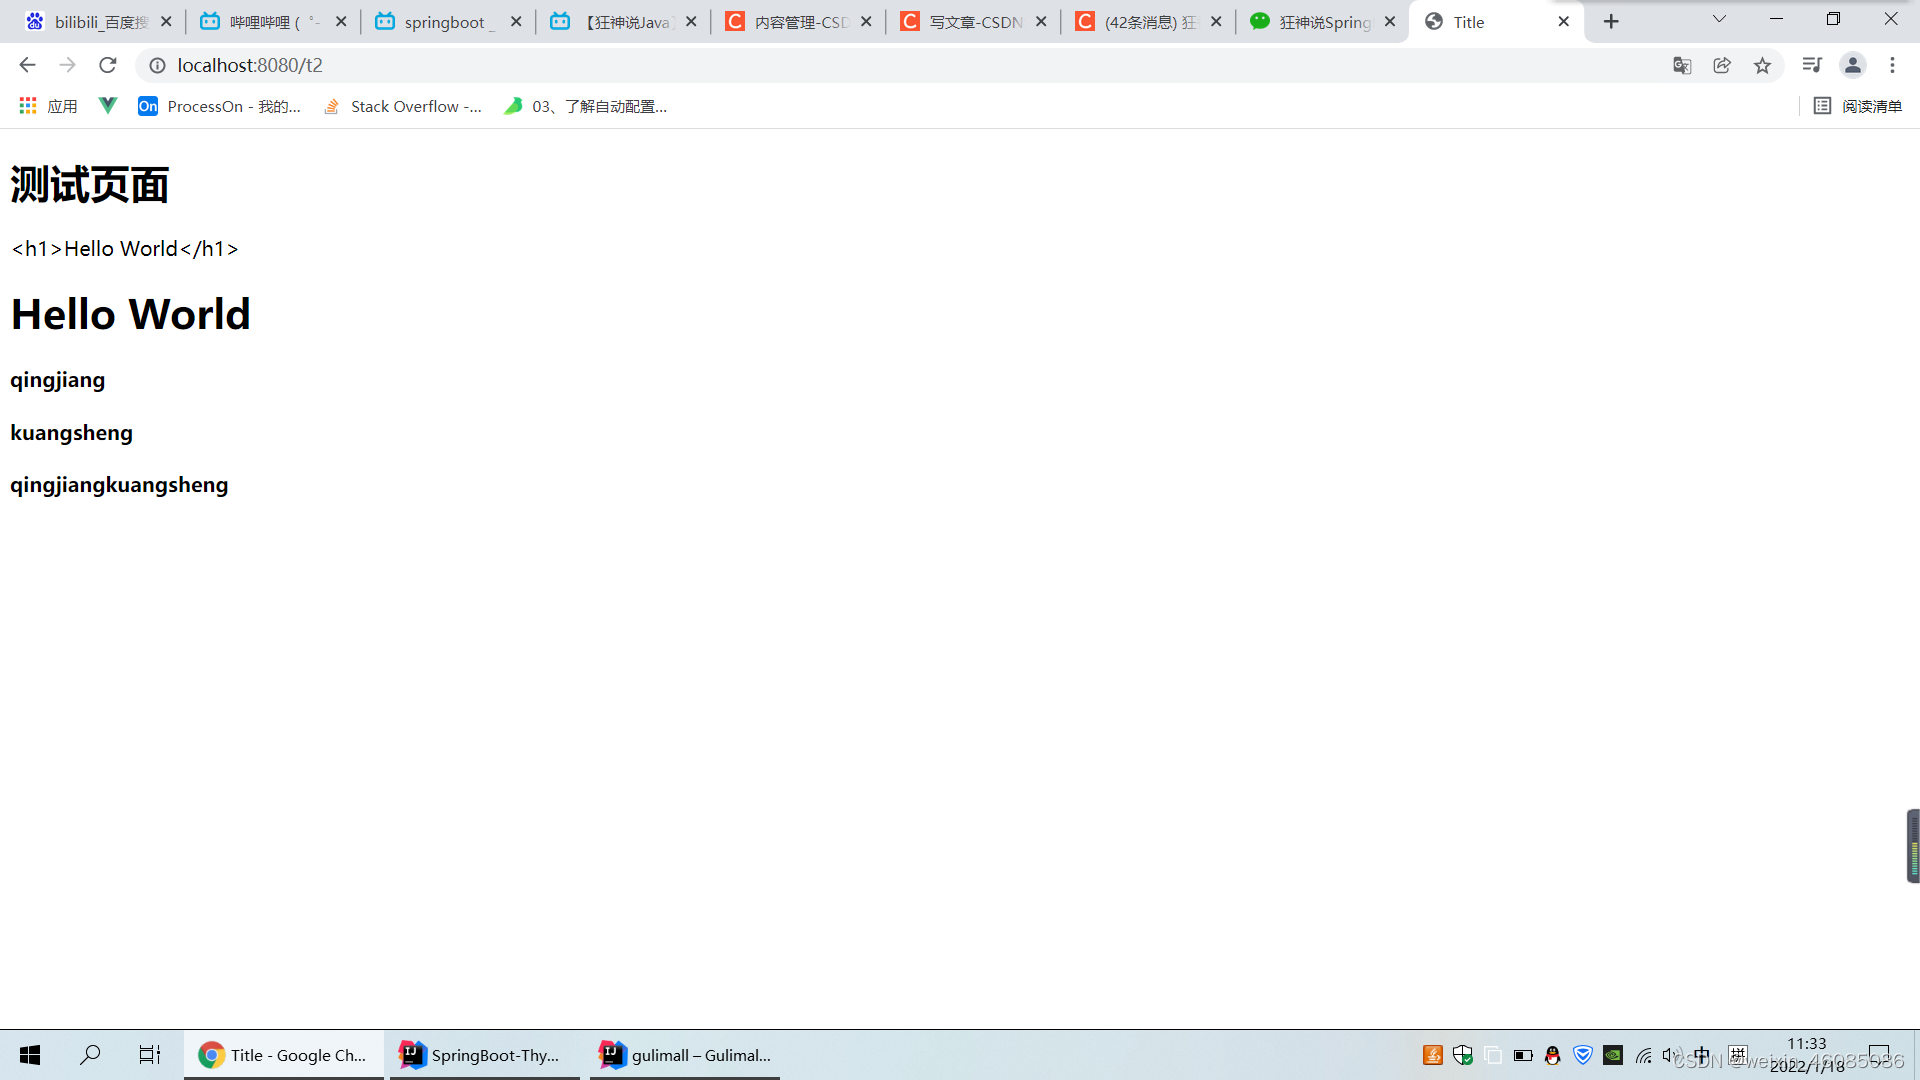
1、编写cntroller
   @RequestMapping("/t2")
    public String test2(Map<String,Object> map){
        map.put("msg","<h1>Hello World</h1>");
        map.put("users", Arrays.asList("qingjiang","kuangsheng"));
        return "test";
    }
2、编写test.html
<!DOCTYPE html>

<html lang="en" xmlns:th="http://www.thymeleaf.org">
<head>
    <meta charset="UTF-8">
    <title>Title</title>
</head>
<body>
<h1>测试页面</h1>
<!--/*@thymesVar id="msg" type=""*/-->
<div th:text="${msg}"></div>
<div th:utext="${msg}"></div>
<!DOCTYPE html>

<!--遍历数据-->
<!--th:each每次遍历都会生成当前这个标签-->
<!--/*@thymesVar id="users" type=""*/-->
<h4 th:each="user :${users}" th:text="${user}"></h4>

<h4>
    <!--行内写法:官网#12-->
    <span th:each="user:${users}">[[${user}]]</span>
</h4>
</body>
</html>
3、启动测试


 1366
1366

 被折叠的 条评论
为什么被折叠?
被折叠的 条评论
为什么被折叠?
 到【灌水乐园】发言


