


(实验准备redis软件包和redis-gem包)

- set:存放数据,基本格式:set key value
- get:获取数据,基本格式:get key

*共计最少6台虚拟机登录数据库,使用redis-cli命令
#redis-cli
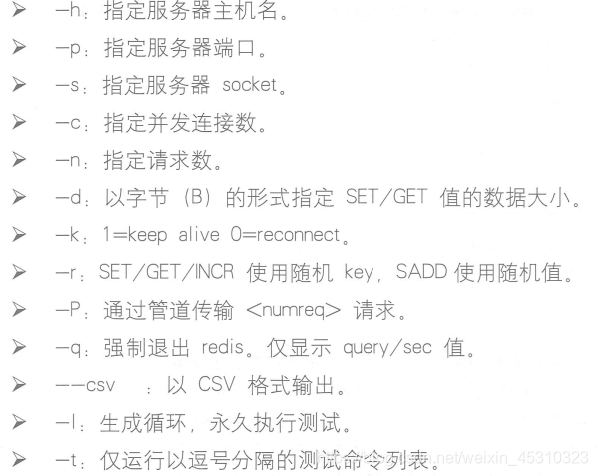
#redis-benchmark -h 192.168.1.1 -p 6379 -c 100 -n 100000
#redis-benchmark -h 192.168.1.1 -p 6379 -q -d 100
# redis-benchmark -t set,lpush -n 100000 -q
redis数据库常用命令
set 存放数据
get 获取数据
rename 重命名
del 删除
select 多数据库切换如:127.0.0.1:6379[10]>切换到序号10的数据库
move 移动 将10数据库的1移动到2中
1号机#
#vim ip.sh
#!/bin/bash
sed -i 's/BOOTPROTO=dhcp/BOOTPROTO=static/g' /etc/sysconfig/network-scripts/ifcfg-ens33
cat >> /etc/sysconfig/network-scripts/ifcfg-ens33 << end
IPADDR=192.168.1.1
DNS1=192.168.1.1
end
ifdown ens33;ifup ens33号机
systemctl stop firewalld
systemctl disable firewalld
setenforce 0
保存退出
#sh ip.sh
2 号机#
#vim ip.sh
#!/bin/bash
sed -i 's/BOOTPROTO=dhcp/BOOTPROTO=static/g' /etc/sysconfig/network-scripts/ifcfg-ens33
cat >> /etc/sysconfig/network-scripts/ifcfg-ens33 << end
IPADDR=192.168.1.2
DNS1=192.168.1.2
end
ifdown ens33;ifup ens33号机
systemctl stop firewalld
systemctl disable firewalld
setenforce 0
保存退出
#sh ip.sh
3号机#
#vim ip.sh
#!/bin/bash
sed -i 's/BOOTPROTO=dhcp/BOOTPROTO=static/g' /etc/sysconfig/network-scripts/ifcfg-ens33
cat >> /etc/sysconfig/network-scripts/ifcfg-ens33 << end
IPADDR=192.168.1.3
DNS1=192.168.1.3
end
ifdown ens33;ifup ens33号机
systemctl stop firewalld
systemctl disable firewalld
setenforce 0
保存退出
#sh ip.sh
4号机#
#vim ip.sh
#!/bin/bash
sed -i 's/BOOTPROTO=dhcp/BOOTPROTO=static/g' /etc/sysconfig/network-scripts/ifcfg-ens33
cat >> /etc/sysconfig/network-scripts/ifcfg-ens33 << end
IPADDR=192.168.1.4
DNS1=192.168.1.4
end
ifdown ens33;ifup ens33号机
systemctl stop firewalld
systemctl disable firewalld
setenforce 0
保存退出
#sh ip.sh
5号机#
#vim ip.sh
#!/bin/bash
sed -i 's/BOOTPROTO=dhcp/BOOTPROTO=static/g' /etc/sysconfig/network-scripts/ifcfg-ens33
cat >> /etc/sysconfig/network-scripts/ifcfg-ens33 << end
IPADDR=192.168.1.5
DNS1=192.168.1.5
end
ifdown ens33;ifup ens33号机
systemctl stop firewalld
systemctl disable firewalld
setenforce 0
保存退出
#sh ip.sh
6号机#
#vim ip.sh
#!/bin/bash
sed -i 's/BOOTPROTO=dhcp/BOOTPROTO=static/g' /etc/sysconfig/network-scripts/ifcfg-ens33
cat >> /etc/sysconfig/network-scripts/ifcfg-ens33 << end
IPADDR=192.168.1.6
DNS1=192.168.1.6
end
ifdown ens33;ifup ens33号机
systemctl stop firewalld
systemctl disable firewalld
setenforce 0
保存退出
#sh ip.sh
在6台centos中安装redis,修改配置文件,启用群集功能
(1)复制redis包到所有主机的/usr/src下
(2)通过脚本安装并配置群集redis
1号机#
#vim redis.sh
#!/bin/bash
cd /usr/src
tar zxf redis-3.2.9.tar.gz
cd redis-3.2.9/
make && make install
cd utils/
./install_server.sh
sed -i "s/bind 127.0.0.1/bind 192.168.1.1/g" /etc/redis/6379.conf
cat >> /etc/redis/6379.conf << end
cluster-enabled yes
cluster-config-file nodes-6379.conf
cluster-node-timeout 15000
cluster-require-full-coverage no
end
/etc/init.d/redis_6379 restart
保存退出
sh redis.sh
2号机#
#vim redis.sh
#!/bin/bash
cd /usr/src
tar zxf redis-3.2.9.tar.gz
cd redis-3.2.9/
make && make install
cd utils/
./install_server.sh
sed -i "s/bind 127.0.0.1/bind 192.168.1.2/g" /etc/redis/6379.conf
cat >> /etc/redis/6379.conf << end
cluster-enabled yes
cluster-config-file nodes-6379.conf
cluster-node-timeout 15000
cluster-require-full-coverage no
end
/etc/init.d/redis_6379 restart
保存退出
sh redis.sh
3号机#
vim redis.sh
#!/bin/bash
cd /usr/src
tar zxf redis-3.2.9.tar.gz
cd redis-3.2.9/
make && make install
cd utils/
./install_server.sh
sed -i "s/bind 127.0.0.1/bind 192.168.1.3/g" /etc/redis/6379.conf
cat >> /etc/redis/6379.conf << end
cluster-enabled yes
cluster-config-file nodes-6379.conf
cluster-node-timeout 15000
cluster-require-full-coverage no
end
/etc/init.d/redis_6379 restart
保存退出
sh redis.sh
4号机#
vim redis.sh
#!/bin/bash
cd /usr/src
tar zxf redis-3.2.9.tar.gz
cd redis-3.2.9/
make && make install
cd utils/
./install_server.sh
sed -i "s/bind 127.0.0.1/bind 192.168.1.4/g" /etc/redis/6379.conf
cat >> /etc/redis/6379.conf << end
cluster-enabled yes
cluster-config-file nodes-6379.conf
cluster-node-timeout 15000
cluster-require-full-coverage no
end
/etc/init.d/redis_6379 restart
保存退出
sh redis.sh
5号机#
vim redis.sh
#!/bin/bash
cd /usr/src
tar zxf redis-3.2.9.tar.gz
cd redis-3.2.9/
make && make install
cd utils/
./install_server.sh
sed -i "s/bind 127.0.0.1/bind 192.168.1.5/g" /etc/redis/6379.conf
cat >> /etc/redis/6379.conf << end
cluster-enabled yes
cluster-config-file nodes-6379.conf
cluster-node-timeout 15000
cluster-require-full-coverage no
end
/etc/init.d/redis_6379 restart
保存退出
sh redis.sh
6号机#
vim redis.sh
#!/bin/bash
cd /usr/src
tar zxf redis-3.2.9.tar.gz
cd redis-3.2.9/
make && make install
cd utils/
./install_server.sh
sed -i "s/bind 127.0.0.1/bind 192.168.1.6/g" /etc/redis/6379.conf
cat >> /etc/redis/6379.conf << end
cluster-enabled yes
cluster-config-file nodes-6379.conf
cluster-node-timeout 15000
cluster-require-full-coverage no
end
/etc/init.d/redis_6379 restart
保存退出
sh redis.sh
1号机# ( 创建集群配置yum,安装ruby、rubygems)
#mount /dev/cdrom /mnt
#cd /etc/yum.repos.d/
#ls (默认将第一个备份为Centos-Base.repo.bak)
#mv Centos-Base.repo Centos-Base.repo.bak
#vim Centos-Base.repo
【a】
baseurl=file:///mnt
gpgcheck=0 (ESC:wq)保存退出
#yum clean all (清除缓存)
#yum -y install ruby rubygems
#cd /usr/src
#gem install redis --version 3.2.0
#cd redis-3.2.9/src/ 创建群集
#./redis-trib.rb create --replicas 1 192.168.1.1:6379 192.168.1.2:6379 192.168.1.3:6379 192.168.1.4:6379 192.168.1.5:6379 192.168.1.6:6379
#./redis-trib.rb check 192.168.1.1:6379 //查看集群状态
#netstat -anput | grep redis
#redis-cli -h 192.168.1.1 -p 6379 -c
>set centos 7.3
>get centos
(出现7.3)


 547
547

 被折叠的 条评论
为什么被折叠?
被折叠的 条评论
为什么被折叠?
 到【灌水乐园】发言


