


跑 官方示例 发现不是动态batch,想改成动态batch过程中碰到了一些问题,以下为整个流程。
1. 将模型文件导出为onnx文件,需要添加dynamic_axes选项,我这里是动态batch,第0维度设置为动态,命名为bs。此外输入输出也需要命名,我这里是输入为input,输出为output,后面要用。
# input
BATCH_SIZE=32
dummy_input=torch.randn(BATCH_SIZE, 3, 224, 224)

# export the model to ONNX
input_name = 'input'
output_names= "output"

torch.onnx.export(resnet50, dummy_input, "resnet50_pytorch.onnx", input_names=[input_name], output_names=[output_names], dynamic_axes = {input_name:{0: "bs"}, output_names:{0:"bs"}} )
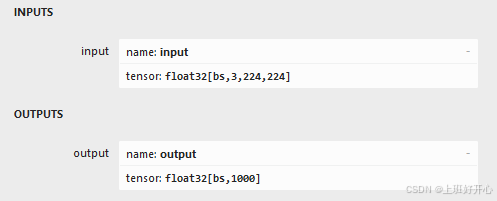
2. 导出后可通过可视化平台查看是否有误,可视化平台,右侧菜单如下
3. 将onnx转成trt模型,指令如下
trtexec --onnx=resnet50_pytorch.onnx --saveEngine=resnet_engine_pytorch.trt --inputIOFormats=fp16:chw --outputIOFormats=fp16:chw --minShapes=input:1x3x224x224 --optShapes=input:32x3x224x224 --maxShapes=input:64x3x224x224 --fp16
参数说明:
- minShapes、optShapes、maxShapes: 分别是最小、推理常用、最大的尺寸,使用动态batch就意味着是显式批处理,并且高版本TensorRT(10.0之后)隐式batch已经被删除,其中的input就是步骤2中设置的名称。
- inputIOFormats、outputIOFormats: 输入与输出的数据类型,这里均为fp16,要与自己的输入类型匹配,否则结果会出错,如我输入的是fp16的numpy array,但是没有加这个选项,结果就会出错,默认为fp32,如果输入也是默认的类型,则不用加这个选项
- fp16: 推理时模型的精度
4. 推理阶段
- (1)创建引擎与上下文
import tensorrt as trt
import pycuda.driver as cuda
import pycuda.autoinit

f = open("resnet_engine_pytorch.trt", "rb")
runtime = trt.Runtime(trt.Logger(trt.Logger.WARNING))

engine = runtime.deserialize_cuda_engine(f.read())
context = engine.create_execution_context()
创建引擎后可通过下面的查看是否为动态batch:
context.get_tensor_shape("input")
结果如下:

- (2)分配显存
# 最大batch 与 数据类型
MAX_BATCH_SIZE = 32
target_dtype = np.float16

# 计算最大batch对应的显存大小
dynamic_input_dim = np.array(engine.get_tensor_shape("input"))
dynamic_output_dim = np.array(engine.get_tensor_shape("output"))
dynamic_input_dim[0] = MAX_BATCH_SIZE
dynamic_output_dim[0] = MAX_BATCH_SIZE
max_input = np.empty(dynamic_input_dim, dtype=target_dtype)
max_output = np.empty(dynamic_output_dim, dtype=target_dtype)

max_input_memory = max_input.nbytes
max_output_memory = max_output.nbytes


# 根据最大的BATCH_SIZE分配显存
d_input = cuda.mem_alloc(1 * max_input_memory)
d_output = cuda.mem_alloc(1 * max_output_memory)

# 将分配的显存地址分配给输入输出buffer
context.set_tensor_address(engine.get_tensor_name(0), int(d_input))
context.set_tensor_address(engine.get_tensor_name(1), int(d_output))
stream = cuda.Stream()

del max_input, max_output
- (3) 推理部分
推理部分要根据输入数据动态的设定上下文推理形状
def predict(batch):

    # 根据输入batch设置输出大小
    N, _, _, _ = batch.shape[0]
    output = np.empty([N, 1000], dtype = target_dtype)

    # 设置上下文输入形状
    tensor_name = engine.get_tensor_name(0) # input tensor
    context.set_input_shape(tensor_name, batch.shape)

    # 将数据从内存移动到显存中
    cuda.memcpy_htod_async(d_input, batch, stream)

    # 异步执行模型
    context.execute_async_v3(stream.handle)

    # 将输出从显存中移动到内存中
    cuda.memcpy_dtoh_async(output, d_output, stream)

    # 同步线程
    stream.synchronize()

    return output

pred = predict(preprocessed_images)
5. 参考资料
- https://blog.youkuaiyun.com/hjxu2016/article/details/119796206
- https://docs.nvidia.com/deeplearning/tensorrt/api/python_api/infer/Core/Engine.html#tensorrt.ICudaEngine.get_tensor_vectorized_dim
- https://blog.youkuaiyun.com/HW140701/article/details/120360642


 2415
2415

 被折叠的 条评论
为什么被折叠?
被折叠的 条评论
为什么被折叠?
 到【灌水乐园】发言


