


前言
该专栏文章介绍图像分类的经典网络。网上提供的代码大多是神经网络代码包含图像预处理、后处理、tricks及一些可视化工具,网络结构部分代码反而没那么清晰。本系列单独将网络代码部分抽取出来,便于初学者学习。
一、AlexNet网络简介
原文链接:ImageNet Classification with Deep Convolutional Neural Networks
这篇文章网上介绍多如牛毛,写的也很详细,因此本篇也不再赘述。只介绍几个需要记住的知识点,面试可能会问道。
AlexNet是2012年ImageNet竞赛冠军获得者Hinton和他的学生Alex Krizhevsky设计的。在2012年图像识别竞赛ILSVRC中,直接将错误率降低了近10个百分点,远远超过传统的机器学习模型,从而基于卷积的神经网络进入了大众的视野。
网络亮点:
1、使用ReLU作为神经网络的激活函数,代替了传统的Sigmoid激活函数及Tanh激活函数;
2、首次利用GPU进行网络加速训练;
3、使用Doupout随机忽略一部分神经元,有效避免过拟合;
4、提出了LRN层,对局部神经元的活动创建竞争机制,使得其中响应比较大的值变得相对更大,并抑制其他反馈较小的神经元,增强了模型的泛化能力;
5、数据增强,随机地从256256的原始图像中截取224224大小的区域(以及水平翻转的镜像),相当于增加了2*(256-224)^2=2048倍的数据量。如果没有数据增强,仅靠原始的数据量,参数众多的CNN会陷入过拟合中,使用了数据增强后可以大大减轻过拟合,提升泛化能力。
(以上参考:AlexNet模型特点)
网络结构
以下是截取
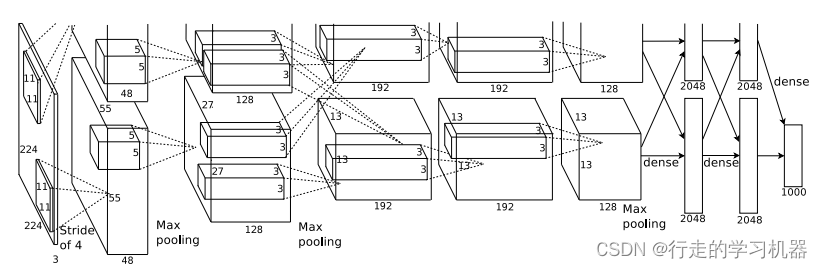
以上是截取原文作者画的网络结构。由于作者使用两个GPU进行并行训练,因此分为上下两部分结构。为了简单起见,我们不考虑两块GPU具体的数据如何传输,只用下半部分网络来训练。我依据此图画了结构更清晰的模型图。
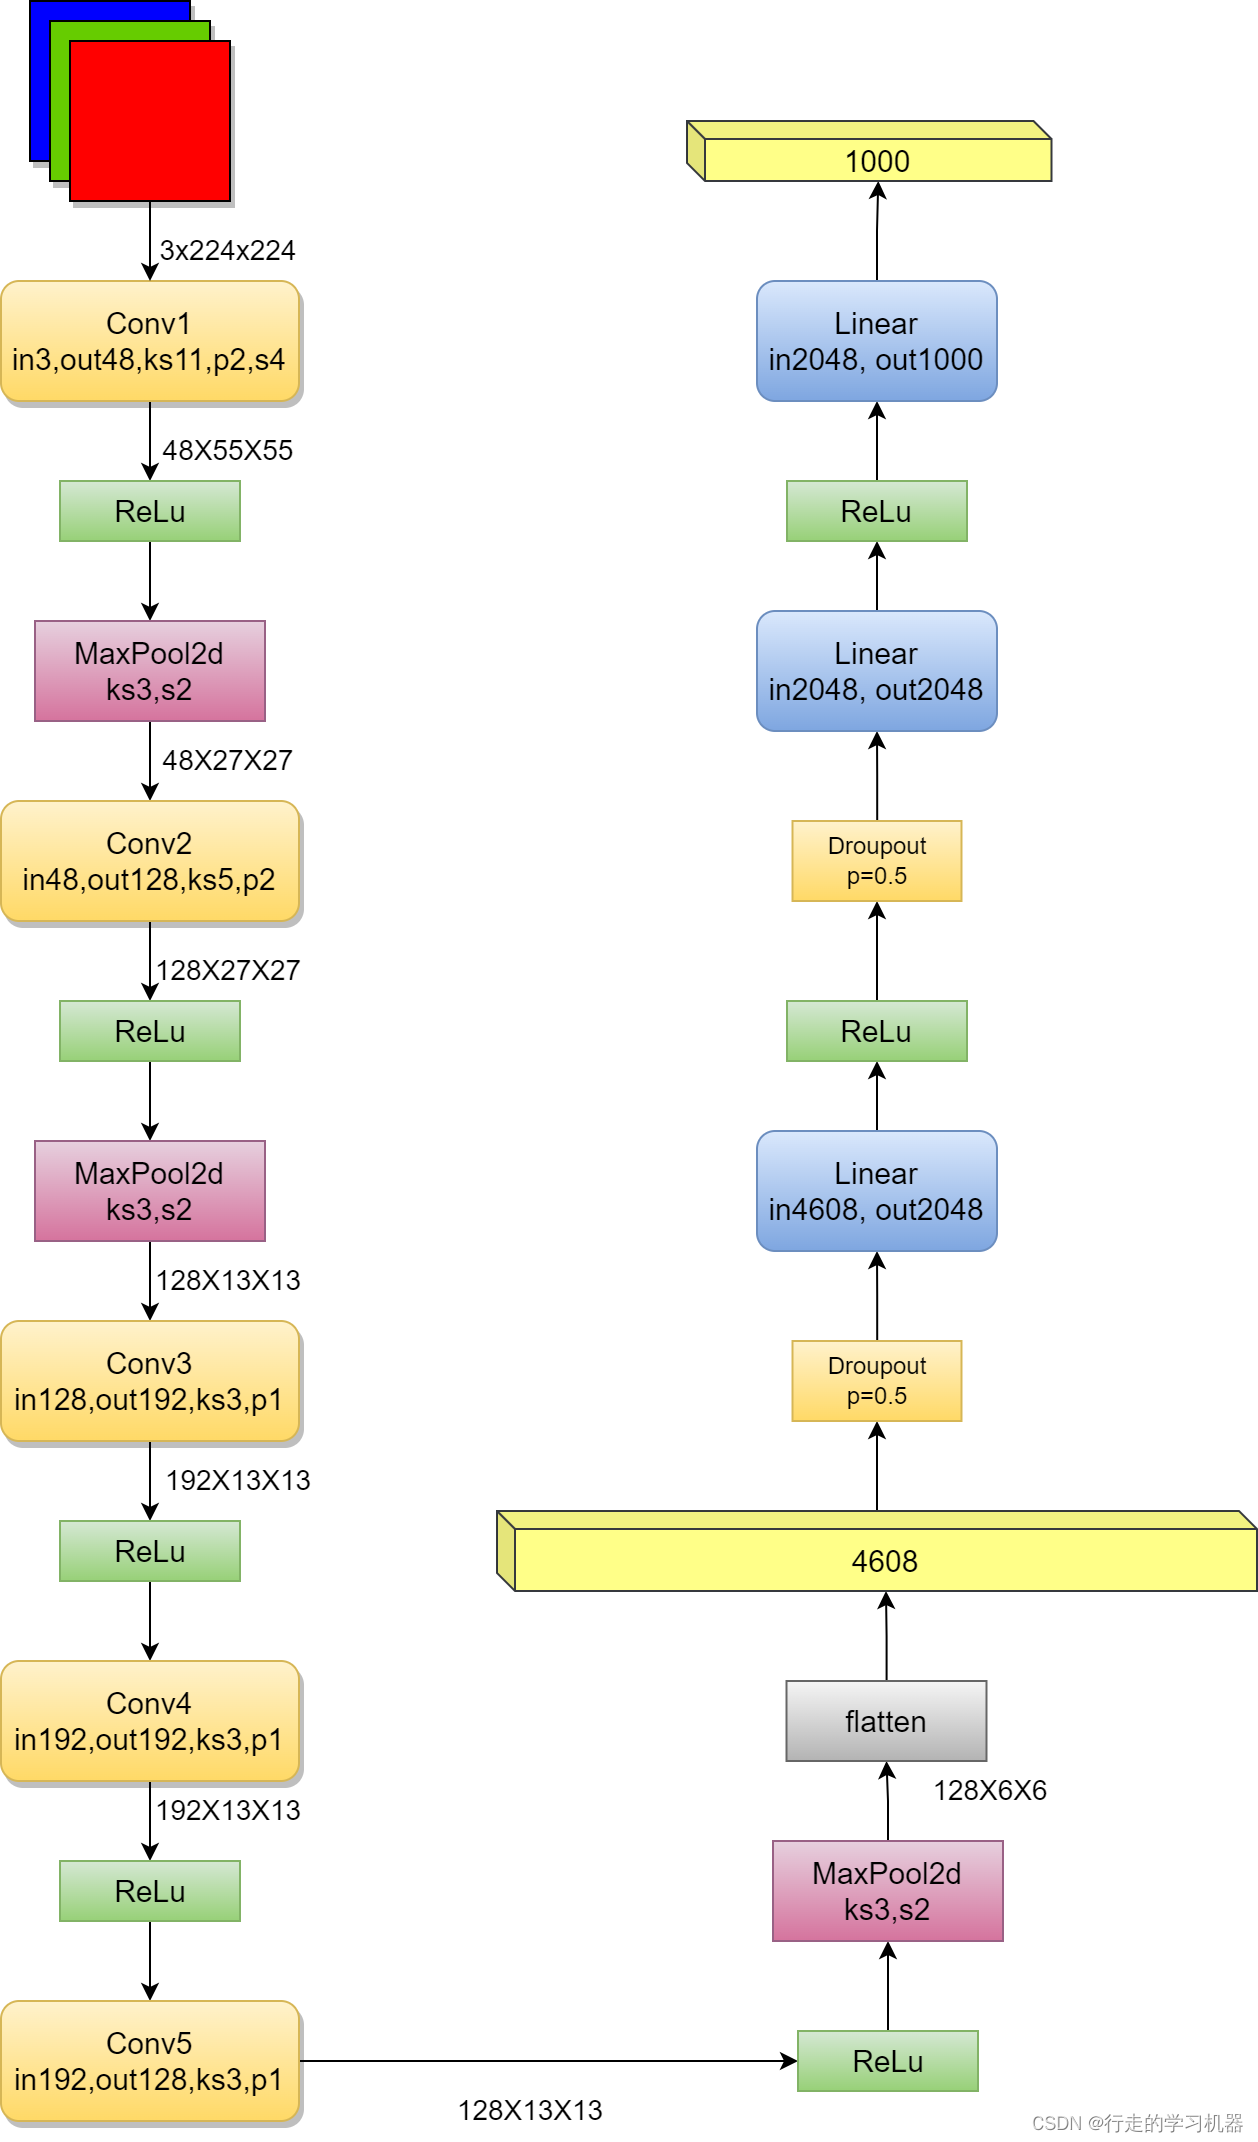
上述结构图清晰明了,可以自己照着图把网络搭建出来。
二、模型代码
import torch.nn as nn
import torch


class AlexNet(nn.Module):
    def __init__(self, num_classes=1000, init_weights=False):
        super(AlexNet, self).__init__()
        self.features = nn.Sequential(
            nn.Conv2d(3, 48, kernel_size=11, stride=4, padding=2),  # input[3, 224, 224]  output[48, 55, 55]
            nn.ReLU(inplace=True),
            nn.MaxPool2d(kernel_size=3, stride=2),  # output[48, 27, 27]
            nn.Conv2d(48, 128, kernel_size=5, padding=2),  # output[128, 27, 27]
            nn.ReLU(inplace=True),
            nn.MaxPool2d(kernel_size=3, stride=2),  # output[128, 13, 13]
            nn.Conv2d(128, 192, kernel_size=3, padding=1),  # output[192, 13, 13]
            nn.ReLU(inplace=True),
            nn.Conv2d(192, 192, kernel_size=3, padding=1),  # output[192, 13, 13]
            nn.ReLU(inplace=True),
            nn.Conv2d(192, 128, kernel_size=3, padding=1),  # output[128, 13, 13]
            nn.ReLU(inplace=True),
            nn.MaxPool2d(kernel_size=3, stride=2),  # output[128, 6, 6]
        )
        self.classifier = nn.Sequential(
            nn.Dropout(p=0.5),
            nn.Linear(128 * 6 * 6, 2048),
            nn.ReLU(inplace=True),
            nn.Dropout(p=0.5),
            nn.Linear(2048, 2048),
            nn.ReLU(inplace=True),
            nn.Linear(2048, num_classes),
        )
        if init_weights:
            self._initialize_weights()

    def forward(self, x):
        x = self.features(x)
        x = torch.flatten(x, start_dim=1)
        x = self.classifier(x)
        return x

    def _initialize_weights(self):
        for m in self.modules():
            if isinstance(m, nn.Conv2d):
                nn.init.kaiming_normal_(m.weight, mode='fan_out', nonlinearity='relu')
                if m.bias is not None:
                    nn.init.constant_(m.bias, 0)
            elif isinstance(m, nn.Linear):
                nn.init.normal_(m.weight, 0, 0.01)
                nn.init.constant_(m.bias, 0)


if __name__ == '__main__':
    input = torch.rand(8, 3, 244, 244)  # 初始化一个参数[batch_size, channel, h, w]
    model = AlexNet()
    output = model(input)
    print(output.shape) # 输出[8,1000]
以上代码仅仅是网络结构部分,不包含预处理等代码。输入8x3x224x224的张量,输出8X1000,表示8张图片,每张图片1000类别,之后再对8X1000的数据进行解析,通过softmax,选取维度1上的最大值,就能得到模型的结果。可以一步步调试,看tensor在模型中如何变化,有助于理解模型。
总结
本文介绍了AlexNet网络结构特点,绘制了结构图,并提供了网络结构相应的代码,去除图像预处理、后处理等冗余的代码,专注模型部分,对理解网络结构有很大的帮助,方便初学者学习。


 6319
6319

 被折叠的 条评论
为什么被折叠?
被折叠的 条评论
为什么被折叠?
 到【灌水乐园】发言


