


 本文详述了一个JavaWeb基础项目的实现过程,包括环境配置、用户登录、部门信息的增删改查功能。项目涉及IDEA搭建开发环境、数据库连接、Servlet及JDBC操作,以及前后端交互。通过用户登录验证,展示部门列表,实现部门的新增、删除、修改和详情查看等功能。
说明:
本篇文章主要记录的是JavaWeb基础项目,从开始搭建环境,到最后实现用户登录,单表的增删改查完整过程。
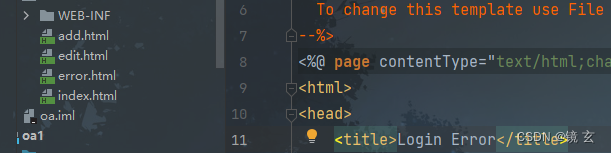
项目目录
1. 项目需求
- 实现用户登录
- 查看部门列表
- 新增部门
- 删除部门
- 查看部门详细信息
- 跳转到修改页面
- 修改部门
2、项目资源准备
开发工具:IDEA+Navicat+Tomcat+Mysql连接
静态资源页面:
加入Tomcat依赖
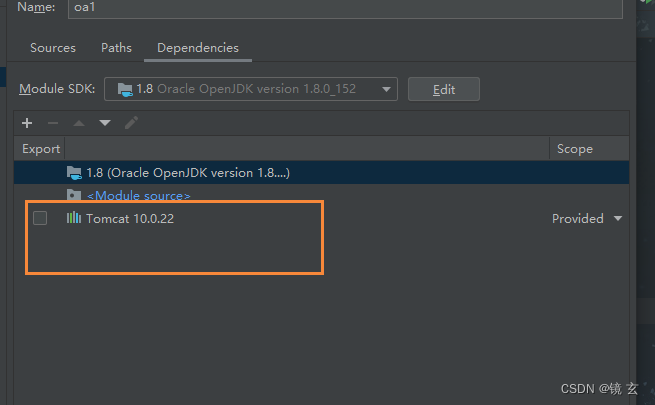
3、在IDEA当中搭建开发环境
- 创建一个webapp(给这个webapp添加servlet-api.jar和jsp-api.jar到classpath当中。)
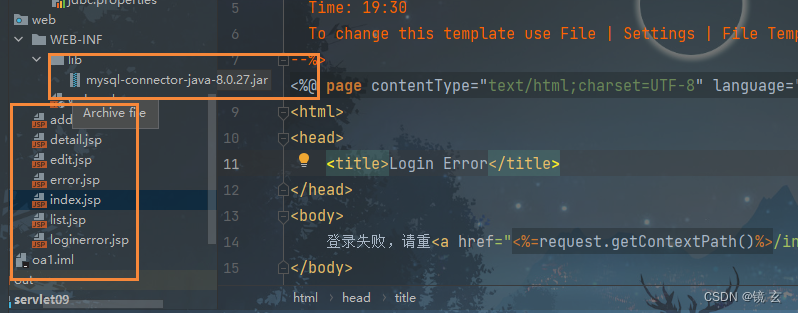
- 向webapp中添加连接数据库的jar包(mysql驱动)
- 必须在WEB-INF目录下新建lib目录,然后将mysql的驱动jar包拷贝到这个lib目录下。这个目录名必须叫做lib,全部小写的。
- JDBC的工具类
- 将所有HTML页面拷贝到web目录下【将资源变成jsp文件后放到Web根目录】。
4、功能实现
4.1 实现用户登录页面
前端
基础的用户登录页面很好写,只需要画一个简单的表单,然后设置表单的action属性为对应的servlet,method放大设置为post
<form action="<%=request.getContextPath()%>/user/login" method="post">
			用户名:<input type="text" name="username"><br><br>
			密 码:<input type="password" name="password"><br><br>
			<input type="submit" value="登录"><br><br>
</form>
- request.getContextPath()表示获取项目名
- /user/login是servletPath,Servlet名称
- method="post"表明请求方式
后端
登陆的核心代码:
@WebServlet("/user/login")
public class LoginServlet extends HttpServlet {

    @Override
    protected void doPost(HttpServletRequest request, HttpServletResponse response)
            throws ServletException, IOException {

        Boolean success = false;

        //获取用户提交的数据,连接数据库进行验证
        String username = request.getParameter("username");
        String password = request.getParameter("password");

        //连接数据库,进行表单验证
        Connection conn = null;
        PreparedStatement ps = null;
        ResultSet rs = null;

        try {
            conn = DBUtil.getConnection();
            String sql = "select * from t_user where username = ? and password = ?";
            ps = conn.prepareStatement(sql);
            ps.setString(1,username);
            ps.setString(2,password);

            rs = ps.executeQuery();
            if (rs.next()){
                success = true;
            }
        } catch (SQLException e) {
            e.printStackTrace();
        }finally {
            DBUtil.close(conn,ps,rs);
        }

        if (success){
            response.sendRedirect(request.getContextPath()+"/dept/list");
        }else {
            response.sendRedirect(request.getContextPath()+"/loginerror.jsp");
        }

    }
}
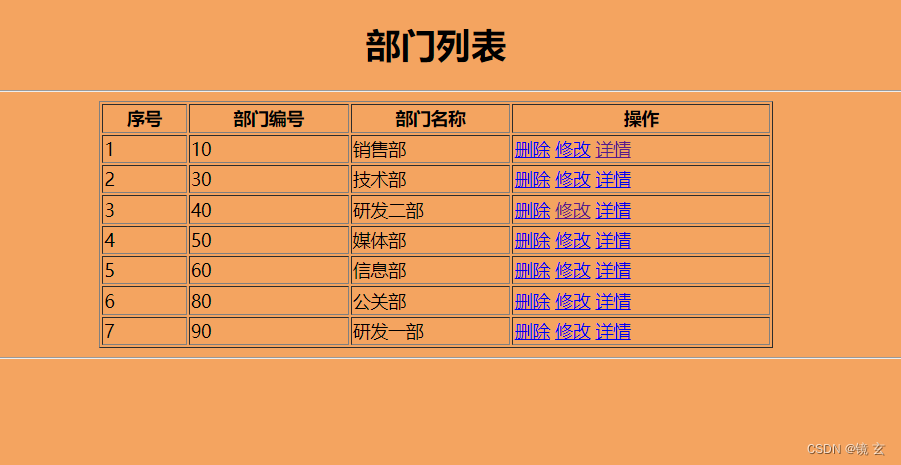
4.2 实现列表页面显示
前端
- 实现动态列表显示部门信息比较复杂,需要从后端Servlet中获取数据(从请求域中获取),然后再取出数据,进行类型的转换(取的时候是Object类型,需要转换为Dept类型),使用for循环集合中的数据;核心代码:
<%
			List<Dept> deptList = (List<Dept>) request.getAttribute("deptList");
			int i = 0;
			for(Dept dept:deptList){

			%>

			<tr>
				<td><%=++i%></td>
				<td><%=dept.getDeptno()%></td>
				<td><%=dept.getDname()%></td>
				<td>
					<a href="javascript:void(0)" onclick="del(<%=dept.getDeptno()%>)">删除</a>
					<a href="<%=request.getContextPath()%>/dept/edit?deptno=<%=dept.getDeptno()%>">修改</a>
					<a href="<%=request.getContextPath()%>/dept/detail?deptno=<%=dept.getDeptno()%>">详情</a>
				</td>
			</tr>

			<%
			   }
			%>
- 这里使用了拼接,jsp中插入了Java代码所以会看着不好,以后再进行改进,以上代码完成的主要是取数据,然后显示再浏览器
后端
-
后端的主要实现过程就是,从数据库中读取信息,将数据存储到List集合中,然后将List集合放到请求域中,利用转发,实现页面跳转到前端的list.jsp;核心代码:
- 由于使用了模板,所以首先获取Servlet的请求路径,进行匹配
String servletPath = request.getServletPath();

        if ("/dept/list".equals(servletPath)){
            doList(request,response);
- 匹配成功后进入此方法,完成功能
       private void doList(HttpServletRequest request, HttpServletResponse response)
            throws ServletException, IOException {

        List<Dept> depts = new ArrayList<>();
            //连接数据库,查询部门信息
        Connection conn = null;
        PreparedStatement ps = null;
        ResultSet rs = null;

        try {
            //获取连接
            conn = DBUtil.getConnection();
            String sql = "select deptno,dname,loc from dept";
            //预编译sql语句
            ps = conn.prepareStatement(sql);
            //获取结果集
            rs = ps.executeQuery();
            while (rs.next()) {
                String deptno = rs.getString("deptno");
                String dname = rs.getString("dname");
                String loc = rs.getString("loc");

                //创建一个Dept对象,将零散的数据封装到一个对象中
                Dept dept = new Dept();
                dept.setDeptno(deptno);
                dept.setDname(dname);
                dept.setLoc(loc);

                //封装好数据之后,又需要有一个容器,可以把数据都封装到里面
                //所以需要创建一个集合
                depts.add(dept);

            }
        } catch (SQLException e) {
            e.printStackTrace();
        }finally {
            //释放资源
            DBUtil.close(conn,ps,rs);
        }

        //将一个集合放到一个请求域中
        request.setAttribute("deptList",depts);
        //转发,不做重定向
        request.getRequestDispatcher("/list.jsp").forward(request,response);
    }
}
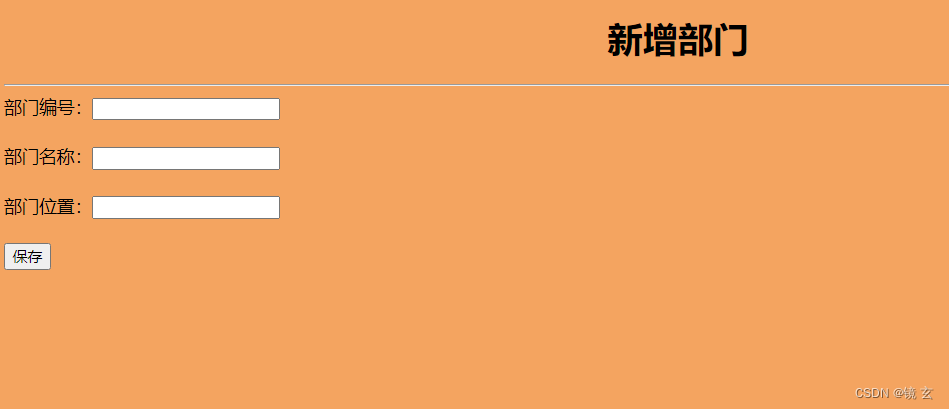
4.3 实现新增部门
前端
- 新增部门的前端页面很简单,就是一个表单,设置一个action和method属性
<form action="<%=request.getContextPath()%>/dept/save" method="post">
			部门编号:<input type="text" name="deptno"/><br><br>
			部门名称:<input type="text" name="dname"/><br><br>
			部门位置:<input type="text" name="loc"/><br><br>
			<input type="submit" value="保存"/><br>
</form>
- <%=request.getContextPath()%>/dept/save表明请求的路径
- method="post"请求的方式
后端
- 后端实现也很简单就是使用request的方法获取前端表单提交的数据,然后添加到数据库中,再使用重定向方式跳转到列表页面;核心代码:
private void doSave(HttpServletRequest request, HttpServletResponse response)
            throws ServletException, IOException{
        request.setCharacterEncoding("UTF-8");

        String deptno = request.getParameter("deptno");
        String dname = request.getParameter("dname");
        String loc = request.getParameter("loc");

        Connection conn = null;
        PreparedStatement ps = null;
        int count = 0;
        try {
            conn = DBUtil.getConnection();
            String sql = "insert into dept(deptno,dname,loc) values (?,?,?)";
            ps = conn.prepareStatement(sql);
            ps.setString(1,deptno);
            ps.setString(2,dname);
            ps.setString(3,loc);

            count = ps.executeUpdate();
        } catch (SQLException e) {
            e.printStackTrace();
        }finally {
            DBUtil.close(conn,ps,null);
        }

        if (count == 1){
            response.sendRedirect(request.getContextPath()+"/dept/list");
        }else {
            response.sendRedirect(request.getContextPath()+"/error.jsp");
        }
    }
4.4 实现删除部门信息
前端
- 此功能不需要前端界面,只需要再lis.jsp里面设置一下即可
<a href="javascript:void(0)" onclick="del(<%=dept.getDeptno()%>)">删除</a>
-
javascript:void(0):表示不返回任何的结果,删除后会再本页面
-
οnclick=“del(<%=dept.getDeptno()%>)”:调用JavaScript代码编写的函数,将需要删除的编号发过去
<script type="text/javascript">
	function del(dno){
		// 弹出确认框,用户点击确定,返回true,点击取消返回false
		var ok = window.confirm("亲,删了不可恢复哦!");
		if(ok){
			document.location.href = "<%=request.getContextPath()%>/dept/delete?deptno=" + dno;
		}
	}
</script>
- <%=request.getContextPath()%>/dept/delete?deptno=" + dno;:指明删除对应的Servlet对象
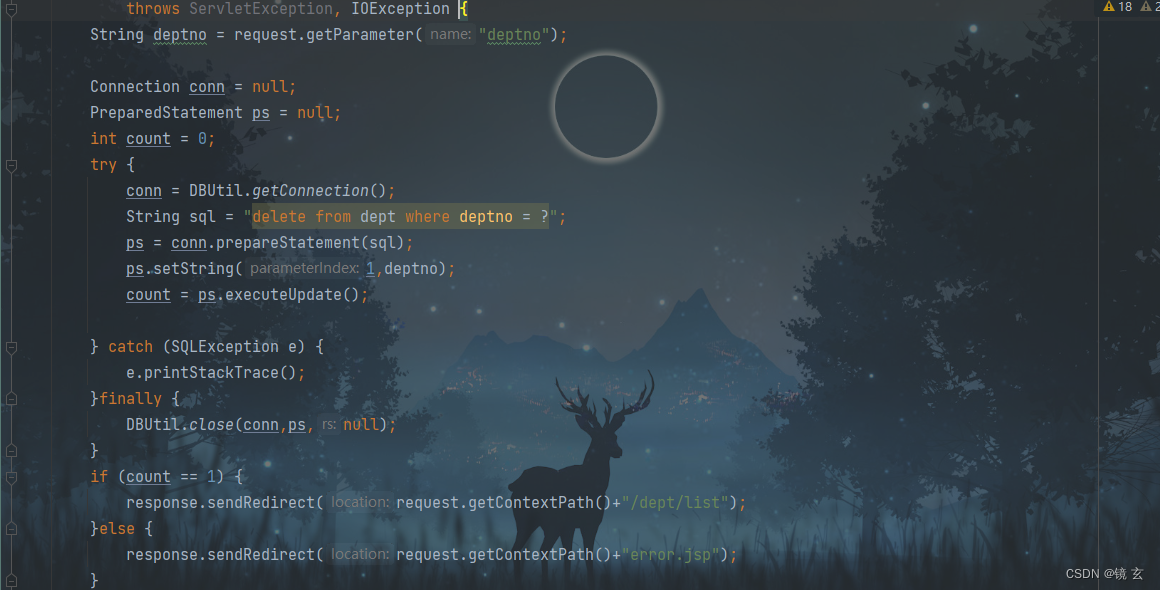
后端
- 后端很简单,从前端获取到需要删除的编号,然后连接数据库进行删除,判断是否删除成功,成功后返回列表页面
private void doDetail(HttpServletRequest request, HttpServletResponse response)
            throws ServletException, IOException {

        Dept dept = new Dept();

        String deptno = request.getParameter("deptno");

        Connection conn = null;
        PreparedStatement ps = null;
        ResultSet rs = null;

        try {
            conn = DBUtil.getConnection();
            String sql = "select dname,loc from dept where deptno = ?";
            ps = conn.prepareStatement(sql);
            ps.setString(1,deptno);
            rs = ps.executeQuery();
            if (rs.next()) {
                //获取数据
                String dname = rs.getString("dname");
                String loc = rs.getString("loc");

                //封装数据

                dept.setDeptno(deptno);
                dept.setDname(dname);
                dept.setLoc(loc);


            }
        } catch (SQLException e) {
            e.printStackTrace();
        }finally {
            DBUtil.close(conn,ps,rs);
        }

        request.setAttribute("DeptObj",dept);
        request.getRequestDispatcher("/detail.jsp").forward(request,response);
    }
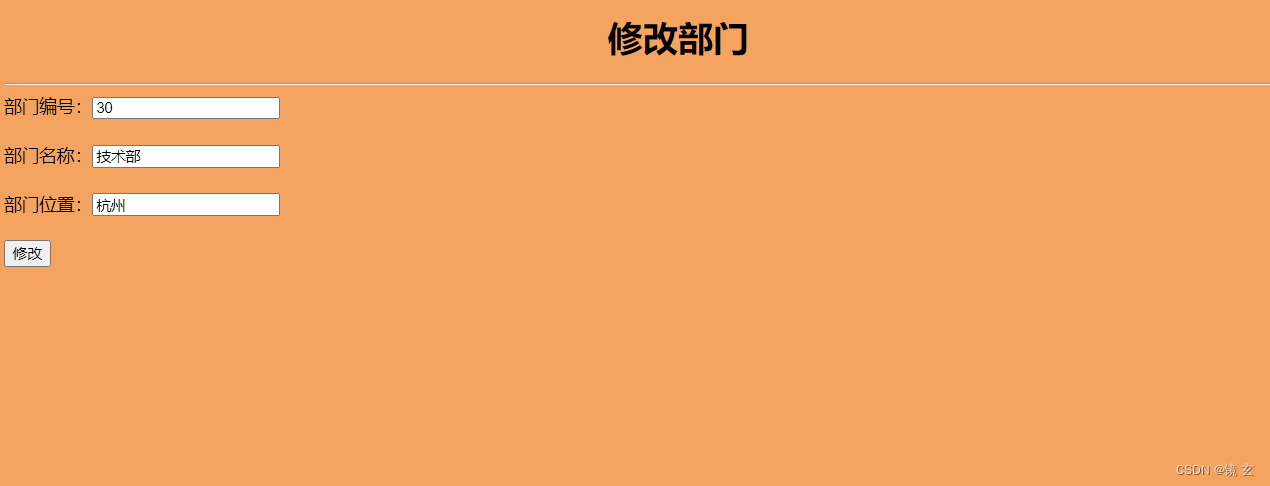
4.5 实现修改部门信息
前端
- 修改部门前端需要有一个表单,用于用户初次进入是时显示信息,还要满足用户能够修改,这里需要将部门编号设置为:只读状态
<form action="<%=request.getContextPath()%>/dept/modify" method="post">
			<%
				Dept dept = (Dept) request.getAttribute("deptObj");
			%>
			部门编号:<input type="text" name="deptno" value="<%=dept.getDeptno()%>" readonly /><br><br>
			部门名称:<input type="text" name="dname" value="<%=dept.getDname()%>"/><br><br>
			部门位置:<input type="text" name="loc" value="<%=dept.getLoc()%>"/><br><br>
			<input type="submit" value="修改"/><br>
		</form>
后端
后端有两部实现:
-
第一步:从数据库中查询信息,将信息返回到前端
-
第二步:从前端获取用户修改后的信息,连接数据库进行修改,然后使用重定向方式,跳转到首页
-
第一步核心代码:从数据库中获取信息,传给前端
- 第二步核心代码:更新数据库

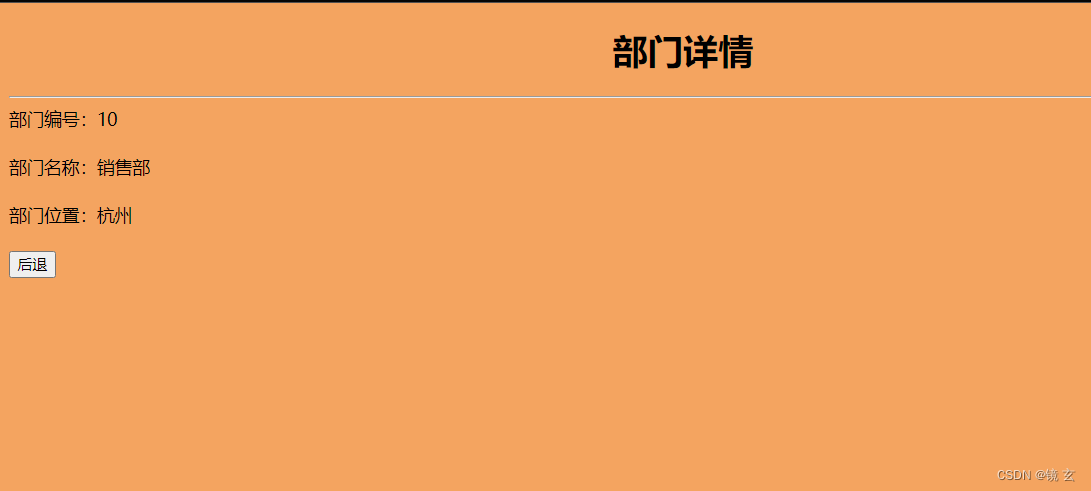
4.6 实现查看详细信息
前端
- 查看详细信息前端只需要展示部门信息就好,不需要表单,页面比较简单
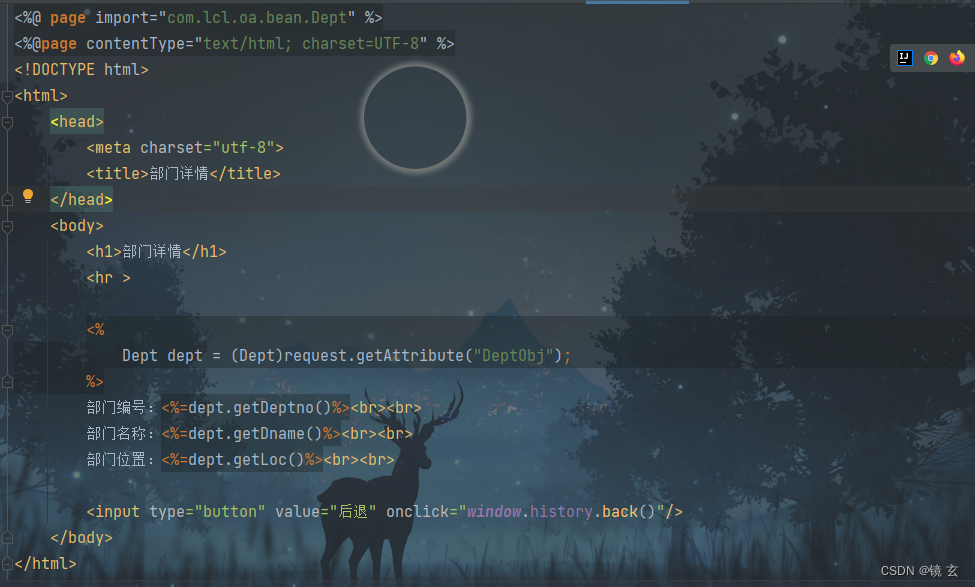
后端
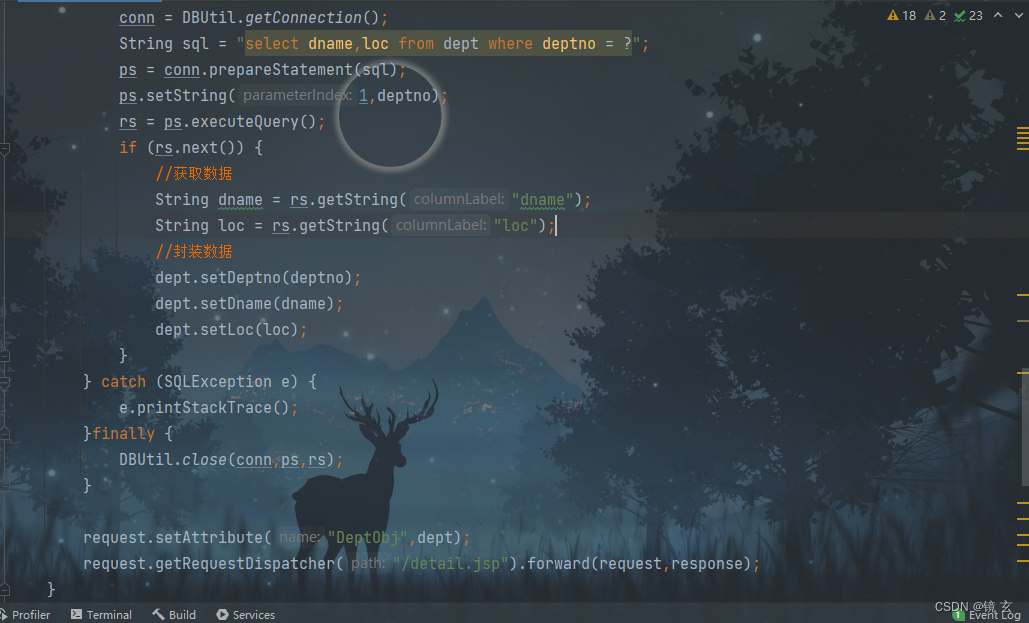
- 后端实现就是:连接数据库,查询对应的部门信息,进行封装,放到请求域,转发给前端。
5. 项目界面展示
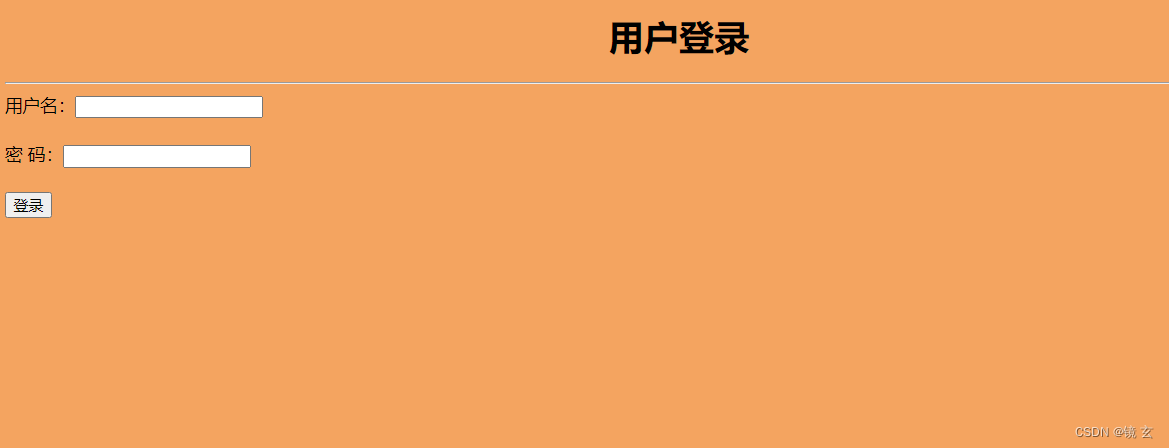
登录界面
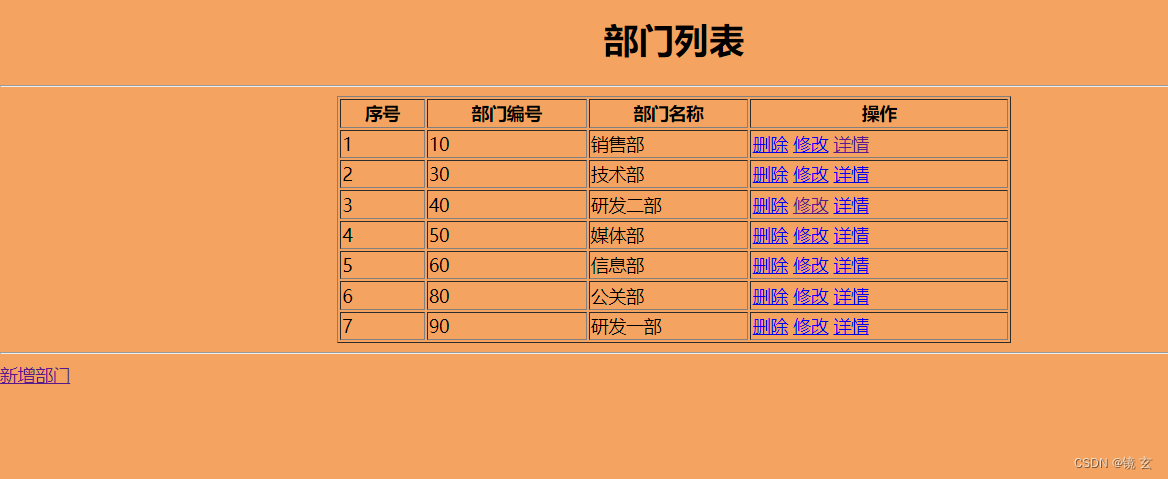
列表页面
新增页面
删除页面
修改页面
查找页面


 5791
5791

 被折叠的 条评论
为什么被折叠?
被折叠的 条评论
为什么被折叠?
 到【灌水乐园】发言


