


 本文档介绍了如何使用IntelliJ IDEA创建一个Spring Boot项目,包括选择项目配置、添加依赖、理解生成的项目结构,以及如何启动和测试项目。通过创建一个简单的Controller接口,演示了Spring Boot的初步应用。
1、 选择文件创建: file->new ->Project->Spring Initializr看到以下界面,选取蓝色标记的一列,注意的是我们也可以使用它的默认网站进行生成,网址就是http://start.spring.io。选中点击next即可。

2、在Group栏输入组织名,Artifact就是项目名。其它选择默认就好,直接Next

3、 目前我们只需要勾选上WEB依赖即可,其他的依赖设置后边在进行讲解。这时候我们一个SpringBoot就生成完毕,可以进行简单的WEB应用开发。

4、选择finish完成即可他会自动下载相应的文件配置(需要联网)

5、生成以后项目的结构图如下:

6、打开会看到有个main方法以及一句代码。这就是默认启动类
package com.gx.myfirstspringboot;

import org.springframework.boot.SpringApplication;
import org.springframework.boot.autoconfigure.SpringBootApplication;

@SpringBootApplication
public class MyFirstSpringbootApplication {

    public static void main(String[] args) {
        SpringApplication.run(MyFirstSpringbootApplication.class, args);
    }

}
7、点击旁边的小三角可以启动看看是否能运行

当在运行窗口看到: Tomcat started on port(s): 8080 (http) with context path ''就说明启动成功了

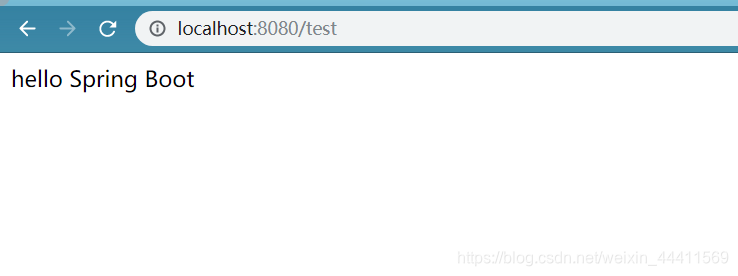
访问:http://localhost:8080出现404,这是springboot为我们自动生成的错误页面/error,因为此时我们还没有创建一个Controller接口

我在myfirstspringboot同级创建了一个包Controller写一个接口映射类testController,然后重新访问http://localhost:8080/test,浏览器输出 hello spring boot! 表示项目可以成功访问!

因为和myfirstspringboot同级所以需要注解@ComponentScan(basePackages= {“com.gx.controller”})指定包中类的位置(也可以把入口文件MyFirstSpringbootApplication移动到包的更目录就不需要使用该注解了)
MyFirstSpringbootApplication文件
package com.gx.myfirstspringboot;

import org.springframework.boot.SpringApplication;
import org.springframework.boot.autoconfigure.SpringBootApplication;
import org.springframework.context.annotation.ComponentScan;
import org.springframework.web.bind.annotation.RequestMapping;

@SpringBootApplication
@ComponentScan(basePackages= {"com.gx.controller"})
public class MyFirstSpringbootApplication {

    public static void main(String[] args) {
        SpringApplication.run(MyFirstSpringbootApplication.class, args);
    }
}
testController:测试文件
package com.gx.controller;

import org.springframework.stereotype.Controller;
import org.springframework.web.bind.annotation.RequestMapping;
import org.springframework.web.bind.annotation.ResponseBody;

@Controller
public class TestController {
    @RequestMapping("/test")
    @ResponseBody
    public String test() {
        System.out.println("hello Spring  Boot");
        return "hello Spring  Boot!";
    }
}
需要导入包

pom.xml文件:
<?xml version="1.0" encoding="UTF-8"?>
<project xmlns="http://maven.apache.org/POM/4.0.0" xmlns:xsi="http://www.w3.org/2001/XMLSchema-instance"
         xsi:schemaLocation="http://maven.apache.org/POM/4.0.0 http://maven.apache.org/xsd/maven-4.0.0.xsd">
    <modelVersion>4.0.0</modelVersion>
    <parent>
        <groupId>org.springframework.boot</groupId>
        <artifactId>spring-boot-starter-parent</artifactId>
        <version>2.1.6.RELEASE</version>
        <relativePath/> <!-- lookup parent from repository -->
    </parent>
    <groupId>com.gx</groupId>
    <artifactId>my-first-springboot</artifactId>
    <version>0.0.1-SNAPSHOT</version>
    <name>my-first-springboot</name>
    <description>Demo project for Spring Boot</description>

    <properties>
        <java.version>1.8</java.version>
    </properties>

    <dependencies>
        <dependency>
            <groupId>org.springframework.boot</groupId>
            <artifactId>spring-boot-starter-web</artifactId>
        </dependency>

        <dependency>
            <groupId>org.springframework.boot</groupId>
            <artifactId>spring-boot-starter-test</artifactId>
            <scope>test</scope>
        </dependency>

        <dependency>
            <!--Thymeleaf麝香叶jar 包-->
            <groupId>org.springframework.boot</groupId>
            <artifactId>spring-boot-starter-thymeleaf</artifactId>
        </dependency>

    </dependencies>

    <build>
        <plugins>
            <plugin>
                <groupId>org.springframework.boot</groupId>
                <artifactId>spring-boot-maven-plugin</artifactId>
            </plugin>
        </plugins>
    </build>

</project>
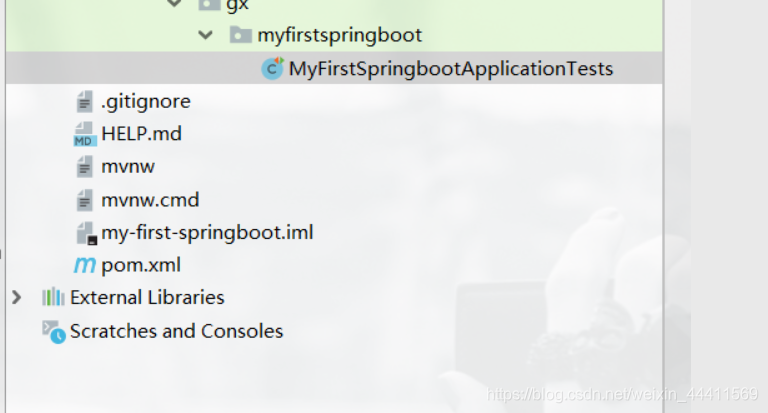
创建完成后的多出来的这几个文件的作用,其中 HELP.md md 、mvnw linux 、mvnw.cmd 这三个基本上都是用不到的 看着不舒服可以直接删掉哦!!!介绍一下各个文件的作用.
.gitignore 用git做版本控制时 用这个文件控制那些文件或文件夹 不被提交(不用git的话可删除 没影响)
HELP.md md是一种文档格式 这个就是你项目的帮助文档(可删除 没影响)
mvnw linux上处理mevan版本兼容问题的脚本(可删除 没影响)
mvnw.cmd windows 上处理mevan版本兼容问题的脚本(可删除 没影响)
spring-boot.iml 是IDEA特有的文件每个导入IDEA的项目都会生成一个项目同名的 .iml文件 用于保存你对这个项目的配置 (删了程序重新导入后还会生成 但由于配置丢失可能会造成程序异常)


 2621
2621

 被折叠的 条评论
为什么被折叠?
被折叠的 条评论
为什么被折叠?
 到【灌水乐园】发言


