


本文章采用了大量知名博主的原文,主要是觉得写的真的太棒了,条理清晰所以在这里做个记录。
Handler
Handler主要用在使用子线程更新UI的操作中起传递数据的作用
安卓开发中,通常会将耗时任务放到子线程中执行,但是出于性能考虑,Android的UI操纵并不是线程安全的,这样意味着如果有多个线程并发操作UI,可能导致线程安全问题,为了解决这个问题,Android指定了一个规则,只允许UI线程修改Activity的UI组件,也就是只允许主线程进行UI相关的修改操作。所以必须要了解Handler机制,才能通过子线程来实现修改UI界面。
Handler类的常用方法有以下这些。
public void handlerMessage(Message msg)    //通过该方法获取,处理信息
public final boolean sendEmptyMessage(int what)   //发送一个只含有what的消息
public final boolean hasMessage(Message msg)    //发送消息到Handler,通过HandlerMessage()方法接受
public final boolean post(Runnable r) 		//将一个线程添加到线程队列
Handler类主要有以下两个作用。
1,在新启动的线程中发送消息。
2,在主线程中获取,处理消息。
开发带有Handler类的程序步骤如下:
- 创建Handler类对象,并重写handlerMessage()方法
- 在新启动的线程中,调用Handler对象的发送消息方法
- 利用Handler对象的handlerMessage()方法接受消息,然后根据不同的消息执行不同的操作。
盗用一位知名博主的代码;实现一个最简单的Handler机制。
private Handler mHandler = new Handler(){
        @Override
        public void handleMessage(Message msg) {
            super.handleMessage(msg);
            switch (msg.what) {
                case MESSAGE_WHAT:
                    Log.d(TAG, "main thread receiver message: " + ((String) msg.obj));
                    break;
            }
        }
    };

    private void sendMessageToMainThreadByWorkThread() {
        new Thread(){
            @Override
            public void run() {
                Message message = mHandler.obtainMessage(MESSAGE_WHAT);
                message.obj = "I am message from work thread";
                mHandler.sendMessage(message);
            }
        }.start();
    }
    /*
    * 通常我们在主线程中创建一个Handler,
    * 然后重写该Handler的handlerMessage方法,可以看到该方法传入了一个参数Message,
    * 该参数就是我们从其他线程传递过来的信息。
    *
    * 我们在来看下子线程中如何传递的信息,子线程通过Handler的obtainMessage()方法获取到一个Message实例,
    * 我们来看看Message的几个属性:
    * Message.what------------------>用来标识信息的int值,通过该值主线程能判断出来自不同地方的信息来源
    * Message.arg1/Message.arg2----->Message初始定义的用来传递int类型值的两个变量
    * Message.obj------------------->用来传递任何实例化对象
    * 最后通过sendMessage将Message发送出去。
    *
    * Handler所在的线程通过handlerMessage方法就能收到具体的信息了,如何判断信息的来源呢?当然是通过what值啦。
    * 怎么样很简单吧
    */
两个线程之间进行通信
private Handler handler;
    private void handlerDemoByTwoWorkThread() {
        Thread hanMeiMeiThread = new Thread() {
            @Override
            public void run() {
//                Looper.prepare();
                handler = new Handler() {
                    @Override
                    public void handleMessage(Message msg) {
                        Log.d(TAG, "hanMeiMei receiver message: " + ((String) msg.obj));
                        Toast.makeText(MainActivity.this, ((String) msg.obj), Toast.LENGTH_SHORT).show();
                    }
                };
//                Looper.loop();
            }
        };
        Thread liLeiThread = new Thread() {
            @Override
            public void run() {
                try {
                    Thread.sleep(2000);
                } catch (InterruptedException e) {
                    e.printStackTrace();
                }
                Message message = handler.obtainMessage();
                message.obj = "Hi MeiMei";
                handler.sendMessage(message);
            }
        };
        hanMeiMeiThread.setName("韩梅梅 Thread");
        hanMeiMeiThread.start();
        liLeiThread.setName("李雷 Thread");
        liLeiThread.start();
        /*
        * 搞定,我们创建了两个Thread,liLeiThread和hanMeiMeiThread两个线程,很熟悉的名字啊!
        * 跟之前的代码没太大区别hanMeiMeiThread创建了Handler,liLeiThread通过Handler发送了消息。
        * 只不过此处我们只发送一个消息,所以没有使用what来进行标记
        * 运行看看,我们的李雷能拨通梅梅吗?
        * 啊哦,出错了
        * 05-13 17:08:17.709 20673-20739/? E/AndroidRuntime: FATAL EXCEPTION: 韩梅梅 Thread
                                                   Process: design.wang.com.designpatterns, PID: 20673
                                                   java.lang.RuntimeException: Can't create handler inside thread that has not called Looper.prepare()
                                                       at android.os.Handler.<init>(Handler.java:200)
                                                       at android.os.Handler.<init>(Handler.java:114)
        *Can't create handler inside thread that has not called Looper.prepare()
        * -----------》它说我们创建的handler没有调用Looper.prepare();
        * 好的,我们在实例化Handler之前调用下该方法,看一下。加上是不是没有报错了呢。
        * 等等,虽然没有报错,但是hanMeiMeiThread也没有接到消息啊,消息呢?别急。
        * 我们在Handler实例化之后加上Looper.loop();看一看,运行一下,是不是收到消息了呢。
        * 这是为什么呢?
        * 接下来我们就去看看Handler是怎么实现的发消息呢,弄清楚了原理,这里的原因也就明白了。
        */
    }
Handler在两个线程之间传递消息的原理实现
我们先来看看new Handler();时出错的原因。后续讲解源码分析只贴出关键部分。
如下是Handler构造函数里抛出上文异常的地方,可以看到,由于mLooper对象为空才抛出的该异常。
mLooper = Looper.myLooper();
        if (mLooper == null) {
            throw new RuntimeException(
                "Can't create handler inside thread that has not called Looper.prepare()");
        }
/*异常的原因看到了,接下来我们看看Looper.prepare()方法都干了些什么?*/
public static void prepare() {
    prepare(true);
}
private static void prepare(boolean quitAllowed) {
    if (sThreadLocal.get() != null) {
        throw new RuntimeException("Only one Looper may be created per thread");
    }
    sThreadLocal.set(new Looper(quitAllowed));
}
/*可以看到,该方法在当前thread创建了一个Looper(), ThreadLocal主要用于维护线程的本地变量,  */
 private Looper(boolean quitAllowed) {
    mQueue = new MessageQueue(quitAllowed);
    mThread = Thread.currentThread();
}
//而Looper的构造函数里面又为我们创建了一个MessageQueue()对象。
了解到此,我们已经成功引出了Handler机制几个关键的对象了,Looper、MessageQueue、Message。
那么,肯定也有人又产生新的疑问了——为什么在主线程中创建Handler不需要要用Looper.prepare()和Looper.loop()方法呢?
其实不是这样的,App初始化的时候都会执行ActivityThread的main方法,我们可以看看ActivityThread的main()方法都做了什么?
    Looper.prepareMainLooper();
    ActivityThread thread = new ActivityThread();
    thread.attach(false);
    if (sMainThreadHandler == null) {
        sMainThreadHandler = thread.getHandler();
    }
    if (false) {
        Looper.myLooper().setMessageLogging(new
                LogPrinter(Log.DEBUG, "ActivityThread"));
    }
    // End of event ActivityThreadMain.
    Trace.traceEnd(Trace.TRACE_TAG_ACTIVITY_MANAGER);
    Looper.loop();
    /*
 真相只有一个,是的在创建主线程的时候Android已经帮我们调用了Looper.prepareMainLooper()
 和Looper.loop()方法,所以我们在主线程能直接创建Handler使用。
*/
我们接着来看Handler发送消息的过程
        //调用Handler不同参数方法发送Message最终都会调用到该方法
public boolean sendMessageAtTime(Message msg, long uptimeMillis) {
        MessageQueue queue = mQueue;
        if (queue == null) {
            RuntimeException e = new RuntimeException(
                    this + " sendMessageAtTime() called with no mQueue");
            Log.w("Looper", e.getMessage(), e);
            return false;
        }
        return enqueueMessage(queue, msg, uptimeMillis);
    }
 sendMessage的关键在于enqueueMessage(),其内部调用了messageQueue的enqueueMessage方法

boolean enqueueMessage(Message msg, long when) {
        ...
        synchronized (this) {
            if (mQuitting) {
                IllegalStateException e = new IllegalStateException(
                        msg.target + " sending message to a Handler on a dead thread");
                Log.w(TAG, e.getMessage(), e);
                msg.recycle();
                return false;
            }
        msg.markInUse();
        msg.when = when;
        Message p = mMessages;
        boolean needWake;
        if (p == null || when == 0 || when < p.when) {
            // New head, wake up the event queue if blocked.
            msg.next = p;
            mMessages = msg;
            needWake = mBlocked;
        } else {
            needWake = mBlocked && p.target == null && msg.isAsynchronous();
            Message prev;
            for (;;) {
                prev = p;
                p = p.next;
                if (p == null || when < p.when) {
                    break;
                }
                if (needWake && p.isAsynchronous()) {
                    needWake = false;
                }
            }
            msg.next = p; // invariant: p == prev.next
            prev.next = msg;
        }

        // We can assume mPtr != 0 because mQuitting is false.
        if (needWake) {
            nativeWake(mPtr);
        }
    }
    return true;
}
/*从代码可以看出Message被存入MessageQueue时是将Message存到了上一个Message.next上,
  形成了一个链式的列表,同时也保证了Message列表的时序性。
*/
Message的发送实际是放入到了Handler对应线程的MessageQueue中,那么,Message又是如何被取出来的呢?
细心的朋友可能早早就发现了,之前抛出异常的地方讲解了半天的Loop.prepare()方法,一直没有说到Loop.loop()方法。同时,在之前的例子中也看到了,如果不调用Looper.loop()方法,Handler是接受不到消息的,所以我们可以大胆的猜测,消息的获取肯定和它脱不了关系!当然关怀疑还不行,我们还必须找出真相来证明我们的猜想?那还等什么,先看看loop()方法吧。
public static void loop() {
//可以看到,在调用Looper.prepare()之前是不能调用该方法的,不然又得抛出异常了
        final Looper me = myLooper();
        if (me == null) {
            throw new RuntimeException("No Looper; Looper.prepare() wasn't called on this thread.");
        }
        final MessageQueue queue = me.mQueue;
// Make sure the identity of this thread is that of the local process,
    // and keep track of what that identity token actually is.
    Binder.clearCallingIdentity();
    final long ident = Binder.clearCallingIdentity();

    for (;;) {
        Message msg = queue.next(); // might block
        if (msg == null) {
            // No message indicates that the message queue is quitting.
            return;
        }

        // This must be in a local variable, in case a UI event sets the logger
        final Printer logging = me.mLogging;
        if (logging != null) {
            logging.println(">>>>> Dispatching to " + msg.target + " " +
                    msg.callback + ": " + msg.what);
        }

        final long traceTag = me.mTraceTag;
        if (traceTag != 0) {
            Trace.traceBegin(traceTag, msg.target.getTraceName(msg));
        }
        try {
            msg.target.dispatchMessage(msg);
        } finally {
            if (traceTag != 0) {
                Trace.traceEnd(traceTag);
            }
        }

        if (logging != null) {
            logging.println("<<<<< Finished to " + msg.target + " " + msg.callback);
        }

        // Make sure that during the course of dispatching the
        // identity of the thread wasn't corrupted.
        final long newIdent = Binder.clearCallingIdentity();
        if (ident != newIdent) {
            Log.wtf(TAG, "Thread identity changed from 0x"
                    + Long.toHexString(ident) + " to 0x"
                    + Long.toHexString(newIdent) + " while dispatching to "
                    + msg.target.getClass().getName() + " "
                    + msg.callback + " what=" + msg.what);
        }

        msg.recycleUnchecked();
    }
}
/*
这里我们看到,mLooper()方法里我们取出了,当前线程的looper对象,然后从looper对象开启了一个死循环
不断地从looper内的MessageQueue中取出Message,只要有Message对象,就会通过Message的target调用
dispatchMessage去分发消息,通过代码可以看出target就是我们创建的handler。我们在继续往下分析Message的分发
*/
public void dispatchMessage(Message msg) {
    if (msg.callback != null) {
        handleCallback(msg);
    } else {
        if (mCallback != null) {
            if (mCallback.handleMessage(msg)) {
                return;
            }
        }
        handleMessage(msg);
    }
}
/*好了,到这里已经能看清晰了
可以看到,如果我们设置了callback(Runnable对象)的话,则会直接调用handleCallback方法
*/
private static void handleCallback(Message message) {
        message.callback.run();
    }
//即,如果我们在初始化Handler的时候设置了callback(Runnable)对象,则直接调用run方法。比如我们经常写的runOnUiThread方法,由于Handler在主线程创建,所以最终得以在主线程执行:
runOnUiThread(new Runnable() {
            @Override
            public void run() {
       }
    });
    public final void runOnUiThread(Runnable action) {
      if (Thread.currentThread() != mUiThread) {
          mHandler.post(action);
      } else {
          action.run();
      }
  }
  /*
而如果msg.callback为空的话,
存在一种情况,当创建Handler使用了带Callback的构造方法的话,将会执行Callback的handleMessgae方法,并且会根据其方法的返回值判断是否会被callback拦截,
是否需要继续执行Handle的handlMessgae方法,如果不存在Callback的拦截则Handler本身的handleMessage方法得意执行。(Handler(Callback)的构造方法使用场景暂时未遇到,欢迎补充)
  */
到这里,想必你应该清楚如何在不同的线程之间来使用Handler了吧。
最后总结一下:
在使用handler的时候,在handler所创建的线程需要维护一个唯一的Looper对象, 每个线程对应一个Looper,每个线程的Looper通过ThreadLocal来保证,如需了解ThreadLocal,点击查看详细讲解 ,
Looper对象的内部又维护有唯一的一个MessageQueue,所以一个线程可以有多个handler,
但是只能有一个Looper和一个MessageQueue。
Message在MessageQueue不是通过一个列表来存储的,而是将传入的Message存入到了上一个
Message的next中,在取出的时候通过顶部的Message就能按放入的顺序依次取出Message。
Looper对象通过loop()方法开启了一个死循环,不断地从looper内的MessageQueue中取出Message,
然后通过handler将消息分发传回handler所在的线程。
博主写的非常的棒,通俗易懂,有理有据,条理清晰,此处粘贴博主的地址:https://blog.youkuaiyun.com/wsq_tomato/article/details/80301851
一、Bundle简介
bundle在Android开发中非常常见,它的作用主要时用于传递数据;它所保存的数据是以key-value(键值对)的形式存在的,也就是说bundle是保存数据的容器,内部使用了Arraymap去存储数据,也提供了很多get,put方法。
bundle传递的数据包括:string、int、boolean、byte、float、long、double等基本类型或它们对应的数组,也可以是对象或对象数组。当bundle传递的是对象或对象数组时,必须实现Serialiable或Parcelable接口。
bundle主要用于以下3个场合:
1. Activity状态数据的保存与恢复,涉及到两个回调:①void onSaveInstanceState(Bundle outState);② void onCreate(Bundle savedInstanceState);
2. Fragment的setArguments方法:void setArgument(Bundle args);
3. 消息机制中的Message的setData方法:void setData(Bundle data)。
二、Bundle源码解析
- 首先看下Bundle的声明:
public final class Bundle extends BaseBundle implements Cloneable, Parcelable
从声明中我们可以看出:①它使用了final进行修饰,所以不可以被继承;②它实现了两个接口Cloneable和Parcelable,这就意味着它必须实现以下方法:
1. public Object clone()
2. public int describeContents()
3. public void writeToParcel(Parcel parcel, int flags)
4. public void readFromParcel(Parcel parcel)
5. public static final Parcelable.Creator CREATOR = new Parcelable.Creator() - 再看bundle的内存结构:
ArrayMap<String, Object> mMap = null
它使用的是ArrayMap,这个集合类存储的也是键值对,但是与Hashmap不同的是,hashmap采用的是“数组+链表”的方式存储,而Arraymap中使用的是两个数组进行存储,一个数组存储key,一个数组存储value,内部的增删改查都将会使用二分查找来进行,这个和SparseArray差不多,只不过sparseArray的key值只能是int型的,而Arraymap可以是map型,所以在数据量不大的情况下可以使用这两个集合代替hashmap去优化性能;
三、Bundle继承的方法
Bundle操作的基本数据类型如下表所示,它们都继承自BaseBundle (From class android.os.BaseBundle )
| 返回类型 | 函数 | 函数说明 |
|---|---|---|
| void | clear() | Removes all elements from the mapping of this Bundle. |
| boolean | containsKey(String key) | Returns true if the given key is contained in the mapping of this Bundle. |
| object | get(String key) | Returns the entry with the given key as an object. |
| boolean | getBoolean(String key, boolean defaultValue) | Returns the value associated with the given key, or defaultValue if no mapping of the desired type exists for the given key. |
| boolean | getBoolean(String key) | Returns the value associated with the given key, or false if no mapping of the desired type exists for the given key. |
| boolean[] | getBooleanArray(String key) | Returns the value associated with the given key, or null if no mapping of the desired type exists for the given key or a null value is explicitly associated with the key. |
| double | getDouble(String key, double defaultValue) | Returns the value associated with the given key, or defaultValue if no mapping of the desired type exists for the given key. |
| double | getDouble(String key) | Returns the value associated with the given key, or 0.0 if no mapping of the desired type exists for the given key. |
| double[] | getDoubleArray(String key) | Returns the value associated with the given key, or null if no mapping of the desired type exists for the given key or a null value is explicitly associated with the key. |
| int | getInt(String key) | Returns the value associated with the given key, or 0 if no mapping of the desired type exists for the given key. |
| int | getInt(String key, int defaultValue) | Returns the value associated with the given key, or defaultValue if no mapping of the desired type exists for the given key. |
| int[] | getIntArray(String key) | Returns the value associated with the given key, or null if no mapping of the desired type exists for the given key or a null value is explicitly associated with the key. |
| long | getLong(String key) | Returns the value associated with the given key, or 0L if no mapping of the desired type exists for the given key. |
| long | getLong(String key, long defaultValue) | Returns the value associated with the given key, or defaultValue if no mapping of the desired type exists for the given key. |
| long[] | getLongArray(String key) | Returns the value associated with the given key, or null if no mapping of the desired type exists for the given key or a null value is explicitly associated with the key. |
| String | getString(String key) | Returns the value associated with the given key, or null if no mapping of the desired type exists for the given key or a null value is explicitly associated with the key. |
| String | getString(String key, String defaultValue) | Returns the value associated with the given key, or defaultValue if no mapping of the desired type exists for the given key or if a null value is explicitly associated with the given key. |
| String[] | getStringArray(String key) | Returns the value associated with the given key, or null if no mapping of the desired type exists for the given key or a null value is explicitly associated with the key. |
| boolean | isEmpty() | Returns true if the mapping of this Bundle is empty, false otherwise. |
| Set | keySet() | Returns a Set containing the Strings used as keys in this Bundle. |
| void | putAll(PersistableBundle bundle) | Inserts all mappings from the given PersistableBundle into this BaseBundle. |
| void | putBoolean(String key, boolean value) | Inserts a Boolean value into the mapping of this Bundle, replacing any existing value for the given key. |
| void | putBooleanArray(String key, boolean[] value) | Inserts a boolean array value into the mapping of this Bundle, replacing any existing value for the given key. |
| void | putDouble(String key, double value) | Inserts a double value into the mapping of this Bundle, replacing any existing value for the given key. |
| void | putDoubleArray(String key, double[] value) | Inserts a double array value into the mapping of this Bundle, replacing any existing value for the given key. |
| void | putInt(String key, int value) | Inserts an int value into the mapping of this Bundle, replacing any existing value for the given key. |
| void | putIntArray(String key, int[] value) | Inserts an int array value into the mapping of this Bundle, replacing any existing value for the given key. |
| void | putLong(String key, long value) | Inserts a long value into the mapping of this Bundle, replacing any existing value for the given key. |
| void | putLongArray(String key, long[] value) | Inserts a long array value into the mapping of this Bundle, replacing any existing value for the given key. |
| void | putString(String key, String value) | Inserts a String value into the mapping of this Bundle, replacing any existing value for the given key. |
| void | putStringArray(String key, String[] value) | Inserts a String array value into the mapping of this Bundle, replacing any existing value for the given key. |
| void | remove(String key) | Removes any entry with the given key from the mapping of this Bundle. |
| int | size() | Returns the number of mappings contained in this Bundle. |
四、构造方法
- Constructs a new, empty Bundle.
Bundle() - Constructs a new, empty Bundle that uses a specific ClassLoader for instantiating Parcelable and Serializable objects.
Bundle(ClassLoader loader) - Constructs a new, empty Bundle sized to hold the given number of elements. The Bundle will grow as needed.
Bundle(Int capacity) - Constructs a Bundle containing a copy of the mappings from the given Bundle. Does only a shallow copy of the original Bundle.
Bundle(Int b) - Constructs a Bundle containing a copy of the mappings from the given PersistableBundle. Does only a shallow copy of the PersistableBundle.
Bundle(PersistableBundle b)
五、实战练习
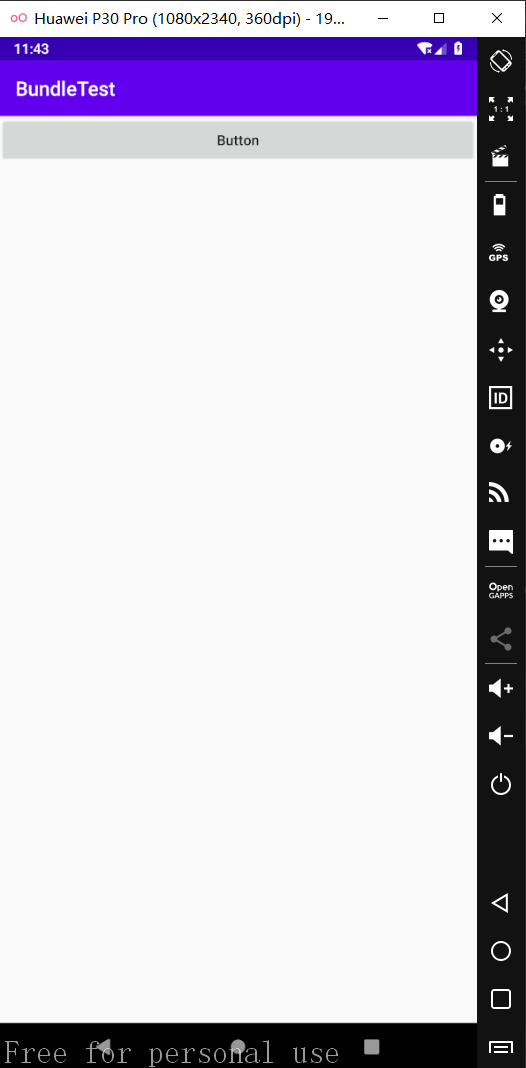
1. 在Activity to Activity传递数据时使用Bundle
① 当传递简单数据时
新建一个MainActivity,对应的布局文件比较简单,就是一个Button,点击这个按钮后,程序跳转到SecondActivity,并将传递的数据在SecondActivity的TextView中显示出来。这样,就使用Bundle实现了数据在Activity之间的传递。
package com.example.bundletest;
import androidx.appcompat.app.AppCompatActivity;
import android.content.Intent;
import android.os.Bundle;
import android.view.View;
import android.widget.Button;
public class MainActivity extends AppCompatActivity {
//声明控件对象
private Button mButton;
@Override
protected void onCreate(Bundle savedInstanceState) {
super.onCreate(savedInstanceState);
setContentView(R.layout.activity_main);
//获取控件的对象
mButton = findViewById(R.id.button);
//为Button绑定监听器
mButton.setOnClickListener(new View.OnClickListener() {
@Override
public void onClick(View v) {
/**
* 存入数据
*/
//实例化一个Bundle
Bundle bundle = new Bundle();
Intent intent = new Intent(MainActivity.this, SecondActivity.class);
//设置数据
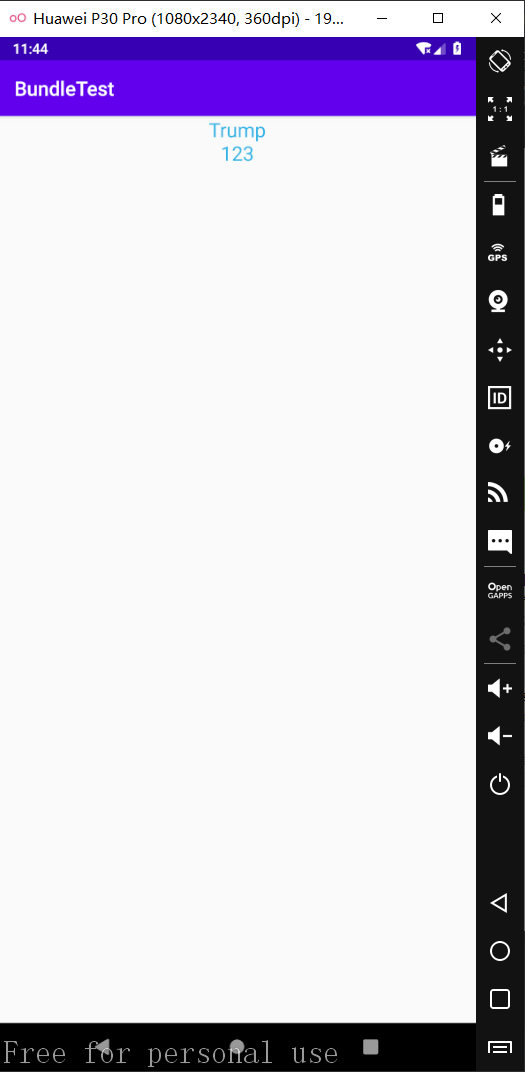
String name = "Trump";
int num = 123;
//把数据放入到Bundle容器中
bundle.putString("Name", name);
bundle.putInt("Num", num);
//把Bundle容器中的数据放到Intent中
intent.putExtra("Message", bundle);
//启动该Intent,实现Activity的跳转
startActivity(intent);
}
});
}
}
新建一个SecondActivity,用于显示传递的数据。对应的布局文件也很简单,就是一个TextView。
package com.example.bundletest;

import androidx.appcompat.app.AppCompatActivity;

import android.annotation.SuppressLint;
import android.content.Intent;
import android.os.Bundle;
import android.widget.TextView;

public class SecondActivity extends AppCompatActivity {
    //声明控件对象
    private TextView textView;

    @SuppressLint("SetTextI18n")
    @Override
    protected void onCreate(Bundle savedInstanceState) {
        super.onCreate(savedInstanceState);
        setContentView(R.layout.activity_second);

        //获取控件的对象
        textView = findViewById(R.id.text_view);

        /**
         *读取数据
         */
        Intent intent = getIntent();
        //从Intent中取出Bundle
        Bundle bundle = intent.getBundleExtra("Message");

        //获取数据
        assert bundle != null;
        String name = bundle.getString("Name");
        int num = bundle.getInt("Num");

        //显示数据
        textView.setText(name + "\n" + num);
    }
}
运行程序后,结果如下图所示:
点击Button,结果如下图所示:
② 当传递的参数很多,或者传递一个类的对象时
新建一个JavaBean,将这个类命名为FunPerson,并实现Serializable接口。
package com.example.bundletest;

import java.io.Serializable;

public class FunPerson implements Serializable {
    //创建实例变量
    private String name;
    private int num;

    public void setName(String name) {
        this.name = name;
    }

    public String getName() {
        return name;
    }

    public void setNum(int num) {
        this.num = num;
    }

    public int getNum() {
        return num;
    }
}
修改MainActivity中的代码:
public class MainActivity extends AppCompatActivity {
//声明控件对象
private Button mButton;
@Override
protected void onCreate(Bundle savedInstanceState) {
super.onCreate(savedInstanceState);
setContentView(R.layout.activity_main);
//获取控件的对象
mButton = findViewById(R.id.button);
//为Button绑定监听器
mButton.setOnClickListener(new View.OnClickListener() {
@Override
public void onClick(View v) {
/**
* 存入数据
*/
FunPerson person = new FunPerson();
//设置数据
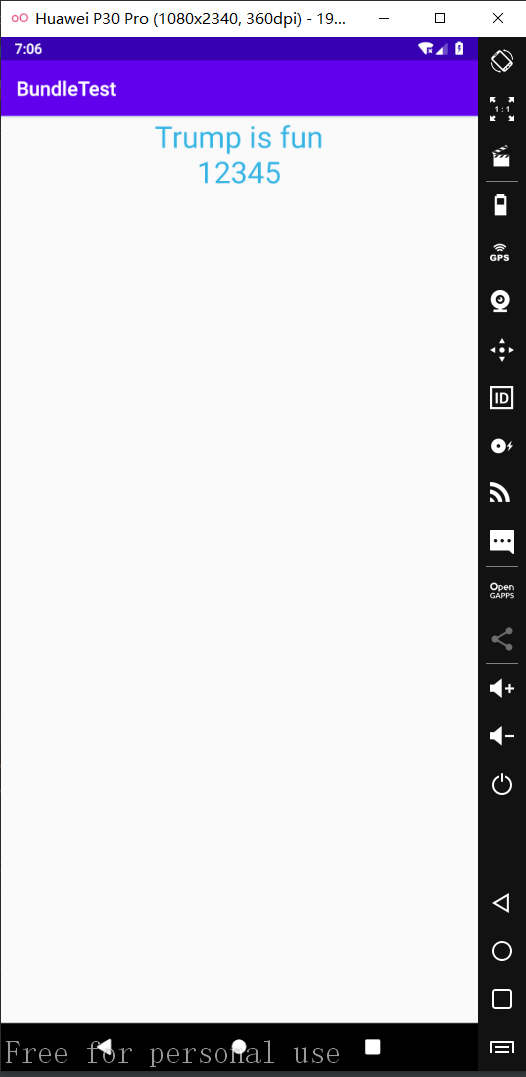
String name = "Trump is fun";
int num = 12345;
person.setName("name");
person.setNum(num);
//实例化一个Bundle
Bundle bundle = new Bundle();
//把FunPerson数据放入到Bundle容器中
bundle.putSerializable("Person", person);
Intent intent = new Intent(MainActivity.this, SecondActivity.class);
//把Bundle容器中的数据放到Intent中
intent.putExtras(bundle);
//启动该Intent,实现Activity的跳转
startActivity(intent);
}
});
}
}
修改SecondActivity中的代码:
public class SecondActivity extends AppCompatActivity {
    //声明控件对象
    private TextView textView;

    @SuppressLint("SetTextI18n")
    @Override
    protected void onCreate(Bundle savedInstanceState) {
        super.onCreate(savedInstanceState);
        setContentView(R.layout.activity_second);

        //获取控件的对象
        textView = findViewById(R.id.text_view);

        /**
         *读取数据
         */
        Intent intent = getIntent();
        //从Intent中取出Bundle
        Bundle bundle = intent.getExtras();

        //获取FunPerson里的数据数据
        assert bundle != null;
        FunPerson person = (FunPerson)bundle.getSerializable("Person");

        assert person != null;
        String name = person.getName();
        int num = person.getNum();

        //显示数据
        textView.setText(name + "\n" + num);
    }
}
看下运行后的结果:
2. 在Activity to Fragment传递数据时使用Bundle
Activity重新创建时,会重新构建它所管理的Fragment,原先的Fragment的字段值将会全部丢失,但是通过Fragment.setArguments(Bundle bundle)方法设置的bundle会保留下来。所以尽量使用Fragment.setArguments(Bundle bundle)方式来传递参数。
有两种实现方案:
① 方法一:使用Fragment的静态方法newInstance()来传递数据
新建MainActivity:
public class MainActivity extends AppCompatActivity {
private Button mButton;
@Override
protected void onCreate(Bundle savedInstanceState) {
super.onCreate(savedInstanceState);
setContentView(R.layout.activity_main);
mButton = findViewById(R.id.button);
mButton.setOnClickListener(new View.OnClickListener() {
@Override
public void onClick(View v) {
//发送数据
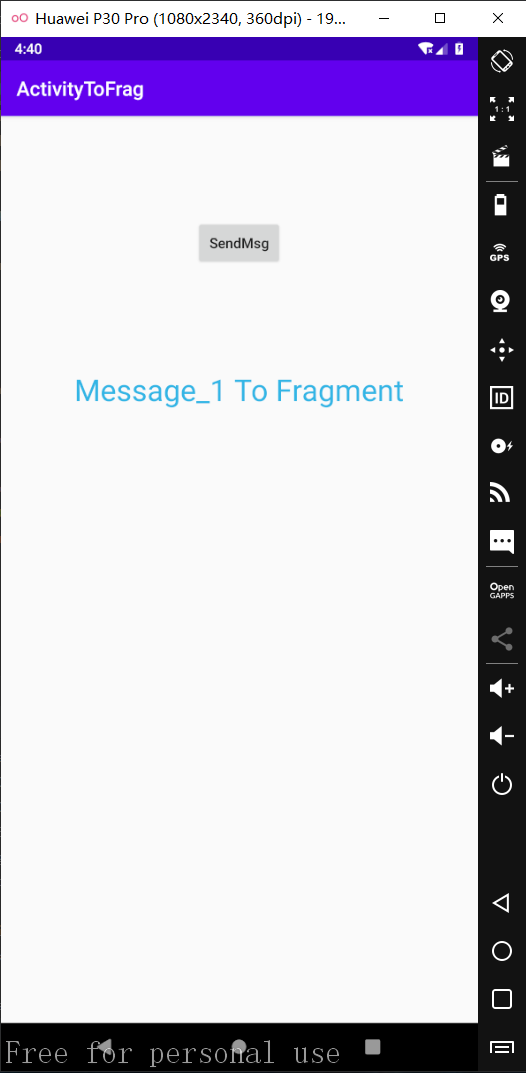
BlankFragment blankFragment = BlankFragment.newInstance("Message_1 To Fragment", "Message_2 To Fragment");
FragmentManager fragmentManager = getSupportFragmentManager();
FragmentTransaction fragmentTransaction = fragmentManager.beginTransaction();
//FrameLayout用于动态更新fragment
fragmentTransaction.replace(R.id.frame_layout, blankFragment);
fragmentTransaction.commit();
}
});
}
}
MainActivity的布局文件如下:
<?xml version="1.0" encoding="utf-8"?>
<androidx.constraintlayout.widget.ConstraintLayout xmlns:android="http://schemas.android.com/apk/res/android"
    xmlns:app="http://schemas.android.com/apk/res-auto"
    xmlns:tools="http://schemas.android.com/tools"
    android:layout_width="match_parent"
    android:layout_height="match_parent"
    tools:context=".MainActivity">

    <Button
        android:id="@+id/button"
        android:layout_width="wrap_content"
        android:layout_height="wrap_content"
        android:layout_marginBottom="8dp"
        android:layout_marginTop="8dp"
        android:text="SendMsg"
        android:textAllCaps="false"
        app:layout_constraintBottom_toTopOf="@+id/guide_line"
        app:layout_constraintEnd_toEndOf="parent"
        app:layout_constraintStart_toStartOf="parent"
        app:layout_constraintTop_toTopOf="parent" />

    <androidx.constraintlayout.widget.Guideline
        android:id="@+id/guide_line"
        android:layout_width="wrap_content"
        android:layout_height="wrap_content"
        android:orientation="horizontal"
        app:layout_constraintGuide_begin="255dp" />

    <FrameLayout
        android:id="@+id/frame_layout"
        android:layout_width="0dp"
        android:layout_height="0dp"
        app:layout_constraintBottom_toBottomOf="parent"
        app:layout_constraintEnd_toEndOf="parent"
        app:layout_constraintHorizontal_bias="0.0"
        app:layout_constraintStart_toStartOf="parent"
        app:layout_constraintTop_toTopOf="@+id/guide_line"
        app:layout_constraintVertical_bias="0.0" >
    </FrameLayout>
</androidx.constraintlayout.widget.ConstraintLayout>
新建一个Fragment:
public class BlankFragment extends Fragment {
    // TODO: Rename parameter arguments, choose names that match
    // the fragment initialization parameters, e.g. ARG_ITEM_NUMBER
    private static final String ARG_PARAM1 = "param1";
    private static final String ARG_PARAM2 = "param2";

    // TODO: Rename and change types of parameters
    private String mParam1;
    private String mParam2;


    public static BlankFragment newInstance(String param1, String param2) {
        BlankFragment fragment = new BlankFragment();
        Bundle args = new Bundle();
        args.putString(ARG_PARAM1, param1);
        args.putString(ARG_PARAM2, param2);
        fragment.setArguments(args);
        return fragment;
    }

    @Override
    public View onCreateView(LayoutInflater inflater, ViewGroup container,
                             Bundle savedInstanceState) {
        // Inflate the layout for this fragment
        View view = inflater.inflate(R.layout.fragment_blank, container, false);

        TextView textView = view.findViewById(R.id.text_view);
        //Fragment获取数据
        Bundle bundle = getArguments();
        String message = null;
        if (bundle != null) {
            message = bundle.getString(ARG_PARAM1);
        }
        textView.setText(message);
        return view;
    }
}
BlankFragment的布局文件比较简单,就是一个显示用的TextView。
运行程序,点击Button,结果如下图bundle4所示:
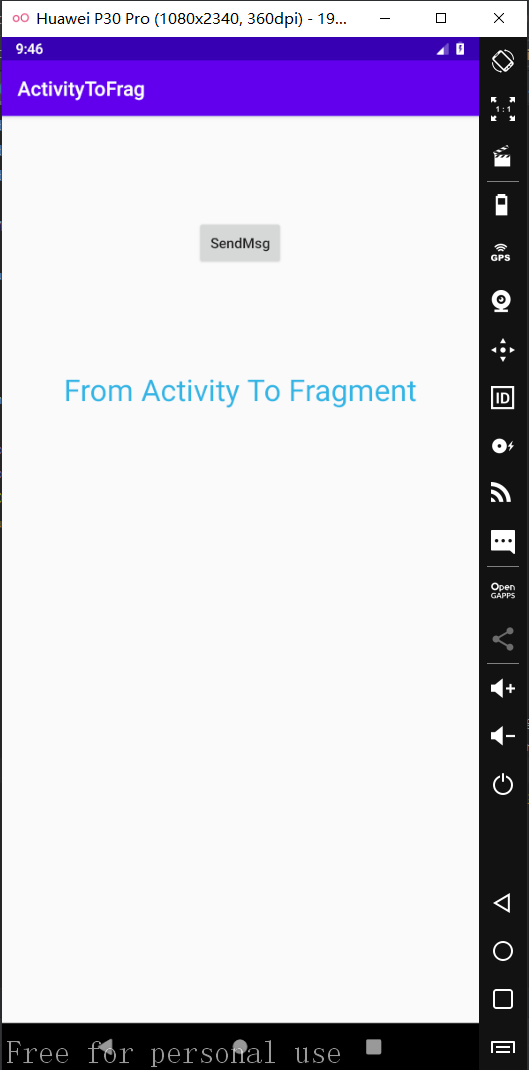
② 方法二:
修改MainActivity的代码:
public class MainActivity extends AppCompatActivity {
    @Override
    protected void onCreate(Bundle savedInstanceState) {
        super.onCreate(savedInstanceState);
        setContentView(R.layout.activity_main);

        Button mButton = findViewById(R.id.button);
        mButton.setOnClickListener(new View.OnClickListener() {
            @Override
            public void onClick(View v) {
                //发送数据
                ToFragment fragment = new ToFragment();
                //新建一个Bundle实例
                Bundle bundle = new Bundle();
                bundle.putString("data", "From Activity To Fragment");
                //将数据传递到Fragment
                fragment.setArguments(bundle);
                FragmentManager fragmentManager = getSupportFragmentManager();
                FragmentTransaction fragmentTransaction = fragmentManager.beginTransaction();
                //FrameLayout用于动态更新fragment
                fragmentTransaction.replace(R.id.frame_layout, fragment);
                fragmentTransaction.commit();
            }
        });
    }
}
新建一个碎片ToFragment,简单起见,就不给新建的碎片弄一个布局文件,直接使用BlankFragment的布局文件,节省时间:
public class ToFragment extends Fragment {
    @Nullable
    @Override
    public View onCreateView(@NonNull LayoutInflater inflater, @Nullable ViewGroup container, @Nullable Bundle savedInstanceState) {
        //简单起见,此处直接使用BlankFragment的布局文件
        View view = inflater.inflate(R.layout.fragment_blank, container, false);

        TextView textView = view.findViewById(R.id.text_view);
        //得到从Activity传来的数据
        Bundle bundle = this.getArguments();
        String message = null;
        if (bundle != null) {
            message = bundle.getString("data");
        }
        textView.setText(message);
        return view;
    }
}
运行程序后结果如下所示:
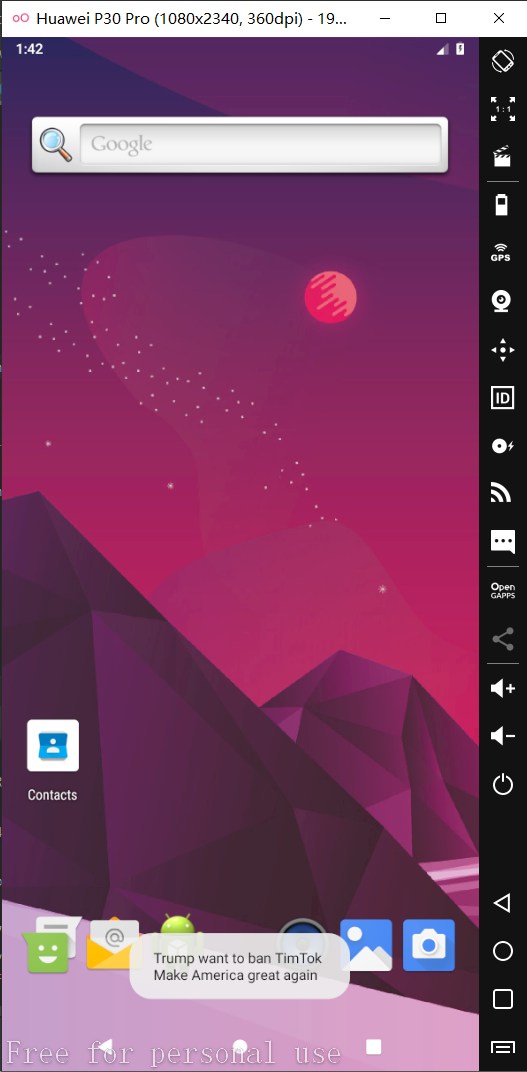
3. 在消息机制的Message中使用setData()传递数据时用到Bundle
这个栗子的思路也很简单,点击屏幕,给Activity发送一个Message,传递两个参数,并通过Toast显示出来,最后finish()掉这个Activity。
新建一个Activity:
public class MainActivity extends AppCompatActivity {

    final static int FLAG = 1;

    @SuppressLint("HandlerLeak")
    public Handler mHandler = new Handler() {
        @Override
        public void handleMessage(@NonNull Message msg) {
            super.handleMessage(msg);
            switch (msg.what) {
                case FLAG:
                    //获取Message传递过来的数据
                    String data1 = msg.getData().getString("text1");
                    String data2 = msg.getData().getString("text2");
                    init(data1, data2);
                    break;
                default:
                    break;
            }
        }
    };

    @Override
    protected void onCreate(Bundle savedInstanceState) {
        super.onCreate(savedInstanceState);
        setContentView(new MyView(this, this));
    }

    public void init(String str1, String str2) {
        //将获取的数据Toast出来
        Toast.makeText(MainActivity.this, str1 + '\n' + str2, Toast.LENGTH_SHORT).show();
        finish();
    }
}
在建一个Java类:
@SuppressLint("ViewConstructor")
public class MyView extends View {
    private MainActivity activity;

    public MyView(Context context, MainActivity activity) {
        super(context);
        this.activity = activity;
    }

    @SuppressLint("ClickableViewAccessibility")
    @Override
    public boolean onTouchEvent(MotionEvent event) {
        int x = (int)event.getX();
        int y = (int)event.getY();
        Rect rect = new Rect(0, 0, 320, 480);
        if (rect.contains(x, y)) {
            Message message = new Message();
            message.what = MainActivity.FLAG;
            //新建Bundle的实例
            Bundle bundle = new Bundle();
            //往Bundle中传入数据
            bundle.putString("text1", "Trump want to ban TimTok");
            bundle.putString("text2", "Make America great again");
            //message利用bundle传递数据
            message.setData(bundle);
            //用activity中的handler发送消息
            activity.mHandler.sendMessage(message);
        }
        return super.onTouchEvent(event);
    }
}
运行程序,得到如下结果:
点击屏幕指定区域,得到如下结果:
六、小结
到此,Bundle的分析基本就结束了,其实Bundle比较简单,只是一个数据容器,不像Activity等有复杂的生命周期。对于开发者来说,只需要了解Bundle的功能、使用场景并掌握常用的数据存取方法即可。
此处说明盗用知名博主的原文,真的写的非常赞,只想保存下来据为己有。
View
View的继承关系
==Android系统中,任何可视化控件都需要从android.viewView类继承。==而任何从Android.view.View继承的类都可以称为视图(View)。Android的中的绝大部分UI组件都放在Android.widget包及其子包下。
[外链图片转存失败,源站可能有防盗链机制,建议将图片保存下来直接上传(img-0GUv4ouC-1664271267594)(C:\Users\29933\AppData\Roaming\Typora\typora-user-images\image-20220829091553561.png)]
从上图看,还有很多布局没有看到,上图仅仅是android.widge包的,还有其他视图,虽然也继承View,但是他们不属于android.widge包。
- RecycleView:继承ViewGroup,但是属于androidx.recyvlerview.widge包的。
- ConstrainLayout继承ViewGroup,但是属于androidx.constraintlayout.widge包的。
- 还有很多自定义控件。
安卓中的属兔类可以分为3种:布局类(Layout),视图容器(ViewGroup),视图类(TextView)。
这三种都是android.view.View的子类,ViewGroup是一个容器,该类也是view的重要子类,所有的布局类和视图容器类都似乎ViewGroup的子类,而视图类直接继承自View类。下图描述了View,ViewGroup,视图容器类及视图类的继承关系。
[外链图片转存失败,源站可能有防盗链机制,建议将图片保存下来直接上传(img-NVXCaWfi-1664271267595)(C:\Users\29933\AppData\Roaming\Typora\typora-user-images\image-20220829093040296.png)]
从上图可以看出:
- Button、TextView、EditText都是视图类,TextView是Button和EditText的父类,TextView直接继承自View类。
- GridView和ListView是ViewGroup的子类,但并不是直接子类,GridView、ListView继承自AbsListView继承自AdapterView继承自ViewGroup,从而形成了视图容器类的层次结构。
- 布局视图虽然也属于容器视图,但由于布局视图具有排版功能,所以将这类视图置为布局类。
对于一个Android应用的图形用户界面来说,ViewGroup作为容器来装其他组件,而ViewGroup里除了可以包含普通View组件之外,还可以再次包含ViewGroup组件。
[外链图片转存失败,源站可能有防盗链机制,建议将图片保存下来直接上传(img-0IgM6w40-1664271267596)(C:\Users\29933\AppData\Roaming\Typora\typora-user-images\image-20220829094739258.png)]
创建View对象
使用XML布局定义View,再用代码控制View
XML布局文件是Android系统中定义视图的常用方法,所有的XML布局文件必须保存在res/layout目录中。XML布局文件的命名及定义需要注意如下几点:
- XML布局文件的扩展名必须是xml。
- 由于aapt会根据每一个XML布局文件名在R类的内嵌类中生成一个int类型的变量,这个变量名就是XML布局文件名,因此,XML布局文件名(不包含扩展名)必须符合Java变量名的命名规则,例如,XML布局文件名不能以数字开头。
- 每一个XML布局文件的根节点可以是任意的视图标签,如< LinearLayout >,< TextView >。
- XML布局文件的根节点必须包含android命名空间,而且命名空间的值必须是android=“http://schemas.android.com/apk/res/android”。
- 为XML布局文件中的标签指定ID时需要使用这样的格式:@+id/tv_xml,其实@+id就是在R.java文件里新增一个id名称,在同一个xml文件中确保ID唯一。
- 由于每一个视图ID都会在R.id类中生成与之相对应的变量,因此,视图ID的值也要符合Java变量的命名规则,这一点与XML布局文件名的命名规则相同。
举例
1.创建activity_view.xml文件
<?xml version="1.0" encoding="utf-8"?>
<LinearLayout xmlns:android="http://schemas.android.com/apk/res/android"
    android:id="@+id/ll_view"
    android:layout_width="match_parent"
    android:layout_height="match_parent"
    android:background="@color/color_666666"
    android:orientation="vertical">
    <TextView
        android:id="@+id/tv_xml"
        android:layout_width="wrap_content"
        android:layout_height="wrap_content"
        android:layout_gravity="center"
        android:layout_marginTop="@dimen/dimen_20"
        android:background="@color/color_188FFF"
        android:padding="@dimen/dimen_10"
        android:text="XML设置TextView"
        android:textColor="@color/white"
        android:textSize="@dimen/text_size_18" />
    <Button
        android:id="@+id/btn_xml"
        android:layout_width="wrap_content"
        android:layout_height="wrap_content"
        android:layout_gravity="center"
        android:layout_marginTop="@dimen/dimen_20"
        android:background="@color/color_188FFF"
        android:padding="@dimen/dimen_10"
        android:text="按钮"
        android:textColor="@color/white"
        android:textSize="@dimen/text_size_18" />
</LinearLayout>
2.加载布局文件、关联控件
如果要使用上面的XML布局文件(activity_view.xml),通常需要在onCreate方法中使用setContentView方法指定XML布局文件的资源lD,并获取在activity_view.xml文件中定义的某个View,代码如下:
public class ViewActivity extends AppCompatActivity{
    private Button btnXml;
    private TextView tvXml;
    @Override
    protected void onCreate(Bundle savedInstanceState) {
        super.onCreate(savedInstanceState);
        //加载布局文件
        setContentView(R.layout.activity_view);
        //如果想获得在activity_view.xml文件中定义的某个View
        //关联控件:R.id.tv_xml是tvXml的ID,确保这个ID在R.layout.activity_view中
        tvXml = findViewById(R.id.tv_xml);
        //关联控件:R.id.btn_xml是btnXml的ID,确保这个ID在R.layout.activity_view中
        btnXml = findViewById(R.id.btn_xml);
    }
}
3.在获得XML布局文件中的视图对象时需要注意下面几点:
- 先使用setContentView方法装载XML布局文件,再使用findViewByld方法,否则findViewByld方法会由于未找到控件而产生空指针异常,导致应用崩溃。
- 虽然所有的XML布局文件中的视图ID都在R.id类中生成了相应的变量,但使用findViewByld方法只能获得已经装载的XML布局文件中的视图对象。
- 例,activity_view.xml中TextView的对应R.id.tv_xml;
- 其他XML文件中有TextView的R.id.tv_shuaiciid,tv_shuaici不在activity_view.xml中如果使用 tvXml = findViewById(R.id.tv_shuaici);
- 结果应用崩溃。原因:在activity_view.xml中找不到ID为tv_shuaici的视图对象。
4.用代码控制视图
虽然使用XML布局文件可以非常方便地对控件进行布局,但若想控制这些控件的行为,仍然需要编写Java代码。在上面介绍了使用findViewByld方法获得指定的视图对象,当获得视图对象后,就可以使用代码来控制这些视图对象了。例如,下面的代码获得了一个TextView对象,并修改了TextView的文本。
TextView tvXml = findViewById(R.id.tv_xml);
//直接使用字符串来修改TextView的文本
tvXml.setText("帅次");
//使用字符串资源(res/values/strings.xml)
//其中R.string.str_tv_shuaici是字符串资源ID,系统会使用这个ID对应的字符串设置TextView的文本。
tvXml.setText(R.string.str_tv_shuaici);
选择其中一样即可,如果同时设置,最后一次设置为最终结果。
使用代码的方式来创建View对象
在更高级的Android应用中,往往需要动态添加视图。要实现这个功能,最重要的是获得当前的视图容器对象,这个容器对象所对应的类需要继承ViewGroup类。
将其他的视图添加到当前的容器视图中需要如下几步:
- 第1步,获得当前的容器视图对象;
- 第2步,获得或创建待添加的视图对象;
- 第3步,将相应的视图对象添加到容器视图中。
总结
- 实际上不管使用那种方式,他们创建Android用户界面行为的本质是完全一样的。大部分时候,设置UI组件的XML属性还有对应的方法。
- 对于View类而言,它是所有UI组件的基类,因此它包含的XML属性和方法是所有组件都可以使用的。
自定义View
为什么要自定义View
Android系统提供了一系列的原生控件,但这些原生控件并不能够满足我们的需求时,我们就需要自定义View了。
自定义View的基本方法
自定义View的最基本的三个方法分别是: onMeasure()、onLayout()、onDraw();
View在Activity中显示出来,要经历测量、布局和绘制三个步骤,分别对应三个动作:measure、layout和draw。
- 测量:onMeasure()决定View的大小;
- 布局:onLayout()决定View在ViewGroup中的位置;
- 绘制:onDraw()决定绘制这个View。
[外链图片转存失败,源站可能有防盗链机制,建议将图片保存下来直接上传(img-ywfXlm7l-1664271267596)(C:\Users\29933\AppData\Roaming\Typora\typora-user-images\image-20220829095356737.png)]
需要用到的两个对象
- Canvas(画布),可在画布上面绘制东西,绘制的内容取决于所调用的方法。如drawCircle方法,用来绘制圆形,需要我们传入圆心的x和y坐标,以及圆的半径。
- Paint(画笔),用来告诉画布,如何绘制那些要被绘制的对象。
这两个方法暂时了解就行,如果拓展开,这不够写,后面可能会针对这两个对象单独拉一个章节出来。
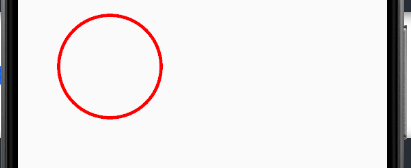
自绘控件View实例
1、直接继承View类
自绘View控件时,最主要工作就是绘制出丰富的内容,这一过程是在重写的onDraw方法中实现的。由于是View,它没有子控件了,所以重写onLayout没有意义。onMeasure的方法可以根据自己的需要来决定是否需要重写,很多情况下,不重写该方法并不影响正常的绘制。
/**
 * 创建人:scc
 * 功能描述:自定义View
 */
public class CustomView extends View {
    private Paint paint;
    //从代码创建视图时使用的简单构造函数。
    public CustomView(Context context) {
        super(context);
    }
    //从XML使用视图时调用的构造函数。
    public CustomView(Context context, @Nullable AttributeSet attrs) {
        super(context, attrs);
    }
    //View的绘制工作
    @Override
    protected void onDraw(Canvas canvas) {
        super.onDraw(canvas);
        //实例化画笔对象
        paint = new Paint();
        //给画笔设置颜色
        paint.setColor(Color.RED);
        //设置画笔属性
        //paint.setStyle(Paint.Style.FILL);//画笔属性是实心圆
        paint.setStyle(Paint.Style.STROKE);//画笔属性是空心圆
        paint.setStrokeWidth(10);//设置画笔粗细
        //cx:圆心的x坐标;cy:圆心的y坐标;参数三:圆的半径;参数四:定义好的画笔
        canvas.drawCircle(getWidth() / 4, getHeight() / 4, 150, paint);
    }
}
2、在布局 XML 文件中使用自定义View
<com.scc.demo.view.CustomView
        android:id="@+id/view_circle"
        android:layout_width="wrap_content"
        android:layout_height="wrap_content"/>
3、实现效果:
性能优化
在自定义View时需要注意,避免犯以下的性能错误:
- 在非必要时,对View进行重绘。
- 绘制一些不被用户所看到的的像素,也就是过度绘制。(被覆盖的地方)
- 在绘制期间做了一些非必要的操作,导致内存资源的消耗。
可进一步了解和优化:
- View.invalite()是最最广泛的使用操作,因为在任何时候都是刷新和更新视图最快的方式。
在自定义View时要小心避免调用非必要的方法,因为这样会导致重复强行绘制整个视图层级,消耗宝贵的帧绘制周期。检查清楚View.invalite()和View.requestLayout()方法调用时间位置,因为这会影响整个UI,导致GPU和它的帧速率变慢。
- 避免过渡重绘。为了避免过渡重绘,我们可以利用Canvas方法,只绘制控件中所需要的部分。整个一般在重叠部分或控件时特别有用。相应的方法是Canvas.clipRect()(指定要被绘制的区域);
- 在实现View.onDraw()方法中,不应该在方法内及调用的方法中进行任何的对象分配。在该方法中进行对象分配,对象会被创建和初始化。而当View.onDraw()方法执行完毕时。垃圾回收器会释放内存。如果View带动画,那么View在一秒内会被重绘60次。所以要避免在View.onDraw()方法中分配内存。
永远不要在View.onDraw()方法中及调用的方法中进行内存分配,避免带来负担。垃圾回收器多次释放内存,会导致卡顿。最好的方式就是在View被首次创建出来时,实例化这些对象。
到这里View基本差不多了,还有其他属性、方法、事件等,在后面的TexView、Button、Layout等中慢慢了解。
一、为什么要使用SurfaceView
我们知道View是通过刷新来重绘视图,系统通过发出
VSSYNC信号来进行屏幕的重绘,刷新的时间间隔是16ms,如果我们可以在16ms以内将绘制工作完成,则没有任何问题,如果我们绘制过程逻辑很复杂,并且我们的界面更新还非常频繁,这时候就会造成界面的卡顿,影响用户体验,为此Android提供了SurfaceView来解决这一问题。
View和SurfaceView的区别:
1 . View适用于主动更新的情况,而SurfaceView则适用于被动更新的情况,比如频繁刷新界面。
2 . View在主线程中对页面进行刷新,而SurfaceView则开启一个子线程来对页面进行刷新。
3 . View在绘图时没有实现双缓冲机制,SurfaceView在底层机制中就实现了双缓冲机制。
这摘录了一段网上对于双缓冲技术的介绍
双缓冲技术是游戏开发中的一个重要的技术。当一个动画争先显示时,程序又在改变它,前面还没有显示完,程序又请求重新绘制,这样屏幕就会不停地闪烁。而双缓冲技术是把要处理的图片在内存中处理好之后,再将其显示在屏幕上。双缓冲主要是为了解决 反复局部刷屏带来的闪烁。把要画的东西先画到一个内存区域里,然后整体的一次性画出来。
二、如何使用SurfaceView
要想使用
SurfaceView需要经过创建、初始化、使用三个步骤,下面我们就一步步来说说这三个步骤。
1 . 创建SurfaceView
我们需要自定义一个类继承自SurfaceView,并且实现两个接口以及接口定义的方法,当然,与自定义View类似,还要重写三个构造函数。下面是代码:
public class SurfaceViewTemplate extends SurfaceView implements SurfaceHolder.Callback, Runnable {
    public SurfaceViewTemplate(Context context) {
        this(context, null);
    }

    public SurfaceViewTemplate(Context context, AttributeSet attrs) {
        this(context, attrs, 0);
    }

    public SurfaceViewTemplate(Context context, AttributeSet attrs, int defStyleAttr) {
        super(context, attrs, defStyleAttr);
    }

    @Override
    public void surfaceCreated(SurfaceHolder holder) {
       //创建
    }

    @Override
    public void surfaceChanged(SurfaceHolder holder, int format, int width, int height) {
        //改变
    }

    @Override
    public void surfaceDestroyed(SurfaceHolder holder) {
        //销毁
    }

    @Override
    public void run() {
        //子线程
    }
}
前面三个构造函数的写法和自定义View是相同的,接下来的三个方法分别在SurfaceView创建、改变、销毁的时候进行调用,最后的
run()方法中写我们子线程中执行的绘图逻辑即可。
2 . 初始化SurfaceView
这一步我们主要是定义三个成员变量以备后面绘图时使用,然后初始化这三个成员变量并且注册对应的回调方法。代码如下:
private SurfaceHolder mSurfaceHolder;
//绘图的Canvas
private Canvas mCanvas;
//子线程标志位
private boolean mIsDrawing;

/**
 * 初始化View
 */
private void initView(){
    mSurfaceHolder = getHolder();
    //注册回调方法
    mSurfaceHolder.addCallback(this);
    //设置一些参数方便后面绘图
    setFocusable(true);
    setKeepScreenOn(true);
    setFocusableInTouchMode(true);
}

public SurfaceViewSinFun(Context context, AttributeSet attrs, int defStyleAttr) {
    super(context, attrs, defStyleAttr);
    //在三个参数的构造方法中完成初始化操作
    initView();
}
上面的代码很简单,都有注释,相信很容易看懂,这里不再过多解释。
3 . 使用SurfaceView
经过上面两步的准备工作,下面就可以开始使用SurfaceView了。
这一步又可以分为3步来完成:
(1) 通过lockCanvas()方法获得Canvas对象
(2) 在子线程中使用Canvas对象进行绘制
(3) 使用unlockCanvasAndPost()方法将画布内容进行提交
注意: lockCanvas() 方法获得的Canvas对象仍然是上次绘制的对象,由于我们是不断进行绘制,但是每次得到的Canvas对象都是第一次创建的Canvas对象。
SurfaceView的绘制可以使用下面的模板代码来实现,唯一的不同就是绘制逻辑的不同,代码如下:
public class SurfaceViewTemplate extends SurfaceView implements SurfaceHolder.Callback, Runnable {
    private SurfaceHolder mSurfaceHolder;
    //绘图的Canvas
    private Canvas mCanvas;
    //子线程标志位
    private boolean mIsDrawing;
    public SurfaceViewTemplate(Context context) {
        this(context, null);
    }

    public SurfaceViewTemplate(Context context, AttributeSet attrs) {
        this(context, attrs, 0);
    }

    public SurfaceViewTemplate(Context context, AttributeSet attrs, int defStyleAttr) {
        super(context, attrs, defStyleAttr);
        initView();
    }

    @Override
    public void surfaceCreated(SurfaceHolder holder) {
        mIsDrawing = true;
        //开启子线程
        new Thread(this).start();
    }

    @Override
    public void surfaceChanged(SurfaceHolder holder, int format, int width, int height) {

    }

    @Override
    public void surfaceDestroyed(SurfaceHolder holder) {
        mIsDrawing = false;
    }

    @Override
    public void run() {
        while (mIsDrawing){
            drawSomething();
        }
    }
    //绘图逻辑
    private void drawSomething() {
        try {
            //获得canvas对象
            mCanvas = mSurfaceHolder.lockCanvas();
            //绘制背景
            mCanvas.drawColor(Color.WHITE);
            //绘图
        }catch (Exception e){

        }finally {
            if (mCanvas != null){
                //释放canvas对象并提交画布
                mSurfaceHolder.unlockCanvasAndPost(mCanvas);
            }
        }
    }

    /**
     * 初始化View
     */
    private void initView(){
        mSurfaceHolder = getHolder();
        mSurfaceHolder.addCallback(this);
        setFocusable(true);
        setKeepScreenOn(true);
        setFocusableInTouchMode(true);
    }
}
我们在xml文件中的使用和自定义View是相同的,使用全路径名称即可:
<com.codekong.drawlearning.view.SurfaceViewTemplate
        android:layout_width="match_parent"
        android:layout_height="match_parent" />
三、SurfaceView小案例
下面我们通过两个小案例来展示SurfaceView的使用。先放上效果图
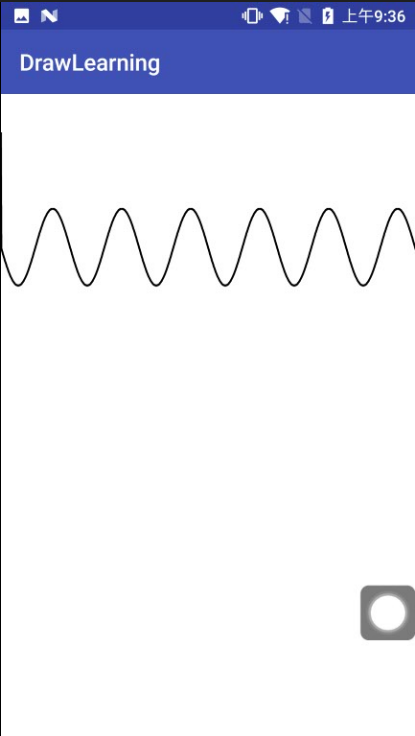
正弦曲线

手写板
1 . 绘制正弦曲线
大体的框架都是上面给的那个代码模板,区别只在于初始化画笔,和具体的绘图逻辑,所以这里不再赘述,直接上代码:
public class SurfaceViewSinFun extends SurfaceView implements SurfaceHolder.Callback, Runnable {
    private SurfaceHolder mSurfaceHolder;
    //绘图的Canvas
    private Canvas mCanvas;
    //子线程标志位
    private boolean mIsDrawing;
    private int x = 0, y = 0;
    private Paint mPaint;
    private Path mPath;
    public SurfaceViewSinFun(Context context) {
        this(context, null);
    }

    public SurfaceViewSinFun(Context context, AttributeSet attrs) {
        this(context, attrs, 0);
    }

    public SurfaceViewSinFun(Context context, AttributeSet attrs, int defStyleAttr) {
        super(context, attrs, defStyleAttr);
        mPaint = new Paint();
        mPaint.setColor(Color.BLACK);
        mPaint.setStyle(Paint.Style.STROKE);
        mPaint.setAntiAlias(true);
        mPaint.setStrokeWidth(5);
        mPath = new Path();
        //路径起始点(0, 100)
        mPath.moveTo(0, 100);
        initView();
    }

    @Override
    public void surfaceCreated(SurfaceHolder holder) {
        mIsDrawing = true;
        new Thread(this).start();
    }

    @Override
    public void surfaceChanged(SurfaceHolder holder, int format, int width, int height) {

    }

    @Override
    public void surfaceDestroyed(SurfaceHolder holder) {
        mIsDrawing = false;
    }

    @Override
    public void run() {
        while (mIsDrawing){
            drawSomething();
            x += 1;
            y = (int)(100 * Math.sin(2 * x * Math.PI / 180) + 400);
            //加入新的坐标点
            mPath.lineTo(x, y);
        }
    }

    private void drawSomething() {
        try {
            //获得canvas对象
            mCanvas = mSurfaceHolder.lockCanvas();
            //绘制背景
            mCanvas.drawColor(Color.WHITE);
            //绘制路径
            mCanvas.drawPath(mPath, mPaint);
        }catch (Exception e){

        }finally {
            if (mCanvas != null){
                //释放canvas对象并提交画布
                mSurfaceHolder.unlockCanvasAndPost(mCanvas);
            }
        }
    }

    /**
     * 初始化View
     */
    private void initView(){
        mSurfaceHolder = getHolder();
        mSurfaceHolder.addCallback(this);
        setFocusable(true);
        setKeepScreenOn(true);
        setFocusableInTouchMode(true);
    }
}
2 . 手写板(随手指绘制轨迹)
这个主要是涉及到触摸事件,在手指按下时将Path的起始点移动到按下的坐标点,手指移动时将移动的坐标点加入Path中,其他的代码是相同的。代码如下:
public class SurfaceViewHandWriting extends SurfaceView implements SurfaceHolder.Callback, Runnable {
    private SurfaceHolder mSurfaceHolder;
    //绘图的Canvas
    private Canvas mCanvas;
    //子线程标志位
    private boolean mIsDrawing;
    //画笔
    private Paint mPaint;
    //路径
    private Path mPath;
    private static final String TAG = "pyh";
    public SurfaceViewHandWriting(Context context) {
        this(context, null);
    }

    public SurfaceViewHandWriting(Context context, AttributeSet attrs) {
        this(context, attrs, 0);
    }

    public SurfaceViewHandWriting(Context context, AttributeSet attrs, int defStyleAttr) {
        super(context, attrs, defStyleAttr);
        mPaint = new Paint();
        mPaint.setColor(Color.BLACK);
        mPaint.setStyle(Paint.Style.STROKE);
        mPaint.setStrokeWidth(5);
        mPaint.setAntiAlias(true);
        mPath = new Path();
        mPath.moveTo(0, 100);
        initView();
    }

    @Override
    public void surfaceCreated(SurfaceHolder holder) {
        mIsDrawing = true;
        new Thread(this).start();
    }

    @Override
    public void surfaceChanged(SurfaceHolder holder, int format, int width, int height) {

    }

    @Override
    public void surfaceDestroyed(SurfaceHolder holder) {
        mIsDrawing = false;
    }

    @Override
    public void run() {
        while (mIsDrawing) {
            long start = System.currentTimeMillis();
            drawSomething();
            long end = System.currentTimeMillis();
            if (end - start < 100) {
                try {
                    Thread.sleep(100 - (end - start));
                } catch (InterruptedException e) {
                    e.printStackTrace();
                }
            }
        }

    }

    @Override
    public boolean onTouchEvent(MotionEvent event) {
        int x = (int) event.getX();
        int y = (int) event.getY();
        switch (event.getAction()){
            case MotionEvent.ACTION_DOWN:
                mPath.moveTo(x, y);
                break;
            case MotionEvent.ACTION_MOVE:
                mPath.lineTo(x, y);
                break;
            case MotionEvent.ACTION_UP:
                break;
        }
        return true;
    }

    /**
     * 初始化View
     */
    private void initView(){
        mSurfaceHolder = getHolder();
        mSurfaceHolder.addCallback(this);
        setFocusable(true);
        setKeepScreenOn(true);
        setFocusableInTouchMode(true);
    }

    private void drawSomething() {
        try {
            //获得canvas对象
            mCanvas = mSurfaceHolder.lockCanvas();
            //绘制背景
            mCanvas.drawColor(Color.WHITE);
            //绘制路径
            mCanvas.drawPath(mPath, mPaint);
        }catch (Exception e){

        }finally {
            if (mCanvas != null){
                //释放canvas对象并提交画布
                mSurfaceHolder.unlockCanvasAndPost(mCanvas);
            }
        }
    }
}
上面还有一个细节,在绘制的时候,我们并没有让线程一直运行,而是让它休眠一会,从而节约系统资源,一般建议判断的阈值为50-100之间即可保证用户体验同时节约系统资源。


 932
932

 被折叠的 条评论
为什么被折叠?
被折叠的 条评论
为什么被折叠?
 到【灌水乐园】发言


