


 本文介绍如何在Spring Boot项目中整合Mybatis并实现表单验证功能。详细步骤包括设置POM.xml、配置数据源和Mybatis、创建实体类、定义Mapper接口和映射类、实现Service与Controller层,以及使用Thymeleaf创建前端页面。同时,解决了Spring Boot中无需重启即可刷新前端页面的问题。
首先是目录结构(可以运行)

我使用的开发工具是eclipse(由于插件sts一直下载不好,我是直接添加的依赖),验证使用的是springboot自带的validation验证器
1.pom.xml
	<parent>
		<groupId>org.springframework.boot</groupId>
		<artifactId>spring-boot-starter-parent</artifactId>
		<version>2.0.4.RELEASE</version>
	</parent>
	<dependencies>
		<dependency>
			<groupId>org.mybatis.spring.boot</groupId>
			<artifactId>mybatis-spring-boot-starter</artifactId>
			<version>1.3.2</version>
		</dependency>

		<dependency>
			<groupId>mysql</groupId>
			<artifactId>mysql-connector-java</artifactId>
			<version>8.0.11</version>
		</dependency>
		<dependency>
			<groupId>com.alibaba</groupId>
			<artifactId>druid-spring-boot-starter</artifactId>
			<version>1.1.10</version>
		</dependency>
		<dependency>
			<groupId>org.springframework.boot</groupId>
			<artifactId>spring-boot-starter-web</artifactId>
		</dependency>
		<dependency>
			<groupId>org.springframework.boot</groupId>
			<artifactId>spring-boot-starter-thymeleaf</artifactId>
		</dependency>
	</dependencies>
2.在application.properties配置数据源和mybatis
mysql8.X版本的spring.datasource.driverClassName=com.mysql.cj.jdbc.Driver
spring.datasource.url=jdbc:mysql://localhost:3306/test?useUnicode=true&characterEncoding=utf8
spring.datasource.driverClassName=com.mysql.cj.jdbc.Driver
spring.datasource.username=root
spring.datasource.password=root
server.port=8015
#mybatis
mybatis:typeAliasesPackage:com.test.entity
mybatis.mapperLocations=classpath:mapper/*mapper.xml
3.创建实体类
标签加在属性上
(1)附上标签的含义
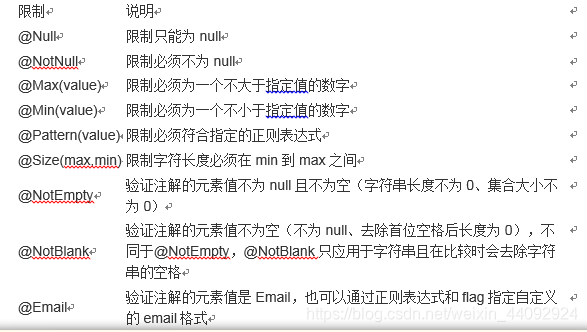
public class Users {
private Integer id;
@NotNull
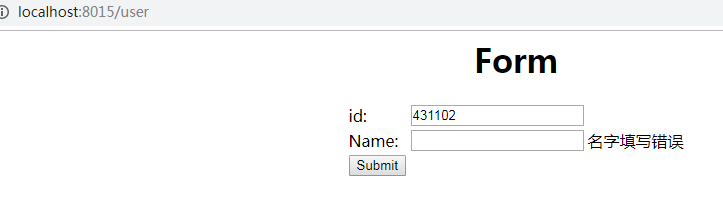
@Size(min = 2, max = 30, message = "名字填写错误")
private String username;
public Integer getId() {
return id;
}
public void setId(Integer id) {
this.id = id;
}
public String getUsername() {
return username;
}
public void setUsername(String username) {
this.username = username;
}
}
4.添加Mapper接口和映射类
usersMapper接口中的方法必须与mybatis的配置文件mapper.xml中insert标签中的id相同
public interface UsersMapper {

	void insert(Users users);
}
mapper.xml
<?xml version="1.0" encoding="UTF-8"?>
<!DOCTYPE mapper PUBLIC "-//mybatis.org//DTD Mapper 3.0//EN"
        "http://mybatis.org/dtd/mybatis-3-mapper.dtd" >
<mapper namespace="com.test.dao.UsersMapper">
	<resultMap id="userMap" type="com.test.entity.Users">
		<result property="id" column="id" />
		<result property="username" column="uesrname" />
	</resultMap>
	<insert id="insert" parameterType="com.test.entity.Users">
		INSERT INTO
		user(id,username)
		VALUES(#{id},#{username})
	</insert>
</mapper>
5.创建service和service的实现
public interface UsersService {

	void insertUsers(Users users);
}
@Service
@Transactional
public class UsersServiceImpl implements UsersService{
  @Autowired
	private UsersMapper userMapper;
	public void insertUsers(Users users) {
		// TODO Auto-generated method stub
		this.userMapper.insert(users);
	}

}
6.controller层
@Controller
public class AddController {
	@Autowired
	private UsersService usersService;

	@GetMapping("/user")
	public String greetingForm(Model model) {
		model.addAttribute("users", new Users());
		return "user";
	}

	@PostMapping("/user")
	public String userSubmit(@Valid Users user, BindingResult bindingResult) {
		Users newUser = new Users();
		newUser.setId(user.getId());
		newUser.setUsername(user.getUsername());
		usersService.insertUsers(newUser);
		if (bindingResult.hasErrors()) {// 验证出错返回user.html页面
			return "user";// 这是一个html页面
		}
		return "result";// 这是一个html页面
	}
}
7.建立前端页面使用的是thymeleaf
user.html
<html xmlns:th="http://www.thymeleaf.org">
<head>
<title>Getting Started: Handling Form Submission</title>
<meta http-equiv="Content-Type" content="text/html; charset=UTF-8" />
</head>
<body>
<div align="center">
	<h1>Form</h1>
	<form  th:action="@{/user}" th:object="${users}"
		method="post">
		<table>
			<tr>
				<td>id:</td>
				<td><input type="text" th:field="*{id}" /></td>
				<td th:if="${#fields.hasErrors('id')}" th:errors="*{id}">id
					Error</td>
			</tr>
			<tr>
				<td>Name:</td>
				<td><input type="text" th:field="*{username}" /></td>
				<td th:if="${#fields.hasErrors('username')}" th:errors="*{username}">Name
					Error</td>
			</tr>
			<tr>
				<td><button type="submit">Submit</button></td>
			</tr>
		</table>
	</form>
</div>
</body>
</html>
result.html
<!DOCTYPE HTML>
<html xmlns:th="http://www.thymeleaf.org">
<head>
<title>Getting Started: Handling Form Submission</title>
<meta http-equiv="Content-Type" content="text/html; charset=UTF-8" />
</head>
<body>
	<h1>Result</h1>
	<ul class="list-group" style="width: 300px">
		<li class="list-group-item" th:text="'Id: ' + ${users.id}"></li>
		<li class="list-group-item" th:text="'Username: ' + ${users.username}"></li>

	</ul>
	<h4>
		<span class="glyphicon glyphicon-saved"></span> Insert into MySQL
		successfully!
	</h4>
	<a href="/user">重新添加数据</a>
	<a href="/getAllUser"><button type="button" >查看数据</button></a>
</body>
</html>
启动类(一定要加@MapperScan(“com.test.dao”))//里面是mapper的所在位置
@SpringBootApplication
@EnableCaching
@MapperScan("com.test.dao")
public class App {
	public static void main(String[] args) {
		SpringApplication.run(App.class, args);

	}
}
在springboot中更改前端页面,在浏览器中直接刷新页面,不重启项目
解决:在application.properties配置文件中添加如下语句
spring.thymeleaf.cache=false
最后的效果展示
有问题欢迎在博客下留言


 1360
1360

 被折叠的 条评论
为什么被折叠?
被折叠的 条评论
为什么被折叠?
 到【灌水乐园】发言


