


运行环境为ubunutu18.04
YOLOv3要求
https://github.com/eriklindernoren/PyTorch-YOLOv3
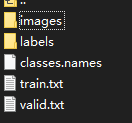
数据集格式:
images是图片
labels是TXT格式的标记
# labels的文件格式
0 0.515 0.5 0.21694873 0.18286777
# 第一位0:代表class.names文件中类别列表中0位(第一行)的类
# 后面四位为:x y w h
class.names是一共有哪些分类,一种分类是一行
train.txt是训练集图片列表
#train.txt的文件格式:记录了训练集的图片地址
data/custom/images/train.jpg
valid.txt是验证集图片列表,同上
数据处
本人采集图片分辨率为2592×1520为,使用精灵标注标注图片。
精灵标注后的JSON文件格式如下:
{
#图片名字0010000001012019102215130502bd.jpg
    "path":"C:\Users\yiwen\Desktop\sleep\0010000001012019102215130502bd.jpg",
    "outputs":{
        "object":[
            {
                "name":"groveling", # 标签
                "bndbox":{
                    "xmin":1688,
                    "ymin":418,
                    "xmax":2278,
                    "ymax":982
                }
            }
        ]
    },
    "time_labeled":1594128879086,
    "labeled":true,
    "size":{
        "width":2592,
        "height":1520,
        "depth":3
    }
}
标注框是以xmin,ymin,xmax,ymax形式储存。
需要转换成x y w h形式
X是标记框的中心横坐标
X是标记框的中心纵坐标
W是标记框的宽
H是标记框的高
所以变换公式为
 w = xmax - xmin  # 标记框的宽
 h = ymax - ymin  # 标记框的高
 x = (w/2)+xmin  # 标记框中心点坐标
 y = (h/2)+ymin
因为训练数据要求缩放到0到一之间所以坐标数据都以图片大小进行缩放
因为我使用的图片大小为2592×1520所以进行如下缩放。
x = x/2592
y = y/1520
w = w/2592
h = h/1520
最后要把数据保存为txt格式
all_json = os.listdir(data_dir)
label_idx = 0  # 因为我只有一个类别所以全部都是0
for j_name in all_json:
    j_path = data_dir + '/' + j_name  # 得到json文件路径
    txt_name = j_name[0:30]
    txt_path = txt_ex_dir + '/' + txt_name+'.txt'  # 输出的txt文件路径
    with open(j_path, 'r', encoding='utf-8') as f:
        with open(txt_path, 'w', ) as ex:
            info = json.loads(f.read())  # 读json文件,转为dict
            for peo_list in reversed(range(0, len(info['outputs']['object']))):
                x, y, w, h = get_coordinate_list(info, peo_list)  # 获得处理好的X Y W H
                # print(info['outputs']['object'][peo_list]['bndbox'])
                # print(info['path'])
                txt_data = str(label_idx) + ' ' + str(x) + ' ' + str(y) + ' ' + str(w) + ' ' + str(h)  #格式化处理需要写到txt的文本
                ex.write(txt_data)  # 把文本输出到txt中
                ex.write('\n')  # 一个标记框换行一次
        ex.close()
    f.close()
    print(count)
# 把所有图片分为测试机和验证集
all_json = os.listdir(data_dir)
all_data = []
for j_name in all_json:
    first_name = j_name
    all_data.append(first_name)  # 获得所有图片的地址
seed = 7
seed = np.random.seed(seed)
train, val = train_test_split(all_data, test_size=0.2, random_state=seed)  # 把数据集分为测试机和验证集
print(len(train))
print(len(val))
write_txt('lable/train.txt', train)  # 把分好的训练集地址写入到train.txt中
write_txt('lable/valid.txt', val)
处理训练中的问题
使用代码训练
python3 train.py --batch_size 6 --model_def config/yolov3-custom.cfg --data_config config/custom.data --pretrained_weights weights/darknet53.conv.74 --epochs 200
把数据集都放入相应的位置后
检查文件config/custom.data分类数量是否正确
cd config/                                # 到config目录下
$ bash create_custom_model.sh 			  # 这个会生成一个训练用的模型 'yolov3-custom.cfg'
训练中的问题挺多的只记得其中一部分
-
缺少terminaltables包,解决使用pip install terminaltables
-
AttributeError: module ‘tensorboard.summary._tf.summary’ has no attribute 'FileWriter’问题,问题是因为使用的tensorflow版本过高,通过修改代码解决,看这里https://github.com/eriklindernoren/PyTorch-YOLOv3/commit/930c5872eea3d22233805f3f693dd5c9a9892707
-
RuntimeError: shape ‘[2, 3, 6, 16, 16]’ is invalid for input of size 16384类似问题,是因为生成训练集模型有问题,解决方法一:重新做bash create_custom_model.sh。
如果还不行请修改config/yolov3-custom.cfg中代码
如果classes = 1
则把改成filters = (classes+4+1)*3 =18
# config/yolov3-custom.cfg 文件中
[convolutional]
size=1
stride=1
pad=1
filters=18  # 文件中共有三个类似地方要改,都按filters = (classes+4+1)*3改
activation=linear


[yolo]
mask = 0,1,2
anchors = 10,13,  16,30,  33,23,  30,61,  62,45,  59,119,  116,90,  156,198,  373,326
classes=1
num=9
jitter=.3
ignore_thresh = .7
truth_thresh = 1
random=1
- CUDA out of memory.问题。解决:
在train.py中注释掉下面三行。
#可能是每次使用tensorboard写入的张量太多了
logger = Logger("logs")
logger.list_of_scalars_summary(tensorboard_log, batches_done)
logger.list_of_scalars_summary(evaluation_metrics, epoch)
而且要把batch_size 改小
-
ValueError: not enough values to unpack (expected 3, got 0)看https://github.com/eriklindernoren/PyTorch-YOLOv3/issues/222
-
IndexError: list index out of range(while training on custom dataset with two classes),解决把utils.py中
names = fp.read().split("\n")[:-1]
# 改为
names = fp.read().split("\n")
最重要的是基本上所有问题都在https://github.com/eriklindernoren/PyTorch-YOLOv3/issues能找到答案,如果不行多尝试就好了。
使用训练好的网络
私有数据集训练完后使用命令:
python detect.py --model_def config/yolov3-custom.cfg --weights_path checkpoints/yolov3_ckpt_199.pth --class_path data/custom/classes.names
model_def:是新建的模型地址
weights_path:是训练网络的后生成的checkpoints
class_path: 是分类用的文件


 7218
7218

 被折叠的 条评论
为什么被折叠?
被折叠的 条评论
为什么被折叠?
 到【灌水乐园】发言


