


目录
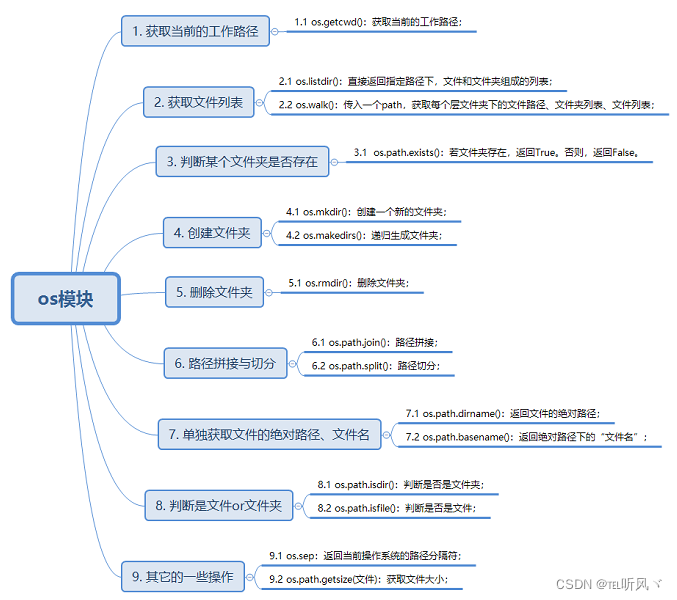
1. OS模块
参考链接:os详解
2. pathlib模块
导入函数:
from pathlib import Path参考链接:pathlib模块

3. lambda函数
使用方法:
result = lambda x : x.split()  #lambda()函数
print(result('spacy test')) #输出 ['spacy', 'test']更多参考:lambda详细讲解
4. collections模块
导入函数:
import collections
print(collections.__all__) # 生成所有子类
# ['ChainMap', 'Counter', 'OrderedDict', 'UserDict', 'UserList', 'UserString', 'defaultdict', 'deque', 'namedtuple']

# 对应子类导入使用
from collections import Counter
常用介绍:
1. namedtuple
namedtuple 是一个工厂函数,用于创建自定义的、具名的元组类型。这意味着你可以通过名称 访问元组的元素,而不仅仅是通过索引。
from collections import namedtuple

# 创建一个名为 Point 的元组类
Point = namedtuple('Point', ['x', 'y'])

# 创建一个 Point 对象
p = Point(x=1, y=2)

# 通过字段名称访问
print(p.x)  # 1
print(p.y)  # 2

# 通过索引访问
print(p[0])  # 1
print(p[1])  # 2
print(p[0] + p[1]) # 3

# _fields 是类中字段的元组
print(p._fields)  # ('x', 'y')

# 使用 _asdict() 可以将其转为字典
print(p._asdict())  # OrderedDict([('x', 1), ('y', 2)])  {'x': 1, 'y': 2}
适用场景:
- 当你需要一个轻量级的对象,拥有具名字段,并且这些字段的数量和访问方式都与普通元组类似时,
namedtuple非常有用。 - 例如,可以用它来表示二维坐标、日期等。
2. deque
deque(双端队列)是一个支持从两端高效插入和删除操作的数据结构。它比普通的列表在这些操作上更高效。
from collections import deque

# 创建一个 deque 最大尺寸设置
d = deque([1, 1,  2, 3], maxlen=10)

# 从右侧添加元素
d.append(4)
print(d)  # deque([1, 2, 3, 4])

# 从左侧添加元素
d.appendleft(0)
print(d)  # deque([0, 1, 2, 3, 4])

# 从右侧删除元素
d.pop()
print(d)  # deque([0, 1, 2, 3])

# 从左侧删除元素
d.popleft()
print(d)  # deque([1, 2, 3])

# 将deque转换为列表
print(list(d))  # [1, 2, 3]

# 浅拷贝
p = d.copy()
print(p)

# 计算
count = d.count(1)
print(count) # 2

# 扩展
c = deque(['a', 'b'])
d.extend(c)
print(d) # deque([1, 1, 2, 3, 'a', 'b'])

# 左侧扩展
d.extendleft(c)
print(d) # deque(['b', 'a', 1, 1, 2, 3, 'a', 'b'])

# 索引
index = d.index(3)
print(index) # 5

# 插入
d.insert(1, 4)
print(d) # deque(['b', 4, 'a', 1, 1, 2, 3, 'a', 'b'])

# 移除第一个
d.remove('b')
print(d) # deque([4, 'a', 1, 1, 2, 3, 'a', 'b'])

# 逆序
d.reverse() # deque(['b', 'a', 3, 2, 1, 1, 'a', 4])
print(d)

# 右循环n步
d.rotate(1)
print(d) # deque([4, 'b', 'a', 3, 2, 1, 1, 'a'])

# 左循环n步
d.rotate(-2)
print(d) # deque(['a', 3, 2, 1, 1, 'a', 4, 'b'])

# 清除
d.clear()
print(d) # deque([])
适用场景:
- 当你需要从两端插入和删除元素时,可以使用
deque,它比list在这些操作上更高效,尤其是在需要频繁进行队列操作(如广度优先搜索)时。 - 例如,可以用它来实现一个队列或滑动窗口。
3. Counter
Counter 是一个字典子类,用于计数对象中的元素。它用于计算可哈希对象的频率。
from collections import Counter

# 创建一个 Counter
c = Counter('aabbbcccc')

# 计数每个字符的频率
print(c)  # Counter({'c': 4, 'b': 3, 'a': 2})

# 可以像字典一样访问计数
print(c['a'])  # 2
print(c['b'])  # 3
print(c['z'])  # 0 (不存在的元素返回 0)

# 查找出现次数最多的元素
print(c.most_common(2))  # [('c', 4), ('b', 3)]

# 计数器也可以用来做加法和减法
c2 = Counter('xyzxy')
c3 = c + c2  # 合并两个 Counter
print(c3)  # Counter({'c': 4, 'b': 3, 'x': 2, 'y': 2, 'a': 2, 'z': 1})

# 还支持减法
c4 = c - c2
print(c4)  # Counter({'c': 4, 'b': 3, 'a': 2})
适用场景:
- 当你需要统计某些元素的频率时,
Counter是非常合适的。它通常用于文本处理、数据分析、频率计数等场景。
4. OrderedDict
OrderedDict 是字典的一个子类,它记住了元素插入的顺序。传统的 dict 在 Python 3.7 及以后的版本中也会保持插入顺序,但 OrderedDict 在某些场景下提供了更多的功能。
from collections import OrderedDict

# 创建一个 OrderedDict
od = OrderedDict([('a', 1), ('b', 2), ('c', 3)])

# 插入新的元素
od['d'] = 4
print(od)  # OrderedDict([('a', 1), ('b', 2), ('c', 3), ('d', 4)])

# 删除并返回最后一个元素
od.move_to_end('a')
print(od)  # OrderedDict([('b', 2), ('c', 3), ('d', 4), ('a', 1)])

# 删除并返回第一个元素
od.move_to_end('b', last=False)
print(od)  # OrderedDict([('c', 3), ('d', 4), ('a', 1), ('b', 2)])
适用场景:
- 如果你需要保持字典中的元素顺序,并且希望执行插入顺序相关的操作(如移动元素到末尾或开头),
OrderedDict很合适。 - 例如,它常用于需要记住插入顺序的缓存实现。
5. defaultdict
defaultdict 是 dict 的一个子类,它允许你为不存在的键提供默认值,而不是抛出 KeyError。默认值是通过传递一个工厂函数(如 list、int)来指定的。
from collections import defaultdict

# 创建一个默认值为 list 的 defaultdict
d = defaultdict(list)

# 向键为 'a' 的列表中添加元素
d['a'].append(1)
d['a'].append(2)

# 向键为 'b' 的列表中添加元素
d['b'].append(3)

print(d)  # defaultdict(<class 'list'>, {'a': [1, 2], 'b': [3]})

# 创建一个默认值为 int 的 defaultdict(默认值为 0)
d2 = defaultdict(int)

d2['a'] += 1
print(d2)  # defaultdict(<class 'int'>, {'a': 1})
适用场景:
- 当你需要自动创建字典的默认值(如计数器或分组),
defaultdict非常有用。 - 例如,可以用它来统计某些项的计数或将数据分组。
6. ChainMap
ChainMap 是一个类,它可以将多个字典或映射(如字典、defaultdict 等)合并成一个单一的视图。它不会创建一个新的字典,而是将多个字典“链接”在一起,并且优先考虑第一个字典中的键。
from collections import ChainMap

# 创建两个字典
dict1 = {'a': 1, 'b': 2}
dict2 = {'b': 3, 'c': 4}

# 合并字典
cm = ChainMap(dict1, dict2)

print(cm)  # ChainMap({'a': 1, 'b': 2}, {'b': 3, 'c': 4})

# 查找键
print(cm['a'])  # 1
print(cm['b'])  # 2 (优先考虑 dict1 中的 'b')

# 添加新映射
cm = cm.new_child({'d': 5})
print(cm)  # ChainMap({'d': 5}, {'a': 1, 'b': 2}, {'b': 3, 'c': 4})
适用场景:
ChainMap适用于需要合并多个字典并同时进行查找的情况。它常用于多个作用域的查找(例如,全局和局部变量的查找)。
更多参考:collections详解
5. argparse用法
argparse是自带命令行的参数解析包
使用方法:
import argparse
def test():
    parser = argparse.ArgumentParser(description="Demo of argparse")
    parser.add_argument('-n','--name', default='hh')
    parser.add_argument('-y','--age', default='22')
    args = parser.parse_args()
    print(args) # Namespace(age='22', name='hh')
    name = args.name
    age = args.age
    print('Hello-{}-{}'.format(name,age)) # Hello-hh-22
if __name__ == '__main__':
    test()
运行方式:
注意:当'-'和'--'同时出现的时候,系统默认后者为参数名,前者不是,但是在命令行输入的时候没有这个区分
python test.py -n 'hh' --age 22当执行命令python test.py -h可以查看帮助信息
6. sort、sorted函数
样例展示:
list = [('susan', (18, 28)), ('aisi', (20, 24)), ('cat', (24, 26))]
list1 = sorted(list, key= lambda x: (-x[1][0],x[0]),reverse=False)
print(list1)
list.sort(key= lambda x: -sum(x[1]))
print(list)
# reverse=False 默认 升序排序 True 降序排序
# key= lambda x: (-x[1][0],x[0]) 按照列表中根据存放第二个元组的第一个参数降序排序,若相同,按照第一个元组姓名数据字典排序
#[('cat', (24, 26)), ('aisi', (20, 24)), ('susan', (18, 28))]
#[('cat', (24, 26)), ('susan', (18, 28)), ('aisi', (20, 24))]
7. re模块
正则表达式是一种文本模式,它可以用来匹配或搜索字符串中的特定模式。Python中的re模块支持所有标准的正则表达式语法,包括基本语法和一些扩展功能。
正则表达式常用语法:
| 字符 | 功能 | 位置 |
| 字符匹配 | ||
|
| 匹配任意字符(除了换行符\n) | |
\d | 匹配一个数字字符,等价于[0-9]。 | |
\D | 匹配一个非数字字符,等价于[^0-9]。 | |
\w | 匹配一个字母、数字或下划线字符,等价于[a-zA-Z0-9_]。 | |
\W | 匹配一个非字母、数字或下划线字符,等价于[^a-zA-Z0-9_]。 | |
\s | 匹配任何空白字符(空格、制表符、换行符等)。 | |
\S | 匹配任何非空白字符。 | |
| 数量词 | ||
* | 匹配前一个字符零次或多次。 | |
+ | 匹配前一个字符一次或多次。 | |
? | 匹配前一个字符零次或一次。 | |
{n} | 匹配前一个字符恰好n次。 | |
{n,} | 匹配前一个字符至少n次。 | |
{n,m} | 匹配前一个字符至少n次,最多m次。 | |
| 字符类 | ||
[abc] | 匹配 | |
[^abc] | 匹配除a、b、c之外的任意字符(否定字符类)。 | |
[a-z] | 匹配小写字母中的任意一个字符。 | |
[A-Za-z] | 匹配任意大小写字母。 | |
| 位置匹配符 | ||
^ | 匹配字符串的开头。 | |
$ | 匹配字符串的结尾。 | |
\b | 匹配单词边界(字母、数字和非字母数字之间的边界)。 | |
\B | 匹配非单词边界。 | |
| 分组和捕获 | ||
() | 将多个字符组合成一个组,可以通过 | |
(?:...) | 非捕获分组,匹配括号中的内容,但不捕获该内容。 | |
| 零宽断言 | ||
(?=...) | 正向前瞻断言,匹配后面跟着特定模式的内容,但不消耗字符。 | |
(?!...) | 负向前瞻断言,匹配后面不跟着特定模式的内容。 | |
(?<=...) | 正向后顾断言,匹配前面有特定模式的内容,但不消耗字符。 | |
(?<!...) | 负向后顾断言,匹配前面没有特定模式的内容。 | |
常用函数详解:
(1)re.match
re.match()用于从字符串的开头进行匹配。如果正则表达式匹配成功,返回一个match对象;否则返回None。
import re
pattern = r"\d+"
text = "123abc"
result = re.match(pattern, text)
if result:
    print("匹配成功:", result.group())  # 输出匹配的结果 123
else:
    print("匹配失败")
(2)re.search()
re.search()会在整个字符串中搜索第一个匹配的子串。如果匹配成功,返回一个match对象,否则返回None。
import re
text = "abc 123 def"
result = re.search(r"\d+", text)
if result:
    print("找到匹配:", result.group())  # 输出第一个匹配的数字 123
(3)re.findall()
re.findall()返回所有匹配的非重复子串组成的列表。如果没有匹配项,则返回空列表
import re
text = "one 11, two 12, three 13"
result = re.findall(r"\D+", text)
print(result)  # 返回所有匹配的非数字 ['one ', ', two ', ', three ']
(4)re.finditer()
re.finditer()返回一个迭代器,生成所有匹配的match对象,适合用来处理匹配内容较多的情况。
import re
text = "one 1, two 2, three 3"
result = re.finditer(r"[0-9]", text)
for match in result:
    print(match.group()) # 1  2  3
(5)re.sub()
re.sub()用于替换匹配的文本,可以通过给定的正则表达式替换字符串中的内容。
import re
text = "The 123 in Spain"
result = re.sub(r"\d+", "snow", text)
print(result)  # 将数字替换为snow  The snow in Spain
(6)re.split()
re.split()根据正则表达式匹配的内容进行分割,返回分割后的子字符串列表。
text = "apple, banana, cherry"
result = re.split(r",\s*", text)  # 使用逗号和空格分割
print(result)  # ['apple', 'banana', 'cherry']
(7)re.compile()
re.compile()将正则表达式编译成一个正则表达式对象,使得在多个地方使用同一个模式时更加高效。
import re
pattern = re.compile(r"[a-zA-Z]+")
result = pattern.findall("There are 123 apples and 456 bananas.")
print(result) # ['There', 'are', 'apples', 'and', 'bananas']
正则表达式的高级用法:
1. 命名组
- 通过命名捕获组,可以给分组命名,方便后续提取。
import re
pattern = r"(\d{4})-(?P<month>\d{2})-(?P<day>\d{2})"
text = "2025-01-02"
match = re.match(pattern, text)
if match:
    print(f"Year: {match.group(1)}, Month: {match.group('month')}, Day: {match.group('day')}") # Year: 2025, Month: 01, Day: 02
2. 前瞻和后顾断言
- 正向前瞻:
(?=...)表示在当前位置之后要匹配的内容。 - 负向前瞻:
(?!...)表示在当前位置之后不能匹配的内容。 - 正向后顾:
(?<=...)表示当前位置之前要匹配的内容。 - 负向后顾:
(?<!...)表示当前位置之前不能匹配的内容。
import re
text = "56abc 123 def 34 "
result = re.findall(r"\d+(?=\s)", text)  # 匹配数字后面跟着空格
print(result)  # 输出 ['123', '34']

text2 = "567abc 123 def 345 "
result2 = re.findall(r"\d{3}(?!\s)", text2)  # 匹配数字后面不能跟着空格
print(result2)  # 输出 ['567']

text3 = "565abc 123 def 345 "
result3 = re.findall(r"(?<=\s)\d+", text3)  # 匹配数字之前跟着空格
print(result3)  # 输出 ['123', '345']

text4 = "565abc 123 def 345 "
result4 = re.findall(r"(?<!\s)\d+", text4)  # 匹配数字之前不能跟着空格
print(result4)  # 输出 ['565', '23', '45']
3. 非捕获分组
- 使用
(?:...)进行非捕获分组,它匹配内容但不返回捕获组。
import re
s = "to 123 made"
rel = re.findall(r'(\d+)(?:\s)', s)
print(rel) # ['123']
4. 替换和回溯
- 使用反向引用(如
\1,\2等)可以在re.sub()中引用捕获的组。
import re
text = "123abc"
result = re.sub(r"(\d+)([a-z]+)", r"\2\1", text)
print(result)  # 输出abc123
参考链接: re模块详解
8. set集合
在 Python 中,set 是一种内置的数据类型,表示集合。集合是一个无序的、元素唯一的容器,可以用来存储不重复的元素集合,并支持集合的各种运算(如并集、交集、差集等)。
(1)创建集合
# 使用set集合创建
empty_set = set()  # 创建一个空集合
# 使用{}创建
numbers= {1, 2, 3, 4, 5}
# 集合自动去重
repeat_set = {1, 1, 2, 2, 3}  # 输出{1, 2, 3}
# 列表转集合
list_to_set = set([x for x in range(5)]) # 输出 {0, 1, 2, 3, 4}
(2)基本操作
- 添加元素:
add()s = {1, 2, 3} s.add(4) # {1, 2, 3, 4} - 删除元素:
remove()和discard()# remove():删除指定元素,如果元素不存在会报错。 s = {1, 2, 3} s.remove(2) # {1, 3} # discard():删除指定元素,如果元素不存在不会报错。 s = {1, 2, 3} s.discard(4) # {1, 2, 3} - 清空集合:
clear()s = {1, 2, 3} s.clear() # 空集合 set() - 检查元素是否存在:
in和not ins = {1, 2, 3} print(2 in s) # True print(4 not in s) # True
(3)集合运算
- 并集:
union()或|a = {1, 2, 3} b = {3, 4, 5} print(a.union(b)) # {1, 2, 3, 4, 5} print(a | b) # {1, 2, 3, 4, 5} - 交集:
intersection()或&a = {1, 2, 3} b = {3, 4, 5} print(a.intersection(b)) # {3} print(a & b) # {3} - 差集:
difference()或-a = {1, 2, 3} b = {3, 4, 5} print(a.difference(b)) # {1, 2} print(a - b) # {1, 2} - 对称差集:
symmetric_difference()或^a = {1, 2, 3} b = {3, 4, 5} print(a.symmetric_difference(b)) # {1, 2, 4, 5} print(a ^ b) # {1, 2, 4, 5}
(4)集合关系
- 子集:
issubset()或<=a = {1, 2} b = {1, 2, 3} print(a.issubset(b)) # True print(a <= b) # True - 超集:
issuperset()或>=a = {1, 2, 3} b = {1, 2} print(a.issuperset(b)) # True print(a >= b) # True - 是否相交:
isdisjoint()a = {1, 2, 3} b = {4, 5, 6} print(a.isdisjoint(b)) # True
(5)集合的其他方法
求长度:len()
s = {1, 2, 3}
print(len(s))  # 3
复制集合:copy()
s = {1, 2, 3}
new_s = s.copy()
冻结集合:frozenset
# 创建一个不可变的集合
fset = frozenset([1, 2, 3, 3])  # frozenset({1, 2, 3})
(6)常见注意事项
1.集合中的元素必须是不可变对象,如数字、字符串、元组。
s = {1, 2, (3, 4)}  # 正确
s = {1, 2, [3, 4]}  # 错误,列表是可变的
2. 集合是无序的,不能通过索引访问元素。
9. zip()函数
zip() 是 Python 内置的一个非常实用的函数,用于将多个可迭代对象(如列表、元组、字符串等)打包成一个元组的迭代器。它的主要用途是在多个可迭代对象之间建立一种一对一的映射关系,方便在循环或其它操作中处理。
1. 基本用法:
# 假设有两个列表(不限于两个,可以是多个),需要将它们对应的元素配对
a = [1, 2, 3]
b = ['a', 'b', 'c']

zipped = zip(a, b)
print(list(zipped))  # 转为列表查看结果 [(1, 'a'), (2, 'b'), (3, 'c')]


# 如果传入的可迭代对象长度不同,zip()会根据最短的可迭代对象进行配对,忽略多余的元素
a = [1, 2, 3]
b = ['a', 'b']

zipped = zip(a, b)
print(list(zipped)) # [(1, 'a'), (2, 'b')]


# 解压zip
zipped = [(1, 'a'), (2, 'b'), (3, 'c')]
a, b = zip(*zipped)

print(a)  # (1, 2, 3)
print(b)  # ('a', 'b', 'c')


# for循环中使用
a = [1, 2, 3]
b = ['a', 'b', 'c']

for x, y in zip(a, b):
    print(x, y)


# 与字典结合使用
keys = ['name', 'age', 'gender']
values = ['Alice', 25, 'Female']

result = dict(zip(keys, values))
print(result) # {'name': 'Alice', 'age': 25, 'gender': 'Female'}
2. 对比
如果需要保证所有元素都参与配对,即使其中某些可迭代对象长度不同,也可以使用 itertools.zip_longest()。这个函数会用 fillvalue 填充缺失的值
from itertools import zip_longest

a = [1, 2, 3]
b = ['a', 'b']

zipped = zip_longest(a, b, fillvalue='-')
print(list(zipped)) # [(1, 'a'), (2, 'b'), (3, '-')]
10. python相关安装注意事项
1. 镜像源添加
# 清华大学镜像源
https://pypi.tuna.tsinghua.edu.cn/simple/
# 阿里云镜像源
http://mirrors.aliyun.com/pypi/simple/
# 中国科技大学镜像源
https://pypi.mirrors.ustc.edu.cn/simple/
# 华中科技大学镜像源
http://pypi.hustunique.com/simple/
# 上海交通大学镜像源
https://mirror.sjtu.edu.cn/pypi/web/simple/
# 豆瓣镜像源
http://pypi.douban.com/simple/
# 山东理工大学镜像源
http://pypi.sdutlinux.org/
# 百度镜像源
https://mirror.baidu.com/pypi/simple
# 安装实例
pip install xxxx -i https://pypi.tuna.tsinghua.edu.cn/simple/
2. python环境安装
# Install py env
# conda search python
conda create -n myenv python=3.9.20
conda activate myenv

cd $SOURCE_DIR
python3 -m venv .venv

# Activate the py env
source .venv/bin/activate

# Install requirements
pip install -r requirements.txt
pip install --no-deps .
持续更新!!!


 被折叠的 条评论
为什么被折叠?
被折叠的 条评论
为什么被折叠?
 到【灌水乐园】发言


