


一. 跳转到带有tabbar的界面
使用函数 wx.switchTab
若想要界面停留一小会再跳转,使用函数 setTimeout
setTimeout(function () {
 wx.switchTab({
 	url: "想要跳转的页面的url",
 });
}, 1500);//1500单位毫秒,表示定时器时长
二. 获取定位计算距离
- wx.getLocation默认gps系 (‘wgs84’)
- wx.chooseLocation是火星系 (‘gcj02’)
- 想要通过两点经纬度准确计算出两点距离,首先要保证是同一标系,即统一 type属性取值为’gcj02’
三. json数据嵌套
json数据这个坑先占着,以后再补
四. wxs——在wxml写的功能函数模块
五. view中放button,如何做到只触发button跳转而不触发view的功能?
需求:笔者是在view中设置了点击跳转界面功能,同时也需要里面放的button在点击后触发相应功能且不要触发view的跳转。
解决方法:button中的bindtap改为catchtap
六. 前端界面往后台传值
data-
e.currentTarget.dataset
七、云数据库获取指定几列
field配合get使用
field使用官方文档:field
八、选中swiper筛选栏后样式发生变化
效果图:

代码:
<view wx:for="{{navTab}}" wx:key="index" class="swiper-tab-list {{currentTab==index ? 'chosen' : ''}}" data-current="{{index}}" bindtap="switchNav">
	{{item}}
</view>
九、云数据库模糊搜索
效果图

wxml代码:
/* pages/search/index.wxss */
.weui-search-bar {
  position: relative;
  padding: 8px 10px;
  display: -webkit-box;
  display: -webkit-flex;
  display: flex;
  box-sizing: border-box;
  background-color: #EFEFF4;
  border-top: 1rpx solid #D7D6DC;
  border-bottom: 1rpx solid #D7D6DC;
}
.weui-icon-search_in-box {
  position: absolute;
  left: 10px;
  top: 7px;
}
.weui-search-bar__form {
  position: relative;
  -webkit-box-flex: 1;
  -webkit-flex: auto;
          flex: auto;
  border-radius: 5px;
  background: #FFFFFF;
  border: 1rpx solid #E6E6EA;
}
.weui-search-bar__box {
  position: relative;
  padding-left: 30px;
  padding-right: 30px;
  width: 100%;
  box-sizing: border-box;
  z-index: 1;
}
.weui-search-bar__input {
  height: 28px;
  line-height: 28px;
  font-size: 14px;
}
.weui-search-bar__cancel-btn {
  margin-left: 10px;
  line-height: 28px;
  color: #09BB07;
  white-space: nowrap;
  font-size: 14px;
}

.first_tab .order_item {
  display: flex;
  border-bottom: 1rpx solid #ccc;
}
.first_tab .order_item .order_img {
  flex: 2;
  display: flex;
  justify-content: center;
  align-items: center;
  width: 25rpx;
  /*height: 40rpx;*/
}
.first_tab .order_item .order_img image {
  width: 50%;
}
.first_tab .order_item .order_info {
  display: flex;
  flex: 3;
  flex-direction: column;
  justify-content: space-evenly;
}
.first_tab .order_item .order_info .goods_name {
  display: -webkit-box;
  overflow: hidden;
  -webkit-box-orient: vertical;
  -webkit-line-clamp: 2;
}
.first_tab .order_item .order_info.order_price {
  color: var(--themeColor);
  font-size: 20rpx;
}
.add_icon{
  position: fixed;
  width:42px;
  height: 42px;
  bottom: 30px;
  right:20px;
}
.avatar-img {
  height: 120rpx;
  width: 120rpx;
  border-radius: 50%;
}
wss代码:
<!--pages/search/index.wxml-->
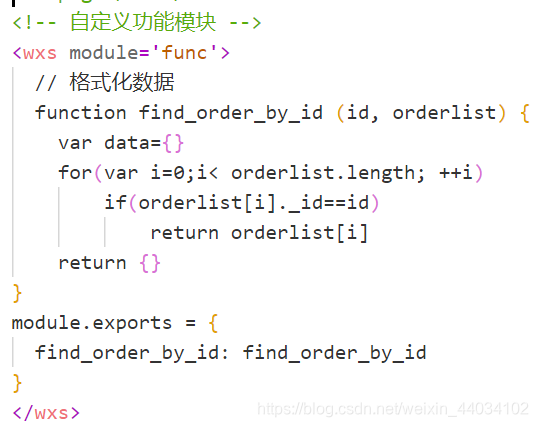
<!-- 自定义功能模块 -->
<wxs module='func'>
// 格式化数据
function find_order_by_id (id, orderlist) {
var data={}
for(var i=0;i< orderlist.length; ++i)
if(orderlist[i]._id==id)
return orderlist[i]
return {}
}
module.exports = {
find_order_by_id: find_order_by_id
}
</wxs>
<!-- order==>(_id,openid)==>user==>url -->
<wxs module='func1'>
// 格式化数据
function find_user_by_openid (openid, userlist) {
var data={}
for(var i=0;i< userlist.length; ++i)
if(userlist[i].openid==openid)
return userlist[i].avatarUrl
return {}
}
module.exports = {
find_user_by_openid: find_user_by_openid
}
</wxs>
<!-- 搜索栏 -->
<view>
<view>
<view class="weui-search-bar">
<view class="weui-search-bar__form">
<!-- 搜索框 -->
<view class="weui-search-bar__box">
<icon class="weui-icon-search_in-box" type="search" size="14"></icon>
<input bindinput="input_text" type="text" class="weui-search-bar__input" placeholder="请输入搜索内容"/>
</view>
</view>
<!-- 搜索按钮,调用搜索查询方法 -->
<view class="weui-search-bar__cancel-btn" bindtap='search'>搜索</view>
</view>
</view>
</view>
<!-- 搜索结果 -->
<view class="first_tab" wx:if="{{clicked==1}}">
<navigator class="order_item"
wx:for="{{orderlist}}"
wx:key="_id"
url="/pages/order_detail/main?_id={{item._id}}"
>
<view class="order_img">
<image wx:if='{{func1.find_user_by_openid(func.find_order_by_id(item._id,orderlist).order_receiver_openid,userlist)}}' mode="widthFix" class="avatar-img" src="{{func1.find_user_by_openid(func.find_order_by_id(item._id,orderlist).order_receiver_openid,userlist)}}"></image>
</view>
<view class="order_info">
<view class="goods_name">【{{func.find_order_by_id(item._id,orderlist).start_position.address}}】</view>
<view class="goods_name">{{func.find_order_by_id(item._id,orderlist).order_details}}</view>
<view class="goods_price">¥{{func.find_order_by_id(item._id,orderlist).price}}</view>
</view>
</navigator>
</view>
js代码:
    db.collection("order").where({	 	//order 表示查询数据库名
        order_details:{								//order_details表示欲模糊查询数据所在列的名
          $regex:'.*' + _this.data.text + '.*',		//_this.data.text表示欲查询的内容,‘.*’等同于SQL中的‘%’
          $options: 'i'							//$options:'1' 代表这个like的条件不区分大小写,详见开发文档
        }
      }).get({
        success:res=>{
          console.log(res);
        },
        fail:res=>{
          console.log(res);
        }
      })
十、setData数据同步的简易操作
var _this=this;
_this.setData({
      _id:data._id
    },()=>{
      //此处填赋值后需要执行的函数
    })
十一、订阅信息各种坑
- 订阅模板需要用户授权
授权订阅信息的参考代码如下:
wx.requestSubscribeMessage({
      tmplIds: ['此处填申请得到的模板ID'], // 此处可填写多个模板 ID,但低版本微信不兼容只能授权一个
      success (res) {
        console.log('已授权接收订阅消息',res)
      },
      fail(res){
        console.log('未授权接收订阅消息',res)
      }
    })
- 个人注册的小程序只能申请一次性订阅模板
看别的博客说有次数限制,次数用尽需要用户再次授权
(我使用的时候还没遇到) - 发送订阅信息
本人选择的是调用云函数发送订阅信息
发送这里坑特别多!出问题要看日志并进行云函数调试!
一定要看微信公众平台订阅信息提供的模板数据!
发送失败时要仔细检查以下几点:
- 用户是否授权
- 订阅模板的id是否正确且对应
- 云函数是否上传成功
- 云函数是否成功传入数据
- data中传入的数据是否正确!!!(包括数据类型、数据格式、字符数在限制以内)
发送订阅信息的参考代码:(使用的是订单状态更新提醒模板)
// 云函数入口文件
const cloud = require('wx-server-sdk')

cloud.init()

// 订单状态更新云函数入口函数
exports.main = async (event, context) => {//event包含该订单的data和接单人信息order_taker
  try {
    const result = await cloud.openapi.subscribeMessage.send({
        touser: event.order_receiver.openid,//收到这条提醒的人的openid
        page: "想要跳转的页面url",
        lang: 'zh_CN',
        data: {
          //操作时间
          "time5":{
            "value":curr_time
          },
          //订单标题
          "thing2":{
            "value":event.order.order_details
          },
          //订单状态
          "phrase3":{
            "value":state
          },
          //申请人
          "thing12":{
            "value":event.order_taker.nickName
          },
          //联系电话
          "phone_number7":{
            "value":event.order_taker.tel
          }
        },
        templateId: '此处填申请得到的模板ID',
        miniprogramState: 'developer'
      })
    return result
  } catch (err) {
    return err
  }
}
效果图:

十二、for循环里面有云数据库查询
又是经典的数据同步异步问题
除了常规方法promise、await|async,
笔者介绍一个懒人必备方法——使用函数递归调用来代替for循环
参考博客:函数递归
未完待续~~~


 516
516

 被折叠的 条评论
为什么被折叠?
被折叠的 条评论
为什么被折叠?
 到【灌水乐园】发言


