


UI
- 用户界面(User Interface,简称 UI,亦称使用者界面)是系统和用户之间进行交互和信息交换
的媒介,它实现信息的内部形式与人类可以接受形式之间的转换。 - 软件设计可分为两个部分:编码设计与UI设计。
- Android UI 都是由布局和控件组成的
View(视图)
此类代表用户界面组件的基本构建块。视图占据屏幕上的一个矩形区域,负责绘图和事件处理。View 是widgets的基类,用于创建交互式 UI 组件(按钮、文本字段等)。
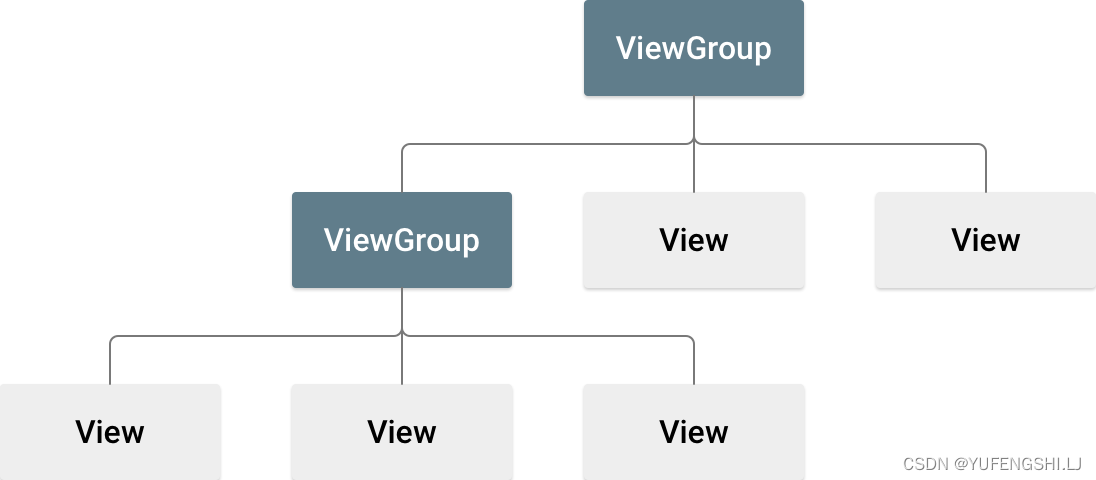
子类是布局ViewGroup的基类,布局是容纳其他视图(或其他视图组)并定义其布局属性的不可见容器。
ViewGroup包含一些View或ViewGroup,用于控制子View的布局。
View对象通常称为 widget,可以是多个子类之一,例如Button或TextView。ViewGroup对象通常称为布局,可以是提供不同布局结构的众多类型之一,例如LinearLayout或 ConstraintLayout。
Android 中所说的“视图”通常指的是UI界面上的各种元素,比如按钮、文本框、图像等。在Android开发中,这些UI元素通常被称为"View",它们用于构建用户界面,并且可以通过代码进行操作和控制。
使用视图(view/widget)
窗口中的所有视图都排列在一棵树中。可以通过代码或通过在一个或多个 XML 布局文件中指定视图树来添加视图。有许多专门的视图子类,它们充当控件或能够显示文本、图像或其他内容。
-
在XML布局文件中定义视图
可以在XML布局文件中使用标记来定义各种视图,比如TextView(文本视图)、Button(按钮)、ImageView(图像视图)等。可以设置视图的属性,如大小、位置、颜色等。
-
通过Java代码操作视图
在Java代码中,可以通过findViewById()方法找到XML布局文件中定义的视图,并对其进行操作。例如,您可以设置文本视图的文本内容,为按钮添加点击事件监听器等。
布局
布局中的所有元素均使用 View 和 ViewGroup 对象的层次结构进行构建。
View 通常用于绘制用户可以看到并与之互动的内容。ViewGroup 是一个不可见容器,用于定义 View 和其他 ViewGroup 对象的布局结构,如图 1 所示:
常用布局
线性布局 - LinearLayout
| 属性名称 | 功能描述 |
|---|---|
| android: oruentation | 设置布局内控件的排列顺序 |
| android: layout_weight | 在布局内设置控件权重,属性值可直接写int值 |
相对布局 - RelativeLayout
通过相对定义的方式指定子控件的位置。
android: layout_centerParent 设置当前控件位于父布局的中央位置
android: layout_centerVertical 设置当前控件位于父布局的垂直居中位置
android:layout_centerHorizontal 设置当前控件位于父布局的水平居中位置
android:layout_above 设置当前控件位于某控件上方
android:layout_below 设置当前控件位于某控件下方
android:layout_toLeftOf 设置当前控件位于某控件左侧
android:layout_toRightOf 设置当前控件位于某控件右侧
android:layout_alignParentTop 设置当前控件是否与父控件顶端对齐
android:layout_alignParentLetf 设置当前控件是否与父控件左对齐
android:layout_alignParentRight 设置当前控件是否与父控件右对齐
android:layout_alignParentBottom 设置当前控件是否与父控件底端对齐
android:layout_alignTop 设置当前控件的上边界与某控件的上边界对齐
android:layout_alignBottom 设置当前控件的下边界与某控件的下边界对齐
android:layout_alignLetf
android:layout_alignRight 设置当前控件的右边界与某控件的右边界对齐
帧布局 - FramLayout
帧布局的控件是层层向上叠的
| android: foreground | 设置帧布局容器的前景图像(始终在所有子控件之上) |
| android: foregroundGravity | 设置前景图像显示的位置 |
约束布局 - ConstraintLayout
layout_constraintLeft_toLeftOf 控件的左边与另外一个控件的左边对齐
layout_constraintLeft_toRightOf 控件的左边与另外一个控件的右边对齐
layout_constraintRight_toLeftOf 控件的右边与另外一个控件的左边对齐
layout_constraintRight_toRightOf 控件的右边与另外一个控件的右边对齐
layout_constraintTop_toTopOf 控件的上边与另外一个控件的上边对齐
layout_constraintTop_toBottomOf 控件的上边与另外一个控件的底部对齐
layout_constraintBottom_toBottomOf 控件间的文本内容基准线对齐
layout_constraintStart_toEndOf 控件的起始边与另外一个控件的尾部对齐
layout_constraintStart_toStartOf 控件的起始边与另外一个控件的起始边对齐layout_constraintEnd_toStartOf 控件的尾部与另外一个控件的起始边对齐layout_constraintEnd_toEndOf 控件的尾部与另外一个控件的尾部对齐layout_constraintHorizontal_bias 横向的倾向
layout_constraintVertical_bias 纵向的倾向
设置内容布局(视图)
xml文件
编写xml
每个布局文件必须正好包含一个根元素,该元素必须是 View 或 ViewGroup 对象。定义根元素后,您可以将其他布局对象或 widget 添加为子元素,以逐步构建一个定义布局的 View 层次结构.
<?xml version="1.0" encoding="utf-8"?>
<LinearLayout xmlns:android="http://schemas.android.com/apk/res/android"
              android:layout_width="match_parent"
              android:layout_height="match_parent"
              android:orientation="vertical" >
    <TextView android:id="@+id/text"
              android:layout_width="wrap_content"
              android:layout_height="wrap_content"
              android:text="Hello, I am a TextView" />
    <Button android:id="@+id/button"
            android:layout_width="wrap_content"
            android:layout_height="wrap_content"
            android:text="Hello, I am a Button" />
</LinearLayout>
加载xml资源
当编译应用时,系统会将每个 XML 布局文件编译成 View 资源。在应用的 Activity.onCreate() 回调实现中加载布局资源。为此,请调用 setContentView(),并以 R.layout.layout_file_name 的形式向其传递对布局资源的引用,R.layout.layout_file_name 就是这个布局资源的id。例如,如果您的 XML 布局保存为 main_layout.xml,请为 Activity 加载该布局,如下所示:
setContentView(布局id)
public void onCreate(Bundle savedInstanceState) {
    super.onCreate(savedInstanceState);
    setContentView(R.layout.main_layout);
}
用代码定义布局
1.定义布局
2.设置宽高
3.设置背景颜色
4.设置内容布局
// 1.定义布局
LinearLayout linearLayout = new LinearLayout(this);

// 2.设置宽高
linearLayout.setLayoutParams(newViewGroup.LayoutParams(ViewGroup.LayoutParams.MATCH_PARENT,ViewGroup.LayoutParams.MATCH_PARENT));

// 3.设置背景颜色
linearLayout.setBackgroundColor(Color.GREEN);

setContentView(linearLayout);*/
UI事件
- 当用户通过手指触摸UI时,系统会自动创建对应的Event对象
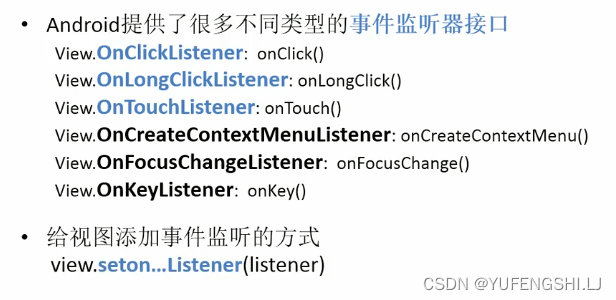
- Android提供了多种方式拦截处理不同类型的事件
- 视图本身就可以处理发生在该视图上的事件,这就意味着真正处理事件的不是avtivity,而是视图
什么是事件源?
事件发生在谁身上了,也就是视图
点击事件
设置点击事件的四种方法
通过自定义内部类实现点击事件
-
根据id找到按钮
-
自定义一个类实现 View.OnClickListener 接口的类,重写里面的 onClick 方法
// 自定义一个 继承 View.OnClickListener 接口的类,实现里面的方法
class MyClickListener implements View.OnClickListener{

  @Override
  public void onClick(View v) {
  // 在控制台输入语句 Log.e 输入错误类型,也就是红色语句,不管错误与否
  Log.e("btn_tags","通过自定义内部类实现点击方法");
  }
}
// 一、通过自定义内部类实现点击事件(当有多个相似的点击事件时适用)
// 1.根据id找到按钮
Button button1 = findViewById(R.id.btn_1);
// 2.添加事件监听器 -> OnClickListener 对象,这个监听器是一个接口
MyClickListener onc1 = new MyClickListener();
button1.setOnClickListener(onc1);匿名内部类
/二、匿名内部类 - 当有唯一操作的按钮时通常使用这种方法
Button button2 = findViewById(R.id.btn_2);
button2.setOnClickListener(new View.OnClickListener() {
  @Override
  public void onClick(View v) {
  Log.e("btn_niming_tags", "====通过匿名内部类实现点击方法=====");
 }
});
通过当前Activity实现点击事件
让当前的activity类继承 View.OnClickListener 接口并实现里面的点击方法
public class ButtonActivity extends AppCompatActivity implements View.OnClickListener {
    @Override
    protected void onCreate(Bundle savedInstanceState) {
        super.onCreate(savedInstanceState);
        setContentView(R.layout.activity_button);

        Button button3 = findViewById(R.id.btn_3);
        // this指向本类,本类就是一个继承View.OnClickListener 接口的类
        button3.setOnClickListener(this);
    }

    @Override
    public void onClick(View v) {
        Log.e("activity","====通过当前activity实现事件接口=====");
    }
}
button3.setOnClickListener(this);
其中,this指向的是当前类,它已经在里面重写了onClick方法
在xml布局文件中添加点击事件
Button的onclick属性中定义一个方法名,并在对应的activity中实现该方法
<Button
    android:id="@+id/btn4"
    android:layout_width="wrap_content"
    android:layout_height="wrap_content"
    android:layout_marginTop="20dp"
    android:onClick="myClick"
    android:text="在xml布局文件中绑定添加点击事件属性"/>

<Button
    android:id="@+id/btn5"
    android:layout_width="wrap_content"
    android:layout_height="wrap_content"
    android:layout_marginTop="20dp"
    android:onClick="myClick"
    android:text="btn_5"/>
    public void myClick(View view) {
        // Log.e("xml","====在xml布局文件中绑定添加点击事件属性=====");
        switch (view.getId()){
            case R.id.btn4:
                Log.e("xml_viewId4","====点击btn_4=====");
                break;
            case R.id.btn5:
                Log.e("xml_viewId5","====点击btn_5=====");
                break;
        }
    }


 235
235

 被折叠的 条评论
为什么被折叠?
被折叠的 条评论
为什么被折叠?
 到【灌水乐园】发言


