


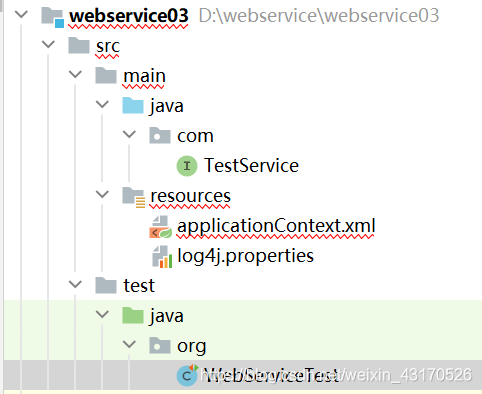
1. service端编写
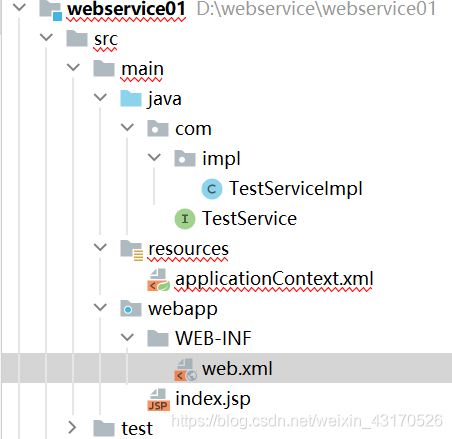
项目结构如下图所示
步骤如下
- 创建一个spring项目
- 添加pom中的cxf依赖
- 编写spring的配置文件
- 编写webservice接口
- 测试webservice服务是否发布成功
pom.xml
 		<dependency>
            <groupId>org.apache.cxf</groupId>
            <artifactId>cxf-rt-transports-http</artifactId>
            <version>3.1.4</version>
        </dependency>
        <dependency>
            <groupId>org.apache.cxf</groupId>
            <artifactId>cxf-core</artifactId>
            <version>3.1.4</version>
        </dependency>
        <dependency>
            <groupId>org.apache.cxf</groupId>
            <artifactId>cxf-rt-frontend-jaxws</artifactId>
            <version>3.1.4</version>
        </dependency>
        <dependency>
            <groupId>org.springframework</groupId>
            <artifactId>spring-context</artifactId>
            <version>4.3.7.RELEASE</version>
        </dependency>
        <dependency>
            <groupId>org.springframework</groupId>
            <artifactId>spring-web</artifactId>
            <version>4.3.7.RELEASE</version>
        </dependency>
        <dependency>
            <groupId>javax.servlet</groupId>
            <artifactId>servlet-api</artifactId>
            <version>2.4</version>
            <scope>provided</scope>
        </dependency>
applicationContext.xml
<?xml version="1.0" encoding="UTF-8"?>
<beans xmlns="http://www.springframework.org/schema/beans"
       xmlns:xsi="http://www.w3.org/2001/XMLSchema-instance"
       xmlns:cfx="http://cxf.apache.org/core"
       xmlns:jaxws="http://cxf.apache.org/jaxws"
       xmlns:jaxrs="http://cxf.apache.org/jaxrs"
       xsi:schemaLocation="
       http://www.springframework.org/schema/beans
       http://www.springframework.org/schema/beans/spring-beans.xsd
       http://cxf.apache.org/core
       http://cxf.apache.org/schemas/core.xsd
       http://cxf.apache.org/jaxws
       http://cxf.apache.org/schemas/jaxws.xsd
       http://cxf.apache.org/jaxrs
	   http://cxf.apache.org/schemas/jaxrs.xsd">

    <jaxws:server address="/hello">
        <jaxws:serviceBean>
            <bean class="com.impl.TestServiceImpl"></bean>
        </jaxws:serviceBean>
    </jaxws:server>
</beans>
注:jaxrs可能会爆红,删除,或者无视都可以
TestService.java
package com;

import javax.jws.WebService;

/**
 * @author shenming
 */
@WebService
public interface TestService {

    /**
     * webservice接口
     *
     * @param name 客户端调用传入的参数
     * @return 返回处理完的结果
     */
    String sayHello(String name);
}
TestServiceImpl.java
package com.impl;

import com.TestService;

/**
 * @author shenming
 */
public class TestServiceImpl implements TestService {
    @Override
    public String sayHello(String name) {
        return name+",恭喜你成功搭建WebService";
    }
}
web.xml
<!DOCTYPE web-app PUBLIC
        "-//Sun Microsystems, Inc.//DTD Web Application 2.3//EN"
        "http://java.sun.com/dtd/web-app_2_3.dtd" >

<web-app>
    <display-name>Archetype Created Web Application</display-name>
    <!--  cxf的sevlet配置-->
    <servlet>
        <servlet-name>cxfservlet</servlet-name>
        <servlet-class>org.apache.cxf.transport.servlet.CXFServlet</servlet-class>
    </servlet>
    <servlet-mapping>
        <servlet-name>cxfservlet</servlet-name>
        <url-pattern>/ws/*</url-pattern>
    </servlet-mapping>

    <!--  spring容器配置-->
    <context-param>
        <param-name>contextConfigLocation</param-name>
        <param-value>classpath:applicationContext.xml</param-value>
    </context-param>
    <listener>
        <listener-class>org.springframework.web.context.ContextLoaderListener</listener-class>
    </listener>
</web-app>
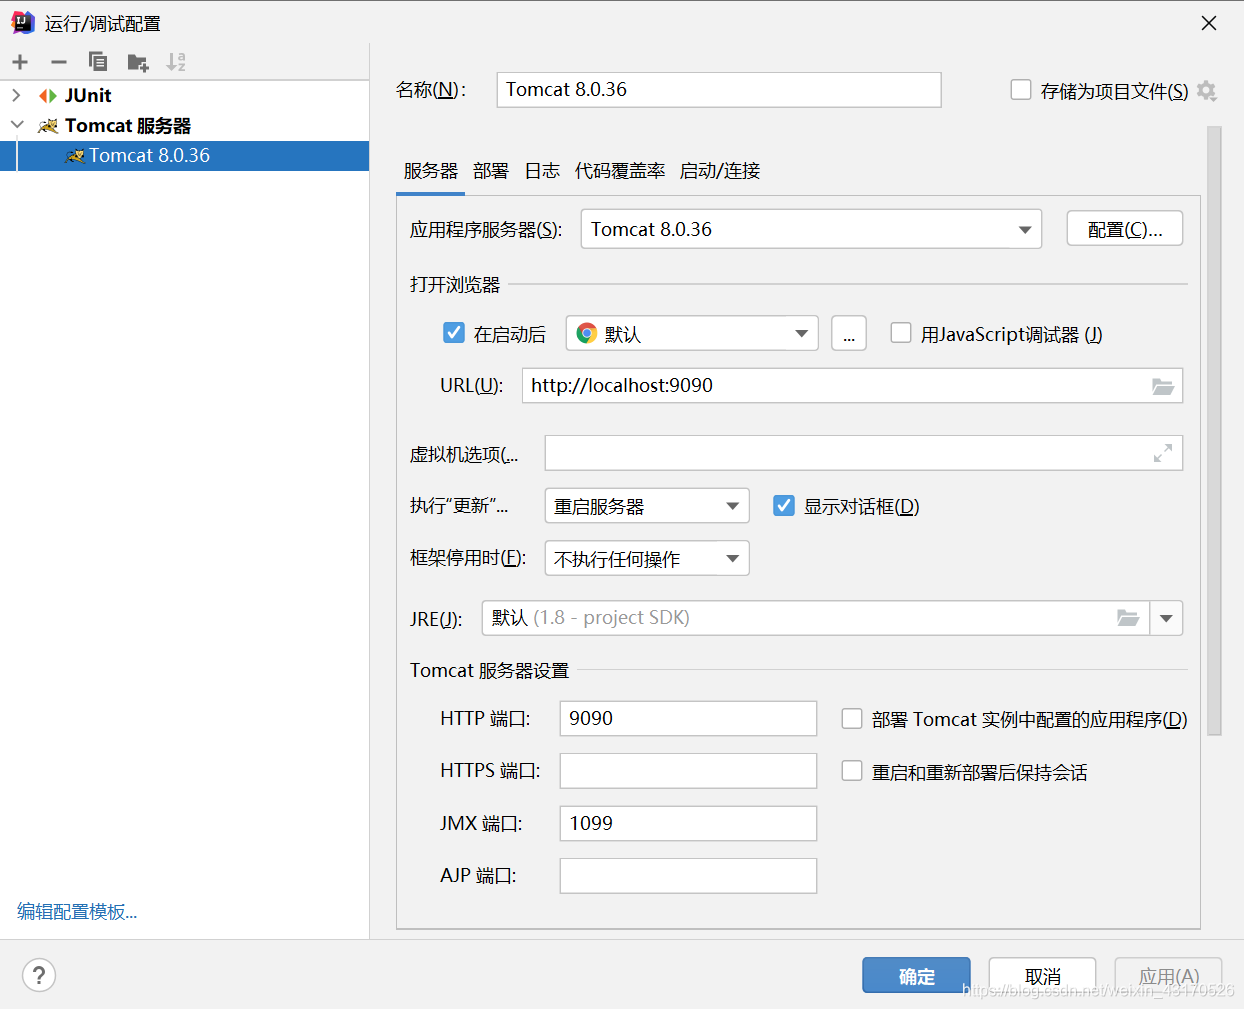
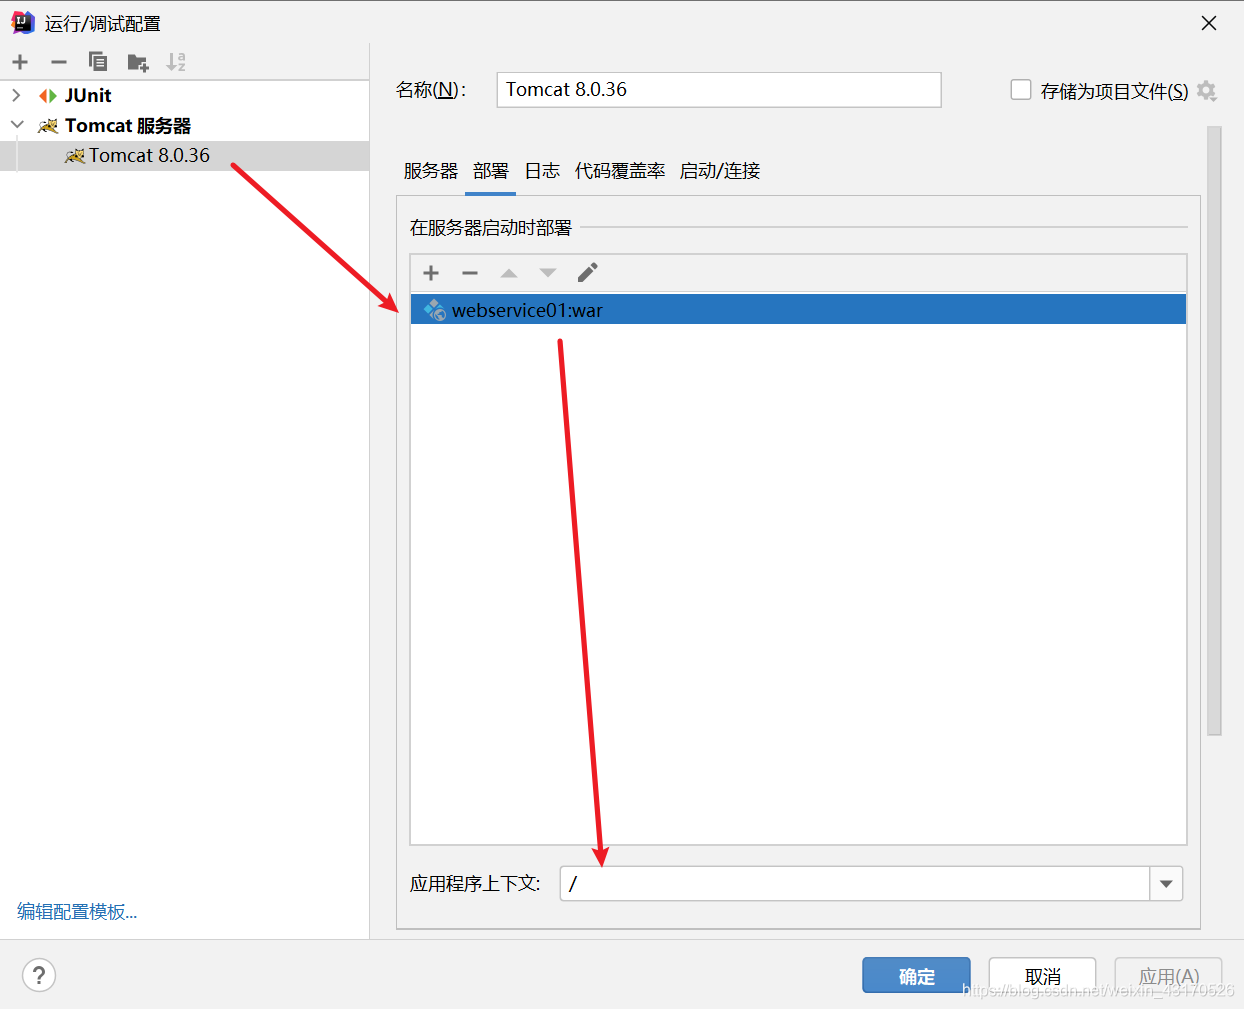
tomcat配置如下图所示
启动之后访问http://localhost:9090/ws/hello?wsdl
结果如图所示
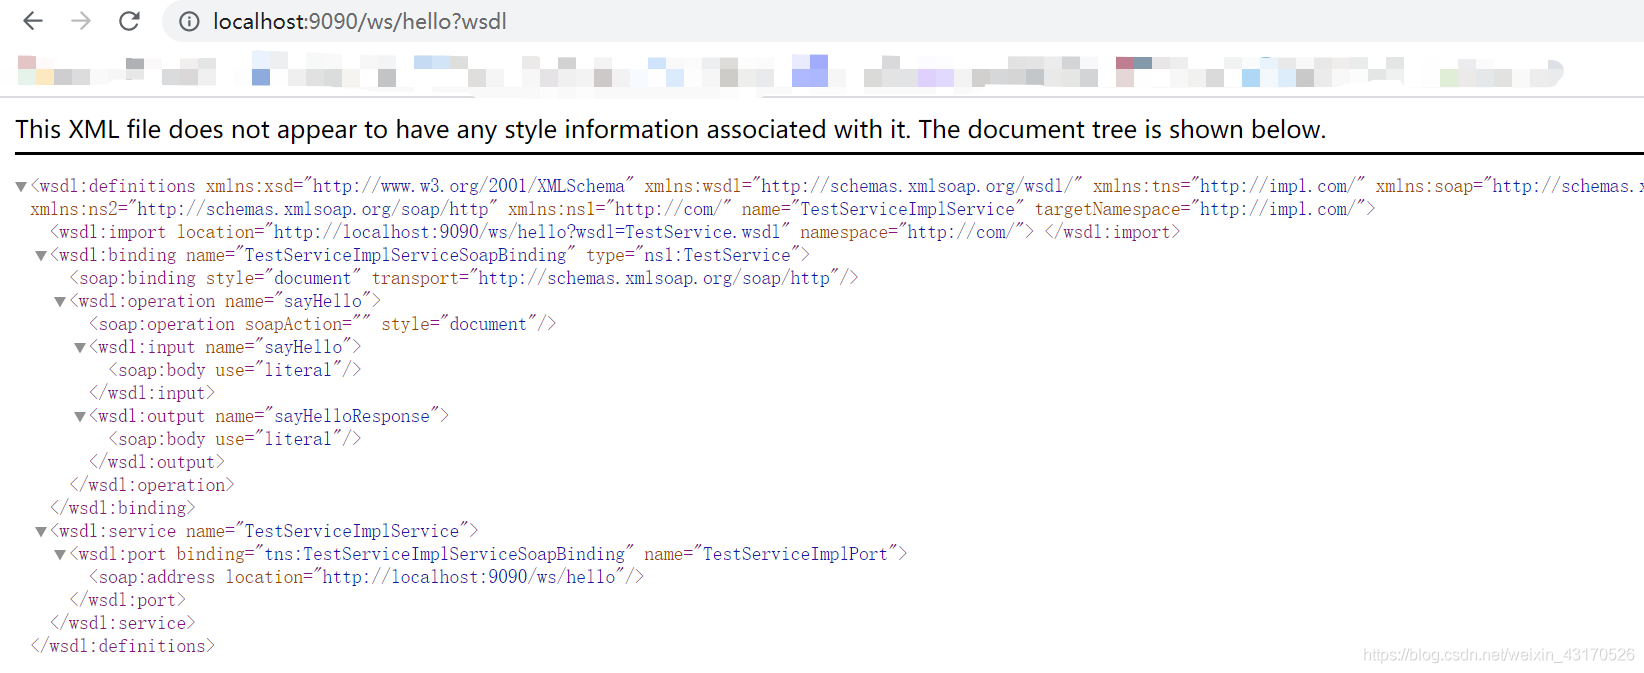
到这一步,代表服务端已成功!!!
2. client端编写
项目结构
注:TestService的类一定要和服务端中TestService类的位置一样
步骤如下
- 创建一个maven项目
- 添加pom文件的依赖
- 添加spring的配置文件
- 编写webservice客户端接口类
- 编写测试类
pom.xml
		<dependency>
			<groupId>org.apache.cxf</groupId>
			<artifactId>cxf-rt-transports-http</artifactId>
			<version>3.1.4</version>
		</dependency>
		<dependency>
			<groupId>org.apache.cxf</groupId>
			<artifactId>cxf-core</artifactId>
			<version>3.1.4</version>
		</dependency>
		<dependency>
			<groupId>org.apache.cxf</groupId>
			<artifactId>cxf-rt-frontend-jaxws</artifactId>
			<version>3.1.4</version>
		</dependency>
		<dependency>
			<groupId>org.springframework</groupId>
			<artifactId>spring-context</artifactId>
			<version>4.3.7.RELEASE</version>
		</dependency>
		<dependency>
			<groupId>org.springframework</groupId>
			<artifactId>spring-web</artifactId>
			<version>4.3.7.RELEASE</version>
		</dependency>
		<dependency>
			<groupId>junit</groupId>
			<artifactId>junit</artifactId>
			<version>4.12</version>
			<scope>test</scope>
		</dependency>
		<dependency>
			<groupId>javax.servlet</groupId>
			<artifactId>servlet-api</artifactId>
			<version>2.4</version>
			<scope>provided</scope>
		</dependency>
		<dependency>
			<groupId>org.springframework</groupId>
			<artifactId>spring-test</artifactId>
			<version>4.3.7.RELEASE</version>
		</dependency>
注:一定要和webservice端的依赖版本保持一致
applicationContext.xml
<?xml version="1.0" encoding="UTF-8"?>
<beans xmlns="http://www.springframework.org/schema/beans"
       xmlns:xsi="http://www.w3.org/2001/XMLSchema-instance"
       xmlns:cfx="http://cxf.apache.org/core"
       xmlns:jaxws="http://cxf.apache.org/jaxws"
       xmlns:jaxrs="http://cxf.apache.org/jaxrs"
       xsi:schemaLocation="
       http://www.springframework.org/schema/beans
       http://www.springframework.org/schema/beans/spring-beans.xsd
       http://cxf.apache.org/core
       http://cxf.apache.org/schemas/core.xsd
       http://cxf.apache.org/jaxws
       http://cxf.apache.org/schemas/jaxws.xsd
       http://cxf.apache.org/jaxrs
	   http://cxf.apache.org/schemas/jaxrs.xsd">
    <jaxws:client
            id="testService"
            serviceClass="com.TestService"
            address="http://localhost:9090/ws/hello">
    </jaxws:client>
</beans>
注:同样的jaxrs一样爆红的话,可以删除或者无视
TestService.java
package com;

import javax.jws.WebService;

/**
 * @author shenming
 */
@WebService
public interface TestService {

    /**
     * webservice调用接口
     *
     * @param name 传入参数
     * @return 返回服务的获得的结果
     */
    String sayHello(String name);
}
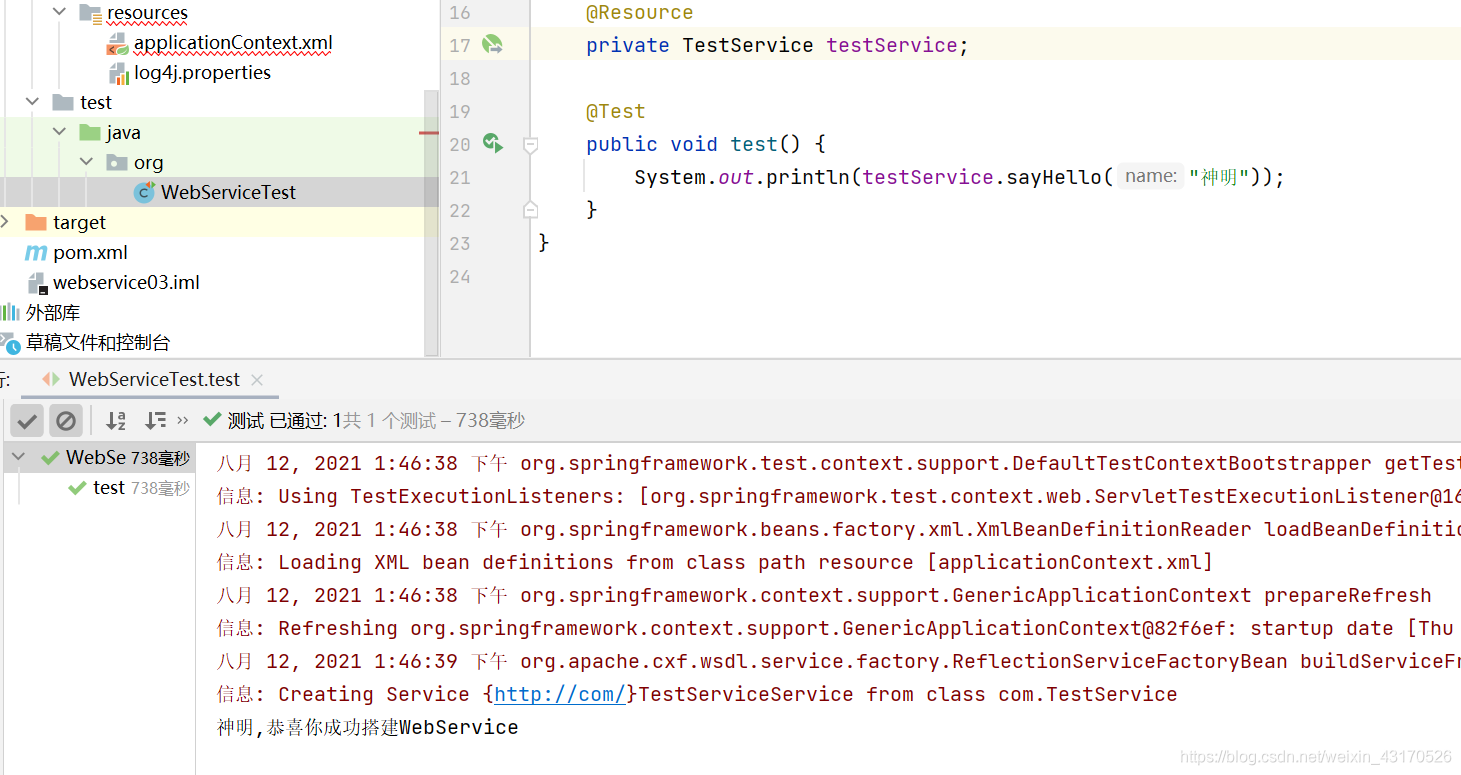
WebServiceTest.java
package org;

import com.TestService;
import org.junit.Test;
import org.junit.runner.RunWith;
import org.springframework.test.context.ContextConfiguration;
import org.springframework.test.context.junit4.SpringJUnit4ClassRunner;

import javax.annotation.Resource;

@RunWith(SpringJUnit4ClassRunner.class)
@ContextConfiguration("classpath:applicationContext.xml")
public class WebServiceTest {

    //注入对象
    @Resource
    private TestService testService;

    @Test
    public void test() {
        System.out.println(testService.sayHello("神明"));
    }
}
结果如图所示


 1万+
1万+

 被折叠的 条评论
为什么被折叠?
被折叠的 条评论
为什么被折叠?
 到【灌水乐园】发言


