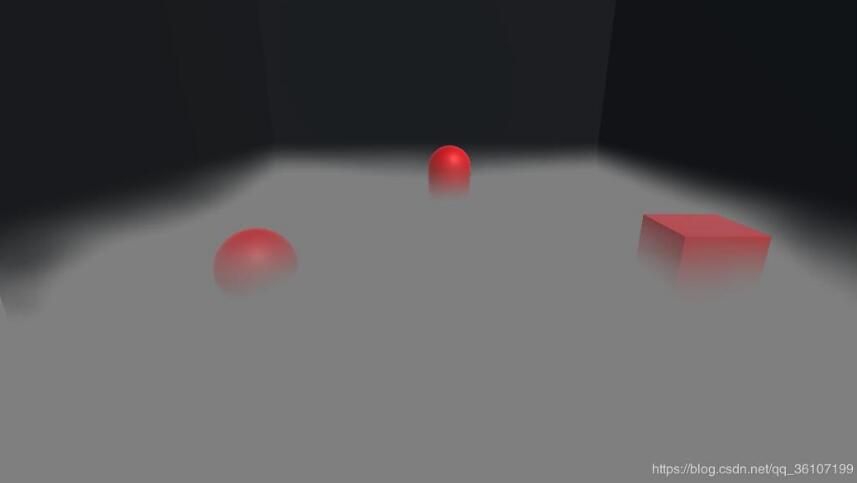
Unity Shader实现动态雾效果

Unity Shader学习:动态雾,供大家参考,具体内容如下

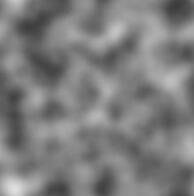
先将相机近裁面四个角向量传给shader,再通过观察空间下的深度值和相机位置算出像素在世界坐标系的位置,通过世界空间高度值来设定雾的范围和浓度,然后通过噪声和uv偏移实现扰动效果。得到了类似寂静岭或恶灵附身1的效果。

C#部分:

1

2

3

4

5

6

7

8

9

10

11

12

13

14

15

16

17

18

19

20

21

22

23

24

25

26

27

28

29

30

31

32

33

34

35

36

37

38

39

40

41

42

43

44

45

46

47

48

49

50

51

52

53

54

55

56

57

58

59

60

61

62

63

using System.Collections;

using System.Collections.Generic;

using UnityEngine;

[ExecuteInEditMode]

public class RayMarchingCamera : MonoBehaviour {

 private Matrix4x4 frustumCorners = Matrix4x4.identity;

 public Material material;

 public Camera myCamera;

 public Transform cameraTransform;

 // Use this for initialization

 private void Start()

 {

  myCamera.depthTextureMode = DepthTextureMode.Depth;

 }

 private void OnRenderImage(RenderTexture source, RenderTexture destination)

 {

  //field of view

  float fov = myCamera.fieldOfView;

  //近裁面距离

  float near = myCamera.nearClipPlane;

  //横纵比

  float aspect = myCamera.aspect;

  //近裁面一半的高度

  float halfHeight = near * Mathf.Tan(fov * 0.5f * Mathf.Deg2Rad);

  //向上和向右的向量

  Vector3 toRight = myCamera.transform.right * halfHeight * aspect;

  Vector3 toTop = myCamera.transform.up * halfHeight;

  //分别得到相机到近裁面四个角的向量

  //depth/dist=near/|topLeft|

  //dist=depth*(|TL|/near)

  //scale=|TL|/near

  Vector3 topLeft = cameraTransform.forward * near + toTop - toRight;

  float scale = topLeft.magnitude / near;

  topLeft.Normalize();

  topLeft *= scale;

  Vector3 topRight = cameraTransform.forward * near + toTop + toRight;

  topRight.Normalize();

  topRight *= scale;

  Vector3 bottomLeft = cameraTransform.forward * near - toTop - toRight;

  bottomLeft.Normalize();

  bottomLeft *= scale;

  Vector3 bottomRight = cameraTransform.forward * near - toTop + toRight;

  bottomRight.Normalize();

  bottomRight *= scale;

  //给矩阵赋值

  frustumCorners.SetRow(0, bottomLeft);

  frustumCorners.SetRow(1, bottomRight);

  frustumCorners.SetRow(2, topRight);

  frustumCorners.SetRow(3, topLeft);

  //将向量传给定点着色器,将屏幕画面传个shader

  material.SetMatrix("_FrustumCornorsRay", frustumCorners);

  material.SetTexture("_MainTex", source);

  Graphics.Blit(source, destination,material,0);

 }

}

shader部分:

1

2

3

4

5

6

7

8

9

10

11

12

13

14

15

16

17

18

19

20

21

22

23

24

25

26

27

28

29

30

31

32

33

34

35

36

37

38

39

40

41

42

43

44

45

46

47

48

49

50

51

52

53

54

55

56

57

58

59

60

61

62

63

64

65

66

67

68

69

70

71

72

73

74

75

76

77

78

79

80

81

82

83

84

85

86

87

88

89

90

91

92

93

Shader "Unlit/Fog"

{

 Properties

 {

 _MainTex ("Texture", 2D) = "white" {}

 _NoiseTex("NoiseTex",2D)="white"{}

 //雾起始高度

 _FogStartHeight("FogStartHeight",float)=0.0

 //雾终点高度

 _FogEndHeight("FogEndHeight",float)=1.0

 //雾x位移速度

 _FogXSpeed("FogXSpeed",float)=0.1

 //雾y位移速度

 _FogYSpeed("FogYSpeed",float)=0.1

 }

 SubShader

 {

 Tags { "RenderType"="Opaque" }

 LOD 100

 Pass

 {

 CGPROGRAM

 #pragma vertex vert

 #pragma fragment frag

 #include "UnityCG.cginc"

 sampler2D _MainTex;

 sampler2D _NoiseTex;

 sampler2D _CameraDepthTexture;

 float _FogStartHeight;

 float _FogEndHeight;

 float _FogXSpeed;

 float _FogYSpeed;

 //获得相机近裁面四个角向量

 float4x4 _FrustumCornorsRay;

 struct a2v{

 float4 vertex:POSITION;

 float2 uv:TEXCOORD0;

 };

 struct v2f{

 float4 pos:SV_POSITION;

 float2 uv:TEXCOORD0;

 float4 interpolatedRay:TEXCOORD1;

 };

 v2f vert(a2v v){

 v2f o;

 o.pos=UnityObjectToClipPos(v.vertex);

 o.uv=v.uv;

 int index=0;

 if (v.uv.x<0.5&&v.uv.y<0.5)

 {

  index = 0;

 }

 else if (v.uv.x>0.5&&v.uv.y<0.5) {

  index = 1;

 }

 else if (v.uv.x>0.5&&v.uv.y>0.5) {

  index = 2;

 }

 else {

  index = 3;

 }

 //安排uv4个角对应四个角向量

 o.interpolatedRay = _FrustumCornorsRay[index];

 return o;

 }

 float4 frag(v2f i):SV_Target{

 //观察空间下的线性深度值

 float linearDepth=LinearEyeDepth(SAMPLE_DEPTH_TEXTURE(_CameraDepthTexture,i.uv));

 //像素世界坐标=世界空间相机位置+像素相对相机距离

 float3 worldPos=_WorldSpaceCameraPos+linearDepth*i.interpolatedRay.xyz;

 float speedX=_Time.y*_FogXSpeed;

 float speedY=_Time.y*_FogYSpeed;

 float noise=tex2D(_NoiseTex,i.uv+float2(speedX,speedY));

 //让噪声图向黑色靠拢,黑白差距不要太大

 noise=pow(noise,0.5);

 //雾浓度=世界高度/指定范围

 float fogDensity=(_FogEndHeight-worldPos.y)/(_FogEndHeight-_FogStartHeight);

 fogDensity=smoothstep(0.0,1.0,fogDensity*noise);

 float4 color=tex2D(_MainTex,i.uv);

 //根据雾浓度混合场景和雾颜色

 color.rgb=lerp(color.rgb,float3(0.5,0.5,0.5),fogDensity);

 return color;

 }

 ENDCG

 }

 }

}

以上就是本文的全部内容,希望对大家的学习有所帮助,原文:Unity Shader实现动态雾效果_csharp_猪先飞

评论
添加红包

请填写红包祝福语或标题

红包个数最小为10个

红包金额最低5元

当前余额3.43前往充值 >
需支付:10.00
成就一亿技术人!
领取后你会自动成为博主和红包主的粉丝 规则
hope_wisdom
发出的红包
实付
使用余额支付
点击重新获取
扫码支付
钱包余额 0

抵扣说明:

1.余额是钱包充值的虚拟货币,按照1:1的比例进行支付金额的抵扣。
2.余额无法直接购买下载,可以购买VIP、付费专栏及课程。

余额充值