 GitLab安装与管理


 本文详细介绍了GitLab的概述、与GitHub的区别、安装步骤及管理方法。包括在CentOS 7上的准备工作、依赖安装、GitLab配置及启动命令等。
目录
- gitlab基本介绍
- 安装前的准备
- gitlab安装
- gitlab管理
gitlab基本介绍
GitLab概述:
是一个利用 Ruby on Rails 开发的开源应用程序,实现一个自托管的Git项目仓库,可通过Web界面进行访问公开的或者私人项目。
Ruby on Rails 是一个可以使你开发、部署、维护 web 应用程序变得简单的框架。
GitLab拥有与Github类似的功能,能够浏览源代码,管理缺陷和注释。可以管理团队对仓库的访问,它非常易于浏览提交过的版本并提供一个文件历史库。它还提供一个代码片段收集功能可以轻松实现代码复用,便于日后有需要的时候进行查找。
GitLab官网:https://about.gitlab.com/
gitlab与github区别:
相同点: 二者都是基于web的Git仓库,在很大程度上GitLab是仿照GitHub来做的,它们都提供了分享开源项目的平台,为开发团队提供了存储、分享、发布和合作开发项目的中心化云存储的场所。
不同点:
1、GitHub如果要使用私有仓库,是需要付费的。GitLab可以在上面创建私人的免费仓库。
2、GitLab让开发团队对他们的代码仓库拥有更多的控制,相比于GitHub,它有不少的特色:允许免费设置仓库权限;允许用户选择分享一个project的部分代码;允许用户设置project的获取权限,进一步的提升安全性;可以设置获取到团队整体的改进进度;通过innersourcing让不在权限范围内的人访问不到该资源。
从代码私有性方面来看,有时公司并不希望员工获取到全部的代码,这个时候GitLab无疑是更好的选择。但对于开源项目而言,GitHub依然是代码托管的首选。
Github正确使用姿势
https://mp.weixin.qq.com/s/cUz9_UDe2FsvBt2M9xp4FA
git相关概念:
git 是一种版本控制系统,是一个命令,是一种工具
gitlib 是用于实现git功能的开发库
github 是一个基于git实现的在线代码托管仓库,包含一个网站界面,向互联网开放
gitlab 是一个基于git实现的在线代码仓库托管软件,一般用于在企业内网搭建git私服
注:gitlab-ce 社区版 ;gitlab-ee是企业版,收费
安装前的准备
系统:CentOS Linux release 7.2.1511 (Core)
内核:3.10.0-327.13.1.el7.x86
配置:2核4G40G(生产环境建议4核8G100G以上。大内存:pull和push代码特别吃内存,特别是jenkins同一时间集中构建push代码的时候,内存消耗很大;大磁盘用于存放前后端代码/var/opt/gitlab)
服务器:
| gitlab server | 10.120.126.28 |
| gitlab client | 10.120.126.29 |
环境设置:此处直接关掉firewalld、iptables
引用阿里云yum源:
mv /etc/yum.repos.d/CentOS-Base.repo /etc/yum.repos.d/CentOS-Base.repo.bak
wget -O /etc/yum.repos.d/CentOS-Base.repo http://mirrors.aliyun.com/repo/Centos-7.repo
yum makecache
安装相关依赖:
yum install curl policycoreutils openssh-server openssh-clients postfix -ysystemctl status postfix.service #查看状态是否有错误
systemctl start postfix.service #启动
systemctl enable postfix.service #开机自启systemctl status postfix.service时,可能出现错误:
1.fatal: parameter inet_interfaces: no local interface found for ::1
#vim /etc/postfix/main.cf
...
inet_interfaces = all
inet_protocols = all
...
2.fatal: unable to use my own hostname
#vim /etc/postfix/main.cf
...
myhostname = mail.mydomain.com    #不能为IP
...
gitlab安装
下载最新版本:gitlab/gitlab-ce - Packages · packages.gitlab.com,下面是文章编写时的最新版本
curl -s https://packages.gitlab.com/install/repositories/gitlab/gitlab-ce/script.rpm.sh | bash
yum -y install gitlab-ce-11.0.4-ce.0.el7.x86_64.rpm/download.rpm
sed -i '/^external_url/s/gitlab.example.com/10.120.126.28/' /etc/gitlab/gitlab.rb  #将10.120.126.28修改成自己的gitlab域名
gitlab-ctl reconfigure        #初始化、启动服务
)若gitlab-ctl reconfigure报错:
initdb.bin: invalid locale settings; check LANG and LC_* environment variables
)使用以下两条命令解决
LC_ALL="en_US.UTF-8"
LC_CTYPE="en_US.UTF-8"
gitlab常用命令
gitlab-ctl start               # 启动所有 gitlab 组件;
gitlab-ctl stop                # 停止所有 gitlab 组件;
gitlab-ctl restart             # 重启所有 gitlab 组件;
gitlab-ctl status              # 查看服务状态;
gitlab-ctl reconfigure         # 启动服务;
vim /etc/gitlab/gitlab.rb      # 修改默认的配置文件;
gitlab-rake gitlab:check SANITIZE=true --trace    # 检查gitlab;
gitlab-ctl tail                # 查看日志;
查看一下服务确认一下,可以看到gitlab是通过nginx来web展现的
# gitlab-ctl status
run: alertmanager: (pid 11534) 15723s; run: log: (pid 11543) 15723s
run: gitaly: (pid 11478) 15725s; run: log: (pid 11490) 15724s
run: gitlab-monitor: (pid 11507) 15724s; run: log: (pid 11515) 15724s
...

# lsof -i :80
COMMAND   PID       USER   FD   TYPE DEVICE SIZE/OFF NODE NAME
nginx   11028       root    7u  IPv4  42791      0t0  TCP *:http (LISTEN)
nginx   11029 gitlab-www    7u  IPv4  42791      0t0  TCP *:http (LISTEN)
nginx   11030 gitlab-www    7u  IPv4  42791      0t0  TCP *:http (LISTEN)
屏蔽掉注册功能【不想让人随便注册使用】
https://blog.youkuaiyun.com/ouyang_peng/article/details/78562125
gitlab管理
访问gitlab:http://10.120.126.28
默认用户:root,设置root密码
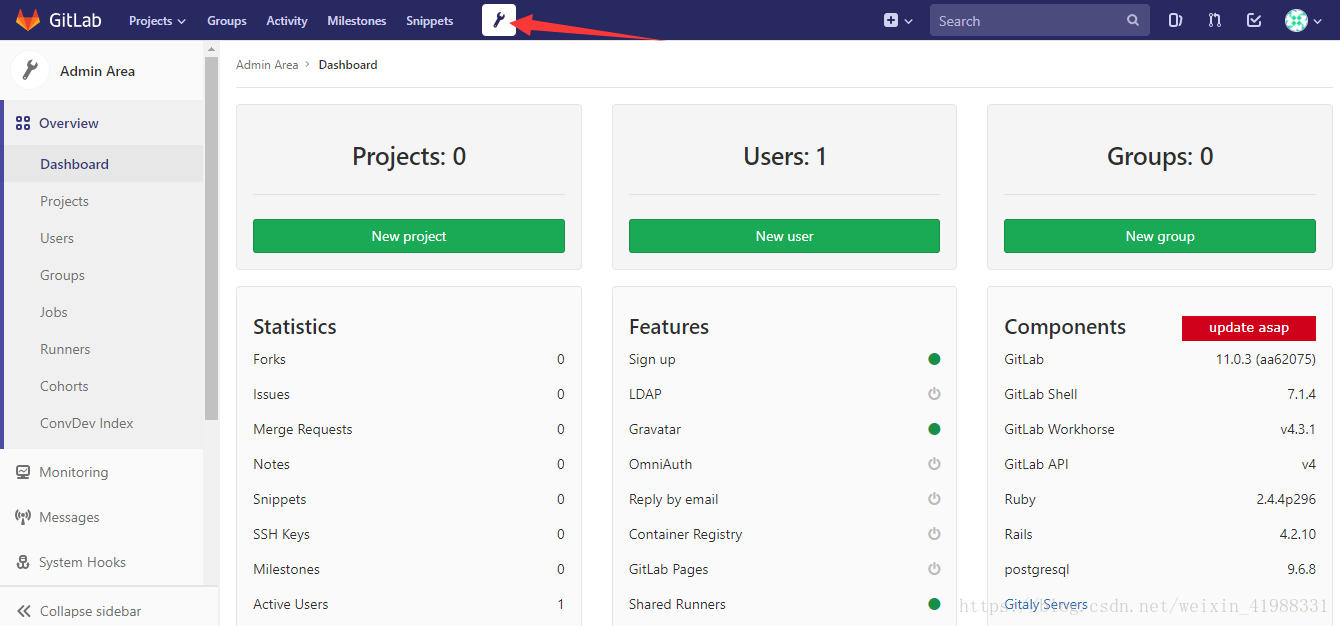
进入之后,点击扳手图标,进入admin管理页面,然后可以看到“项目创建”、“用户创建”、“组创建”选项
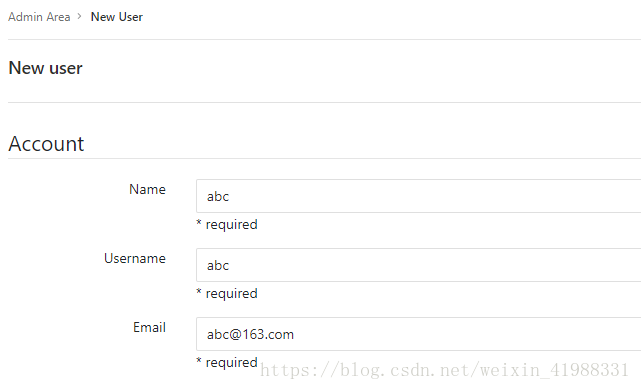
user创建:其他默认
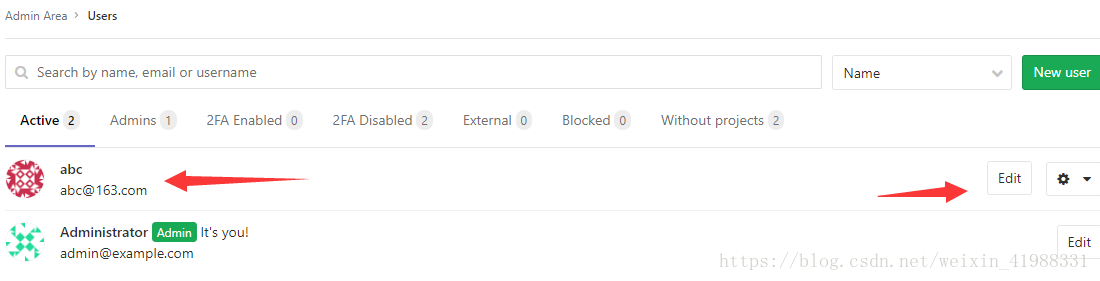
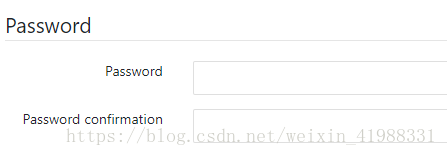
可以看到我们刚创建的用户,点击edit设置统一的用户初始密码,后面新创建的用户第一次登录需更改密码
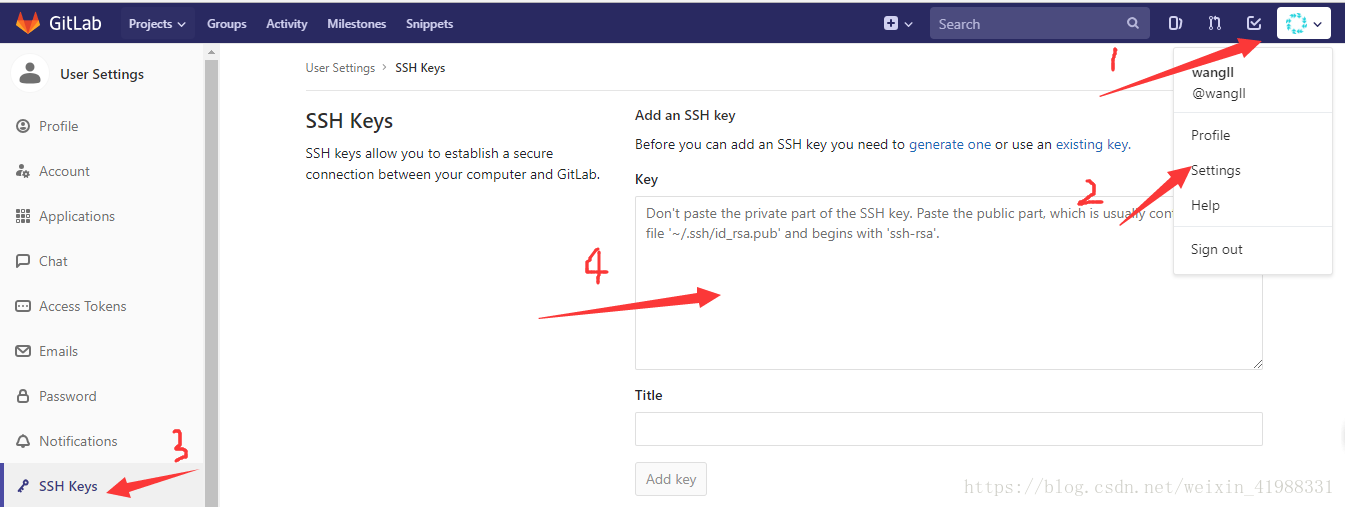
新用户首次登录更改密码后,将自己的开发机的公钥上传(先将gitlab本身的root公钥上传)
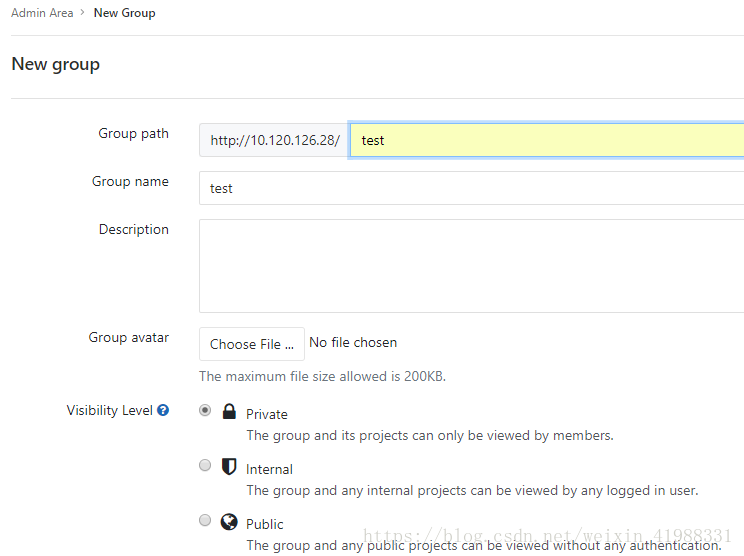
group创建:其他默认
创建一个叫test项目的分组,下面的private/internal/public,根据情况选择,默认为private私有
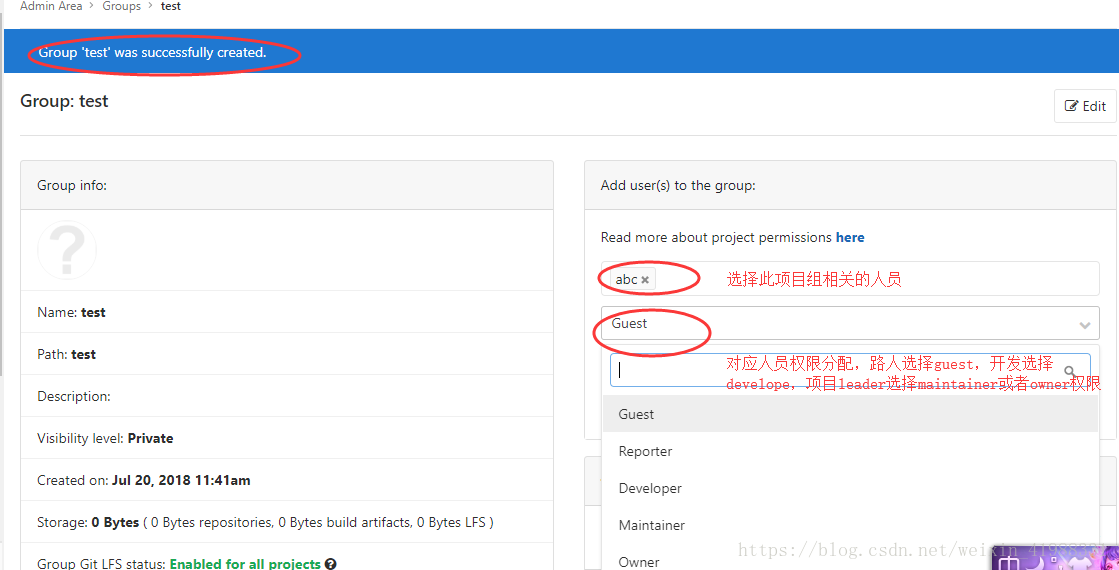
为项目组分配组员、分配权限(后面可以点组名进入此分配权限页面)
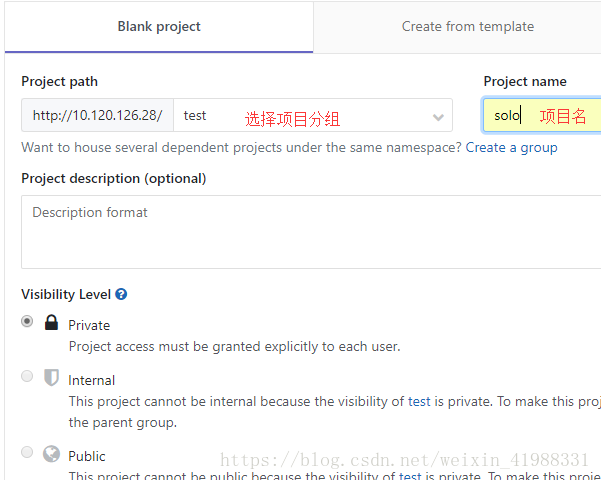
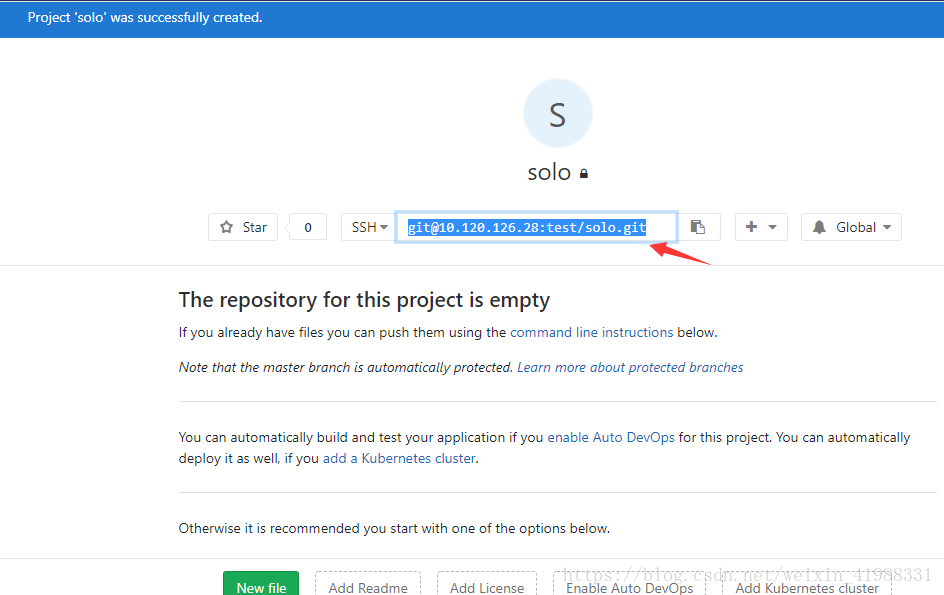
project创建
选择项目组,设置项目名称,其他默认
#Private私有状态或Internal状态,只能通过ssh方式连接(推荐此种方式,比较安全),这两种模式下是不能通过http方式连接
#public公开状态,就可以直接通过http连接(http连接只能在这种模式下才能成功!要保证gitlab机器的http端口对客户机开放)
可以看到创建成功后的git地址,以及git基本的操作命令
项目操作模拟
服务端操作:10.120.126.28,gitlab_first_push.sh
#!/bin/bash
# gitlab_first_push.sh
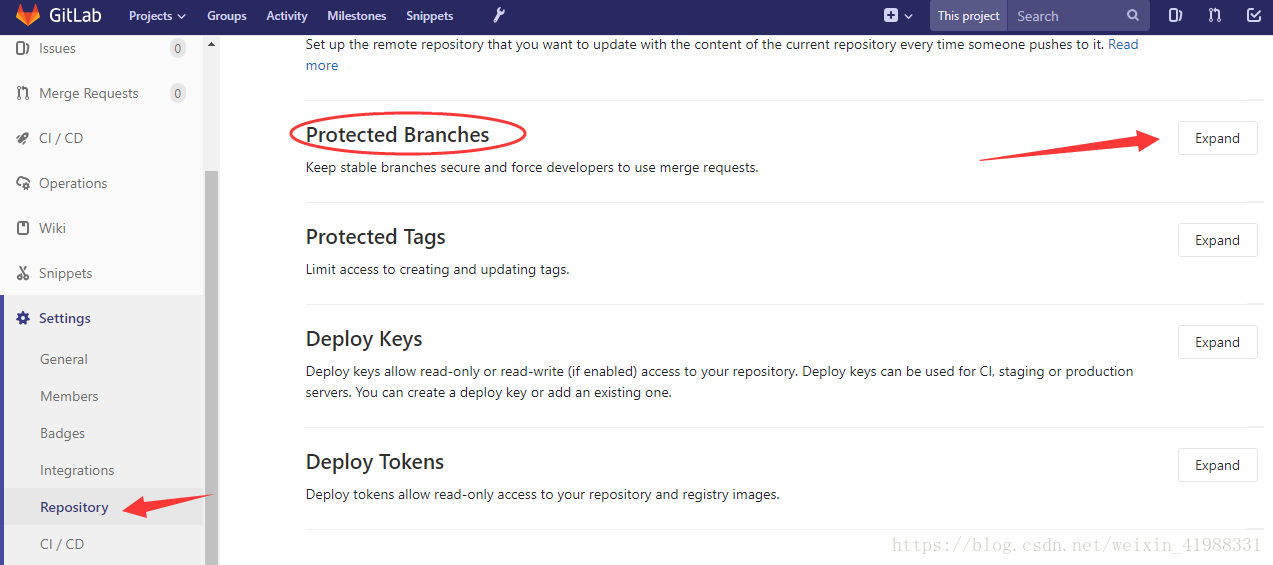
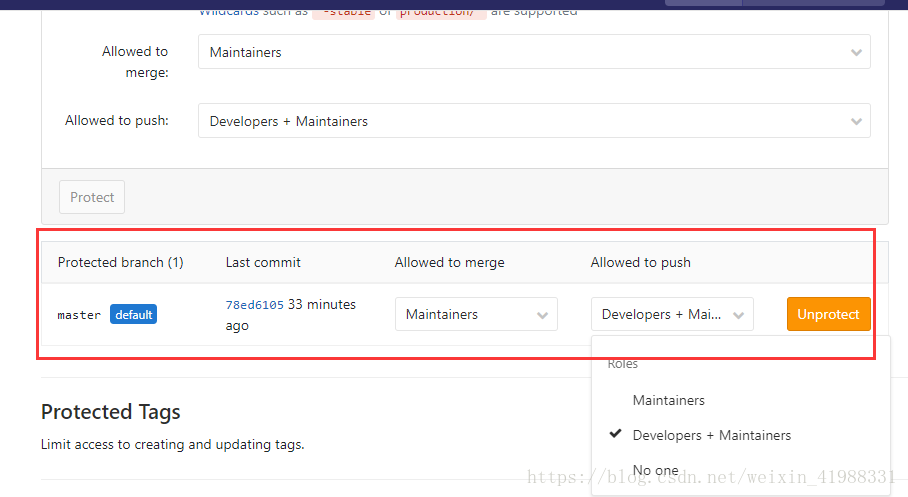
#本脚本用于以管理员首次提交项目,并更改"Protected Branches",将"Allowed to push"设置为"Developers+maintainers",这样其他用户如abc将不会出现以下错误:
# ! [remote rejected] master -> master (pre-receive hook declined)
#error: failed to push some refs to 'git@10.120.126.28:test/solo.git'
project_dir=`date "+%Y-%m-%d/%H:%M:%S"`
mkdir -p /root/${project_dir}
group_name="test"
project_name="solo"
git config --global user.name "Administrator"
git config --global user.email "admin@example.com"
cd /root/${project_dir}
git clone git@10.120.126.28:${group_name}/${project_name}.git
cd ${project_name}
touch README.md
git add README.md
git commit -m "add README"
git push -u origin master
rm -rf /root/${project_dir}
报错解决:remote: GitLab: You are not allowed to push code to protected branches on this project.
git用户端操作:10.120.126.29
mkdir -p /root/soft/
cd /root/soft/
git clone https://github.com/b3log/solo.git

git config --global user.email "abc@163.com"
git config --global user.name "abc"

mkdir -p /root/project
cd /root/project
git clone git@10.120.126.28:test/solo.git
cp -rf /roo/soft/solo/* /root/project/solo/
cd /root/project/solo/src/main/resouces/
sed -i '/^serverhost/s/localhost/10.120.126.29/' latke.properties
cd /root/project/solo/

git add .
git commit -m "all"
#这步如果以abc用户操作报错,参考上面
git push origin master
git clone 服务内存飙升:因为gitlab本身上传下载特别耗资源,如果gitlab服务器报负载高或者内存占用高,直接提高给机器配置吧
git deploykey设置参考:


 1830
1830

 被折叠的 条评论
为什么被折叠?
被折叠的 条评论
为什么被折叠?
 到【灌水乐园】发言


