


上一章分析了客户端获取注册表、注册的逻辑,本章继续分析客户端相关的三个定时任务。
初始化定时任务
回顾一下上一章DiscoveryClient的构造:
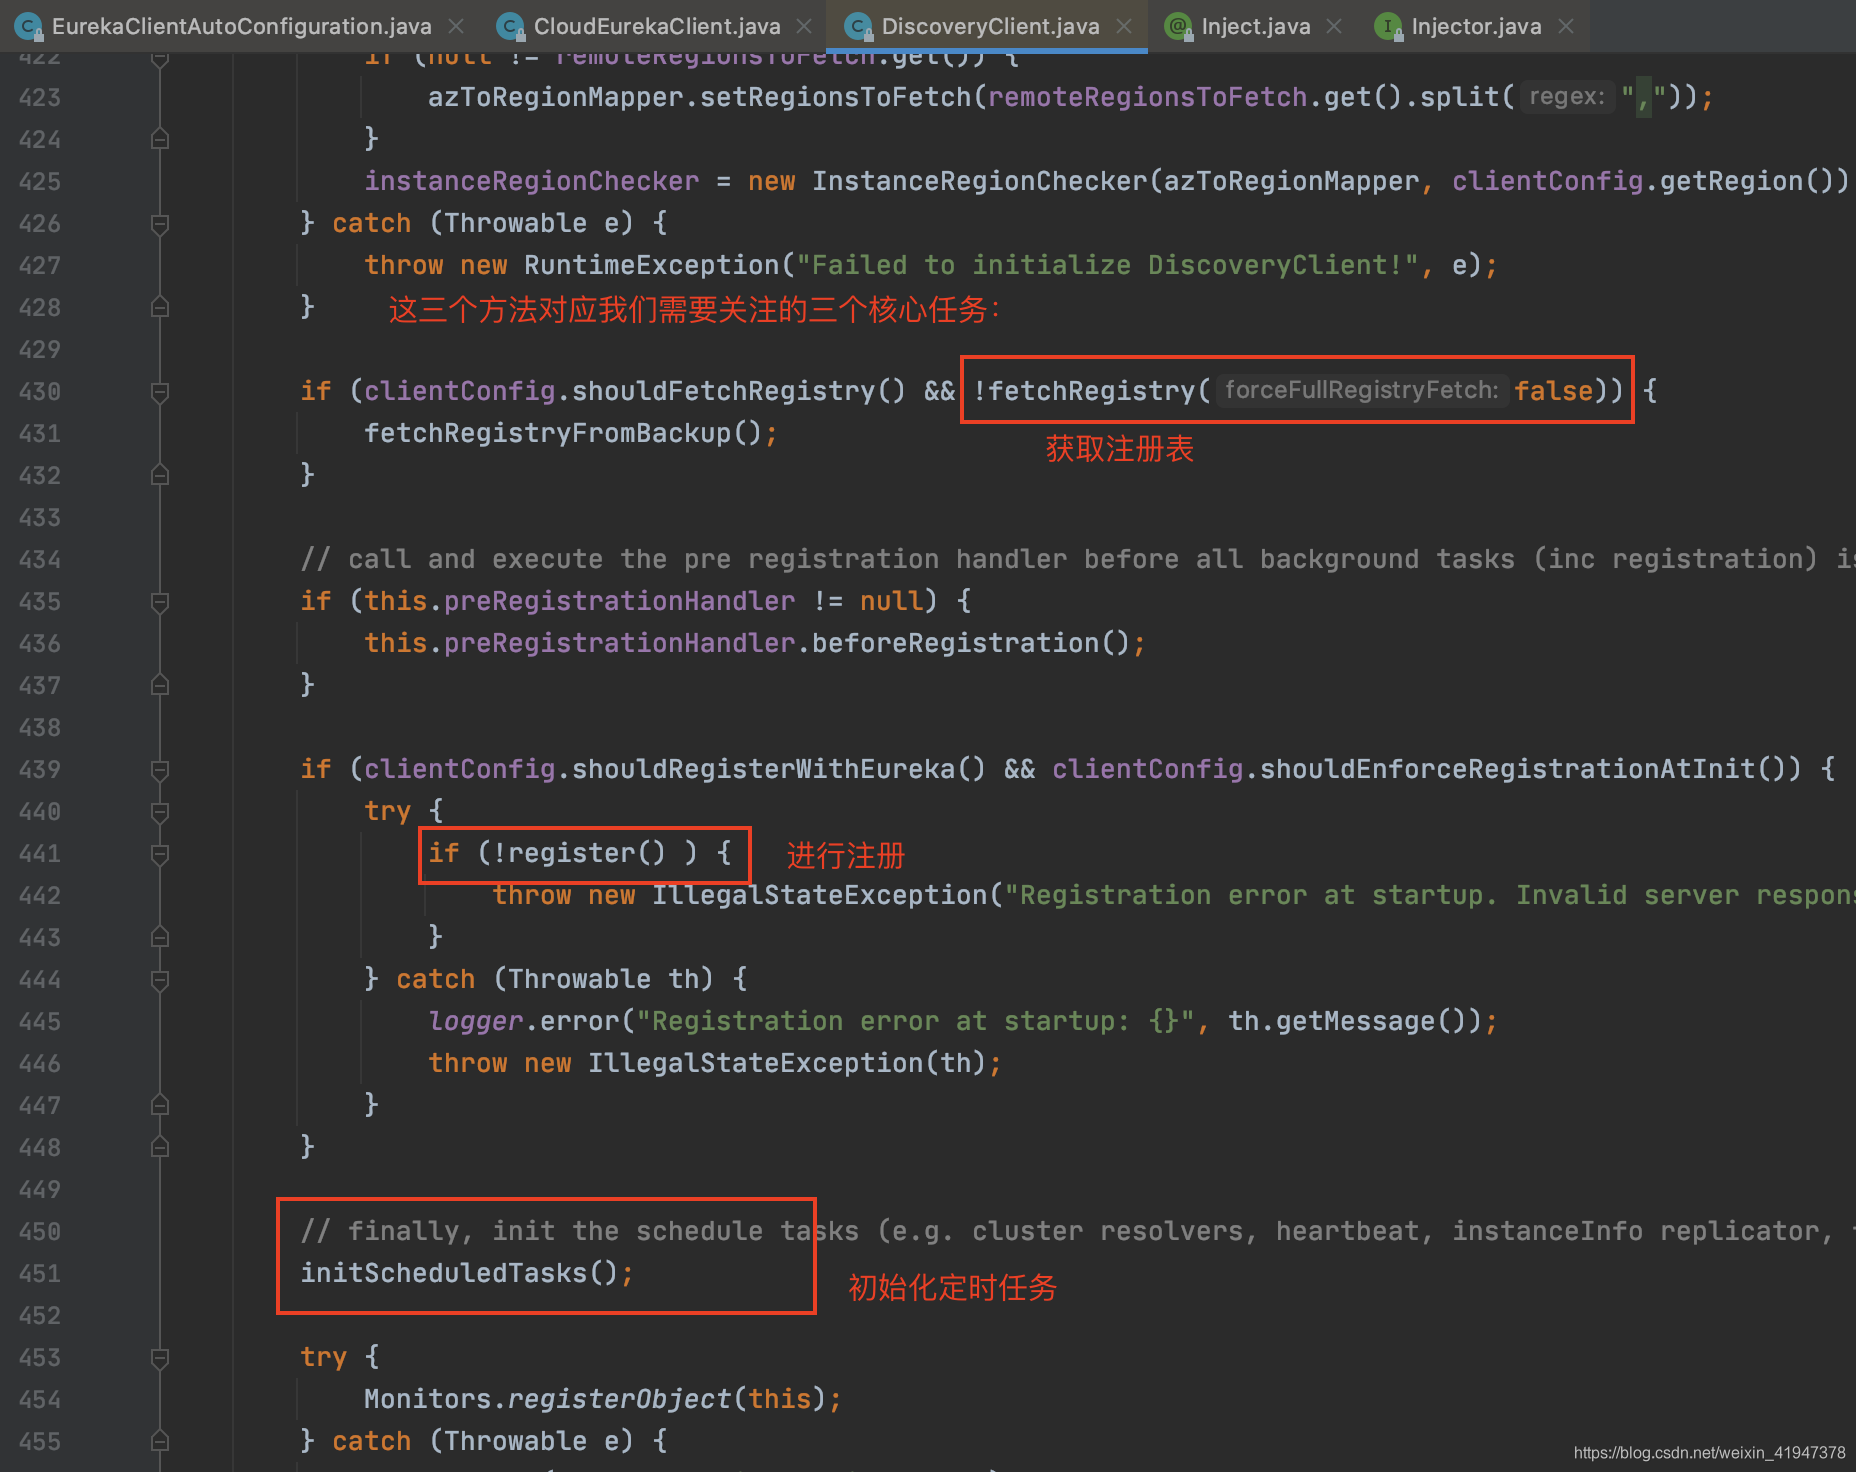
现在我们看initScheduledTasks方法,里面一共有三个定时任务:
//DiscoveryClient.java
/**
* Initializes all scheduled tasks.
*/
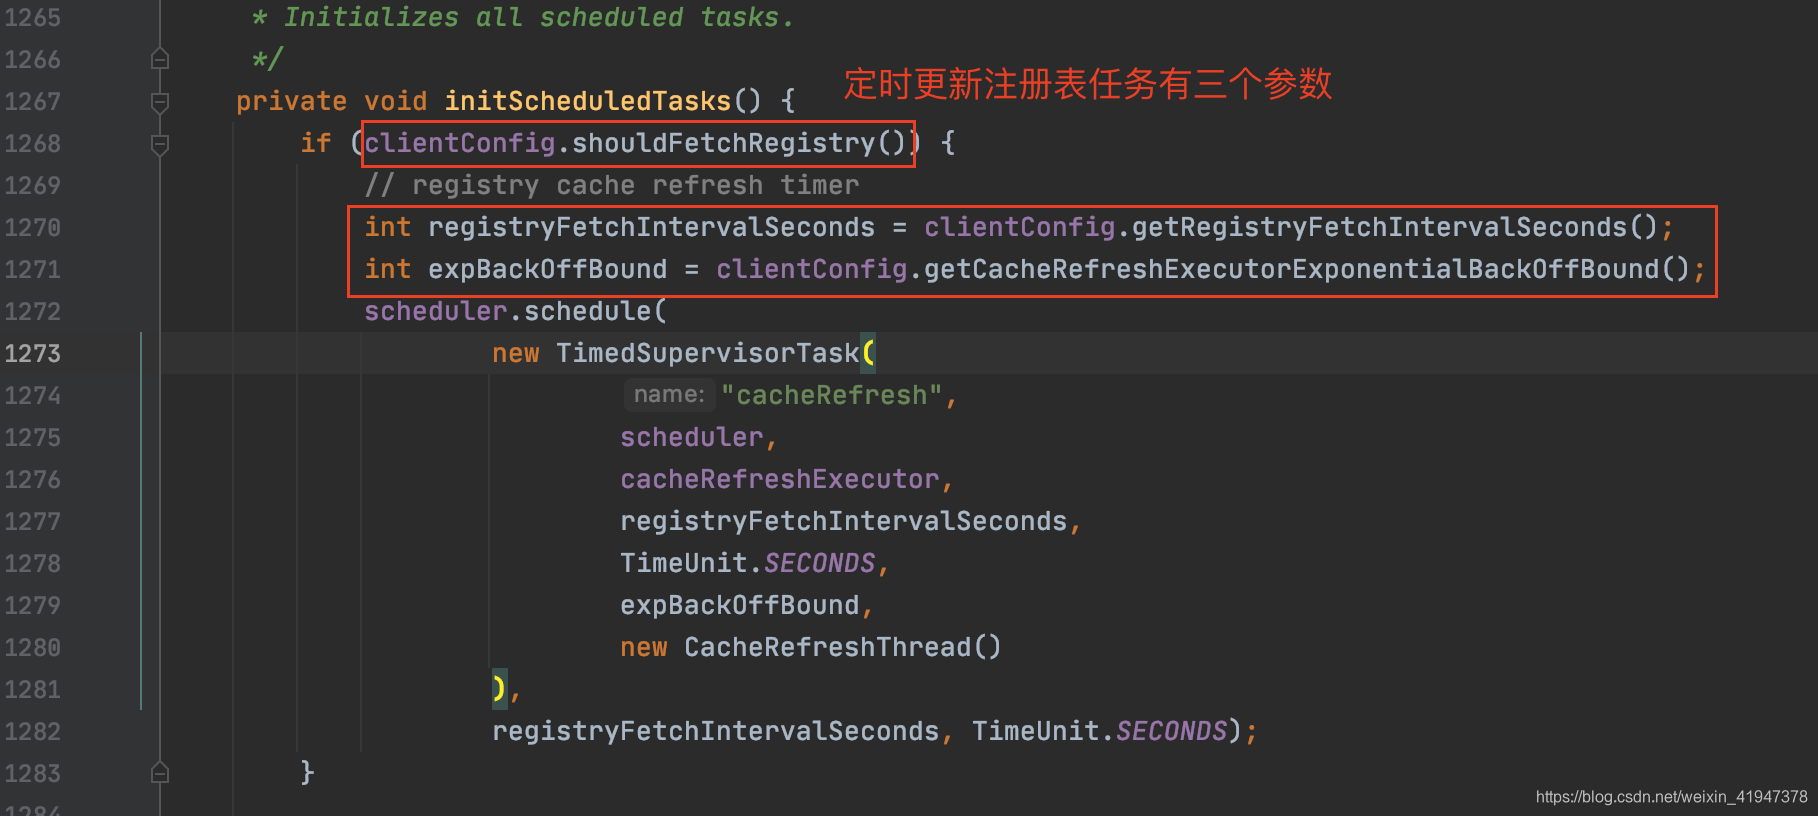
private void initScheduledTasks() {
if (clientConfig.shouldFetchRegistry()) {
// registry cache refresh timer
int registryFetchIntervalSeconds = clientConfig.getRegistryFetchIntervalSeconds();
int expBackOffBound = clientConfig.getCacheRefreshExecutorExponentialBackOffBound();
scheduler.schedule(
//"cacheRefresh" 定时更新注册表任务
new TimedSupervisorTask(
"cacheRefresh",
scheduler,
cacheRefreshExecutor,
registryFetchIntervalSeconds,
TimeUnit.SECONDS,
expBackOffBound,
new CacheRefreshThread()
),
registryFetchIntervalSeconds, TimeUnit.SECONDS);
}
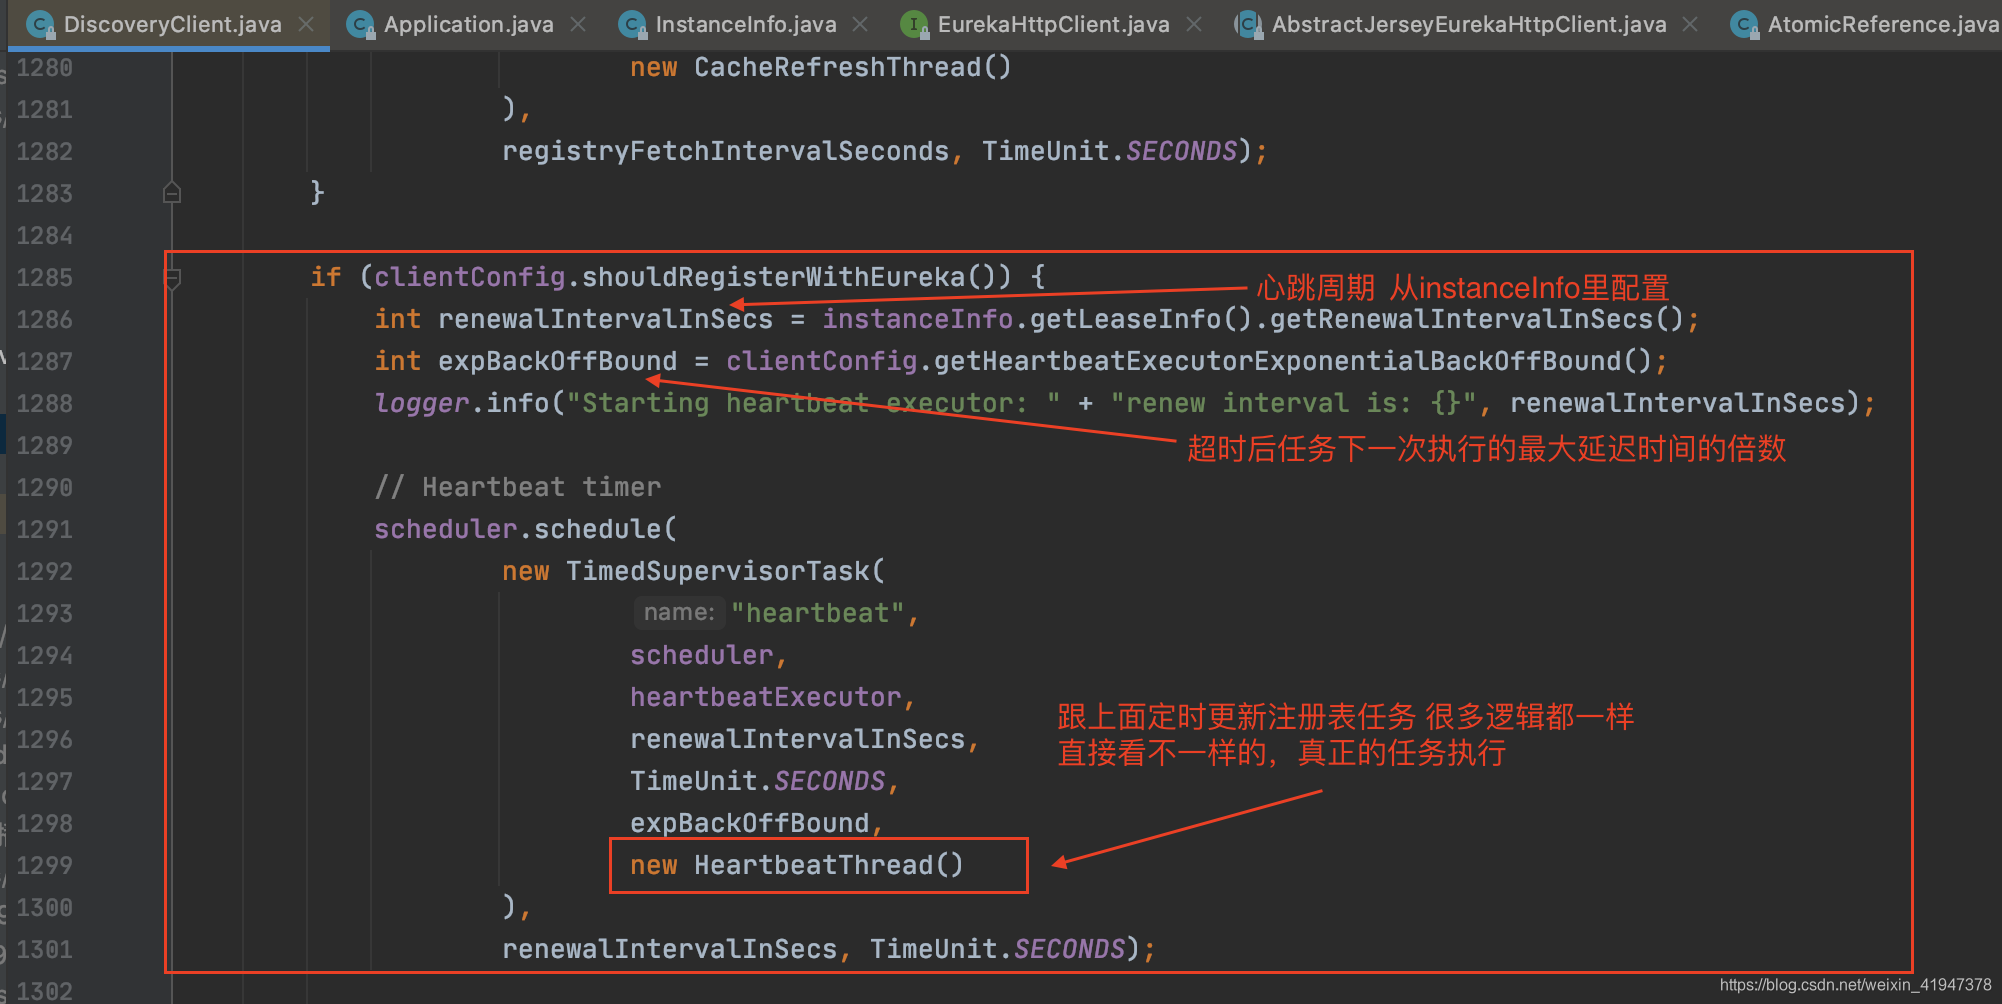
if (clientConfig.shouldRegisterWithEureka()) {
int renewalIntervalInSecs = instanceInfo.getLeaseInfo().getRenewalIntervalInSecs();
int expBackOffBound = clientConfig.getHeartbeatExecutorExponentialBackOffBound();
logger.info("Starting heartbeat executor: " + "renew interval is: {}", renewalIntervalInSecs);
// Heartbeat timer
scheduler.schedule(
//定时心跳续约任务
new TimedSupervisorTask(
"heartbeat",
scheduler,
heartbeatExecutor,
renewalIntervalInSecs,
TimeUnit.SECONDS,
expBackOffBound,
new HeartbeatThread()
),
renewalIntervalInSecs, TimeUnit.SECONDS);
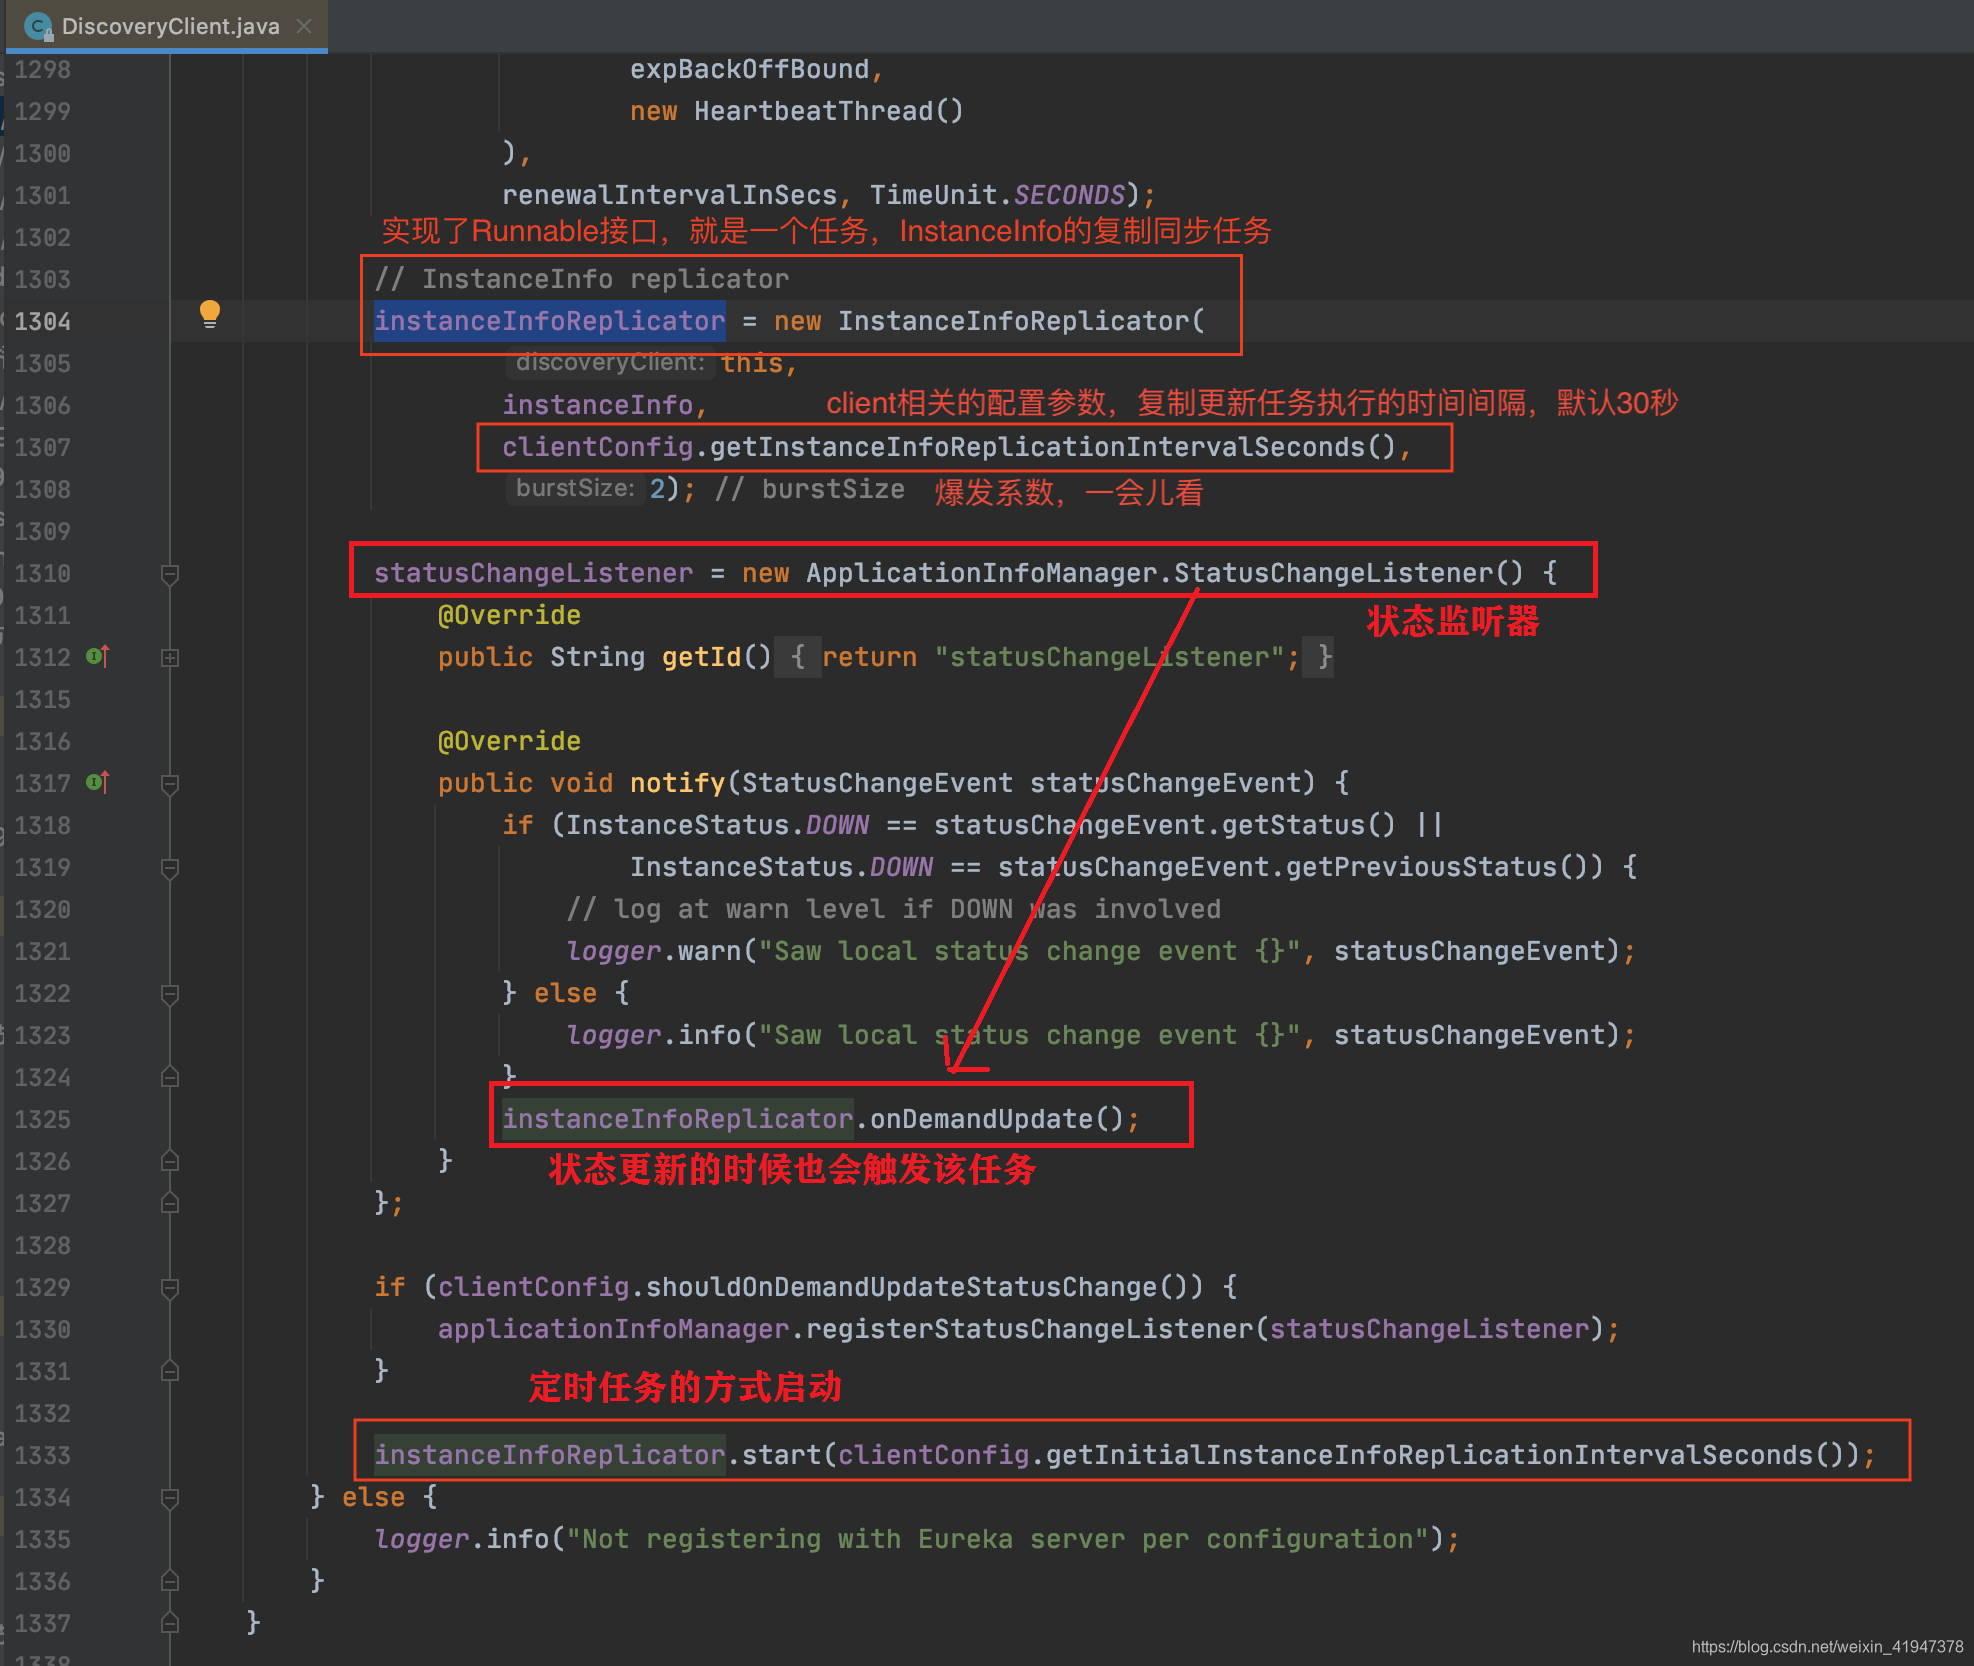
// 定时检测client更新的任务
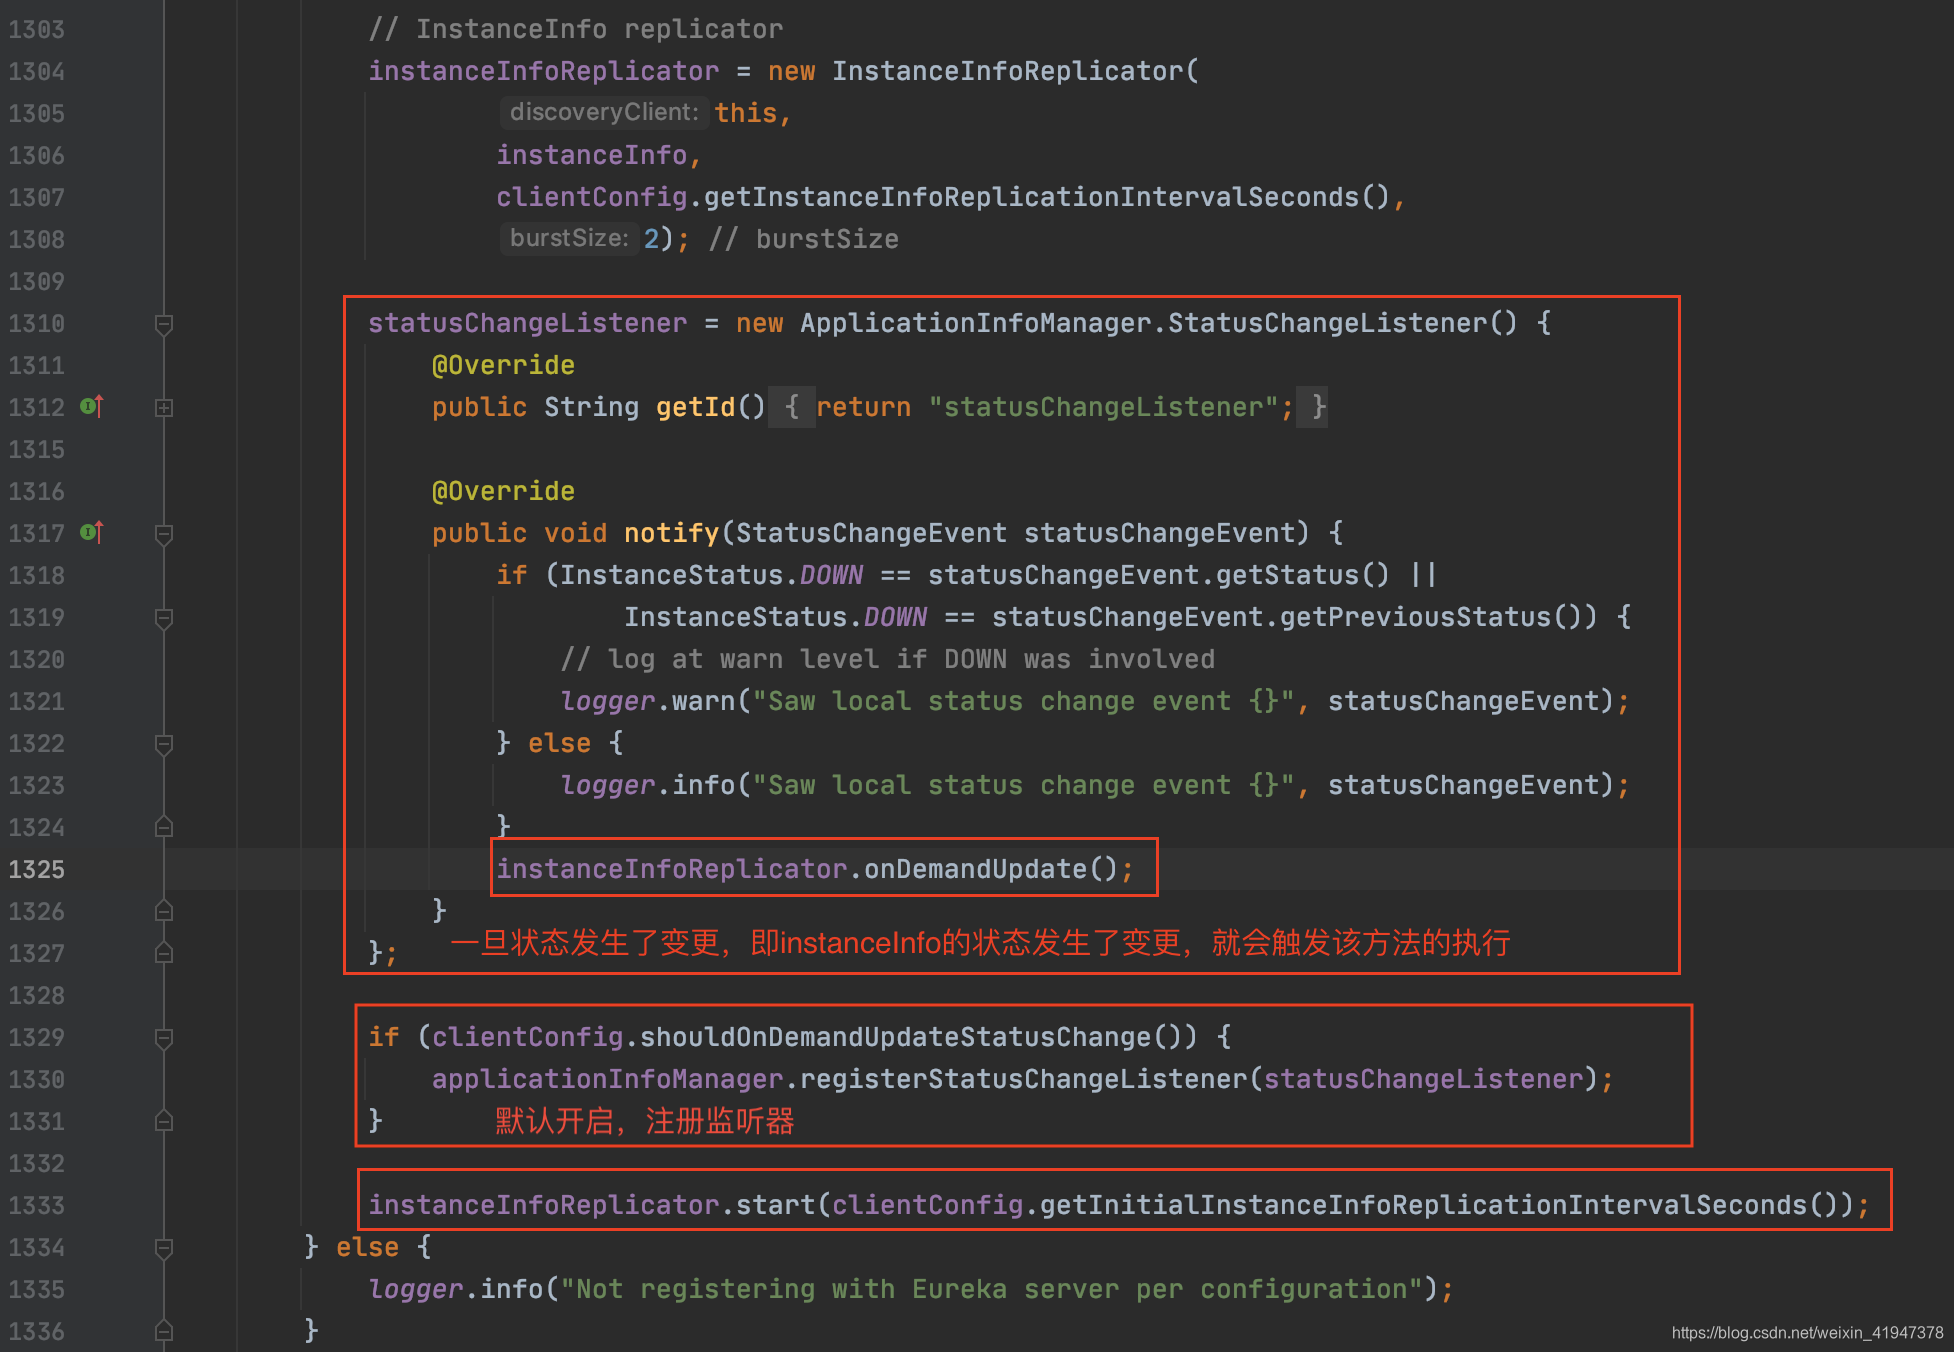
// InstanceInfo replicator
instanceInfoReplicator = new InstanceInfoReplicator(
this,
instanceInfo,
clientConfig.getInstanceInfoReplicationIntervalSeconds(),
2); // burstSize
statusChangeListener = new ApplicationInfoManager.StatusChangeListener() {
@Override
public String getId() {
return "statusChangeListener";
}
@Override
public void notify(StatusChangeEvent statusChangeEvent) {
if (InstanceStatus.DOWN == statusChangeEvent.getStatus() ||
InstanceStatus.DOWN == statusChangeEvent.getPreviousStatus()) {
// log at warn level if DOWN was involved
logger.warn("Saw local status change event {}", statusChangeEvent);
} else {
logger.info("Saw local status change event {}", statusChangeEvent);
}
instanceInfoReplicator.onDemandUpdate();
}
};
if (clientConfig.shouldOnDemandUpdateStatusChange()) {
applicationInfoManager.registerStatusChangeListener(statusChangeListener);
}
instanceInfoReplicator.start(clientConfig.getInitialInstanceInfoReplicationIntervalSeconds());
} else {
logger.info("Not registering with Eureka server per configuration");
}
}
1. 定时更新注册表任务
-
shouldFetchRegistry:
是否需要从注册中心获取注册表,Server端需要将该值设置为false

-
getRegistryFetchIntervalSeconds
客户端定时获取注册表的时间间隔

-
getCacheRefreshExecutorExponentialBackOffBound
客户端定时获取注册表并不是完全按照上面指定的间隔时间定时执行的,如果某一次获取在指定的间隔的时间内没有获取到,导致超时,那么下一次再次执行的延迟时间会相应延长,如果连续几次都超时,每次超时都会在原来的延迟时间基础上 * 2,但延长的最大时间不会超过配置的时间间隔 * 当前参数
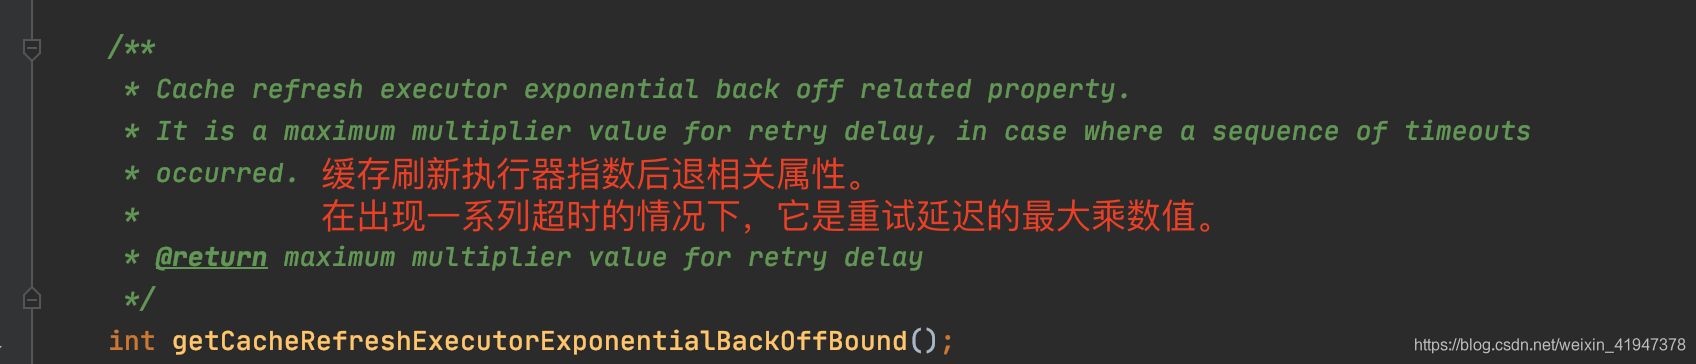
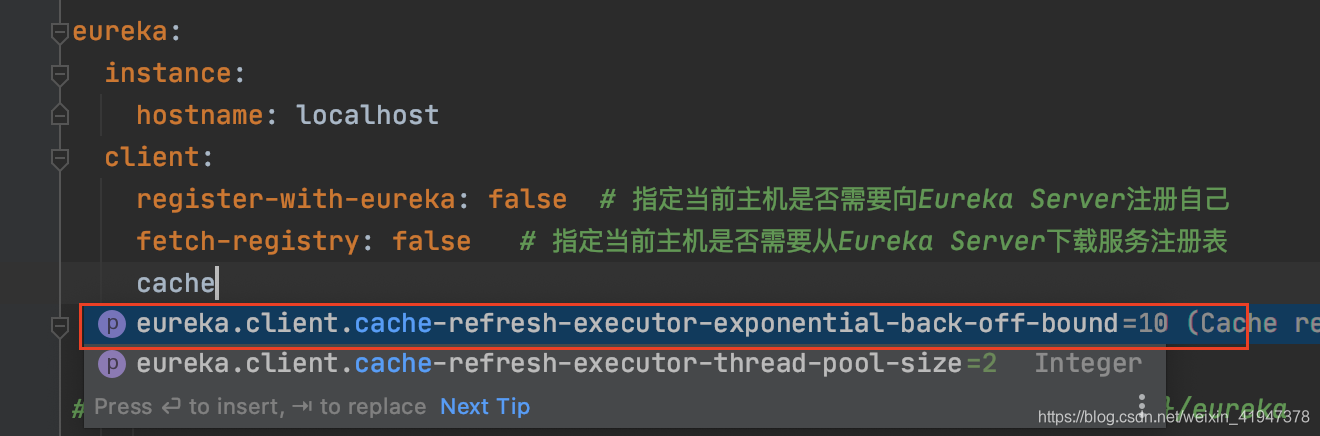
可以看到这个倍数默认是10:
先看一下定时任务的执行器scheduler.schedule方法:
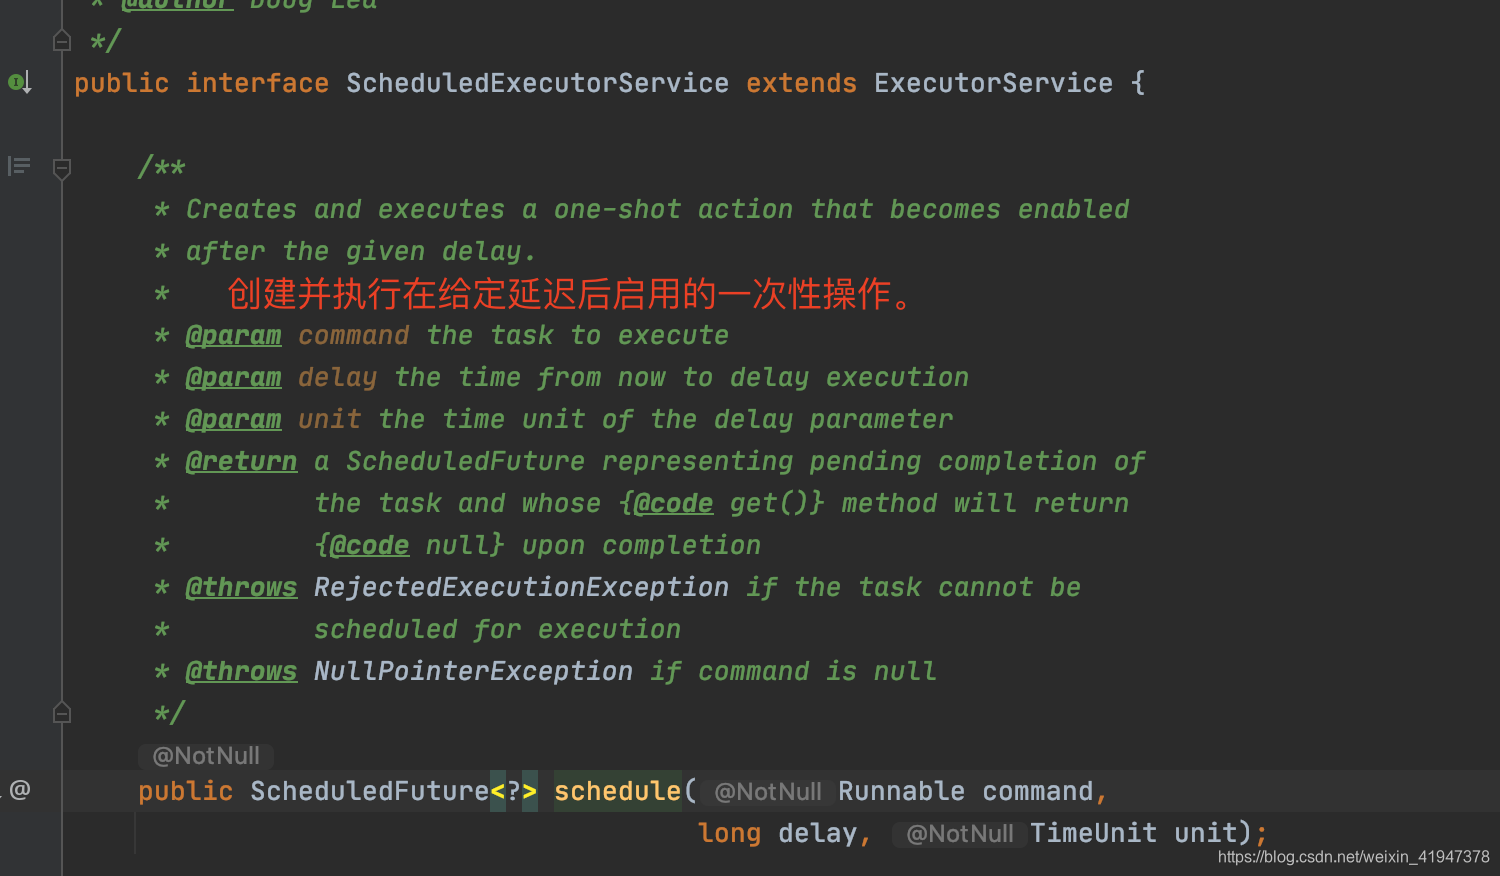
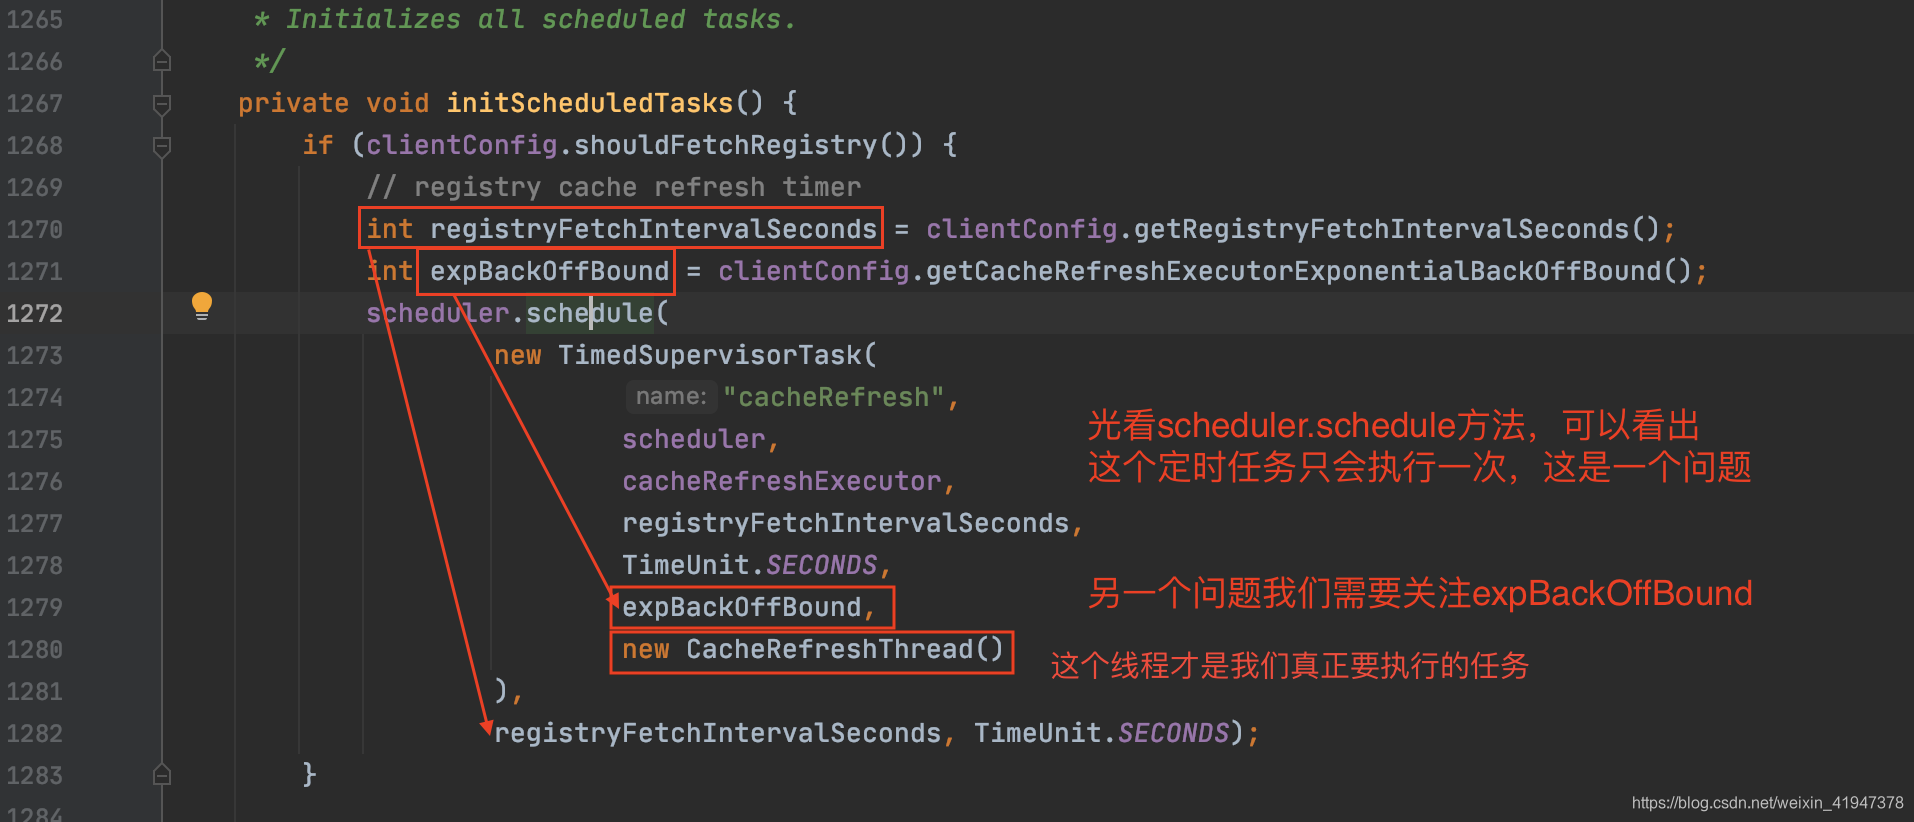
两个问题:
- scheduler.schedule方法只会执行一次定时任务,如何达到定时循环执行的效果?
- 看一下expBackOffBound是怎么用的。
1.1 TimedSupervisorTask
带着问题我们看TimedSupervisorTask:
//TimedSupervisorTask.java  构造
public TimedSupervisorTask(String name, ScheduledExecutorService scheduler, ThreadPoolExecutor executor,
                           int timeout, TimeUnit timeUnit, int expBackOffBound, Runnable task) {
	//主要关注最后4个参数timeout、timeUnit、expBackOffBound、task
    this.scheduler = scheduler;//执行器,专门执行当前TimedSupervisorTask
    this.executor = executor;//执行器,专门执行入参传进来的CacheRefreshThread,定时更新注册表任务

    //timeout就是 配置文件中配置的 定时更新注册表任务 执行的时间间隔
    //这里转换成毫秒
    //注意,此时timeoutMillis 代表的有两层含义:
    //  1.该时间是 定时更新注册表任务 执行中 获取到结果的最大等待时间,超过这个时间则认为获取失败
    //  2.下一次执行的延迟时间的初始值,但不是真正的值,真正的值是下面看到的delay
    this.timeoutMillis = timeUnit.toMillis(timeout);
    // CacheRefreshThread,定时更新注册表任务
    this.task = task;
    // timeoutMillis转换成原子类型,线程安全问题
    // delay ,该时间是 定时更新注册表任务 下一次执行的延迟时间,这个是真正的延迟时间
    this.delay = new AtomicLong(timeoutMillis);
    // 这里看到延迟时间 * expBackOffBound,为最大延迟时间
    // 如果一次获取失败,那么下一次再次执行的延迟时间会在delay基础上*2,最大不会超过maxDelay
    this.maxDelay = timeoutMillis * expBackOffBound;

    // Initialize the counters and register.
    successCounter = Monitors.newCounter("success");
    timeoutCounter = Monitors.newCounter("timeouts");
    rejectedCounter = Monitors.newCounter("rejectedExecutions");
    throwableCounter = Monitors.newCounter("throwables");
    threadPoolLevelGauge = new LongGauge(MonitorConfig.builder("threadPoolUsed").build());
    Monitors.registerObject(name, this);
}
现在看run方法:
//TimedSupervisorTask.java
public void run() {
	//正常情况下,上一次任务执行完毕后,30秒后会再次执行该方法
    Future<?> future = null;
    try {
	    //看到将 定时更新注册表任务 交给executor执行器执行,获取一个异步操作结果
        future = executor.submit(task);
        //executor.getActiveCount():返回executor正在积极执行任务的线程的大致数目。
        threadPoolLevelGauge.set((long) executor.getActiveCount());
        //调用future.get,这里会阻塞,直到获取到异步操作的结果,或者超时
        //最多等待timeoutMillis的时间,即每次获取30秒内没获取到就认为失败。
        future.get(timeoutMillis, TimeUnit.MILLISECONDS);  // block until done or timeout

		//走到这说明异步操作完成了没有超时
		//将 定时更新注册表任务 下一次执行的延迟时间恢复为timeoutMillis
        delay.set(timeoutMillis);
        threadPoolLevelGauge.set((long) executor.getActiveCount());
        successCounter.increment();
    } catch (TimeoutException e) {//如果超时了,这里会catch掉
        logger.warn("task supervisor timed out", e);
	    //记录超时次数
        timeoutCounter.increment();

		//获取当前 定时更新注册表任务 下一次执行的延迟时间
        long currentDelay = delay.get();
        //在当前延迟时间基础上 * 2,最大不能超过maxDelay
        long newDelay = Math.min(maxDelay, currentDelay * 2);
        //新的延迟时间重新赋值给delay,下一次执行的延迟时间会更长
        delay.compareAndSet(currentDelay, newDelay);

    } catch (RejectedExecutionException e) {
        if (executor.isShutdown() || scheduler.isShutdown()) {
            logger.warn("task supervisor shutting down, reject the task", e);
        } else {
            logger.warn("task supervisor rejected the task", e);
        }

        rejectedCounter.increment();
    } catch (Throwable e) {
        if (executor.isShutdown() || scheduler.isShutdown()) {
            logger.warn("task supervisor shutting down, can't accept the task");
        } else {
            logger.warn("task supervisor threw an exception", e);
        }

        throwableCounter.increment();
    } finally {
        if (future != null) {
	        //将当前执行的任务取消,代码走到这有两种情况:
	        //  1.没有超时,获取成功,操作已经结束:已经结束调cancel没有任何效果
	        //  2.超时,获取失败,执行器中的线程还在执行任务中:
	        //    如果当前任务还在执行中,true代表会中断执行该任务的线程以试图停止该任务。
            future.cancel(true);
        }

        if (!scheduler.isShutdown()) {
	        //只要执行器没有关闭,会再次启动定时任务!!!
	        //注意此时delay.get()时间,如果上一次发生了超时,会在原来基础上 * 2
	        //最大超时时间不会超过maxDelay
            scheduler.schedule(this, delay.get(), TimeUnit.MILLISECONDS);
        }
    }
}
这里可以看到虽然scheduler.schedule方法只会执行一次定时任务,但是在定时任务结束时通过再次调用scheduler.schedule方法,可以达到循环执行定时任务的效果,同时通过delay变量,可以根据情况动态控制下一次执行任务的时间,更加灵活
1.2 更新注册表任务
现在看真正的更新注册表任务的执行逻辑:
//DiscoveryClient.java的内部类
/**
 * The task that fetches the registry information at specified intervals.
 *
 */
class CacheRefreshThread implements Runnable {
    public void run() {
    	//刷新注册表
        refreshRegistry();
    }
}
看refreshRegistry方法:
//DiscoveryClient.java
@VisibleForTesting
void refreshRegistry() {
    try {
	    //是否需要从远程region获取注册表
        boolean isFetchingRemoteRegionRegistries = isFetchingRemoteRegionRegistries();
		//远程region列表是否被修改了
        boolean remoteRegionsModified = false;
        // This makes sure that a dynamic change to remote regions to fetch is honored.
        // 这确保对远程region的动态更改的获取是允许的。
        // 获取当前配置信息中的的 远程region列表
        String latestRemoteRegions = clientConfig.fetchRegistryForRemoteRegions();
        if (null != latestRemoteRegions) {
	        //获取当前缓存中的远程region列表
            String currentRemoteRegions = remoteRegionsToFetch.get();
	        //比较缓存中的和配置信息中的是否一致,即 判断远程region列表的配置信息是否被修改过
            if (!latestRemoteRegions.equals(currentRemoteRegions)) {
	            //如果不一致,代表被修改过
                // Both remoteRegionsToFetch and AzToRegionMapper.regionsToFetch need to be in sync
                synchronized (instanceRegionChecker.getAzToRegionMapper()) {
	                //通过CAS方式,将配置信息中的更新到缓存里面
                    if (remoteRegionsToFetch.compareAndSet(currentRemoteRegions, latestRemoteRegions)) {
                        String[] remoteRegions = latestRemoteRegions.split(",");
                        remoteRegionsRef.set(remoteRegions);
                        instanceRegionChecker.getAzToRegionMapper().setRegionsToFetch(remoteRegions);
                        //标记远程Region列表被更新
                        remoteRegionsModified = true;
                    } else {
                    	//更新失败,因为被另一个线程抢先更新了,忽略当前这次
                        logger.info("Remote regions to fetch modified concurrently," +
                                " ignoring change from {} to {}", currentRemoteRegions, latestRemoteRegions);
                    }
                }
            } else {
	            // 如果region列表没有变化,刷新一下Region对应的AZ
                // Just refresh mapping to reflect any DNS/Property change
                instanceRegionChecker.getAzToRegionMapper().refreshMapping();
            }
        }
		//这里又要获取注册表了,上一章已经分析过了,当时该方法的入参是false
		//这里如果远程region列表的配置被更新过,那么remoteRegionsModified则为true
		//true则强制全量更新
        boolean success = fetchRegistry(remoteRegionsModified);
        if (success) {
            registrySize = localRegionApps.get().size();
            lastSuccessfulRegistryFetchTimestamp = System.currentTimeMillis();
        }

        if (logger.isDebugEnabled()) {
			...//Debug模式打印一些日志
        }
    } catch (Throwable e) {
        logger.error("Cannot fetch registry from server", e);
    }
}
看获取注册表的方法fetchRegistry:
//DiscoveryClient.java
private boolean fetchRegistry(boolean forceFullRegistryFetch) {
    Stopwatch tracer = FETCH_REGISTRY_TIMER.start();

    try {
        // If the delta is disabled or if it is the first time, get all
        // applications
        // 获取本地缓存中的注册表
        Applications applications = getApplications();

		// 此时如果forceFullRegistryFetch为true,说明远程region列表的配置被更新过
		// 那么会全量更新注册表
        if (clientConfig.shouldDisableDelta()
                || (!Strings.isNullOrEmpty(clientConfig.getRegistryRefreshSingleVipAddress()))
                || forceFullRegistryFetch
                || (applications == null)
                || (applications.getRegisteredApplications().size() == 0)
                || (applications.getVersion() == -1)) //Client application does not have latest library supporting delta
        {
			...//info日志打印

	        //全量下载
            getAndStoreFullRegistry();
        } else {
        	//如果没有强制全量更新,本地缓存注册表不为空,就会进行增量更新
            getAndUpdateDelta(applications);
        }
        applications.setAppsHashCode(applications.getReconcileHashCode());
        logTotalInstances();
    } catch (Throwable e) {
        logger.error(PREFIX + "{} - was unable to refresh its cache! status = {}", appPathIdentifier, e.getMessage(), e);
        return false;
    } finally {
        if (tracer != null) {
            tracer.stop();
        }
    }

    // Notify about cache refresh before updating the instance remote status
    onCacheRefreshed();

    // Update remote status based on refreshed data held in the cache
    updateInstanceRemoteStatus();

    // registry was fetched successfully, so return true
    return true;
}
全量更新上一章已经分析过了,现在我们只关注增量更新:
1.2.1 增量更新
看之前首先说明一点:Server端维护了一个recentlyChangedQueue最近更新队列,
是一个先进先出队列,所有最近更新的数据都将放入这个队列里,但这个队列的大小
是有限的,而所谓的增量下载就是把这个队列里的数据下载到本地(以后分析Eureka Server端会看到)
//DiscoveryClient.java
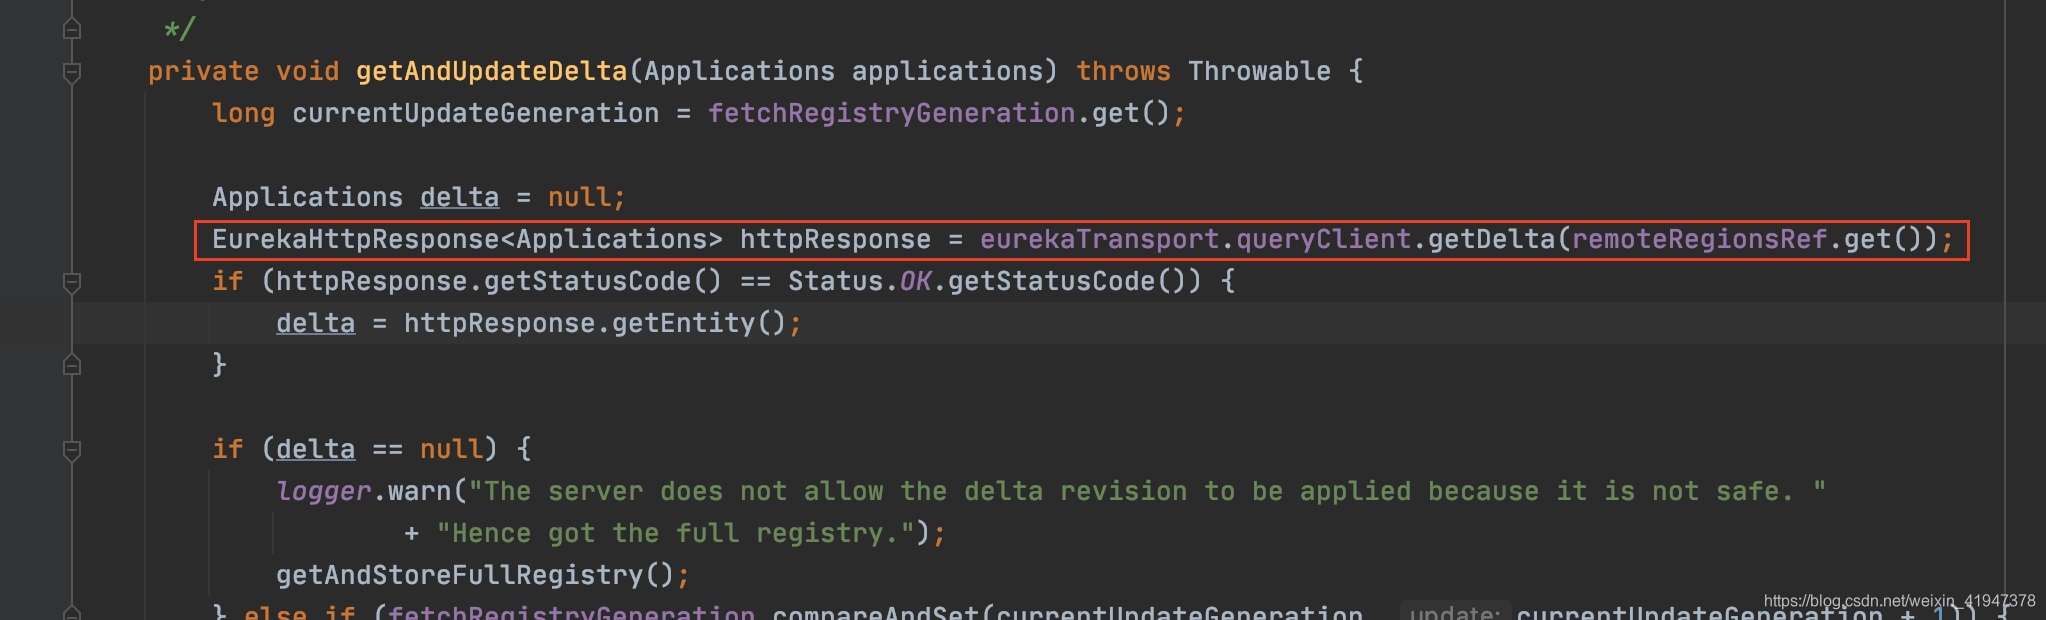
private void getAndUpdateDelta(Applications applications) throws Throwable {
long currentUpdateGeneration = fetchRegistryGeneration.get();
Applications delta = null;
//提交增量下载的请求
EurekaHttpResponse<Applications> httpResponse = eurekaTransport.queryClient.getDelta(remoteRegionsRef.get());
if (httpResponse.getStatusCode() == Status.OK.getStatusCode()) {
//获取增量更新的数据
delta = httpResponse.getEntity();
}
if (delta == null) {
//如果增量更新请求获取的数据为null,则进行全量下载
//因为有可能server端不允许增量下载,所以就会直接返回null
//如果只是没有更新的数据,那么delta不为null,而是delta里面的数据size为0
logger.warn("The server does not allow the delta revision to be applied because it is not safe. "
+ "Hence got the full registry.");
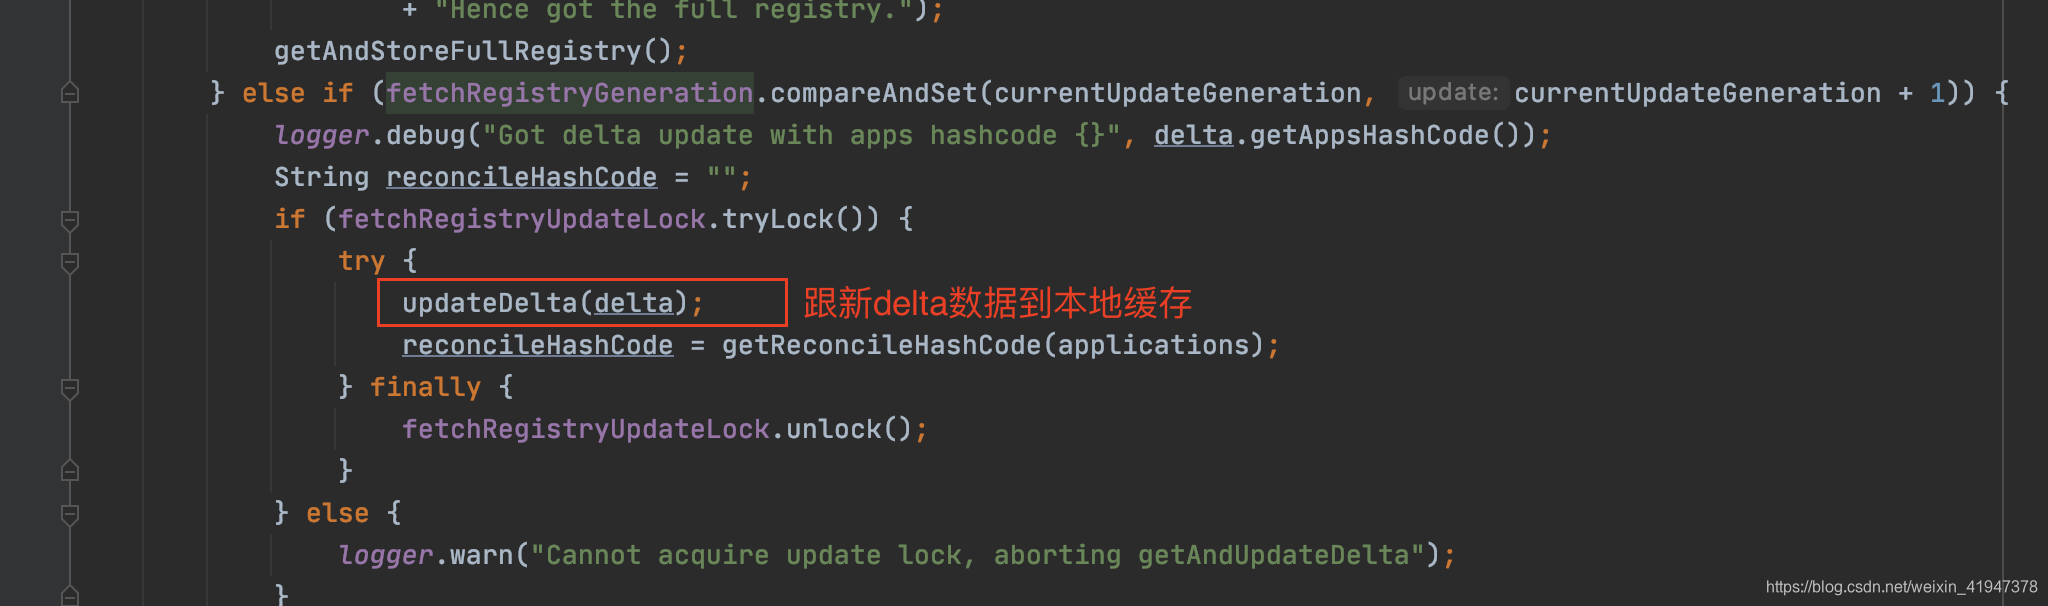
getAndStoreFullRegistry();
} else if (fetchRegistryGeneration.compareAndSet(currentUpdateGeneration, currentUpdateGeneration + 1)) {
//CAS方式记录修改版本号,乐观锁,防止多个线程同时更新
logger.debug("Got delta update with apps hashcode {}", delta.getAppsHashCode());
String reconcileHashCode = "";
if (fetchRegistryUpdateLock.tryLock()) {//尝试获取锁而不会阻塞
try {
//将delta数据更新到本地缓存
updateDelta(delta);
//applications为更新后的本地注册表
//获取更新后的applications的reconcileHashCode
//reconcileHashCode主要用来判断是否发生更新数据丢失的
reconcileHashCode = getReconcileHashCode(applications);
} finally {
fetchRegistryUpdateLock.unlock();
}
} else {
logger.warn("Cannot acquire update lock, aborting getAndUpdateDelta");
}
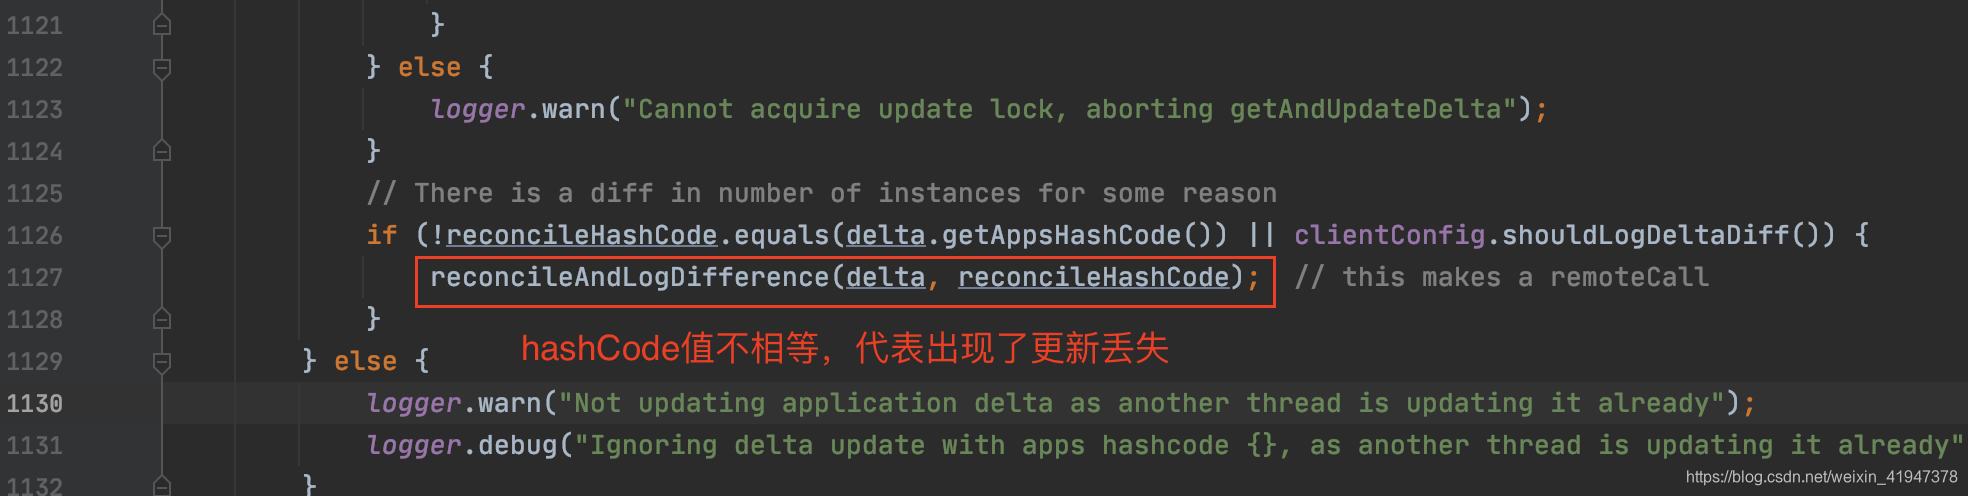
// There is a diff in number of instances for some reason
// 如果更新后的hashCode和delta的hashCode不相同
// 则表示对于当前客户端来说,Server端更新过的数据出现了丢失
// 为什么会丢失:
// Server端维护了一个recentlyChangedQueue最近更新队列,是一个先进先出队列
// 所有最近更新的信息都将放入这个队列里,但这个队列的大小是有限的,默认1000
// 如果客户端很长一段时间没有更新过注册表,在这期间更新数据次数超过了队列的大小
// 那么超过部分的数据就会丢失
//
// 而所谓的增量下载就是把这个队列里存在的所有被更新过的instanceInfo下载到本地
// client端怎么知道出现了数据丢失了呢 ?
// 就是通过这个hash值,如果reconcileHashCode和delta.getAppsHashCode()的
// hash值相同说明没有出现数据丢失
// 关于hash值的算法比较复杂,暂时没研究过
if (!reconcileHashCode.equals(delta.getAppsHashCode()) || clientConfig.shouldLogDeltaDiff()) {
//不相同说明有数据丢失,这个方法就会走全量下载
reconcileAndLogDifference(delta, reconcileHashCode); // this makes a remoteCall
}
} else {
logger.warn("Not updating application delta as another thread is updating it already");
logger.debug("Ignoring delta update with apps hashcode {}, as another thread is updating it already", delta.getAppsHashCode());
}
}
关于增量更新主要分析如下几个流程:
- 1:发起增量下载请求,获取增量数据
- 2:将增量数据更新到本地注册表
- 3:更新丢失情况的处理
增量更新 - 1:发起增量下载请求,获取增量数据
//AbstractJerseyEurekaHttpClient.java
@Override
public EurekaHttpResponse<Applications> getDelta(String... regions) {
	//和全量下载的区别就是这个urlPath不同
	//也是get请求,就不看了
    return getApplicationsInternal("apps/delta", regions);
}
增量更新 - 2:将增量数据更新到本地注册表
//DiscoveryClient.java
private void updateDelta(Applications delta) {
    int deltaCount = 0;//计数器,记录变更了多少条
    for (Application app : delta.getRegisteredApplications()) {
	    //遍历delta中所有的Application
        for (InstanceInfo instance : app.getInstances()) {
	        //遍历每个Application中的每个InstanceInfo

			//获取本地缓存的注册表
            Applications applications = getApplications();
            //获取当前遍历的instance所属的region
            String instanceRegion = instanceRegionChecker.getInstanceRegion(instance);
            //判断当前遍历的instance的region是否是当前客户端本地所在的region
            if (!instanceRegionChecker.isLocalRegion(instanceRegion)) {
	            //不是,则获取当前本地缓存的 远程region对应的的注册表

				//remoteRegionVsApps是个map,key是region,value是Applications
				//从remoteRegionVsApps找到该region对应的注册表
                Applications remoteApps = remoteRegionVsApps.get(instanceRegion);
                if (null == remoteApps) {
	                //为空则新建一个
                    remoteApps = new Applications();
                    remoteRegionVsApps.put(instanceRegion, remoteApps);
                }
                //当前遍历的instance所属的region要和
                //其对应的本地缓存的注册表所属的region保持一致
                applications = remoteApps;
            }
			// 计数器 +1
            ++deltaCount;
            // 开始处理变更的各种情况,增删改

            // 处理instance是添加的情况(新注册的)
            if (ActionType.ADDED.equals(instance.getActionType())) {
	            //根据instance的微服务名称获取所在 的Application
                Application existingApp = applications.getRegisteredApplications(instance.getAppName());
                if (existingApp == null) {
                	//如果当前注册表中没有对应的微服务
	                //则将delta中对应的Application
	                //拿过来放到本地缓存的注册表中
                    applications.addApplication(app);
                }
                logger.debug("Added instance {} to the existing apps in region {}", instance.getId(), instanceRegion);
                // 将该微服务的提供者实例信息添加到本地缓存注册表对应的Application中
                applications.getRegisteredApplications(instance.getAppName()).addInstance(instance);
            } else if (ActionType.MODIFIED.equals(instance.getActionType())) {
	            //处理instance是修改的情况
	            //可以看到修改的代码和添加的代码一模一样
                Application existingApp = applications.getRegisteredApplications(instance.getAppName());
                if (existingApp == null) {
                    applications.addApplication(app);
                }
                logger.debug("Modified instance {} to the existing apps ", instance.getId());
                //所以可以推测addInstance方法是并不单纯是一个新增方法,同时具有修改的特性
                applications.getRegisteredApplications(instance.getAppName()).addInstance(instance);

            } else if (ActionType.DELETED.equals(instance.getActionType())) {
	            //处理instance是删除的情况
                Application existingApp = applications.getRegisteredApplications(instance.getAppName());
                if (existingApp != null) {
                    logger.debug("Deleted instance {} to the existing apps ", instance.getId());
                    //调用remove删除instance
                    existingApp.removeInstance(instance);
                    /*
                     * We find all instance list from application(The status of instance status is not only the status is UP but also other status)
                     * if instance list is empty, we remove the application.
                     */
                     //删掉以后如果application中的instance列表为空
                     //则将其从applications中移除
                    if (existingApp.getInstancesAsIsFromEureka().isEmpty()) {
                        applications.removeApplication(existingApp);
                    }
                }
            }
        }
    }
    logger.debug("The total number of instances fetched by the delta processor : {}", deltaCount);

    getApplications().setVersion(delta.getVersion());
    getApplications().shuffleInstances(clientConfig.shouldFilterOnlyUpInstances());

    for (Applications applications : remoteRegionVsApps.values()) {
        applications.setVersion(delta.getVersion());
        applications.shuffleInstances(clientConfig.shouldFilterOnlyUpInstances());
    }
}
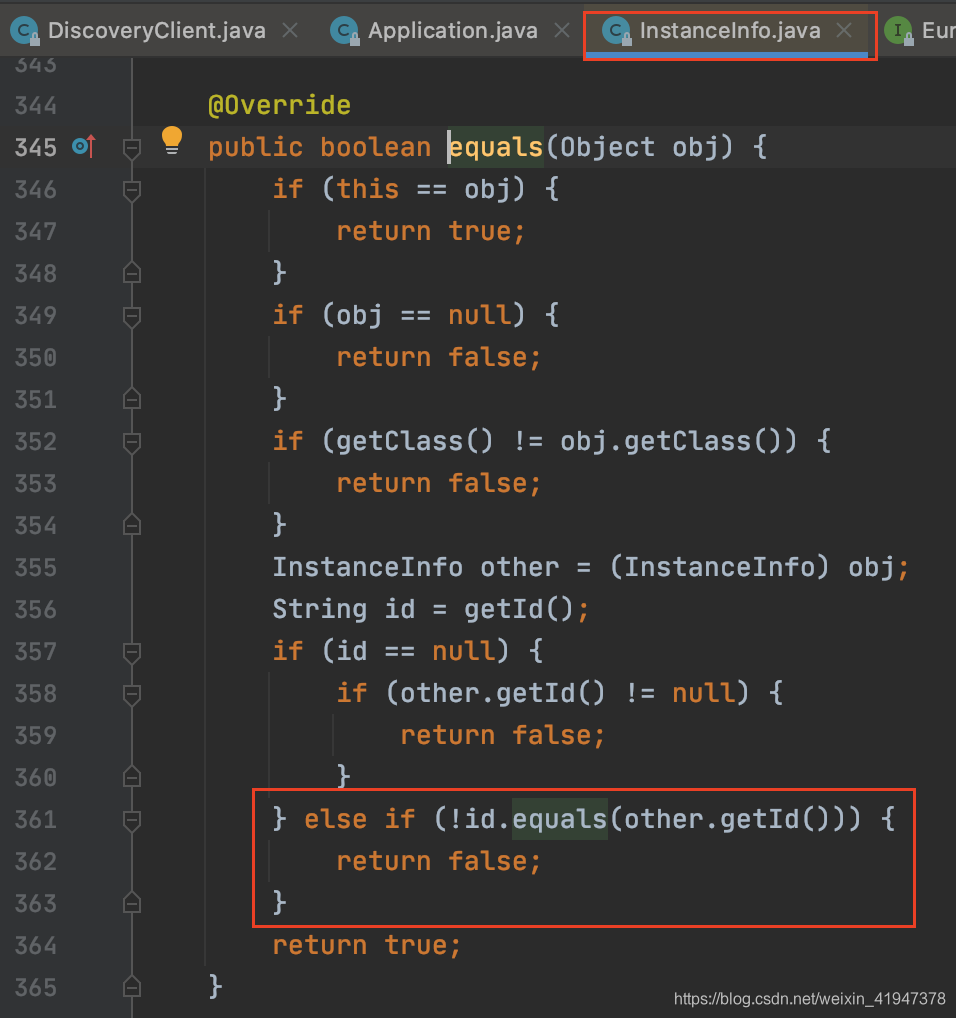
发现修改和添加的代码一模一样,所以我们看一下
applications.getRegisteredApplications(instance.getAppName()).addInstance(instance)的addInstance方法://Application.java //之前分析过,Application里面有两个成员变量,都是维护当前微服务 //提供者实例信息的,一个map一个set public void addInstance(InstanceInfo i) { //map是直接覆盖 instancesMap.put(i.getId(), i); synchronized (instances) { //instances是set集合,先remove再add //set集合删除元素是根据其equals方法判断是否是同一个元素的 instances.remove(i); instances.add(i); isDirty = true; } }
增量更新 - 3:更新丢失情况的处理
可以看到一但更新丢失,就会进行全量下载:
//DiscoveryClient.java
private void reconcileAndLogDifference(Applications delta, String reconcileHashCode) throws Throwable {
    logger.debug("The Reconcile hashcodes do not match, client : {}, server : {}. Getting the full registry",
            reconcileHashCode, delta.getAppsHashCode());

    RECONCILE_HASH_CODES_MISMATCH.increment();

    long currentUpdateGeneration = fetchRegistryGeneration.get();

	//这里又看到vip地址了,我们没有设置RegistryRefreshSingleVipAddress地址
	//所以这里走eurekaTransport.queryClient.getApplications(remoteRegionsRef.get())
	//这里就是进行全量下载,之前跟过,get请求,就不看了
    EurekaHttpResponse<Applications> httpResponse = clientConfig.getRegistryRefreshSingleVipAddress() == null
            ? eurekaTransport.queryClient.getApplications(remoteRegionsRef.get())
            : eurekaTransport.queryClient.getVip(clientConfig.getRegistryRefreshSingleVipAddress(), remoteRegionsRef.get());
    Applications serverApps = httpResponse.getEntity();

    if (serverApps == null) {
        logger.warn("Cannot fetch full registry from the server; reconciliation failure");
        return;
    }

    if (fetchRegistryGeneration.compareAndSet(currentUpdateGeneration, currentUpdateGeneration + 1)) {
	    //将全量下载的数据更新到本地注册表
        localRegionApps.set(this.filterAndShuffle(serverApps));
        getApplications().setVersion(delta.getVersion());
        logger.debug(
                "The Reconcile hashcodes after complete sync up, client : {}, server : {}.",
                getApplications().getReconcileHashCode(),
                delta.getAppsHashCode());
    } else {
        logger.warn("Not setting the applications map as another thread has advanced the update generation");
    }
}
2. 定时心跳续约任务
这里再次看到了TimedSupervisorTask,主要是用来处理任务执行超时失败,下一次再次执行的延迟时间会加倍的逻辑,就不重复看了,直接看心跳续约任务的具体逻辑:
//DiscoveryClient.java 内部类
private class HeartbeatThread implements Runnable {
public void run() {
//renew就是执行心跳的方法
if (renew()) {
//成功就会记录下来心跳成功的时间
lastSuccessfulHeartbeatTimestamp = System.currentTimeMillis();
}
}
}
//DiscoveryClient.java
boolean renew() {
EurekaHttpResponse<InstanceInfo> httpResponse;
try {
//发送心跳,将当前实例信息作为参数
httpResponse = eurekaTransport.registrationClient.sendHeartBeat(instanceInfo.getAppName(), instanceInfo.getId(), instanceInfo, null);
logger.debug(PREFIX + "{} - Heartbeat status: {}", appPathIdentifier, httpResponse.getStatusCode());
if (httpResponse.getStatusCode() == Status.NOT_FOUND.getStatusCode()) {
//如果状态是404,Not Found,说明服务端没找到,代表还没有向它注册过
//这里就会进行注册
REREGISTER_COUNTER.increment();
logger.info(PREFIX + "{} - Re-registering apps/{}", appPathIdentifier, instanceInfo.getAppName());
// 客户端更新修改时间,并设置dirty标志,之前预备知识介绍过
// lastDirtyTimestamp,脏时间戳
// dirty标志代表当前instanceInfo信息 客户端和服务端不一致,需要同步
// 注册请求除了具有注册功能外,也具有向服务端同步更新数据的功能。
long timestamp = instanceInfo.setIsDirtyWithTime();
// 注册
boolean success = register();
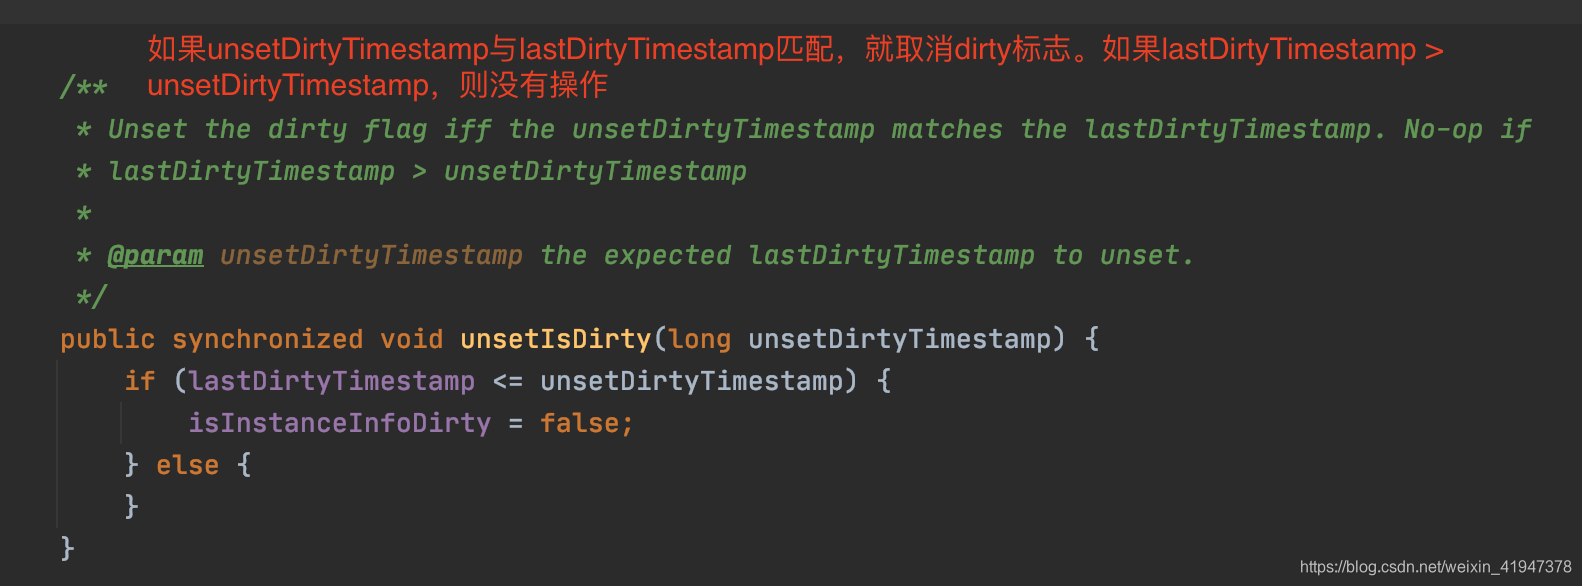
if (success) {
//注册成功,客户端和服务端数据一样就不脏了
//但是要注意unsetDirtyTimestamp要与lastDirtyTimestamp匹配
//才会取消dirty标志。
//如果 lastDirtyTimestamp > unsetDirtyTimestamp,则没有操作
//因为会有其他线程对另一些数据,或者相同的数据进行修改,
//修改之后同样会记录修改时间到lastDirtyTimestamp,并标记dirty
//如果其他线程的修改时机刚好在我setIsDirtyWithTime后,到发起注册请求
//获取到响应的这个时间段内,那么lastDirtyTimestamp就会被更新,
//而此刻我发起的注册请求携带的数据并不是最新的,所以dirty标志不能取消
instanceInfo.unsetIsDirty(timestamp);
}
return success;
}
return httpResponse.getStatusCode() == Status.OK.getStatusCode();
} catch (Throwable e) {
logger.error(PREFIX + "{} - was unable to send heartbeat!", appPathIdentifier, e);
return false;
}
}
定时检测client更新的任务,主要就是以isInstanceInfoDirty是否为true,决定向服务端发起复制同步请求
true:代表当前客户端是脏数据,需要同步
看发送心跳端方法,可以看到是一个put请求,没有请求体,通过url传递参数,并且核心参数只有status、lastDirtyTimestamp:
//AbstractJerseyEurekaHttpClient
@Override
public EurekaHttpResponse<InstanceInfo> sendHeartBeat(String appName, String id, InstanceInfo info, InstanceStatus overriddenStatus) {
	//appName是微服务名
	//id就是InstanceId
    String urlPath = "apps/" + appName + '/' + id;
    ClientResponse response = null;
    try {
    	//可以看到心跳续约请求,核心参数只携带了状态和客户端的修改时间戳
	    //url中添加了status、lastDirtyTimestamp参数
        WebResource webResource = jerseyClient.resource(serviceUrl)
                .path(urlPath)
                .queryParam("status", info.getStatus().toString())
                .queryParam("lastDirtyTimestamp", info.getLastDirtyTimestamp().toString());
        if (overriddenStatus != null) {
        	//如果覆盖状态("外部状态")不为空,也会携带进去
	        //向url中添加了overriddenstatus参数
            webResource = webResource.queryParam("overriddenstatus", overriddenStatus.name());
        }
        Builder requestBuilder = webResource.getRequestBuilder();
        addExtraHeaders(requestBuilder);
        //发起put请求
        response = requestBuilder.put(ClientResponse.class);
        EurekaHttpResponseBuilder<InstanceInfo> eurekaResponseBuilder = anEurekaHttpResponse(response.getStatus(), InstanceInfo.class).headers(headersOf(response));
        if (response.hasEntity()) {
            eurekaResponseBuilder.entity(response.getEntity(InstanceInfo.class));
        }
        return eurekaResponseBuilder.build();
    } finally {
        if (logger.isDebugEnabled()) {
            logger.debug("Jersey HTTP PUT {}/{}; statusCode={}", serviceUrl, urlPath, response == null ? "N/A" : response.getStatus());
        }
        if (response != null) {
            response.close();
        }
    }
}

//WebResource.java
@Override
public <T> T put(Class<T> c) throws UniformInterfaceException, ClientHandlerException {
	//提交put请求,没有携带任何请求体
    return handle(c, build("PUT"));
}
心跳续约请求传给服务端有三个重要参数,以url方式携带的:
- id:InstanceId
- status:状态
- lastDirtyTimestamp:客户端修改时间
- overriddenstatus:外部可修改的状态,覆盖状态(如果设置的话)
3. 定时检测client更新任务
首先看一下相关的参数配置、类描述:
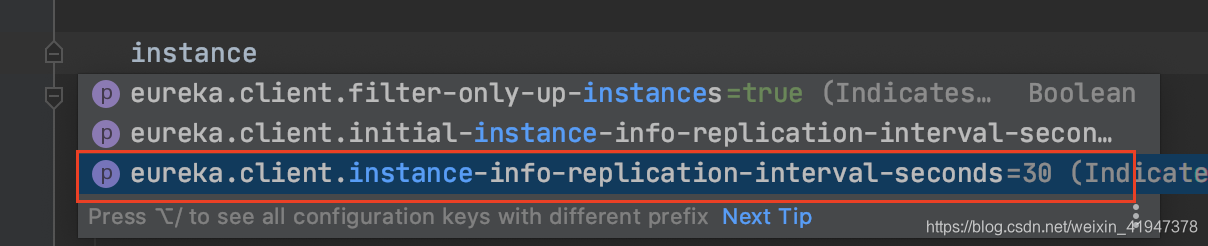
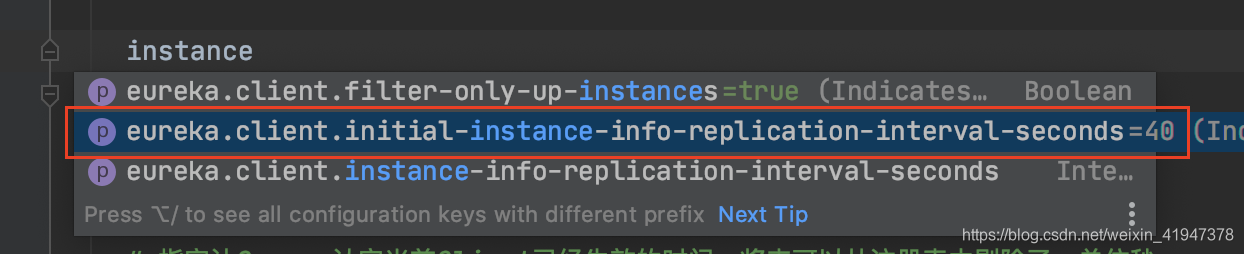
getInstanceInfoReplicationIntervalSeconds:
定时检测client更新任务执行的时间间隔
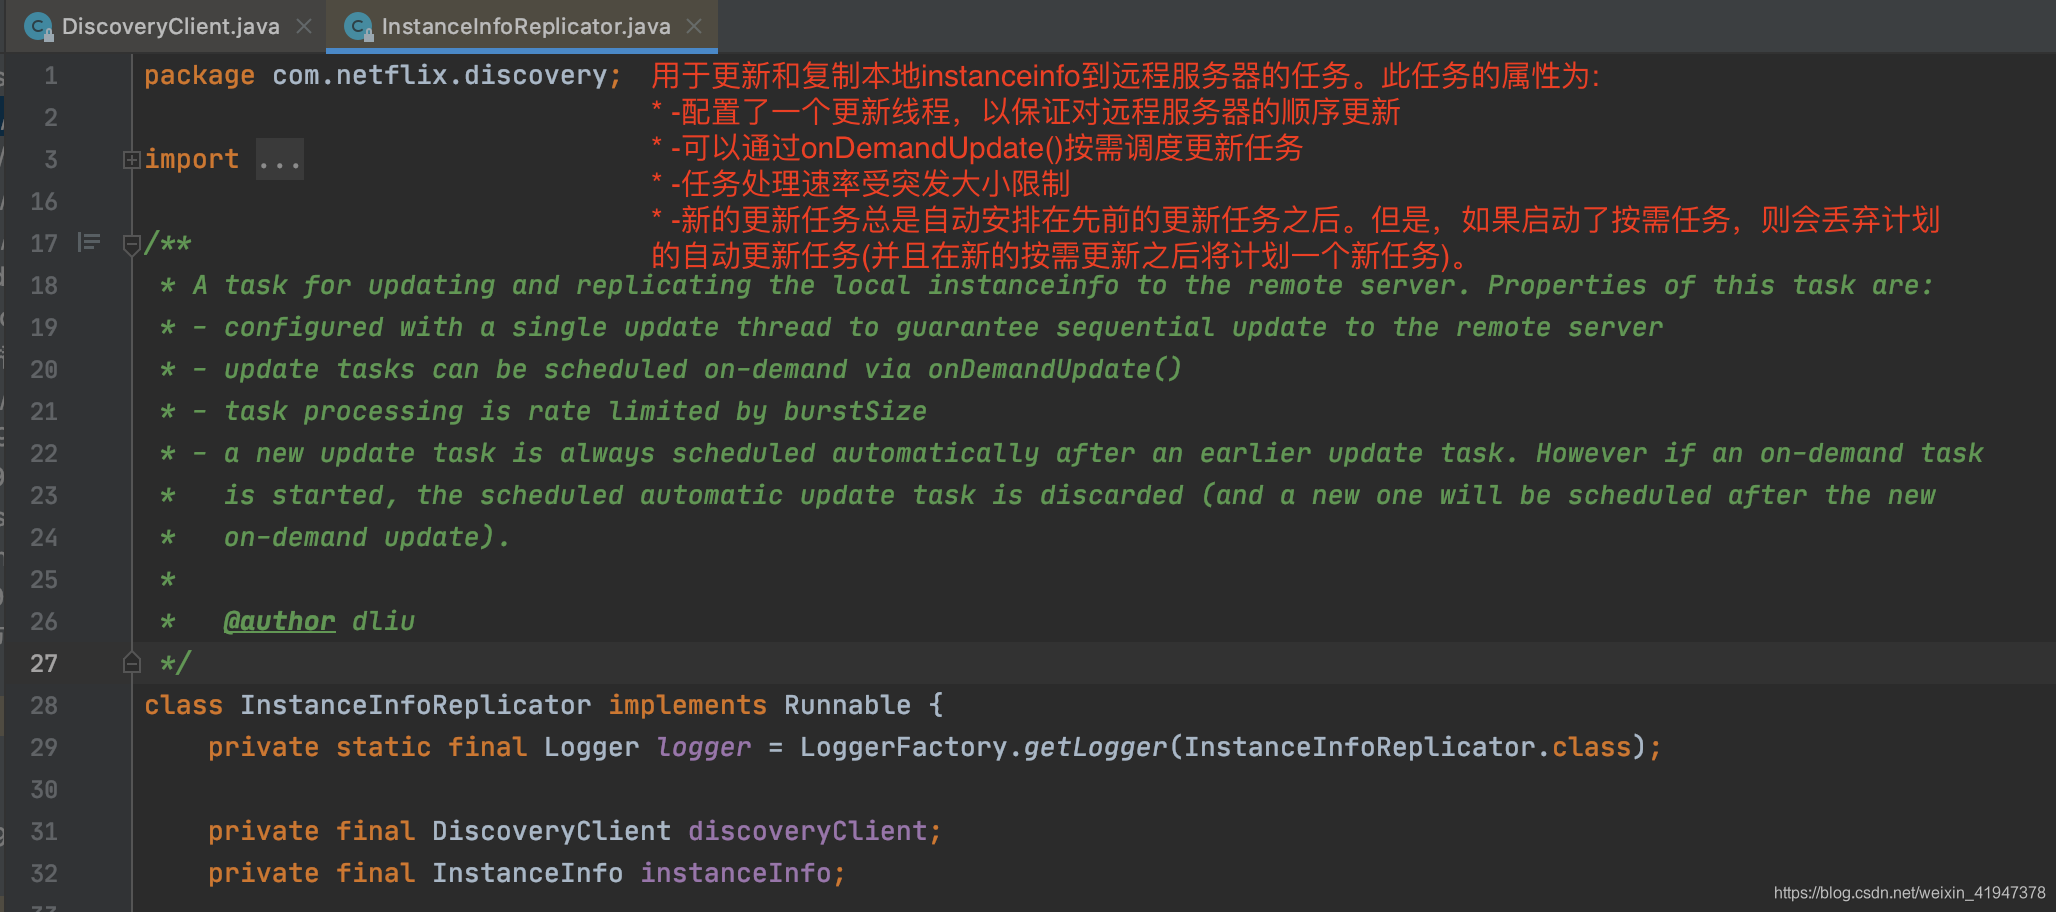
InstanceInfoReplicator描述:
描述中可以看到这个类有2个功能:更新、复制同步
- 配置了一个线程,说明会通过这个线程定时检测client端的数据更新并将更新的数据同步给服务端
- onDemandUpdate方法,可以按需随时检测并向服务端进行同步,比如上面就看到的状态变更监听器,一但监听到状态变更,就触发了该方法
后面两句话,说明了两个特性:
- 速率限制,限制按需执行的频率,避免频繁向Server端发起同步,底层实现用的RateLimiter,基于令牌桶算法的速率限制器
- onDemandUpdate方法,按需执行的方式会中断定时任务,在onDemandUpdate方法结束后重新开启定时任务
getInitialInstanceInfoReplicationIntervalSeconds: 定时任务第一次、最初执行的时间间隔
先看InstanceInfoReplicator的构造:
//InstanceInfoReplicator.java的构造
InstanceInfoReplicator(DiscoveryClient discoveryClient, InstanceInfo instanceInfo, int replicationIntervalSeconds, int burstSize) {
    this.discoveryClient = discoveryClient;
    this.instanceInfo = instanceInfo;
    //初始化一个执行器,专门执行 检测client更新并复制同步 的任务
    this.scheduler = Executors.newScheduledThreadPool(1,
            new ThreadFactoryBuilder()
                    .setNameFormat("DiscoveryClient-InstanceInfoReplicator-%d")
                    .setDaemon(true)
                    .build());

	//原子引用,放的元素是Future,存 检测client更新并复制同步 任务的异步结果
    this.scheduledPeriodicRef = new AtomicReference<Future>();

	//表示状态,初始值false,表示当前定时任务没有启动
    this.started = new AtomicBoolean(false);
    //是基于令牌桶算法的速率限制器,限制任务按需执行频繁触发
    this.rateLimiter = new RateLimiter(TimeUnit.MINUTES);
    //定时任务执行的时间间隔
    this.replicationIntervalSeconds = replicationIntervalSeconds;
    //爆发系数,值为2
    this.burstSize = burstSize;
	// 允许每分钟变化率,主要用来控制 按需执行的方式,过于频繁
	// 60/this.replicationIntervalSeconds,代表一分钟执行此任务的次数
	// 再乘以爆发系数,即最多允许每分钟执行的次数
	// 默认情况60*2/30,即每分钟最多允许执行4次
    this.allowedRatePerMinute = 60 * this.burstSize / this.replicationIntervalSeconds;
    logger.info("InstanceInfoReplicator onDemand update allowed rate per min is {}", allowedRatePerMinute);
}
3.1 按需执行
先看按需执行的方式,onDemandUpdate方法:
看onDemandUpdate,按需更新方法:
//InstanceInfoReplicator.java
public boolean onDemandUpdate() {
	//基于令牌桶算法的速率限制器,限制按需执行方法调用太频繁
	//第一个参数:允许以突发形式进入系统的请求的最大数量
	//第二个参数:期望的每秒请求数(也支持使用分钟的速率限制器)
    if (rateLimiter.acquire(burstSize, allowedRatePerMinute)) {
        if (!scheduler.isShutdown()) {
	        //执行器没有关闭,则提交一个新任务
            scheduler.submit(new Runnable() {
                @Override
                public void run() {
                    logger.debug("Executing on-demand update of local InstanceInfo");

					//先获取最近一次执行的任务的异步结果
                    Future latestPeriodic = scheduledPeriodicRef.get();
                    //判断这个任务是否已经完成
                    if (latestPeriodic != null && !latestPeriodic.isDone()) {
                        logger.debug("Canceling the latest scheduled update, it will be rescheduled at the end of on demand update");//取消最新的预定更新,它将在随需应变更新结束时重新安排时间
                        //如果还没有执行完成,则取消这个任务

                        //注意:此时没有完成,说明这个任务肯定还没有开始执行!不可能在执行中
                        //为什么:
                        //scheduler线程池的核心线程数是1,同一时间只能处理一个任务
                        //新加的任务会进入队列,只有队列满了,才会创建新的线程执行任务
                        //但是是不可能满的,所以提交的任务肯定是顺序执行的
                        //即当前这个匿名runnable和InstanceInfoReplicator这个
                        //runnable是不会并行执行的
                        //所以真运行到这一步,说明当前线程正在处理我自己这个匿名Runnable
                        //即时复制任务已经到时间点了,也需要等我自己Runnable执行完毕才会执行
                        //所有这里肯定是可以取消的,这里false就行了
                        latestPeriodic.cancel(false);
                    }
					//执行检测client更新并复制同步的任务
                    InstanceInfoReplicator.this.run();
                }
            });
            return true;
        } else {
        	//因为执行器被关闭了
            logger.warn("Ignoring onDemand update due to stopped scheduler");
            return false;
        }
    } else {
    	//频繁修改,被速率限制器拦下了
        logger.warn("Ignoring onDemand update due to rate limiter");
        return false;
    }
}
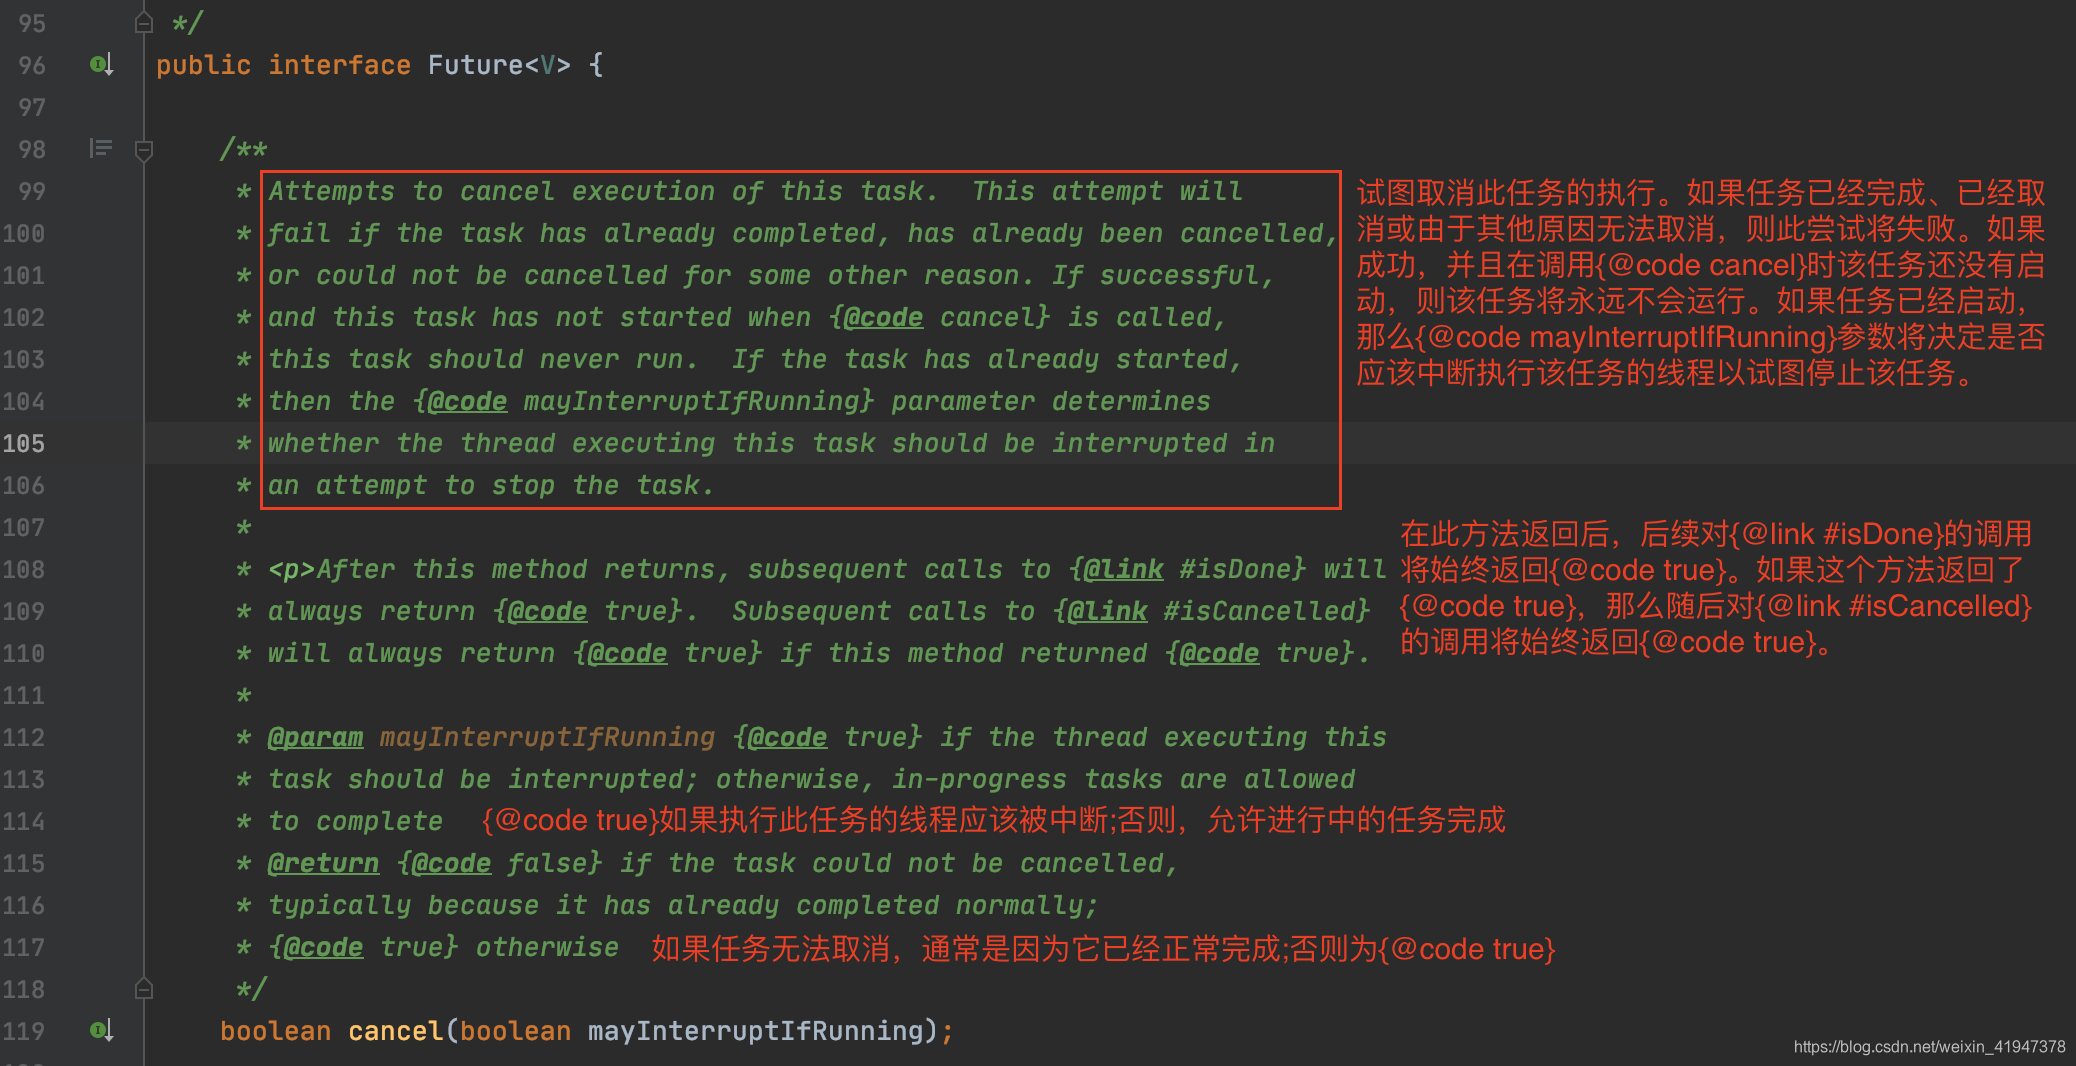
关于Future.cancel:
任务具体的逻辑 和 定时任务方式执行 的任务逻辑完全一样,先看定时任务方式执行的入口。
3.2 定时任务方式执行
InstanceInfoReplicator的start方法:
//InstanceInfoReplicator.java
public void start(int initialDelayMs) {
//started一开始是false,表明还没启动定时任务
if (started.compareAndSet(false, true)) {
//这里可能是客户端刚启动第一次注册的入口(没有配置强制启动注册的情况)
instanceInfo.setIsDirty(); // for initial register
//启动定时任务,注意scheduler.schedule只会执行一次任务,返回异步操作结果
Future next = scheduler.schedule(this, initialDelayMs, TimeUnit.SECONDS);
//scheduledPeriodicRef是原子引用AtomicReference
//将任务的异步操作结果保存
scheduledPeriodicRef.set(next);
}
}
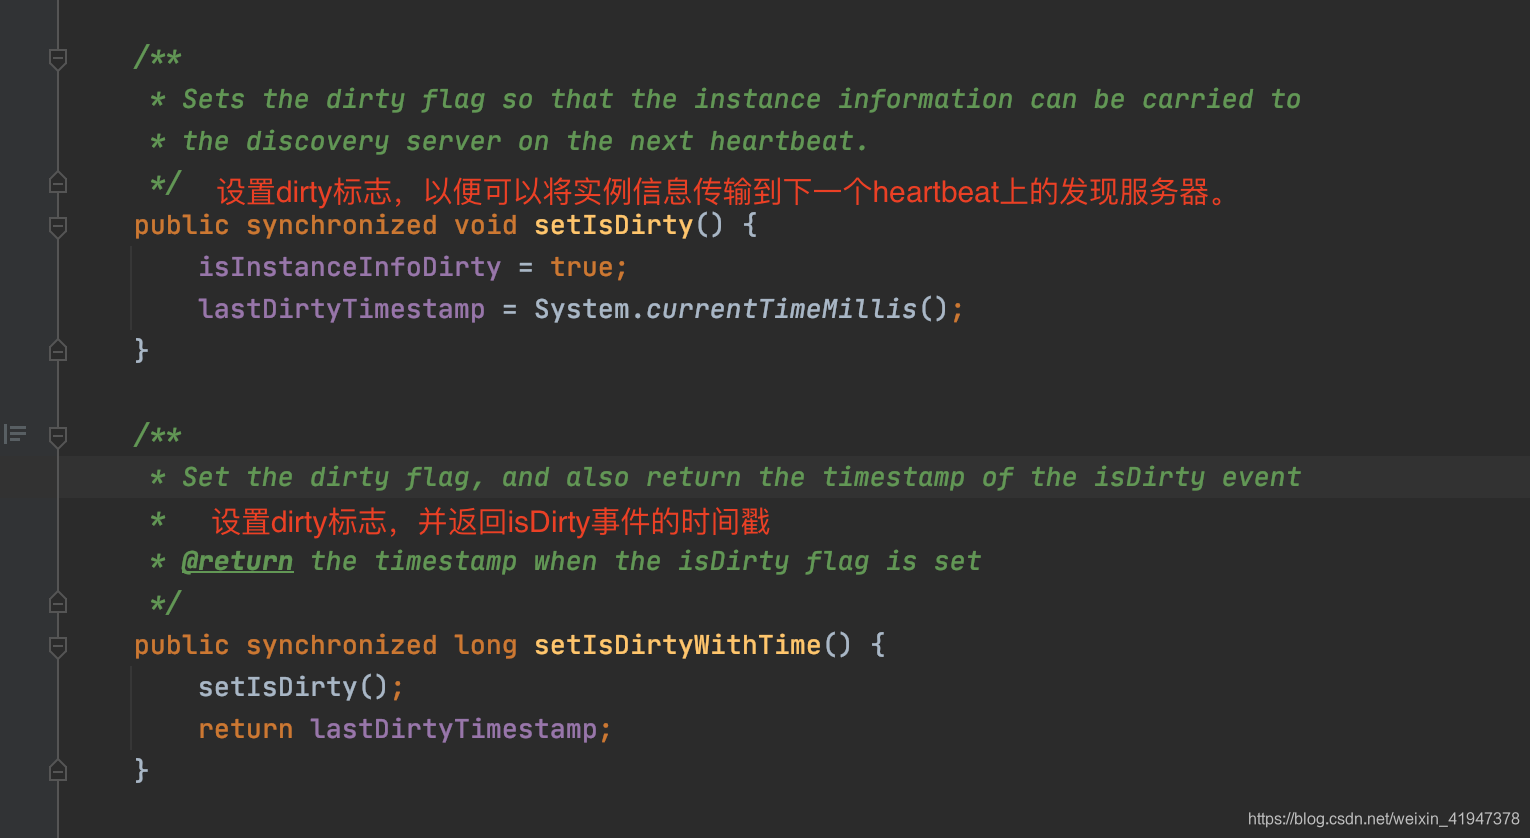
//InstanceInfo.java
public synchronized void setIsDirty() {
//标记dirty同时,记录客户端修改的时间戳
isInstanceInfoDirty = true;
lastDirtyTimestamp = System.currentTimeMillis();
}
3.3 检测client更新任务的逻辑
3.3.1 复制同步
现在我们看具体的任务逻辑,run方法:
//InstanceInfoReplicator.java
public void run() {
try {
//刷新instanceInfo信息
//刷新的过程中一但发现有数据更新了,就会记录客户端修改时间戳
//即脏时间戳,并标记dirty标示
discoveryClient.refreshInstanceInfo();
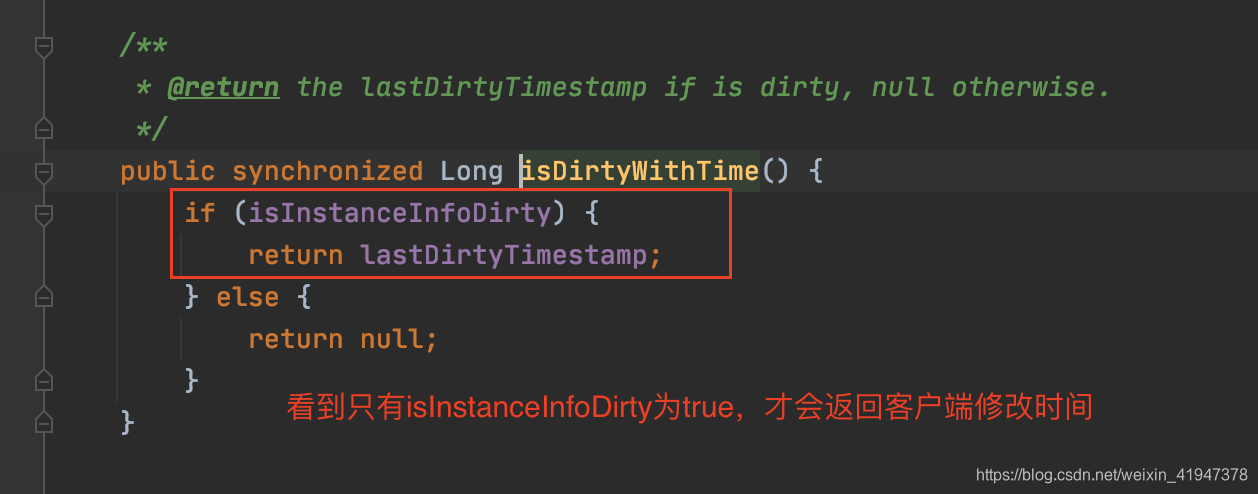
//只有instanceIndo被标记dirty了,这里才会返回最新客户端修改时间
//否则返回null
Long dirtyTimestamp = instanceInfo.isDirtyWithTime();
if (dirtyTimestamp != null) {
//不是null说明客户端的数据被更新了,与服务端不一致
//调用register进行注册,这个时候数据就会同步到服务端
discoveryClient.register();
//同步成功以后,取消dirty标志(要求lastDirtyTimestamp <= unsetDirtyTimestamp)
instanceInfo.unsetIsDirty(dirtyTimestamp);
}
} catch (Throwable t) {
logger.warn("There was a problem with the instance info replicator", t);
} finally {
//任务完成以后,重新定时启动任务,达到一直循环执行任务的目的
Future next = scheduler.schedule(this, replicationIntervalSeconds, TimeUnit.SECONDS);
scheduledPeriodicRef.set(next);
}
}
3.3.2 刷新实例信息(检测client更新)
现在看discoveryClient.refreshInstanceInfo()方法,看一下都刷新了哪些数据:
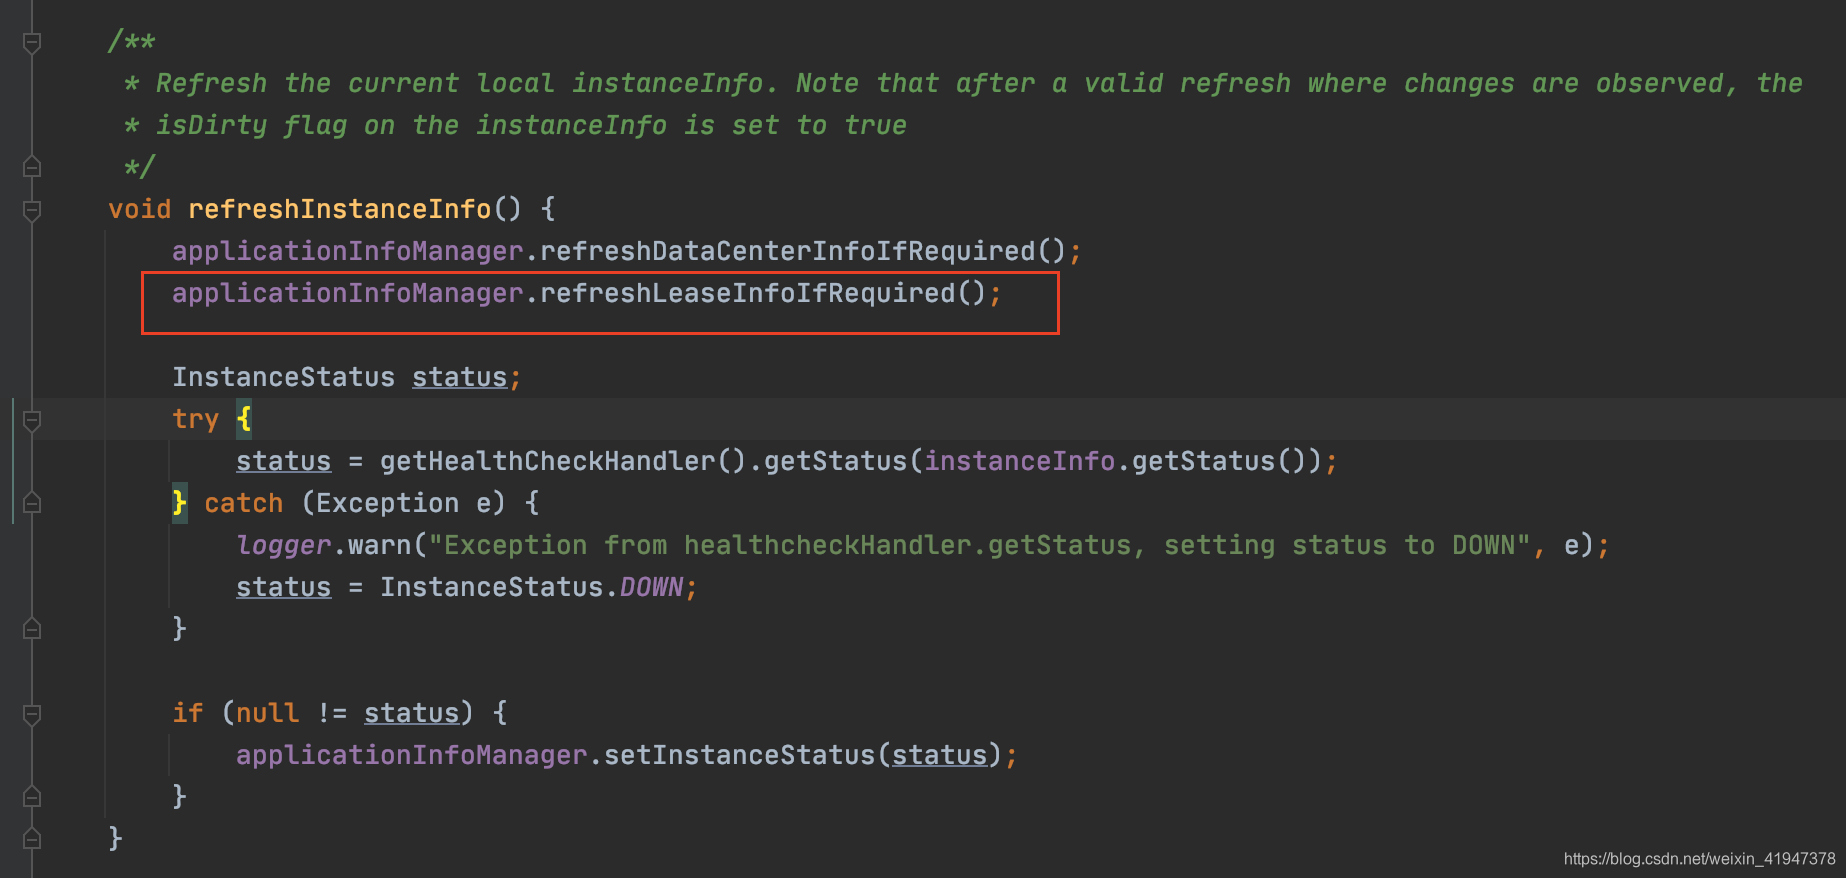
//DiscoveryClient.java
void refreshInstanceInfo() {
	//刷新数据中心信息,其实是刷新主机名。
    applicationInfoManager.refreshDataCenterInfoIfRequired();
    //刷新心跳续约信息
    applicationInfoManager.refreshLeaseInfoIfRequired();
	//状态健康检查
    InstanceStatus status;
    try {
	    //状态健康检查
        status = getHealthCheckHandler().getStatus(instanceInfo.getStatus());
    } catch (Exception e) {
        logger.warn("Exception from healthcheckHandler.getStatus, setting status to DOWN", e);
        //如果抛异常,将状态置为下架状态
        status = InstanceStatus.DOWN;
    }

    if (null != status) {
	    //将状态更新到applicationInfoManager
        applicationInfoManager.setInstanceStatus(status);
    }
}
看到有三类数据会被刷新,数据中心信息、心跳续约信息、状态信息。
(1) 刷新数据中心信息
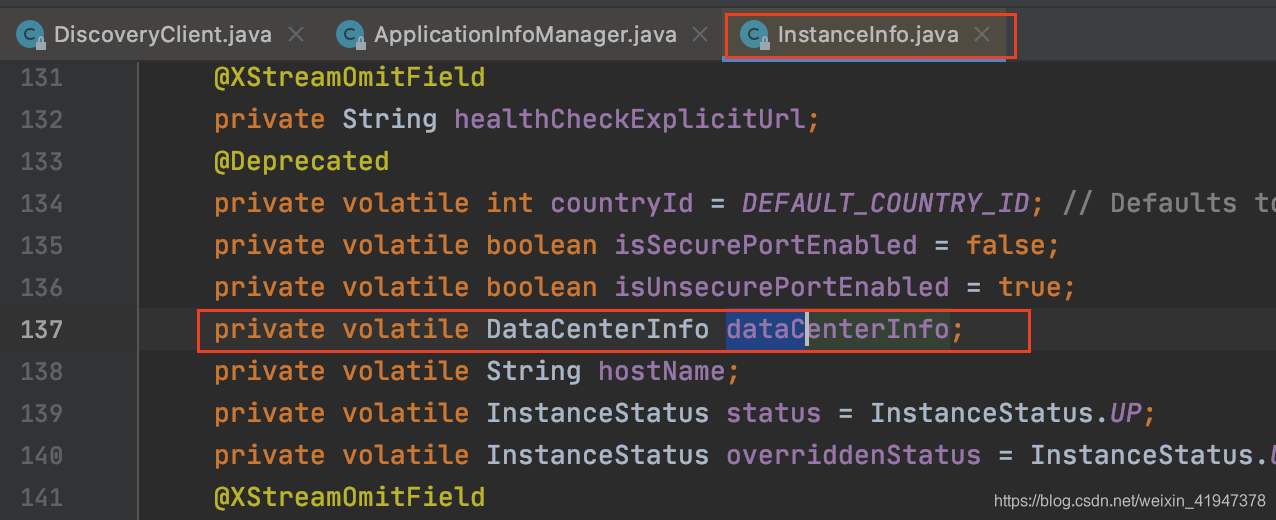
简单了解一下数据中心,先看InstanceInfo这个类:
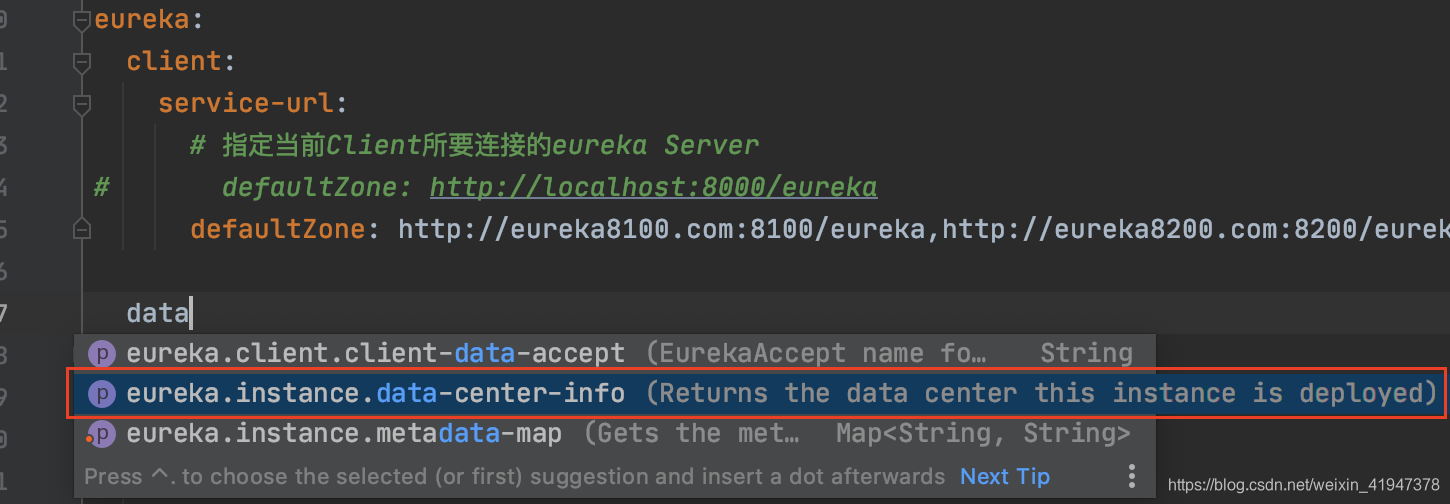
可以在配置文件中指定用哪个数据中心:
看一下数据中心里面放什么东西,对于Eurke来说,这里数据中心主要用来扩展主机地址的:
看一下instanceInfo中的hostName属性:
hostName就是本地网络地址主机名,其他实例调用的时候就通过这个主机名
默认是网络地址,如果需要其他与主机名/ip无关的新地址类型字段,需要使用getDataCenterInfo,即从数据中心获取
由此可以看出数据中心放的数据就是InstanceInfo相关的、未规定的扩展的配置信息
可以通过配置上面的key,控制获取数据中心配置的不同类型地址的优先级


现在看具体的刷新数据中心信息的代码:
//ApplicationInfoManager.java
public void refreshDataCenterInfoIfRequired() {
	//获取更新前的主机名,用来做比较
    String existingAddress = instanceInfo.getHostName();

    String existingSpotInstanceAction = null;
	//判断是不是亚马逊云的数据中心
    if (instanceInfo.getDataCenterInfo() instanceof AmazonInfo) {
	    //是的话获取缓存中的spotInstanceAction配置(干啥的不太清楚。 实例的行为?)
	    //AmazonInfo.MetaDataKey.spotInstanceAction = "instance-action"
        existingSpotInstanceAction = ((AmazonInfo) instanceInfo.getDataCenterInfo()).get(AmazonInfo.MetaDataKey.spotInstanceAction);
    }

    String newAddress;
    if (config instanceof RefreshableInstanceConfig) {//判断是否是可刷新的InstanceConfig
        // Refresh data center info, and return up to date address
        // 可刷新的话,这里会刷新数据中心信息,并从数据中心中获取最新的地址
        // 其他实例调用的时候就通过这个地址
        newAddress = ((RefreshableInstanceConfig) config).resolveDefaultAddress(true);
    } else {
	    // 不可刷新的话,这里获取的地址就是本地配置文件中配置的hostname或者是ip-address
        newAddress = config.getHostName(true);
    }
    //获取ip地址
    String newIp = config.getIpAddress();
	//将更新前 和 更新后的地址比较,看下有没有修改过
    if (newAddress != null && !newAddress.equals(existingAddress)) {
        logger.warn("The address changed from : {} => {}", existingAddress, newAddress);
        //不一致会将新的主机名和ip地址更新到缓存中
        updateInstanceInfo(newAddress, newIp);
    }
	//如果是亚马逊云,会比较spotInstanceAction配置,有修改也会更新
    if (config.getDataCenterInfo() instanceof AmazonInfo) {
        String newSpotInstanceAction = ((AmazonInfo) config.getDataCenterInfo()).get(AmazonInfo.MetaDataKey.spotInstanceAction);
        if (newSpotInstanceAction != null && !newSpotInstanceAction.equals(existingSpotInstanceAction)) {
            logger.info(String.format("The spot instance termination action changed from: %s => %s",
                    existingSpotInstanceAction,
                    newSpotInstanceAction));
            updateInstanceInfo(null , null );
        }
    }
}
关键在updateInstanceInfo方法,看到如果发生了更新,会记录客户端修改时间,标记Diry标识。
//ApplicationInfoManager.java
private void updateInstanceInfo(String newAddress, String newIp) {
    // :( in the legacy code here the builder is acting as a mutator.
    // This is hard to fix as this same instanceInfo instance is referenced elsewhere.
    // We will most likely re-write the client at sometime so not fixing for now.
    InstanceInfo.Builder builder = new InstanceInfo.Builder(instanceInfo);
    //更新本地缓存instanceInfo的主机地址和IP地址
    if (newAddress != null) {
        builder.setHostName(newAddress);
    }
    if (newIp != null) {
        builder.setIPAddr(newIp);
    }
    //更新数据中心数据信息
    builder.setDataCenterInfo(config.getDataCenterInfo());
    //同时标记为Dirty,因为本地和Server端数据不一致了,需要同步了
    instanceInfo.setIsDirty();
}
看一下刷新数据中心信息,并从数据中心中获取最新的地址:
//CloudInstanceConfig.java
public String resolveDefaultAddress(boolean refresh) {
    // In this method invocation data center info will be refreshed.
    // getHostName方法会刷新数据中心的信息
    String result = getHostName(refresh);

    for (String name : getDefaultAddressResolutionOrder()) {
    	//这里就是一开始提到的,通过配置文件可以控制获取从注册中心配置
    	//的不同类型地址的优先级
        try {
        	//转换成数据中心事先定义好的元数据key
            AmazonInfo.MetaDataKey key = AmazonInfo.MetaDataKey.valueOf(name);
            //根据key从数据中心获取数据
            String address = amazonInfoHolder.get().get(key);
            if (address != null && !address.isEmpty()) {
                result = address;
                break;
            }
        } catch (Exception e) {
            logger.error("failed to resolve default address for key {}, skipping", name, e);
        }
    }

    return result;
}
看一下刷新数据中心信息的方法:
//CloudInstanceConfig.java
public String getHostName(boolean refresh) {
    if (refresh) {
    	//刷新
        amazonInfoHolder.refresh();
    }
    return amazonInfoHolder.get().get(MetaDataKey.publicHostname);
}
//RefreshableAmazonInfoProvider.java
public synchronized void refresh() {
    try {
    	//从数据中心获取最新的数据
        AmazonInfo newInfo = getNewAmazonInfo();
		//比较数据中心最新数据 和 本地缓存中的数据,不一致会更新到本地缓存中
        if (shouldUpdate(newInfo, info)) {
            // the datacenter info has changed, re-sync it
            logger.info("The AmazonInfo changed from : {} => {}", info, newInfo);
            this.info = newInfo;
        }
    } catch (Throwable t) {
        logger.error("Cannot refresh the Amazon Info ", t);
    }
}
//RefreshableAmazonInfoProvider.java
//这个visible for testing的注释,测试用的?关于数据中心这边的代码我也拿不准
//请读者自行辨别把
/* visible for testing */ AmazonInfo getNewAmazonInfo() {
    return AmazonInfo.Builder
                    .newBuilder()
                    .withAmazonInfoConfig(amazonInfoConfig)
                    //主要看autoBuild方法
                    .autoBuild(amazonInfoConfig.getNamespace());
}
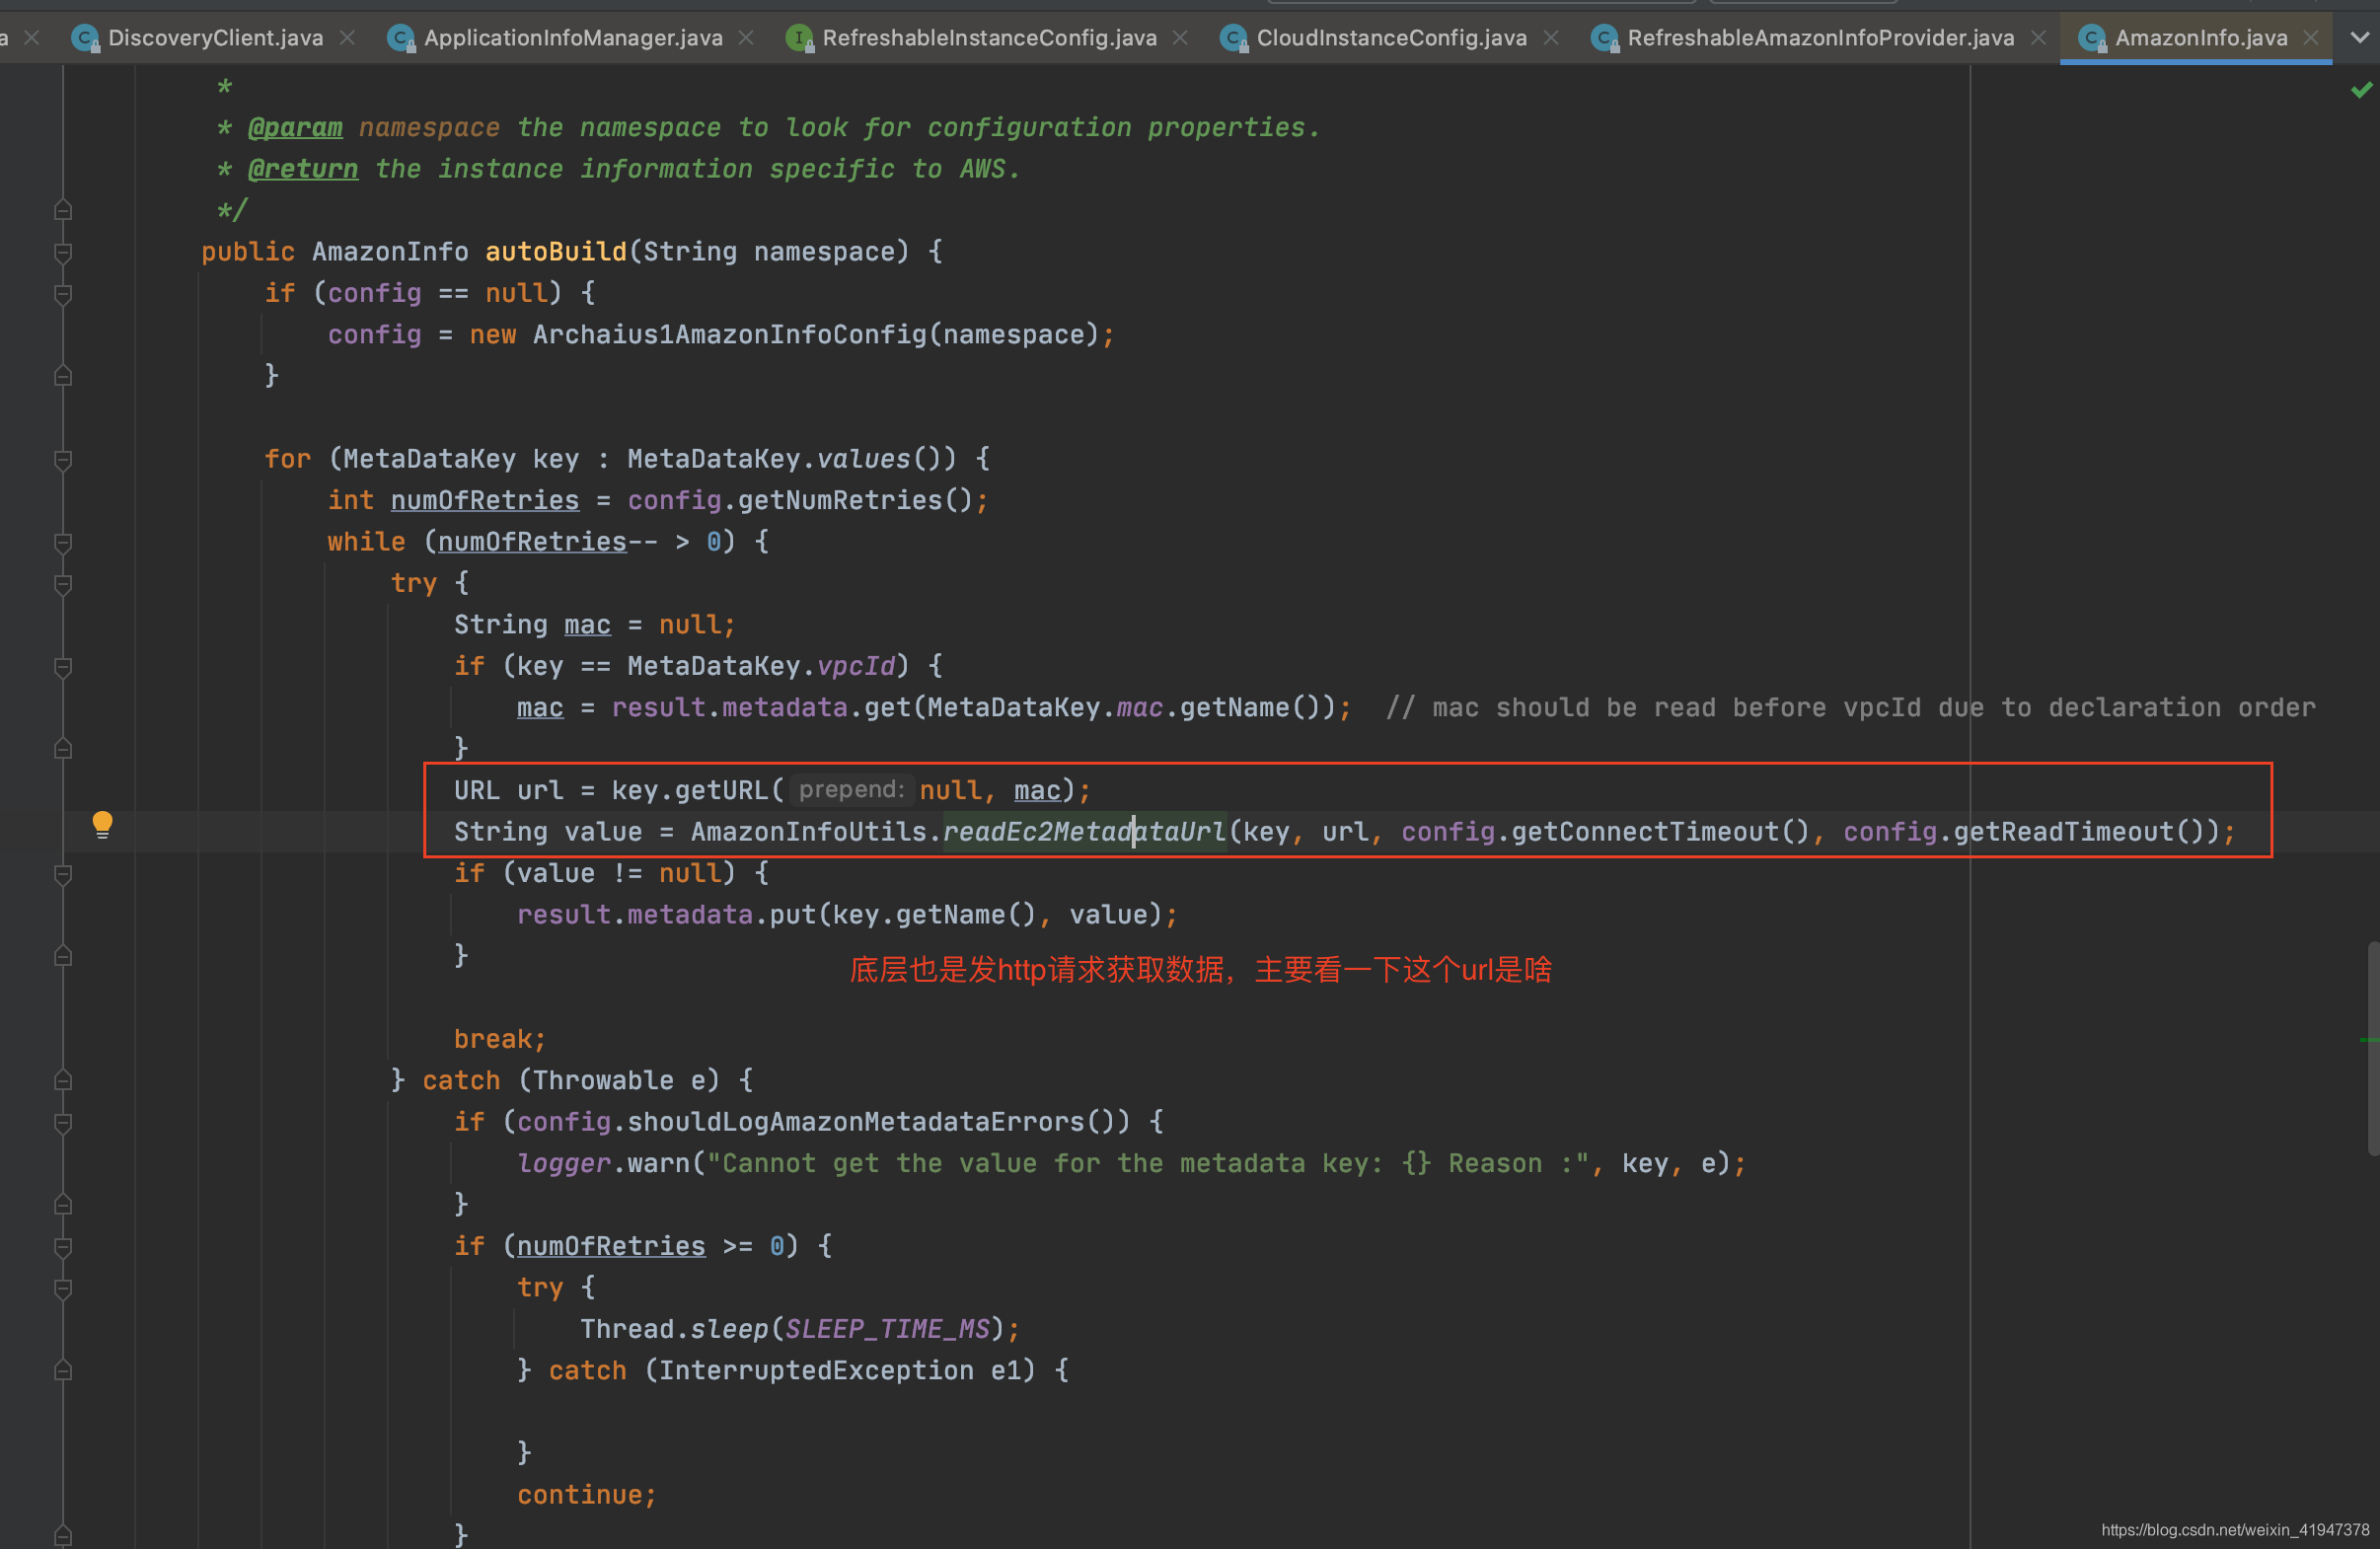
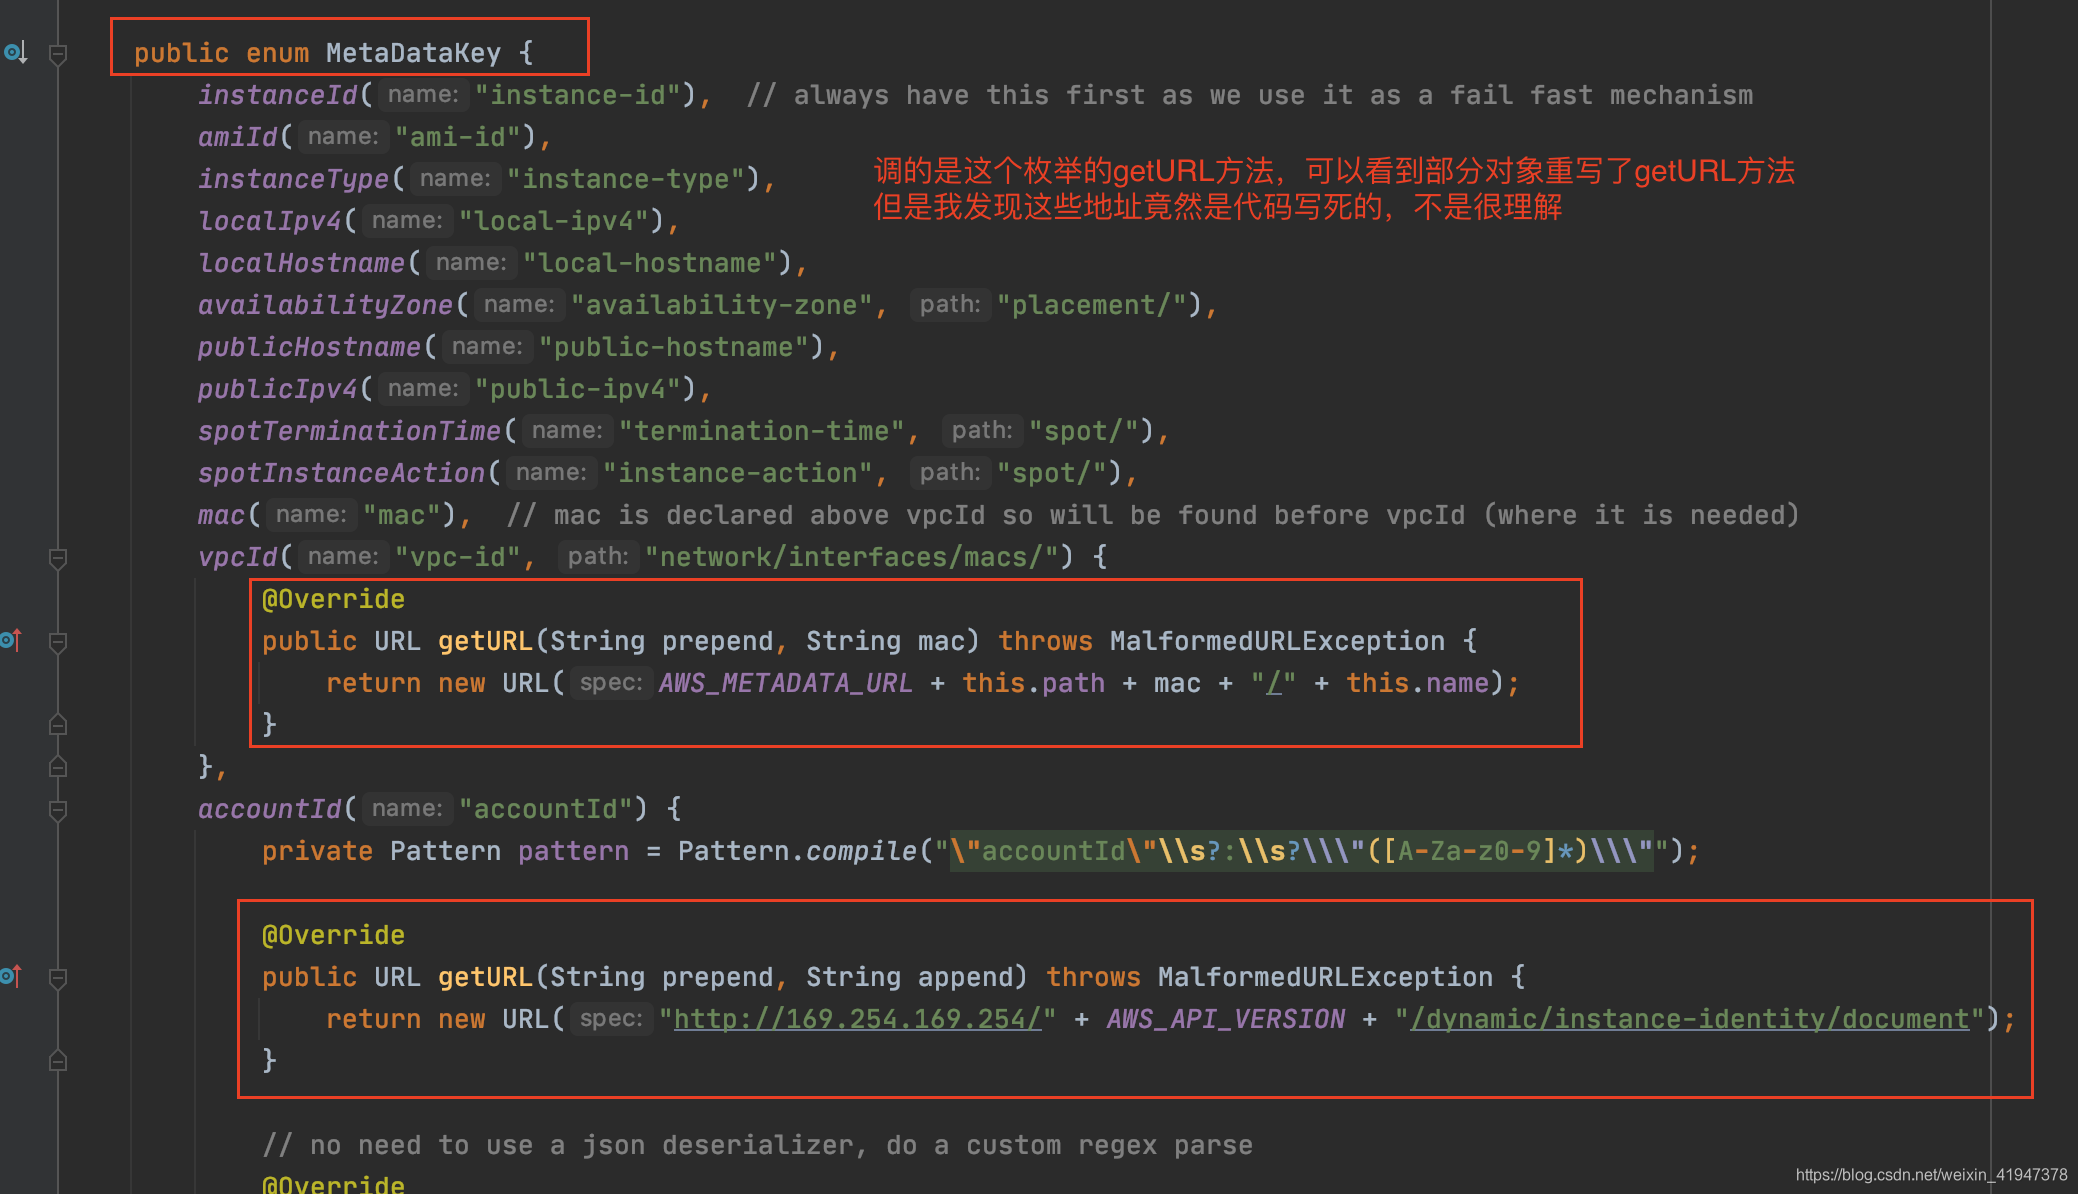
看autoBuild:
(2) 刷新续约信息
先看什么是LeaseInfo:

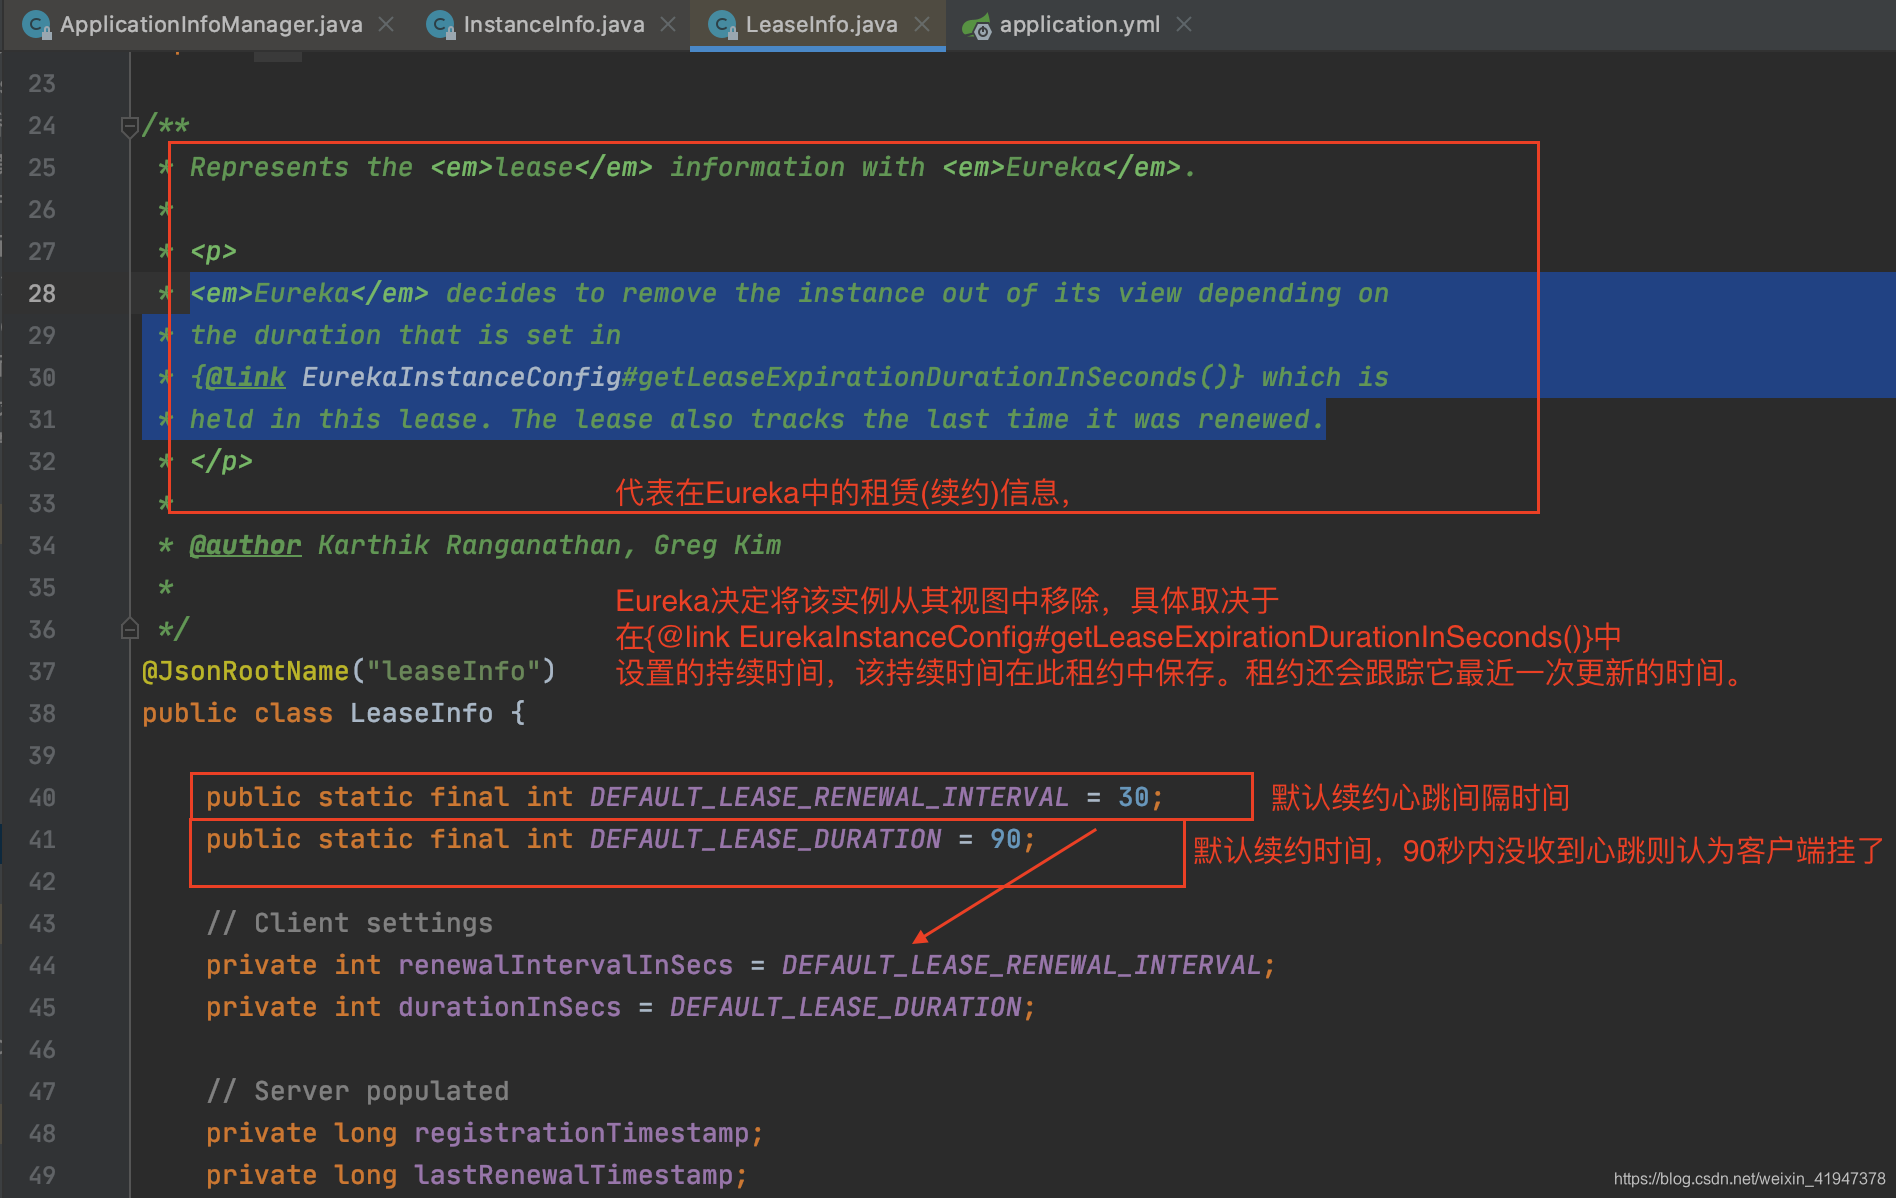
//ApplicationInfoManager.java
public void refreshLeaseInfoIfRequired() {
	//获取缓存中的的续约信息
    LeaseInfo leaseInfo = instanceInfo.getLeaseInfo();
    if (leaseInfo == null) {
        return;
    }
    //获取配置文件中的参数

    //getLeaseRenewalIntervalInSeconds:
    //表示eureka服务器在接收到最后一个心跳之后等待的时间(以秒为单位),
    //然后才可以从视图中删除该实例,并禁止对该实例的通信。
    int currentLeaseDuration = config.getLeaseExpirationDurationInSeconds();

    //getLeaseRenewalIntervalInSeconds:
    //指示eureka客户端需要将心跳发送到eureka服务器的频率(以秒为单位),
    //以表明该服务器仍处于活动状态。
    int currentLeaseRenewal = config.getLeaseRenewalIntervalInSeconds();

    //以上两个参数如果配置文件更新了,就需要更新到ClientInfo中
    if (leaseInfo.getDurationInSecs() != currentLeaseDuration || leaseInfo.getRenewalIntervalInSecs() != currentLeaseRenewal) {
    	//构建新的续约信息实例
        LeaseInfo newLeaseInfo = LeaseInfo.Builder.newBuilder()
                .setRenewalIntervalInSecs(currentLeaseRenewal)
                .setDurationInSecs(currentLeaseDuration)
                .build();
        //保存到instanceInfo中
        instanceInfo.setLeaseInfo(newLeaseInfo);
        //标记为脏,记录修改时间dirty时间戳
        instanceInfo.setIsDirty();
    }
}
再次看到了最重要的方法setIsDirty,如果实例信息被更改了,就会记录更改的时间,同时标记dirty,然后在3.3.1描述的步骤向服务端进行同步。
(3) 状态健康检查
主要关注这个检查方法:

首先看一下HealthCheckHandler怎么来的:
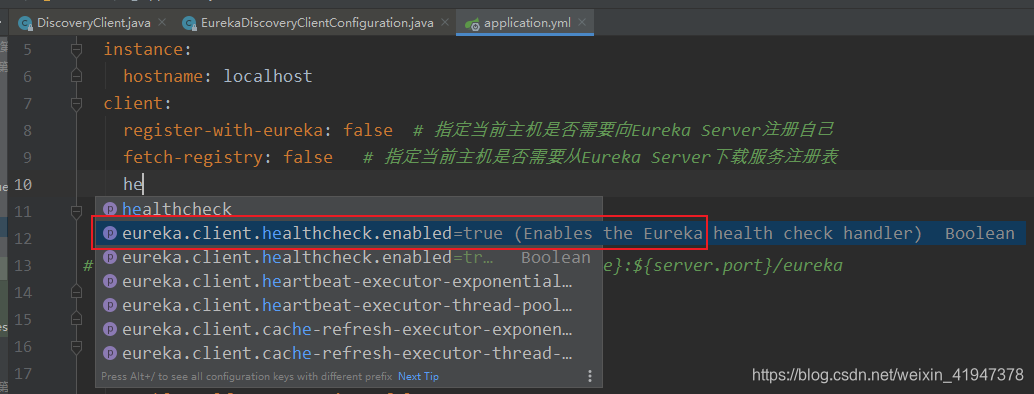
配置文件中默认开启健康检查。在看EurekaDiscoveryClientConfiguration这个自动配置类:

现在我们知道了getHealthCheckHandler()方法返回的就是这个EurekaHealthCheckHandler:
//EurekaHealthCheckHandler.java
public InstanceStatus getStatus(InstanceStatus instanceStatus) {
return getHealthStatus();
}
//EurekaHealthCheckHandler.java
protected InstanceStatus getHealthStatus() {
final Status status;
if (statusAggregator != null) {
//statusAggregator不为null
//且是SimpleStatusAggregator,简单状态聚合器
//走这
status = getStatus(statusAggregator);
}
else {
status = getStatus(getHealthIndicator());
}
return mapToInstanceStatus(status);
}
//EurekaHealthCheckHandler.java
protected Status getStatus(StatusAggregator statusAggregator) {
Status status;
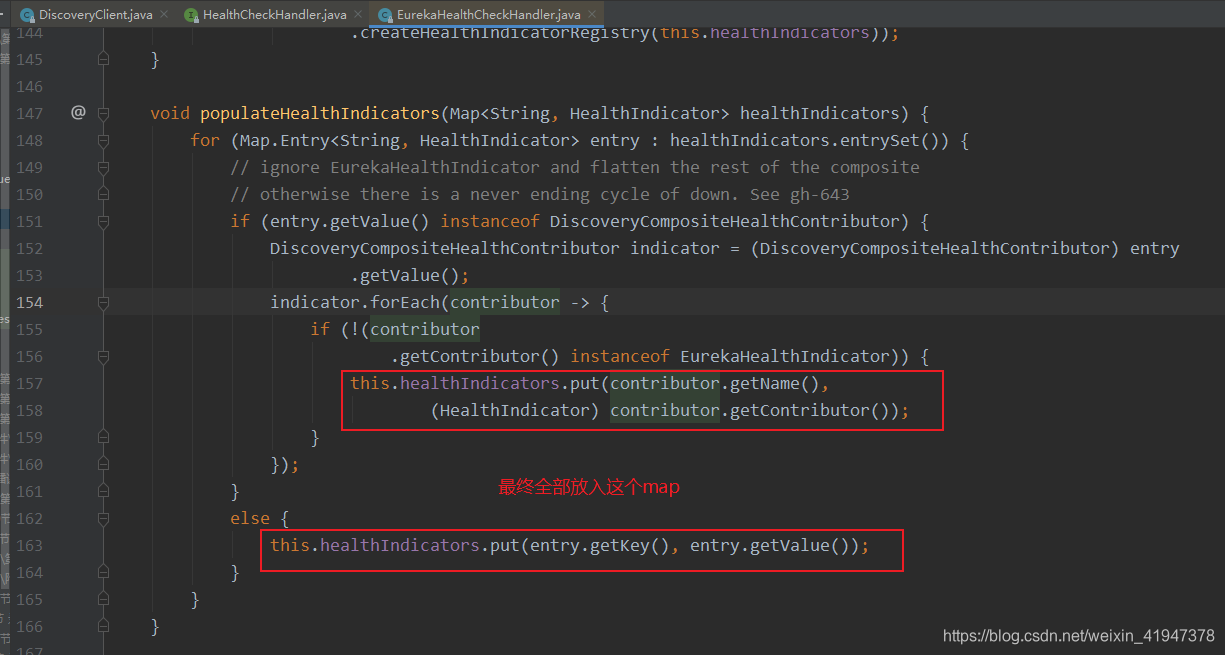
//labmd表达式,healthIndicators是个map,map.values将map的所有value转成集合
//并遍历,调用了该集合中每个HealthIndicator的health方法,得到了Health
//在调用了Health的getStatus方法,获取到状态,将这些状态
//收集到set集合中
Set<Status> statusSet = healthIndicators.values().stream()
.map(HealthIndicator::health).map(Health::getStatus)
.collect(Collectors.toSet());
//通过状态聚合器从状态集合中获取 聚合后的状态
status = statusAggregator.getAggregateStatus(statusSet);
return status;
}
先看healthIndicators怎么来的,里面的元素到底是啥:
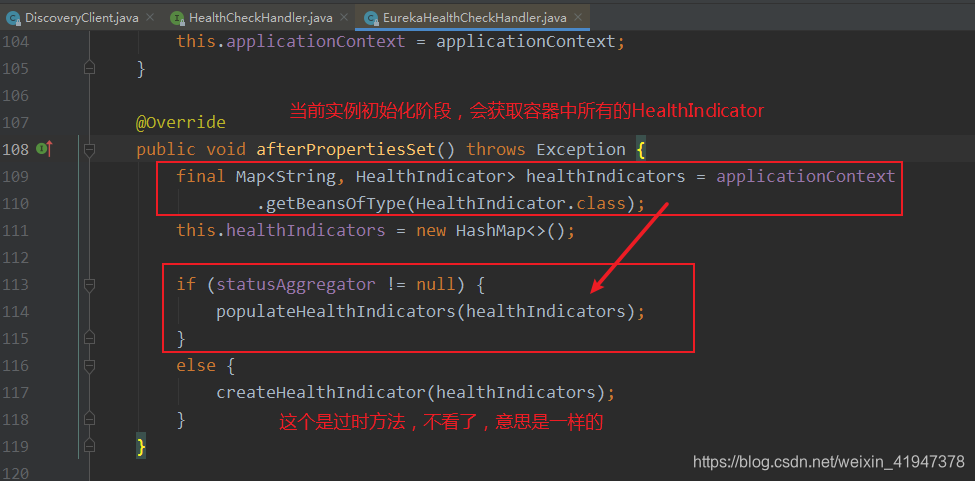
afterPropertiesSet() 这个是Spring框架的知识点,不懂的自行补课吧。
再看下什么是HealthIndicator:
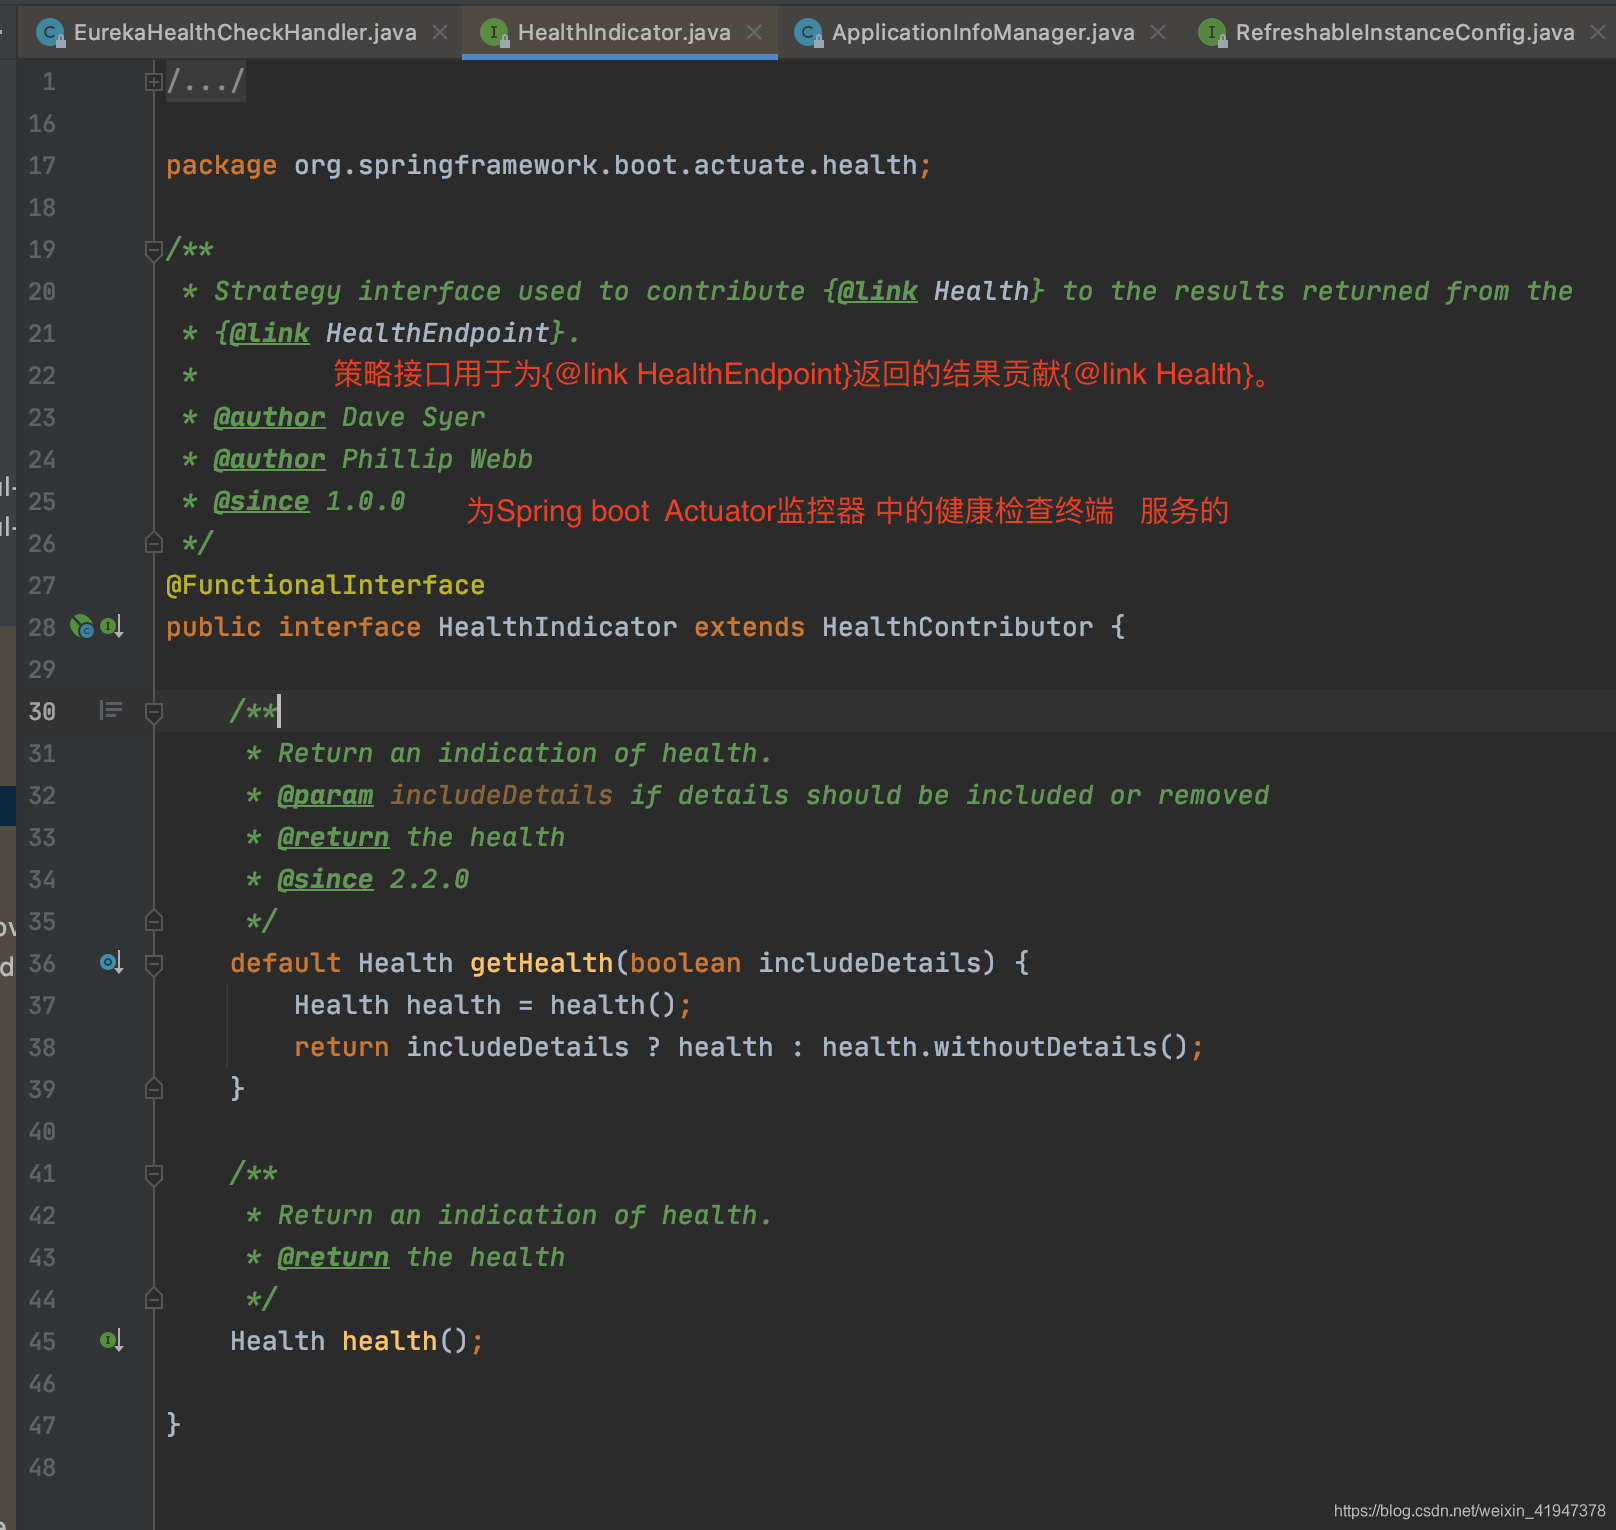
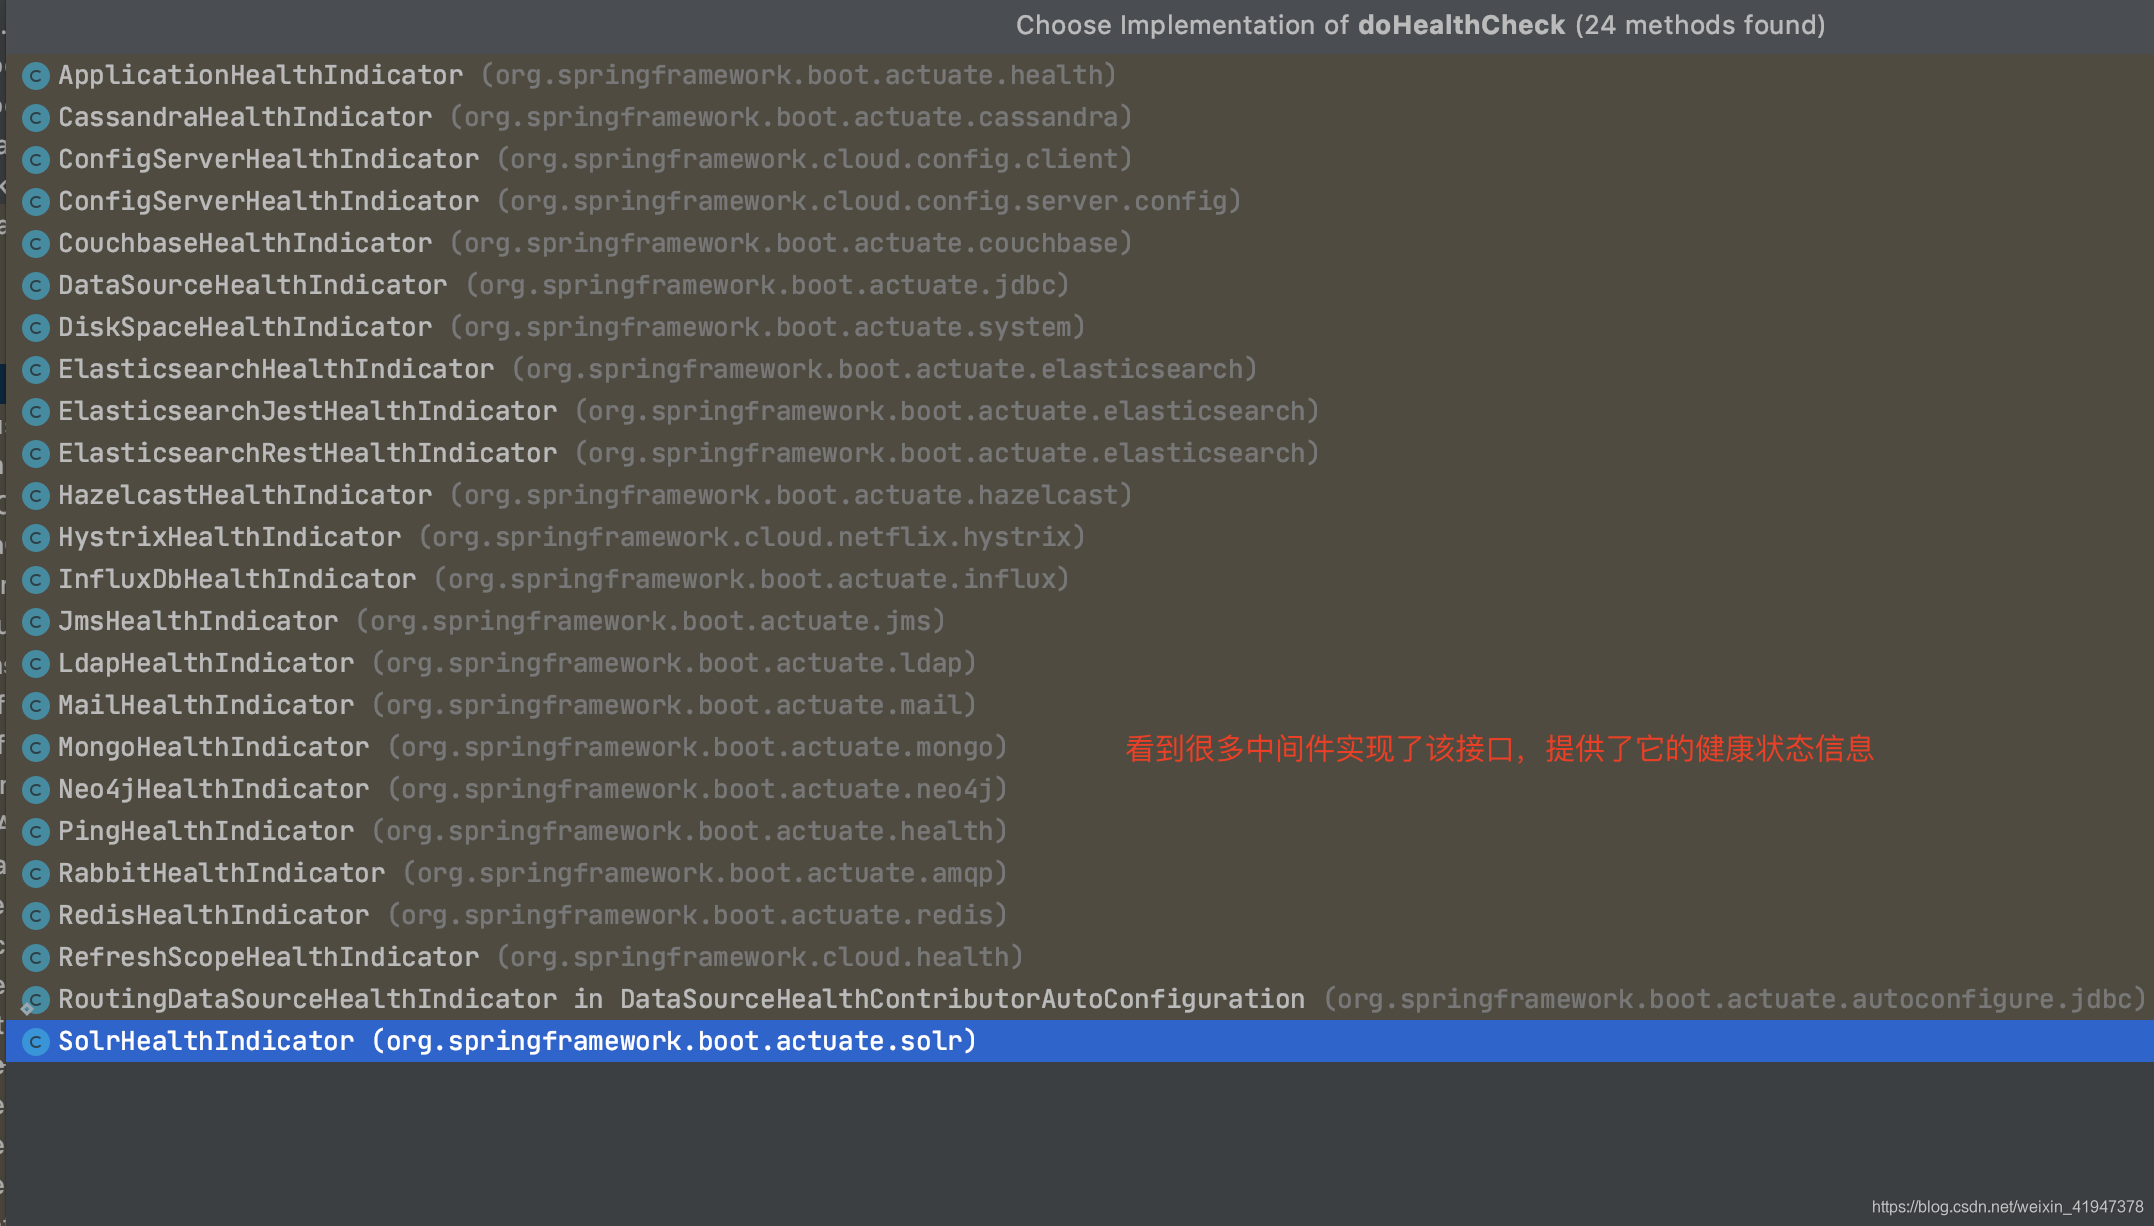
好,现在我们知道Set集合存的是什么了,就是当前应用中用的各种中间件的状态:

现在看获取聚合状态,getAggregateStatus方法:
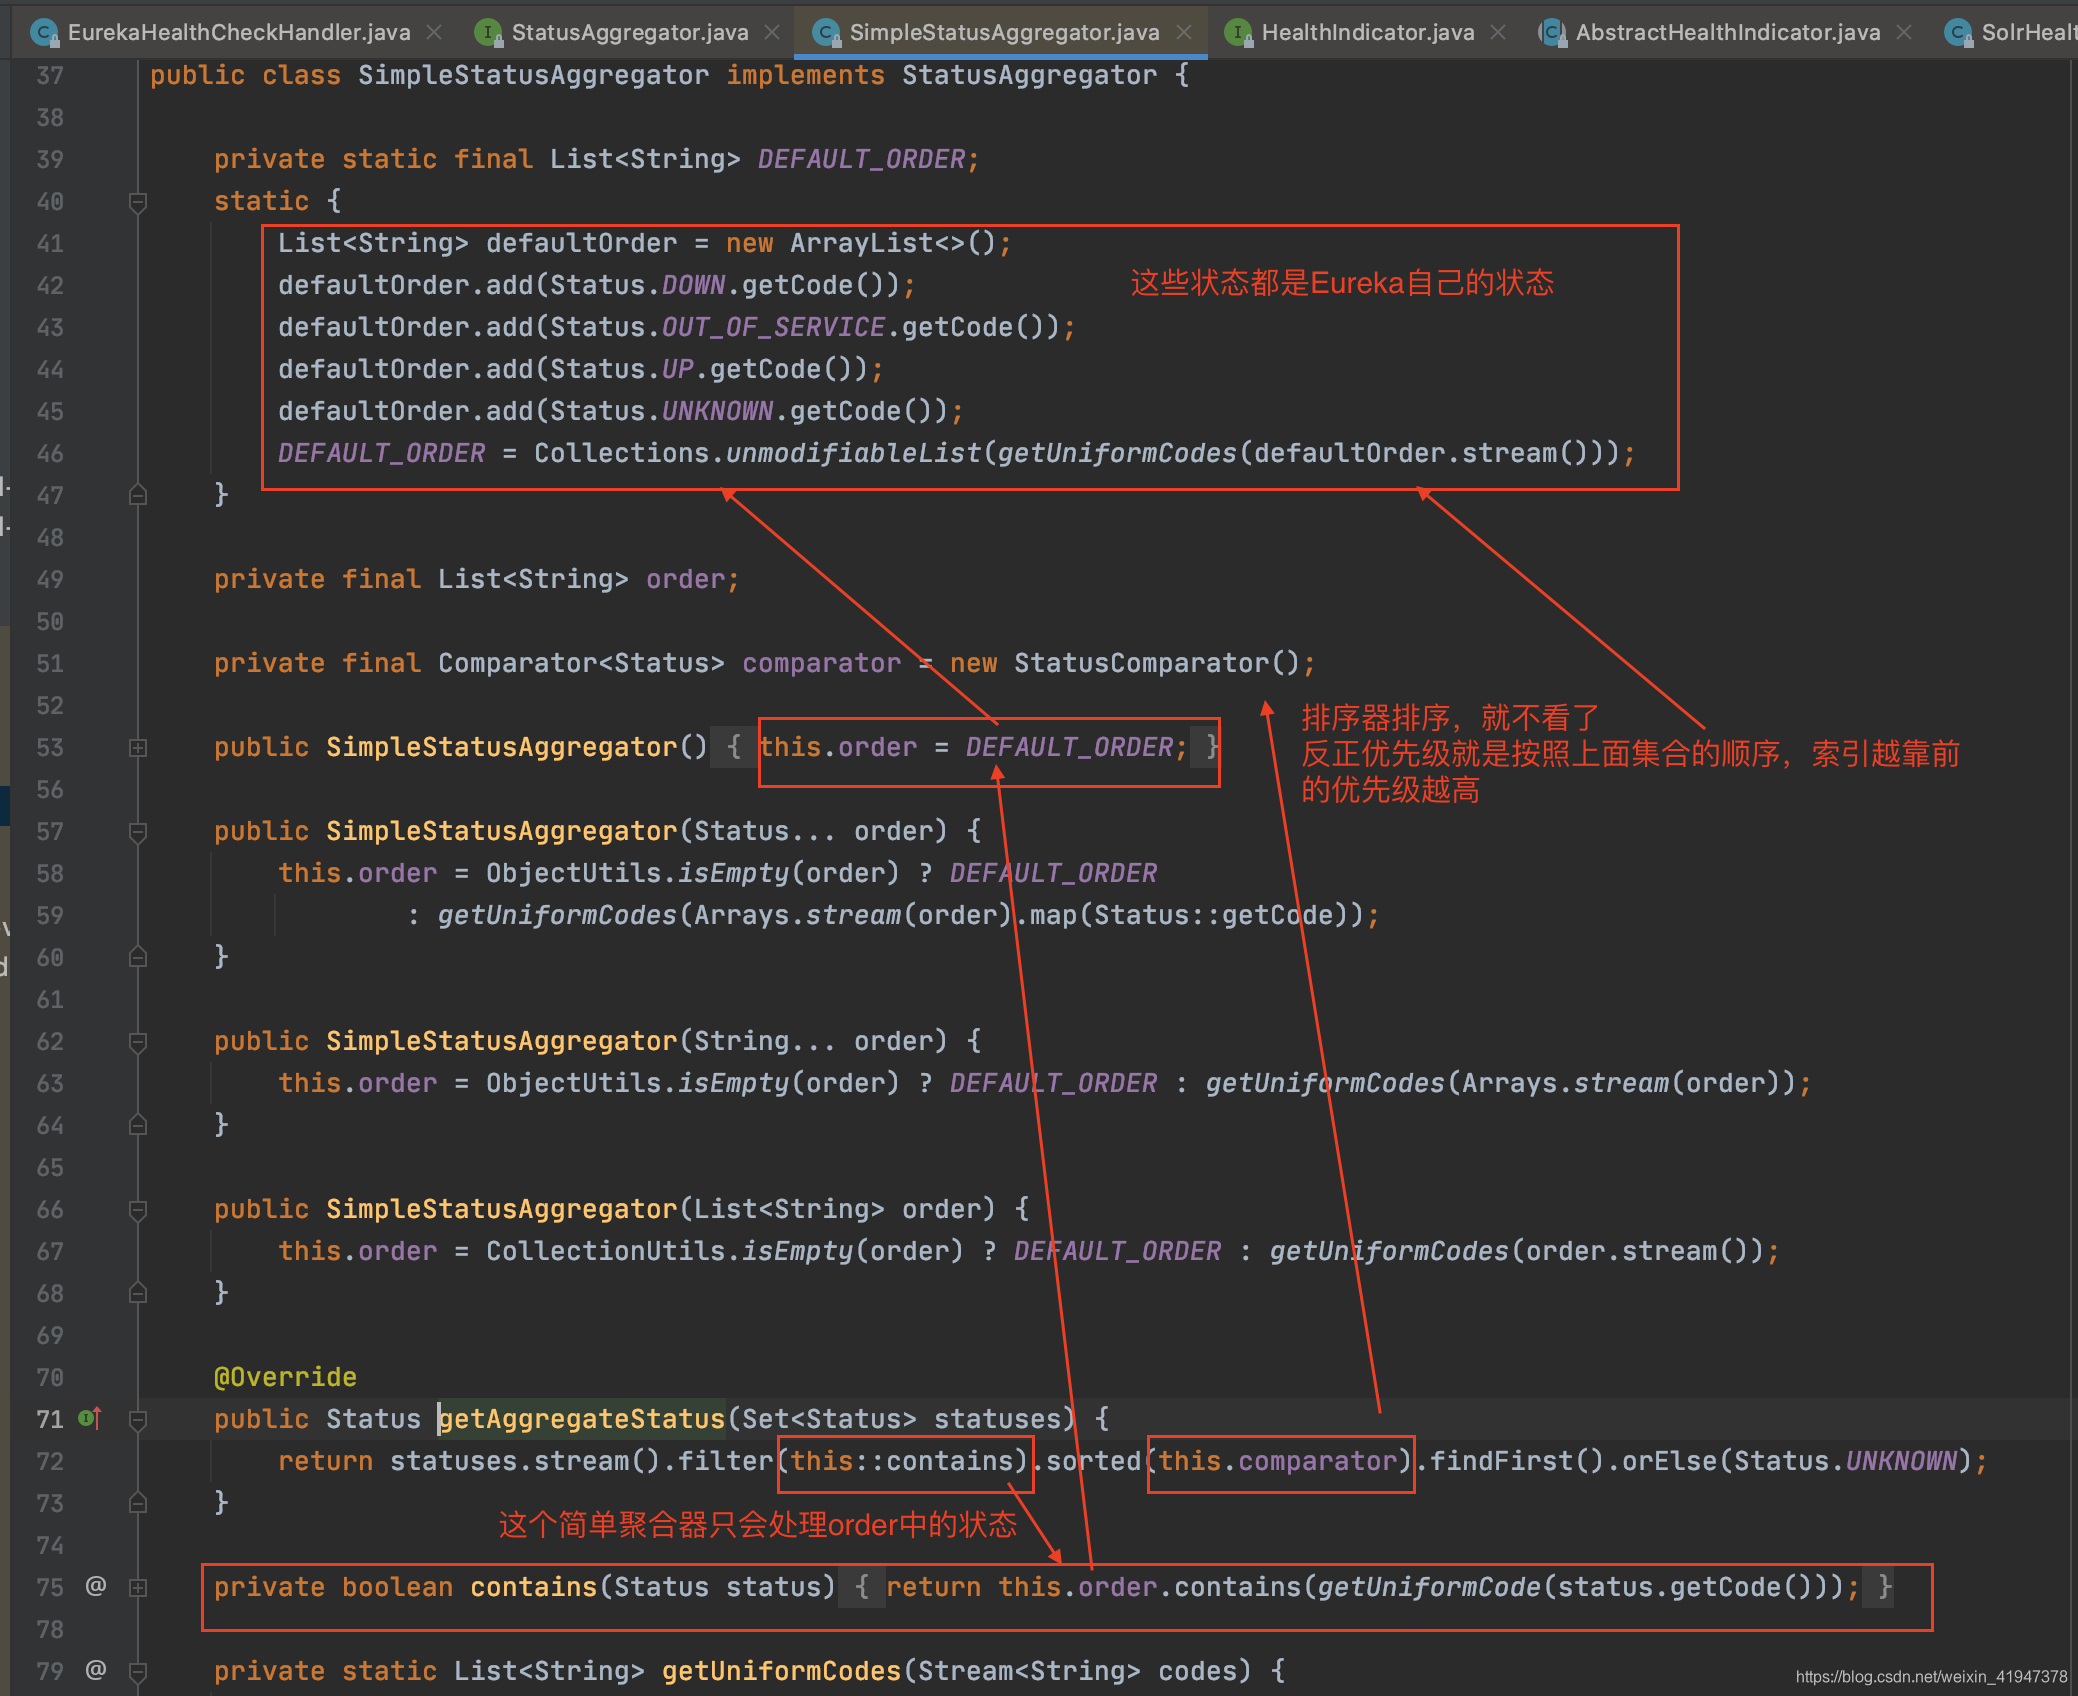
从这里可以看出,Eureka是支持将EurekaClient的客户端状态和应用中其他中间件的状态相绑定的,可以做到应用中任何一个中间件挂了,则EurekaClient也认为挂了,也可以实现一些其他的策略。


 511
511

 被折叠的 条评论
为什么被折叠?
被折叠的 条评论
为什么被折叠?
 到【灌水乐园】发言


