


前言
实现波涛汹涌的大海,添加灯光,阴影等
与我们上个离开时的狂暴海项目相同
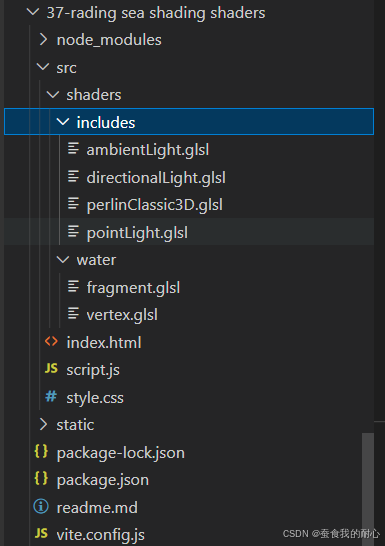
一个细分良好的海洋平面放置在src/shaders/water/中的自定义着色器
1i1-gu1
vite-plugin-gls1
轨道控制
添加灯光
(和light shading学的一样)
环境光,方向光,点光
设置法线,矫正法线数值,设置模型位置,获取视图距离
问题:可能没什么效果,原因是因为法线是向上的,不跟随xyz移动,是g, rgb 绿色
计算法线
邻居技术: 对于网格,我们可以使用“邻居”技术我们将忽略正态属性,计算邻居的理论位置来计算正态。
正常的法线向量值向上,不需要,需要建立一个乘积函数计算
叉积会计算出垂直于两个输入向量的向量
如何让波涛汹涌的大海更加逼真,而且如何运用着色器实现光在海面折射阴影等下面是一些实现思路
首先应引入上一个项目中对应灯光的glsl,返回的对应数据就是对应设置的不同光的数据。
下面关于在平面x,y,z 波浪在上下移动时,对应法线
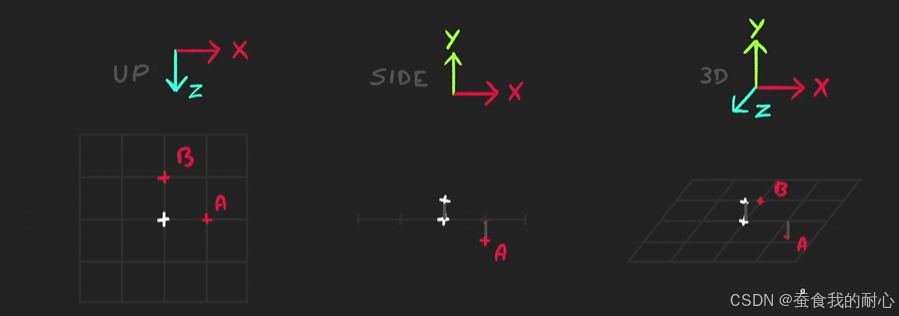
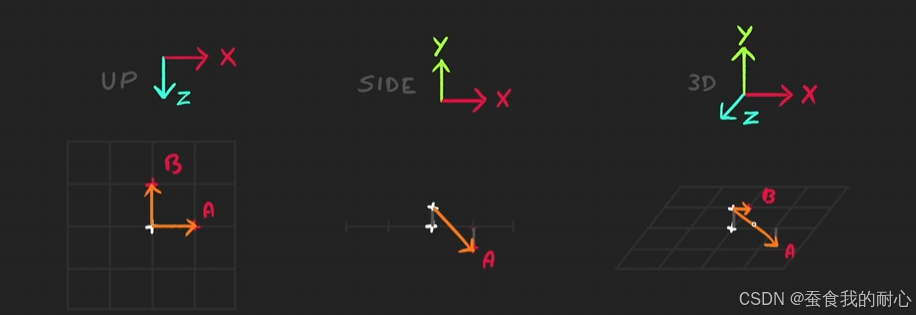
用了新的技术,计算法线在模型移动时,设置的方向问题
问题:可能没什么效果,原因是因为法线是向上的,不跟随xyz移动,是g, rgb 绿色
计算法线
邻居技术: 对于网格,我们可以使用“邻居”技术我们将忽略正态属性,计算邻居的理论位置来计算正态。
正常的法线向量值向上,不需要,需要建立一个乘积函数计算
垂直于A,B的另一个值为叉积,将法线显示
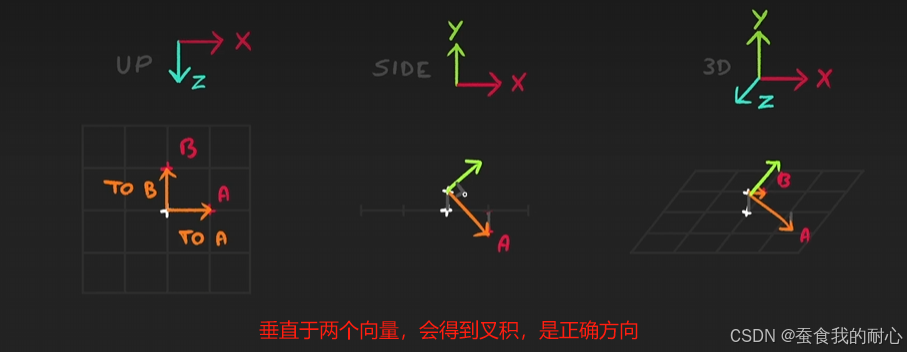
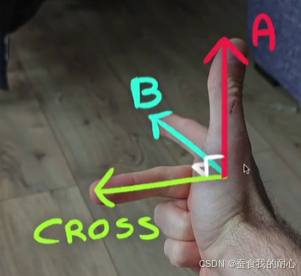
叉积如何确定, 叉积会计算出垂直于两个输入向量的向量
// 比如 :用右手对着屏幕比一个手枪,然后你的中指垂直另外两个手指,这个时候中指就是叉积的方向
// 正常情况下xz,叉积向上,反转之后向下 这也是为什么为负值
项目目录及版本

一、代码
script.js
import * as THREE from 'three'
import { OrbitControls } from 'three/examples/jsm/controls/OrbitControls.js'
import GUI from 'lil-gui'
import waterVertexShader from './shaders/water/vertex.glsl'
import waterFragmentShader from './shaders/water/fragment.glsl'
/**
* Base
*/
// Debug
const gui = new GUI({ width: 340 })
const debugObject = {}
// Canvas
const canvas = document.querySelector('canvas.webgl')
// Scene
const scene = new THREE.Scene()
// Axes helper
// const axesHelper = new THREE.AxesHelper()
// axesHelper.position.y += 0.25
// scene.add(axesHelper)
/**
* Water
*/
// Geometry
const waterGeometry = new THREE.PlaneGeometry(2, 2, 512, 512)
waterGeometry.deleteAttribute('normal') // 由于法线是自己计算,可以去掉
waterGeometry.deleteAttribute('uv')
// Colors
debugObject.depthColor = '#ff4000'
debugObject.surfaceColor = '#151c37'
gui.addColor(debugObject, 'depthColor').onChange(() => { waterMaterial.uniforms.uDepthColor.value.set(debugObject.depthColor) })
gui.addColor(debugObject, 'surfaceColor').onChange(() => { waterMaterial.uniforms.uSurfaceColor.value.set(debugObject.surfaceColor) })
// Material
const waterMaterial = new THREE.ShaderMaterial({
vertexShader: waterVertexShader,
fragmentShader: waterFragmentShader,
uniforms:
{
uTime: { value: 0 },
uBigWavesElevation: { value: 0.2 },
uBigWavesFrequency: { value: new THREE.Vector2(4, 1.5) },
uBigWavesSpeed: { value: 0.75 },
uSmallWavesElevation: { value: 0.15 },
uSmallWavesFrequency: { value: 3 },
uSmallWavesSpeed: { value: 0.2 },
uSmallIterations: { value: 4 },
uDepthColor: { value: new THREE.Color(debugObject.depthColor) },
uSurfaceColor: { value: new THREE.Color(debugObject.surfaceColor) },
uColorOffset: { value: 0.925 },
uColorMultiplier: { value: 1 }
}
})
gui.add(waterMaterial.uniforms.uBigWavesElevation,'value').min(0).max(1).step(0.001).name('uBigWavesElevation(大浪的幅度)')
gui.add(waterMaterial.uniforms.uBigWavesFrequency.value,'x').min(0).max(10).step(0.001).name('uBigWavesFrequencyX(x轴的弯曲频率)')
gui.add(waterMaterial.uniforms.uBigWavesFrequency.value,'y').min(0).max(10).step(0.001).name('uBigWavesFrequencyY(y轴的弯曲频率)')
gui.add(waterMaterial.uniforms.uBigWavesSpeed,'value').min(0).max(4).step(0.001).name('uBigWavesSpeed(大波浪的速度)')
gui.add(waterMaterial.uniforms.uSmallWavesElevation, 'value').min(0).max(1).step(0.001).name('uSmallWavesElevation(控制高度 海拔)')
gui.add(waterMaterial.uniforms.uSmallWavesFrequency, 'value').min(0).max(30).step(0.001).name('uSmallWavesFrequency(控制频率)')
gui.add(waterMaterial.uniforms.uSmallWavesSpeed, 'value').min(0).max(4).step(0.001).name('uSmallWavesSpeed(小波浪的速度和时间相关)')
gui.add(waterMaterial.uniforms.uSmallIterations, 'value').min(0).max(5).step(1).name('uSmallIterations(指波浪的迭代,多少小波浪)')
gui.add(waterMaterial.uniforms.uColorOffset, 'value').min(0).max(1).step(0.001).name('uColorOffset(起伏时,颜色偏移)')
gui.add(waterMaterial.uniforms.uColorMultiplier, 'value').min(0).max(10).step(0.001).name('uColorMultiplier(起伏时,颜色强度)')
// Mesh
const water = new THREE.Mesh(waterGeometry, waterMaterial)
water.rotation.x = - Math.PI * 0.5
scene.add(water)
/**
* Sizes
*/
const sizes = {
width: window.innerWidth,
height: window.innerHeight
}
window.addEventListener('resize', () =>
{
// Update sizes
sizes.width = window.innerWidth
sizes.height = window.innerHeight
// Update camera
camera.aspect = sizes.width / sizes.height
camera.updateProjectionMatrix()
// Update renderer
renderer.setSize(sizes.width, sizes.height)
renderer.setPixelRatio(Math.min(window.devicePixelRatio, 2))
})
/**
* Camera
*/
// Base camera
const camera = new THREE.PerspectiveCamera(75, sizes.width / sizes.height, 0.1, 100)
camera.position.set(1, 1, 1)
scene.add(camera)
// Controls
const controls = new OrbitControls(camera, canvas)
controls.enableDamping = true
/**
* Renderer
*/
const renderer = new THREE.WebGLRenderer({
canvas: canvas
})
/*
toneMapping是Three.js中的一个属性,用于设置渲染器的色调映射算法。色调映射是一种技术,用于将高动态范围(HDR)的图像映射到低动态范围(LDR)的显示设备上,同时保持尽可能多的视觉信息
26-Realistic rendering有完整解释
*/
renderer.toneMapping = THREE.ACESFilmicToneMapping // 支持色调映射 所以可以加
renderer.setSize(sizes.width, sizes.height)
renderer.setPixelRatio(Math.min(window.devicePixelRatio, 2))
/**
* Animate
*/
const clock = new THREE.Clock()
const tick = () =>
{
const elapsedTime = clock.getElapsedTime()
// Water
waterMaterial.uniforms.uTime.value = elapsedTime
// Update controls
controls.update()
// Render
renderer.render(scene, camera)
// Call tick again on the next frame
window.requestAnimationFrame(tick)
}
tick()index.html
<!DOCTYPE html>
<html lang="en">
<head>
    <meta charset="UTF-8">
    <meta name="viewport" content="width=device-width, initial-scale=1.0">
    <title>Raging Sea Shading</title>
    <link rel="stylesheet" href="./style.css">
</head>
<body>
    <canvas class="webgl"></canvas>
    <script type="module" src="./script.js"></script>
</body>
</html>
style.css
*
{
    margin: 0;
    padding: 0;
}

html,
body
{
    overflow: hidden;
}

.webgl
{
    position: fixed;
    top: 0;
    left: 0;
    outline: none;
}
fragment.glsl
uniform vec3 uDepthColor;
uniform vec3 uSurfaceColor;
uniform float uColorOffset;
uniform float uColorMultiplier;

varying float vElevation;
varying vec3 vNormal;
varying vec3 vPosition;

#include ../includes/directionalLight.glsl
#include ../includes/pointLight.glsl

void main()
{
    vec3 viewDirection = normalize(vPosition - cameraPosition); // 确保长度为1,正常化  模型位置 减去 相机位置
    vec3 normal = normalize(vNormal);

    // 基础颜色
    float mixStrength = (vElevation + uColorOffset) * uColorMultiplier;
    mixStrength = smoothstep(0.0,1.0,mixStrength); //通过应用平滑步骤来混合强度,增强梯度的感觉
    vec3 color = mix(uDepthColor, uSurfaceColor, mixStrength);

    //Light
    vec3 light = vec3(0.0);
    // 将灯光相加
    // light += directionalLight(
    //     vec3(1.0),          // 颜色
    //     1.0,                // 强度
    //     normal,             // 法线
    //     vec3(-1.0,0.5,0.0), // 光的位置
    //     viewDirection ,     // 视图方向
    //     30.0                // 镜面反射功率 specular power
    // );

    light += pointLight(
        vec3(1.0),  // 颜色
        10.0,                // 强度
        normal,            // 法线
        vec3(0.0,0.25,0.0),   // 光的位置
        viewDirection ,     // 视图方向
        20.0 ,               // 镜面反射功率 specular power
        vPosition,            // 位置
        0.95                  // 衰变
    );

    // 最后相乘颜色
    color *= light;

    // 最终颜色
    gl_FragColor = vec4(color, 1.0);
    #include <tonemapping_fragment>
    #include <colorspace_fragment>
}
vertex.glsl
uniform float uTime;
uniform float uBigWavesElevation;
uniform vec2 uBigWavesFrequency;
uniform float uBigWavesSpeed;

uniform float uSmallWavesElevation;
uniform float uSmallWavesFrequency;
uniform float uSmallWavesSpeed;
uniform float uSmallIterations;

varying float vElevation;
varying vec3 vNormal;
varying vec3 vPosition;

#include ../includes/perlinClassic3D.glsl

float waveElevation(vec3 position){ // 海拔高度函数
     float elevation = sin(position.x * uBigWavesFrequency.x + uTime * uBigWavesSpeed) *
                      sin(position.z * uBigWavesFrequency.y + uTime * uBigWavesSpeed) *
                      uBigWavesElevation;

    for(float i = 1.0; i <= uSmallIterations; i++)
    {
        elevation -= abs(perlinClassic3D(vec3(position.xz * uSmallWavesFrequency * i, uTime * uSmallWavesSpeed)) * uSmallWavesElevation / i);
    }
    return elevation;
}

void main()
{
    // 基础位置
    float shift = 0.01;
    vec4 modelPosition = modelMatrix * vec4(position, 1.0); // 模型位置
    vec3 modelPositionA = modelPosition.xyz + vec3(shift,0.0,0.0);
    // 这里基本都牵扯数学 学的会学,学不会再看 为什么-shift, 叉积 向量推向相反的方向
    // 比如 :用右手对着屏幕比一个手枪,然后你的中指垂直另外两个手指,这个时候中指就是叉积的方向
    // 正常情况下xz,叉积向上,反转之后向下 这也是为什么为负值
    vec3 modelPositionB = modelPosition.xyz + vec3(0.0,0.0, - shift);

    // Elevation 标高
    float elevation = waveElevation(modelPosition.xyz);
    modelPosition.y += elevation;
    modelPositionA.y += waveElevation(modelPositionA);
    modelPositionB.y += waveElevation(modelPositionB);

    // Compute normal 计算法线 向量正常化,长度为1
    vec3 toA =normalize(modelPositionA - modelPosition.xyz) ;
    vec3 toB =normalize(modelPositionB - modelPosition.xyz) ;
    vec3 computeNormal = cross(toA,toB);

    // 最终位置
    vec4 viewPosition = viewMatrix * modelPosition;
    vec4 projectedPosition = projectionMatrix * viewPosition;
    gl_Position = projectedPosition;

    // Varyings
    vElevation = elevation;
    vNormal = computeNormal;
    vPosition = modelPosition.xzy ;
}
ambientLight.glsl
vec3 ambientLight(vec3 lightColor, float lightIntensity){
    return lightColor * lightIntensity; // 环境光 将颜色和光的强度相乘
}
directionalLight.glsl
// 创建一个方向光  颜色,强度 , 法线 , 光位置 ,视图位置 ,镜面反射率
vec3 directionalLight(vec3 lightColor, float lightIntensity,vec3 normal,vec3 lightPosition,vec3 viewDirection,float specularPower){
    vec3 lightDirection = normalize(lightPosition); // 转成单位向量,长度为1
    vec3 lightReflection = reflect(- lightDirection, normal);

    float shading = dot(normal,lightDirection);
    shading = max(0.0, shading);

    float specular = - dot(lightReflection, viewDirection);
    specular = max(0.0,specular);
    specular = pow(specular,specularPower);

    return lightColor * lightIntensity * (shading + specular); // 镜面反射和阴影相加 然后乘以 颜色 强度

}
pointLight.glsl
// 创建一个点光
vec3 pointLight(vec3 lightColor, float lightIntensity,vec3 normal ,vec3 lightPosition, vec3 viewDirection, float specularPower, vec3 position,float lightDecay){

    vec3 lightDelta = lightPosition - position; // 为什么相减,原因获得点光的位置
    float lightDistance = length(lightDelta); // 想要向量的长度 length 点光到物体表面的距离
    vec3 lightDirection = normalize(lightDelta); //将vector向量 转换成单位向量  长度为1
    vec3 lightReflection = reflect(- lightDirection,normal);

    // shading
    float shading = dot(normal,lightDirection);
    shading = max(0.0, shading); // 保证永远不会低于0.0

    // Specular  光反射和观看方向的一个点 得到反射 由于点积是相反,所以取负值
    float specular = - dot(lightReflection, viewDirection);
    // 保证我们的点积不是负数,因为在背面不需要有反射
    specular = max(0.0,specular);
    specular = pow(specular,specularPower);

    // Decay
    float decay = 1.0 - lightDistance * lightDecay;
    decay = max(0.0,decay);

    return lightColor * lightIntensity * decay *(shading +  specular); // 将颜色和光的强度相乘
}
perlinClassic3D.glsl
// Classic Perlin 3D Noise
// by Stefan Gustavson
//
vec4 permute(vec4 x)
{
    return mod(((x*34.0)+1.0)*x, 289.0);
}
vec4 taylorInvSqrt(vec4 r)
{
    return 1.79284291400159 - 0.85373472095314 * r;
}
vec3 fade(vec3 t)
{
    return t*t*t*(t*(t*6.0-15.0)+10.0);
}

float perlinClassic3D(vec3 P)
{
    vec3 Pi0 = floor(P); // Integer part for indexing
    vec3 Pi1 = Pi0 + vec3(1.0); // Integer part + 1
    Pi0 = mod(Pi0, 289.0);
    Pi1 = mod(Pi1, 289.0);
    vec3 Pf0 = fract(P); // Fractional part for interpolation
    vec3 Pf1 = Pf0 - vec3(1.0); // Fractional part - 1.0
    vec4 ix = vec4(Pi0.x, Pi1.x, Pi0.x, Pi1.x);
    vec4 iy = vec4(Pi0.yy, Pi1.yy);
    vec4 iz0 = Pi0.zzzz;
    vec4 iz1 = Pi1.zzzz;

    vec4 ixy = permute(permute(ix) + iy);
    vec4 ixy0 = permute(ixy + iz0);
    vec4 ixy1 = permute(ixy + iz1);

    vec4 gx0 = ixy0 / 7.0;
    vec4 gy0 = fract(floor(gx0) / 7.0) - 0.5;
    gx0 = fract(gx0);
    vec4 gz0 = vec4(0.5) - abs(gx0) - abs(gy0);
    vec4 sz0 = step(gz0, vec4(0.0));
    gx0 -= sz0 * (step(0.0, gx0) - 0.5);
    gy0 -= sz0 * (step(0.0, gy0) - 0.5);

    vec4 gx1 = ixy1 / 7.0;
    vec4 gy1 = fract(floor(gx1) / 7.0) - 0.5;
    gx1 = fract(gx1);
    vec4 gz1 = vec4(0.5) - abs(gx1) - abs(gy1);
    vec4 sz1 = step(gz1, vec4(0.0));
    gx1 -= sz1 * (step(0.0, gx1) - 0.5);
    gy1 -= sz1 * (step(0.0, gy1) - 0.5);

    vec3 g000 = vec3(gx0.x,gy0.x,gz0.x);
    vec3 g100 = vec3(gx0.y,gy0.y,gz0.y);
    vec3 g010 = vec3(gx0.z,gy0.z,gz0.z);
    vec3 g110 = vec3(gx0.w,gy0.w,gz0.w);
    vec3 g001 = vec3(gx1.x,gy1.x,gz1.x);
    vec3 g101 = vec3(gx1.y,gy1.y,gz1.y);
    vec3 g011 = vec3(gx1.z,gy1.z,gz1.z);
    vec3 g111 = vec3(gx1.w,gy1.w,gz1.w);

    vec4 norm0 = taylorInvSqrt(vec4(dot(g000, g000), dot(g010, g010), dot(g100, g100), dot(g110, g110)));
    g000 *= norm0.x;
    g010 *= norm0.y;
    g100 *= norm0.z;
    g110 *= norm0.w;
    vec4 norm1 = taylorInvSqrt(vec4(dot(g001, g001), dot(g011, g011), dot(g101, g101), dot(g111, g111)));
    g001 *= norm1.x;
    g011 *= norm1.y;
    g101 *= norm1.z;
    g111 *= norm1.w;

    float n000 = dot(g000, Pf0);
    float n100 = dot(g100, vec3(Pf1.x, Pf0.yz));
    float n010 = dot(g010, vec3(Pf0.x, Pf1.y, Pf0.z));
    float n110 = dot(g110, vec3(Pf1.xy, Pf0.z));
    float n001 = dot(g001, vec3(Pf0.xy, Pf1.z));
    float n101 = dot(g101, vec3(Pf1.x, Pf0.y, Pf1.z));
    float n011 = dot(g011, vec3(Pf0.x, Pf1.yz));
    float n111 = dot(g111, Pf1);

    vec3 fade_xyz = fade(Pf0);
    vec4 n_z = mix(vec4(n000, n100, n010, n110), vec4(n001, n101, n011, n111), fade_xyz.z);
    vec2 n_yz = mix(n_z.xy, n_z.zw, fade_xyz.y);
    float n_xyz = mix(n_yz.x, n_yz.y, fade_xyz.x);
    return 2.2 * n_xyz;
}
二、效果
有质感的海洋,shading-shaders
总结
结合光线和shader,实现之前写的海洋更加具有质感!


 2213
2213

 被折叠的 条评论
为什么被折叠?
被折叠的 条评论
为什么被折叠?
 到【灌水乐园】发言


