


 本文详细介绍如何在Spring框架中整合ActiveMQ,包括配置pom文件引入依赖、队列和主题模式配置、异步监听配置等关键步骤。通过具体代码示例,展示如何创建生产者和消费者,实现消息的发送和接收。
ActiveMQ整合spring
一、配置pom文件
<project xmlns="http://maven.apache.org/POM/4.0.0" xmlns:xsi="http://www.w3.org/2001/XMLSchema-instance"
	xsi:schemaLocation="http://maven.apache.org/POM/4.0.0 http://maven.apache.org/xsd/maven-4.0.0.xsd">
	<modelVersion>4.0.0</modelVersion>
	<groupId>com.study</groupId>
	<artifactId>activeMQ_spring</artifactId>
	<version>0.0.1-SNAPSHOT</version>
	<properties>
		<activemq.version>5.15.9</activemq.version>
		<slf4j.version>1.7.25</slf4j.version>
		<lombok.version>1.16.18</lombok.version>
		<spring.version>4.3.24.RELEASE</spring.version>
	</properties>
	<dependencies>
		<!-- https://mvnrepository.com/artifact/org.apache.activemq/activemq-all -->
		<dependency>
			<groupId>org.apache.activemq</groupId>
			<artifactId>activemq-all</artifactId>
			<version>${activemq.version}</version>
		</dependency>
		<dependency>
			<groupId>org.apache.activemq</groupId>
			<artifactId>activemq-pool</artifactId>
			<version>${activemq.version}</version>
		</dependency>
		<dependency>
			<groupId>org.apache.activemq</groupId>
			<artifactId>activemq-jms-pool</artifactId>
			<version>${activemq.version}</version>
		</dependency>
		<dependency>
			<groupId>org.apache.commons</groupId>
			<artifactId>commons-pool2</artifactId>
			<version>2.6.1</version>
		</dependency>
		<dependency>
			<groupId>org.springframework</groupId>
			<artifactId>spring-jms</artifactId>
			<version>${spring.version}</version>
		</dependency>
		<dependency>
			<groupId>org.springframework</groupId>
			<artifactId>spring-core</artifactId>
			<version>${spring.version}</version>
		</dependency>
		<dependency>
			<groupId>org.springframework</groupId>
			<artifactId>spring-context</artifactId>
			<version>${spring.version}</version>
		</dependency>
		<dependency>
			<!-- log通用jar -->
			<groupId>org.slf4j</groupId>
			<artifactId>slf4j-api</artifactId>
			<version>${slf4j.version}</version>
		</dependency>
		<dependency>
			<groupId>org.projectlombok</groupId>
			<artifactId>lombok</artifactId>
			<version>${lombok.version}</version>
		</dependency>
	</dependencies>
</project>
二、ActiveMQ队列模式配置
创建application-queue.xml
<?xml version="1.0" encoding="UTF-8"?>
<beans xmlns="http://www.springframework.org/schema/beans"
	xmlns:xsi="http://www.w3.org/2001/XMLSchema-instance" xmlns:context="http://www.springframework.org/schema/context"
	xmlns:jms="http://www.springframework.org/schema/jms"
	xsi:schemaLocation="
		http://www.springframework.org/schema/beans http://www.springframework.org/schema/beans/spring-beans.xsd
		http://www.springframework.org/schema/context http://www.springframework.org/schema/context/spring-context.xsd
		http://www.springframework.org/schema/jms http://www.springframework.org/schema/jms/spring-jms.xsd">
	<!-- 第一步声明连接工厂 -->
	<bean id="jmsFactory"
	     class="org.apache.activemq.pool.PooledConnectionFactory"
		destroy-method="stop">
		<!-- 通过工厂创建连接 -->
		<property name="connectionFactory">
			<bean class="org.apache.activemq.ActiveMQConnectionFactory">
				<property name="brokerURL"
				    value="tcp://0.0.0.0:61616" />
			</bean>
		</property>
		<!--最大的活动连接数 -->
		<property name="maxConnections" value="100"></property>
	</bean>
	<!-- 声明目标 -->
	<bean id="deatinationQueue" class="org.apache.activemq.command.ActiveMQQueue">
		<!--使用构造方法注入队列名字 -->
		<constructor-arg name="name" value="activeMq-queue"></constructor-arg>
	</bean>

	<!-- 声明操作activeMQ的对像JmsTemplate -->
	<bean id="jmsTemplate" class="org.springframework.jms.core.JmsTemplate">
		<!-- 注入连接工厂 -->
		<property name="connectionFactory" ref="jmsFactory"></property>
		<!-- 注入消息发送的默认目的地 -->
		<property name="defaultDestination" ref="deatinationQueue"></property>
		<!-- 消息转化器 -->
		<property name="messageConverter">
			<bean
				class="org.springframework.jms.support.converter.SimpleMessageConverter">
			</bean>
		</property>
	</bean>
</beans>
创建队列生产者
package com.study.queue;

import javax.jms.JMSException;
import javax.jms.Message;
import javax.jms.Session;
import javax.jms.TextMessage;
import org.springframework.context.ApplicationContext;
import org.springframework.context.support.ClassPathXmlApplicationContext;
import org.springframework.jms.core.JmsTemplate;
import org.springframework.jms.core.MessageCreator;

/*
 * 队列生产者
 */
public class TestQueueProducer {

	public static void main(String[] args) {
		// 1.获取spring的配置文件
		ApplicationContext applicationContext = new ClassPathXmlApplicationContext("classpath:application-queue.xml");
		//获取操作activeMQ的对像JmsTemplate
		JmsTemplate jmsTemplate = applicationContext.getBean(JmsTemplate.class);
		//创建消息并发送
		jmsTemplate.send(new MessageCreator() {
			public Message createMessage(Session session) throws JMSException {
				//session创建TextMessage对象
				TextMessage  message = session.createTextMessage("activeMQ整合spring");
				return message;
			}
		});
	}
}
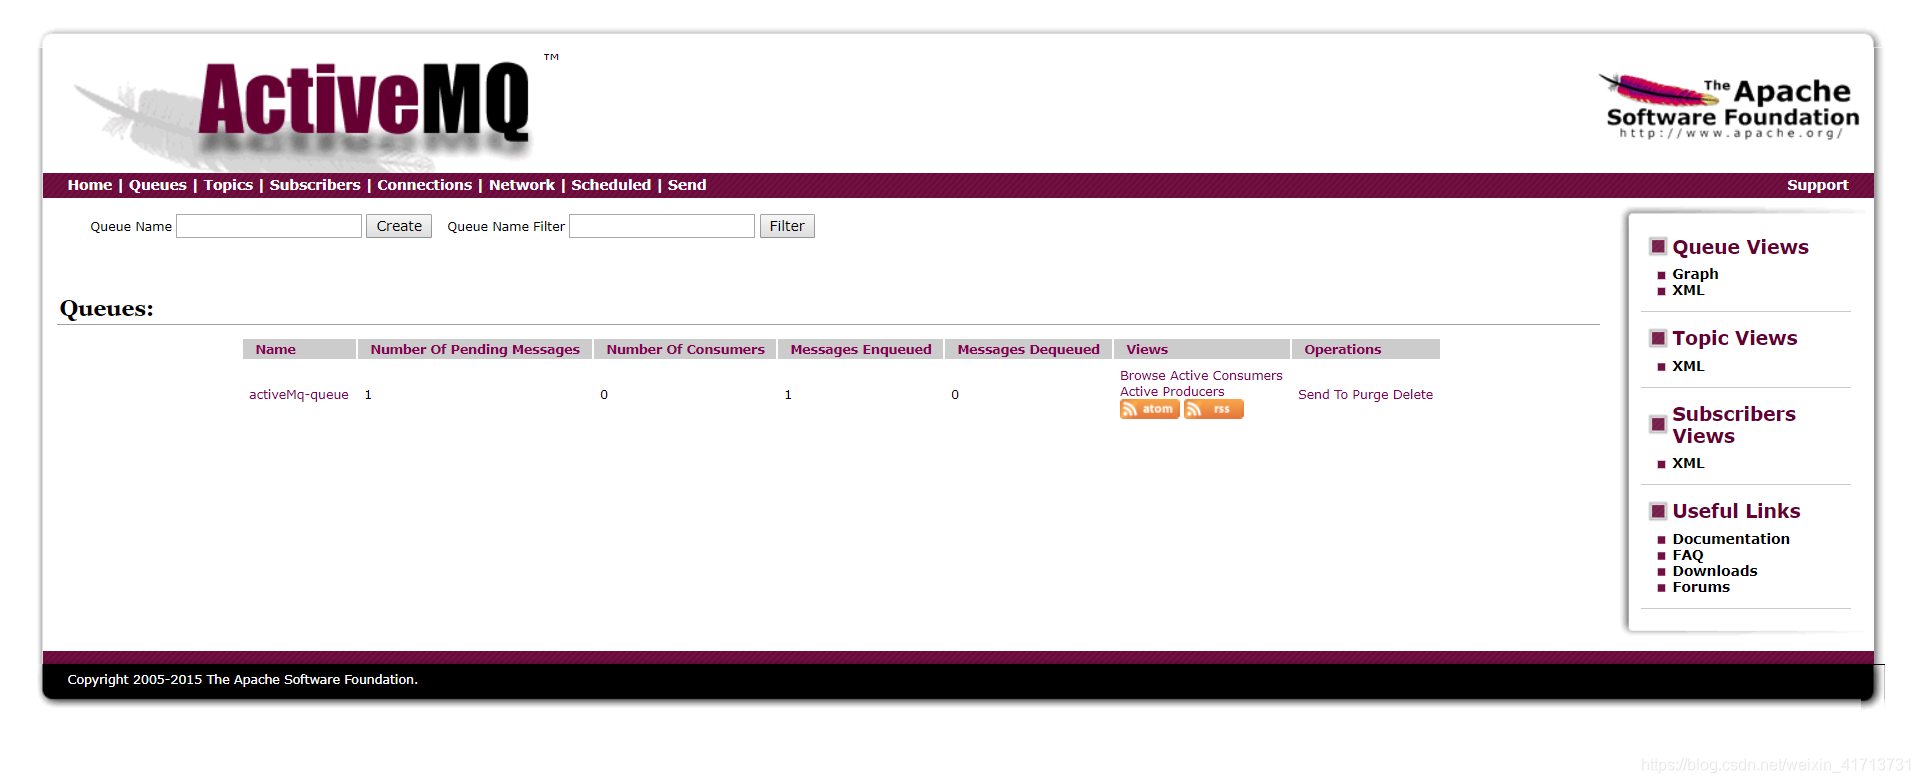
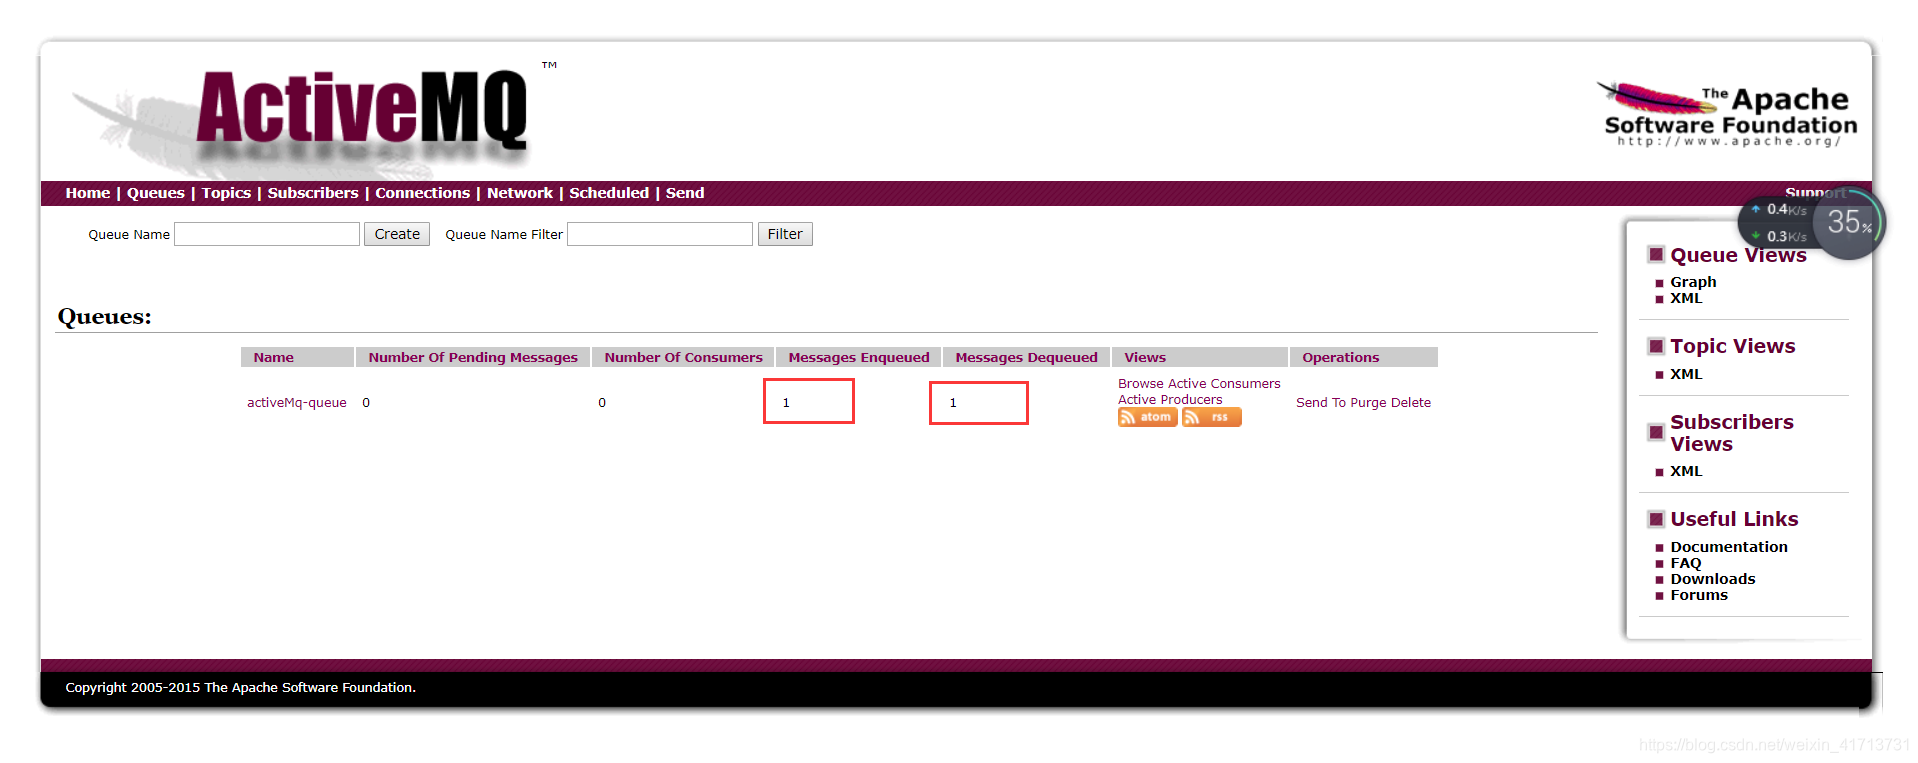
创建队列消费者
package com.study.queue;

import org.springframework.context.ApplicationContext;
import org.springframework.context.support.ClassPathXmlApplicationContext;
import org.springframework.jms.core.JmsTemplate;

/*
 * 创建队列消费者 异步方式
 */
public class TestQueueConsumerSync {


	public static void main(String[] args) {
		// 1.获取spring的配置文件
		ApplicationContext applicationContext = new ClassPathXmlApplicationContext("classpath:application-queue.xml");
		// 获取操作activeMQ的对像JmsTemplate
		JmsTemplate jmsTemplate = applicationContext.getBean(JmsTemplate.class);
		//接收消息
		Object obj = jmsTemplate.receiveAndConvert();
	}
}
三、ActiveMQ主题模式配置
创建application-topic.xml
<?xml version="1.0" encoding="UTF-8"?>
<beans xmlns="http://www.springframework.org/schema/beans"
	xmlns:xsi="http://www.w3.org/2001/XMLSchema-instance" xmlns:context="http://www.springframework.org/schema/context"
	xmlns:jms="http://www.springframework.org/schema/jms"
	xsi:schemaLocation="
		http://www.springframework.org/schema/beans http://www.springframework.org/schema/beans/spring-beans.xsd
		http://www.springframework.org/schema/context http://www.springframework.org/schema/context/spring-context.xsd
		http://www.springframework.org/schema/jms http://www.springframework.org/schema/jms/spring-jms.xsd">
	<!-- 第一步声明连接工厂 -->
	<bean id="jmsFactory"
	     class="org.apache.activemq.pool.PooledConnectionFactory"
		destroy-method="stop">
		<!-- 通过工厂创建连接 -->
		<property name="connectionFactory">
			<bean class="org.apache.activemq.ActiveMQConnectionFactory">
				<property name="brokerURL"
				    value="tcp://0.0.0.0:61616" />
			</bean>
		</property>
		<!--最大的活动连接数 -->
		<property name="maxConnections" value="100"></property>
	</bean>
	<!-- 声明目标 -->
	<bean id="deatinationTopic" class="org.apache.activemq.command.ActiveMQTopic">
		<!--使用构造方法注入队列名字 -->
		<constructor-arg name="name" value="activeMq-topic"></constructor-arg>
	</bean>

	<!-- 声明操作activeMQ的对像JmsTemplate -->
	<bean id="jmsTemplate" class="org.springframework.jms.core.JmsTemplate">
		<!-- 注入连接工厂 -->
		<property name="connectionFactory" ref="jmsFactory"></property>
		<!-- 注入消息发送的默认目的地 -->
		<property name="defaultDestination" ref="deatinationTopic"></property>
		<!-- 消息转化器 -->
		<property name="messageConverter">
			<bean
				class="org.springframework.jms.support.converter.SimpleMessageConverter">
			</bean>
		</property>
	</bean>
</beans>
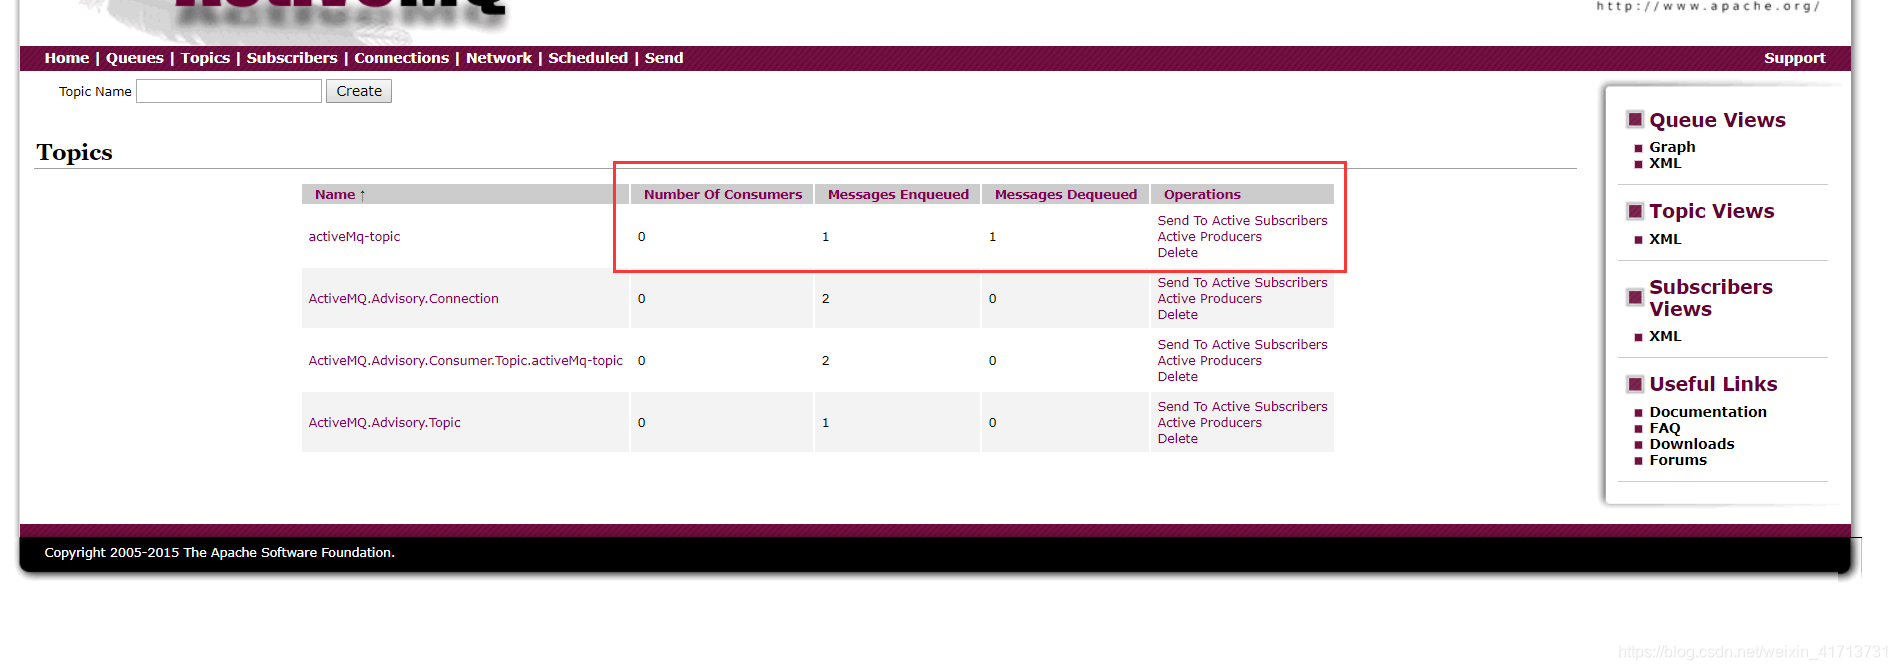
创建主题生产者
package com.study.queue;


import javax.jms.JMSException;
import javax.jms.Message;
import javax.jms.Session;
import javax.jms.TextMessage;

import org.springframework.context.ApplicationContext;
import org.springframework.context.support.ClassPathXmlApplicationContext;
import org.springframework.jms.core.JmsTemplate;
import org.springframework.jms.core.MessageCreator;

/*
 * 发布/订阅模式生产者
 */
public class TestTopicProducer {

	public static void main(String[] args) {
		// 1.获取spring的配置文件
		ApplicationContext applicationContext = new ClassPathXmlApplicationContext("classpath:application-topic.xml");
		//获取操作activeMQ的对像JmsTemplate
		JmsTemplate jmsTemplate = applicationContext.getBean(JmsTemplate.class);
		//创建消息并发送
		jmsTemplate.send(new MessageCreator() {
			public Message createMessage(Session session) throws JMSException {
				//session创建TextMessage对象
				TextMessage  message = session.createTextMessage("activeMQ整合spring--topic");
				return message;
			}
		});

	}
}
创建主题消费者
package com.study.queue;

import org.springframework.context.ApplicationContext;
import org.springframework.context.support.ClassPathXmlApplicationContext;
import org.springframework.jms.core.JmsTemplate;

/*
 * 创建发布/订阅消费者 异步方式
 */
public class TestTopicConsumerSync {
	public static void main(String[] args) {
		// 1.获取spring的配置文件
		ApplicationContext applicationContext = new ClassPathXmlApplicationContext("classpath:application-topic.xml");
		// 获取操作activeMQ的对像JmsTemplate
		JmsTemplate jmsTemplate = applicationContext.getBean(JmsTemplate.class);
		//接收消息
		Object obj = jmsTemplate.receiveAndConvert();
	}
}
四、异步监听配置
创建监听
package com.study.queue;

import javax.jms.JMSException;
import javax.jms.Message;
import javax.jms.MessageListener;
import javax.jms.TextMessage;

/*
 * 创建监听器
 */
public class MyListener implements MessageListener {

	public void onMessage(Message message) {
		if(message instanceof TextMessage){
			TextMessage textMessage = (TextMessage) message;
			try {
				System.err.println(textMessage.getText());
			} catch (JMSException e) {
				// TODO Auto-generated catch block
				e.printStackTrace();
			}
		}
	}
}
创建监听application-queue-listener.xml
<?xml version="1.0" encoding="UTF-8"?>
<beans xmlns="http://www.springframework.org/schema/beans"
	xmlns:xsi="http://www.w3.org/2001/XMLSchema-instance" xmlns:context="http://www.springframework.org/schema/context"
	xmlns:jms="http://www.springframework.org/schema/jms"
	xsi:schemaLocation="
		http://www.springframework.org/schema/beans http://www.springframework.org/schema/beans/spring-beans.xsd
		http://www.springframework.org/schema/context http://www.springframework.org/schema/context/spring-context.xsd
		http://www.springframework.org/schema/jms http://www.springframework.org/schema/jms/spring-jms.xsd">
	<!-- 第一步声明连接工厂 -->
	<bean id="jmsFactory" class="org.apache.activemq.pool.PooledConnectionFactory"
		destroy-method="stop">
		<!-- 通过工厂创建连接 -->
		<property name="connectionFactory">
			<bean class="org.apache.activemq.ActiveMQConnectionFactory">
				<property name="brokerURL" value="tcp://0.0.0.0:61616" />
			</bean>
		</property>
		<!--最大的活动连接数 -->
		<property name="maxConnections" value="100"></property>
	</bean>
	<!-- 声明目标 -->
	<bean id="destinationQueue" class="org.apache.activemq.command.ActiveMQQueue">
		<!--使用构造方法注入队列名字 -->
		<constructor-arg name="name" value="activeMq-queue"></constructor-arg>
	</bean>

	<!-- 声明操作activeMQ的对像JmsTemplate -->
	<bean id="jmsTemplate" class="org.springframework.jms.core.JmsTemplate">
		<!-- 注入连接工厂 -->
		<property name="connectionFactory" ref="jmsFactory"></property>
		<!-- 注入消息发送的默认目的地 -->
		<property name="defaultDestination" ref="destinationQueue"></property>
		<!-- 消息转化器 -->
		<property name="messageConverter">
			<bean
				class="org.springframework.jms.support.converter.SimpleMessageConverter">
			</bean>
		</property>
	</bean>

	<!-- 声明一个监听器容器 -->
	<bean id="myListener" class="com.study.queue.MyListener"></bean>


	<!-- 配置监听容器 -->
	<bean id="queueListenerContainer"
		class="org.springframework.jms.listener.DefaultMessageListenerContainer">
		<!-- 注入连接工厂 -->
		<property name="connectionFactory" ref="jmsFactory"></property>
		<!-- 注入消息发送的默认目的地 -->
		<property name="destination" ref="destinationQueue"></property>
		<!-- 注入监听器容器 -->
		<property name="messageListener" ref="myListener"></property>
	</bean>
</beans>
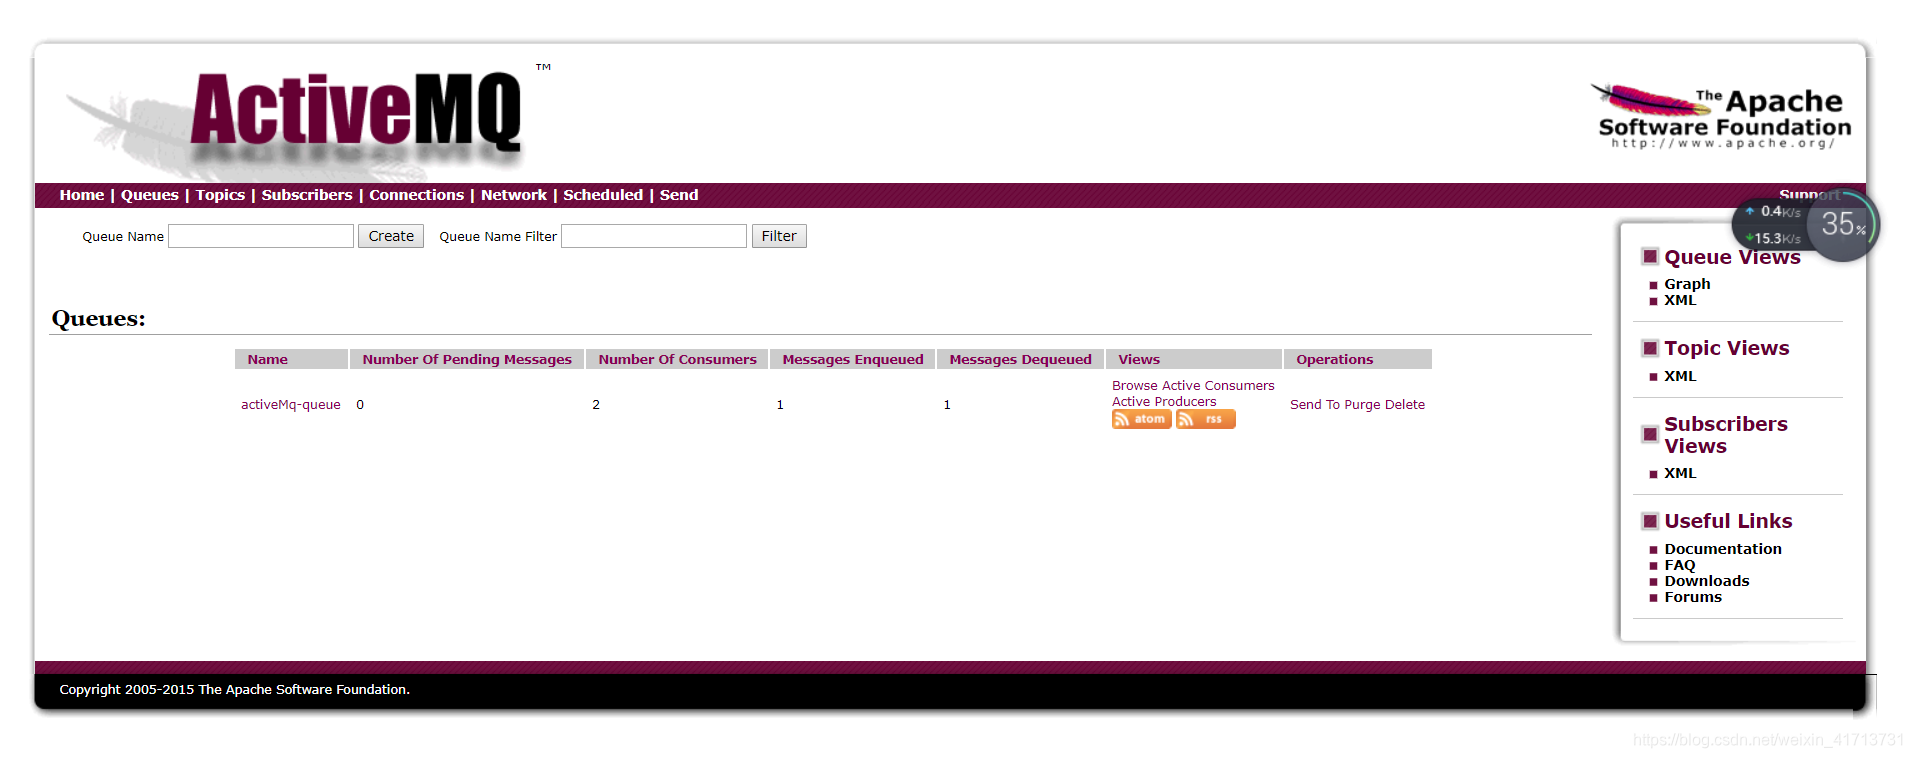
创建队列生产者
package com.study.queue;

import javax.jms.JMSException;
import javax.jms.Message;
import javax.jms.Session;
import javax.jms.TextMessage;
import org.springframework.context.ApplicationContext;
import org.springframework.context.support.ClassPathXmlApplicationContext;
import org.springframework.jms.core.JmsTemplate;
import org.springframework.jms.core.MessageCreator;

/*
 * 队列生产者
 */
public class TestQueueProducer {

	public static void main(String[] args) {
		// 1.获取spring的配置文件
		ApplicationContext applicationContext = new ClassPathXmlApplicationContext("classpath:application-queue-listener.xml");
		//获取操作activeMQ的对像JmsTemplate
		JmsTemplate jmsTemplate = applicationContext.getBean(JmsTemplate.class);
		//创建消息并发送
		jmsTemplate.send(new MessageCreator() {
			public Message createMessage(Session session) throws JMSException {
				//session创建TextMessage对象
				TextMessage  message = session.createTextMessage("activeMQ整合spring");
				return message;
			}
		});
	}
}
因为有监听了,不需要创建消费者了,直接发送消息就可以了。


 被折叠的 条评论
为什么被折叠?
被折叠的 条评论
为什么被折叠?
 到【灌水乐园】发言


