


相机拍摄的物体的边缘一般没有锯齿,因为这些边缘是一些前景和背景的混合。通过对每个像素内的样本进行平均,我们也可以达到同样的效果。虽然对于分层存在争议,但是这里我们不关心这个,因为我们编写的通用ray teacer不能从中获得太多的好处,还会使我们的代码更丑陋。
我们对相机进行了抽象,以便我们接下来制作更酷的相机。
6.1 一些随机数函数
我们需要一个随机数生成器,返回范围为[0, 1)的随机实数。“小于1”很重要,因为有时候我们会利用它。
一个简单的实现方法就是使用rand()函数(在头文件<cstdlib>中)。rand()返回从 0 到RAND_MAX范围内的数,将rand() 除以(RAND_MAX + 1)可得到[0, 1) 范围内的随机数。
所以,我们要添加到rtweekend.h的函数是:
- random_double() :返回[0, 1) 范围内的随机实数。
- random_double(double min, double max) :返回[min, max) 范围内的实数。
代码如下:
// rtweekend.h
#include <cstdlib>
...
inline double random_double() {
    // Returns a random real in [0,1).
    return rand() / (RAND_MAX + 1.0);
}
inline double random_double(double min, double max) {
    // Returns a random real in [min,max).
    return min + (max-min)*random_double();
}
注意:这里的“rand() / (RAND_MAX + 1.0)”中的1.0不能写成1,这样计算的结果返回的类型就变成int型,会导致最终的random_double()返回的是整数0,失去抗锯齿的效果。
(直译)c++传统上没有标准的随机数生成器,但是较新的c++版本已经通过头解决了这个问题(如果根据一些专家的说法不完全)。如果你想使用这个,你可以得到一个随机数,我们需要的条件如下:
// rtweekend.h
#include <random>
inline double random_double() {
    static std::uniform_real_distribution<double> distribution(0.0, 1.0);
    static std::mt19937 generator;
    return generator(distribution);
}
6.2 生成像素的多个样本
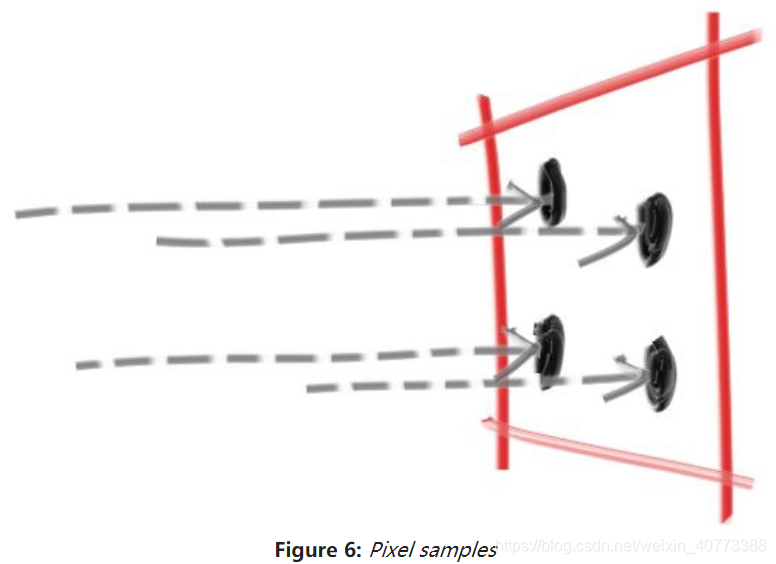
(直译)对于一个给定的像素,我们有几个样本在该像素内,并发送射线通过每个样本。然后对这些光线的颜色进行平均:
就是发射多条射线通过同一个像素中的不同的点,如下图的四个黑色的点,到场景中,计算这些射线与场景中的物体的交点及颜色,求颜色的平均值。
现在我们创建一个相机类camera类去管理我们的虚拟摄像头和进行场景扫描。camera class使用了之前的坐标轴平行相机。
- camera包含的成员变量:
- 相机坐标origin
- 屏幕左下角lower_left_corner
- 水平方向长度向量horizontal
- 垂直方向长度向量vertical
- camera包含的方法:
- 初始化函数
- 获得从相机发出的到屏幕上偏移量(从屏幕左下角开始偏移)为(u + v) 的位置的射线。
代码如下:
// 从网页复制 camera.h
#ifndef CAMERA_H
#define CAMERA_H
#include "rtweekend.h"
class camera {
    public:
        camera() {
            auto aspect_ratio = 16.0 / 9.0;
            auto viewport_height = 2.0;
            auto viewport_width = aspect_ratio * viewport_height;
            auto focal_length = 1.0;
                     origin = point3(0, 0, 0);
            horizontal = vec3(viewport_width, 0.0, 0.0);
            vertical = vec3(0.0, viewport_height, 0.0);
            lower_left_corner = origin - horizontal/2 - vertical/2 - vec3(0, 0, focal_length);
        }
ray get_ray(double u, double v) const {
            return ray(origin, lower_left_corner + u*horizontal + v*vertical - origin);
        }
private:
        point3 origin;
        point3 lower_left_corner;
        vec3 horizontal;
        vec3 vertical;
};
#endif
接下来我们更新write_color()函数,计算随机通过同一个像素的射线的颜色的平均值,将该点着色为该平均值。
这里我们计算每个像素的颜色平均值的方法是:
- 对于当前的像素,在迭代中计算通过该像素的射线返回的颜色,并累加到pixel_color。
- 迭代结束后,将累加的结果除以迭代的次数,即叠加的颜色数量。
- 使用函数clamp(x, min, max)将第2)步的计算结果截断到[min, max]间。
- 对图片上的每个像素,执行步骤 1)~3),输出结果。
代码如下:
// 网站上的 rtweekend.h 中的clamp部分的代码
inline double clamp(double x, double min, double max) {
    if (x < min) return min;
    if (x > max) return max;
    return x;
}
// 网站上的 color.h 代码
void write_color(std::ostream &out, color pixel_color, int samples_per_pixel) {
auto r = pixel_color.x();
auto g = pixel_color.y();
auto b = pixel_color.z();
// Divide the color total by the number of samples.
auto scale = 1.0 / samples_per_pixel;
r *= scale;
g *= scale;
b *= scale;
// Write the translated [0,255] value of each color component.
out << static_cast<int>(256 * clamp(r, 0.0, 0.999)) << ' '
<< static_cast<int>(256 * clamp(g, 0.0, 0.999)) << ' '
<< static_cast<int>(256 * clamp(b, 0.0, 0.999)) << '\n';
}
// 网站上的  main.cc代码
int main() {
    const auto aspect_ratio = 16.0 / 9.0;
    const int image_width = 384;
    const int image_height = static_cast<int>(image_width / aspect_ratio);
    const int samples_per_pixel = 100;
    std::cout << "P3\n" << image_width << " " << image_height << "\n255\n";
    hittable_list world;
    world.add(make_shared<sphere>(point3(0,0,-1), 0.5));
    world.add(make_shared<sphere>(point3(0,-100.5,-1), 100));
    camera cam;
    for (int j = image_height-1; j >= 0; --j) {
        std::cerr << "\rScanlines remaining: " << j << ' ' << std::flush;
        for (int i = 0; i < image_width; ++i) {
            color pixel_color(0, 0, 0);
            for (int s = 0; s < samples_per_pixel; ++s) {
                auto u = (i + random_double()) / (image_width-1);
                auto v = (j + random_double()) / (image_height-1);
                ray r = cam.get_ray(u, v);
                pixel_color += ray_color(r, world);
            }
            write_color(std::cout, pixel_color, samples_per_pixel);
        }
    }
std::cerr << "\nDone.\n";
}
噔噔,运行代码的结果如下:边缘看上去过渡比较柔和。


 280
280

 被折叠的 条评论
为什么被折叠?
被折叠的 条评论
为什么被折叠?
 到【灌水乐园】发言


