


 本文详细介绍了Vue中的表单绑定,包括复选框、单选按钮、选择框和下拉框的使用。深入讲解了Vue组件的基础、复用、局部与全局注册,以及组件间的通信方式,如Prop、动态Prop、事件监听。此外,还涵盖了Vue的过滤器功能,包括全局和私有过滤器的实现。
目录
1、表单输入绑定之复选框、单选按钮、选择框
1.1 单个复选框
<!DOCTYPE html>
<html lang="en">

<head>
	<meta charset="utf-8" />
	<title>v-if,v-show,v-for
	</title>
	<script src="./vue.js"></script>
</head>

<body>
	<div id="root">
	<input type="checkbox" id="checkbox" v-model="checked">
<label for="checkbox">{{ checked }}</label>
</div>
	<script>
		new Vue({
			el: "#root",
			data:{
				checked:"true"
			}
		})
	</script>
</body>

</html>
结果
![]() 或
或 ![]()
<!DOCTYPE html>
<html lang="en">

<head>
	<meta charset="utf-8" />
	<title>v-if,v-show,v-for
	</title>
	<script src="./vue.js"></script>
</head>

<body>
	<div id="root">
		<input type="checkbox" id="checkbox" v-model="toggle" true-value="yes" false-value="no">
		<label for checkbox>{{toggle}}</label>
	</div>
	<script>
		new Vue({
			el: "#root",
			data: {
				toggle:"yes"
			}
		})
	</script>
</body>

</html>
结果
![]() 或
或 ![]()
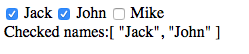
1.2 多个复选框
<!DOCTYPE html>
<html lang="en">

<head>
	<meta charset="utf-8" />
	<title>v-if,v-show,v-for
	</title>
	<script src="./vue.js"></script>
</head>

<body>
	<div id="root">
		<input type="checkbox" id="jack" value="Jack" v-model="checkedNames">
		<label for="jack">Jack</label>
		<input type="checkbox" id="john" value="John" v-model="checkedNames">
		<label for="john">John</label>
		<input type="checkbox" id="mike" value="Mike" v-model="checkedNames">
		<label for="mike">Mike</label>
		<br>
		<span>Checked names:{{checkedNames}}</span>
	</div>
	<script>
		new Vue({
			el: "#root",
			data: {
				checkedNames: []
			}
		})
	</script>
</body>

</html>
结果:
1.3 单选按钮
<!DOCTYPE html>
<html lang="en">

<head>
	<meta charset="utf-8" />
	<title>v-if,v-show,v-for
	</title>
	<script src="./vue.js"></script>
</head>

<body>
	<div id="root">
		<input type="radio" id="one" value="One" v-model="radioName">
		<label for="one">One</label>
		<input type="radio" id="two" value="Two" v-model="radioName">
		<label for="tow">tow</label>

		<br>
		<span>Picked: {{radioName}}</span>
	</div>
	<script>
		new Vue({
			el: "#root",
			data: {
				radioName: ""
			}
		})
	</script>
</body>

</html>
结果:

1.4 下拉框
<!DOCTYPE html>
<html lang="en">

<head>
	<meta charset="utf-8" />
	<title>v-if,v-show,v-for
	</title>
	<script src="./vue.js"></script>
</head>

<body>
	<div id="root">
		<select v-model="selected">
			<option>A</option>
			<option>B</option>
			<option>C</option>
		</select>
		<br>
		<span>Selected: {{selected}}</span>
	</div>
	<script>
		new Vue({
			el: "#root",
			data: {
				selected: ""
			}
		})
	</script>
</body>

</html>
结果

1.5 v-for 渲染的下拉框选项
<!DOCTYPE html>
<html lang="en">

<head>
	<meta charset="utf-8" />
	<title>v-if,v-show,v-for
	</title>
	<script src="./vue.js"></script>
</head>

<body>
	<div id="root">
		<select v-model="selected">
			<option v-for="option in options" v-bind:value="option.value">
				{{option.text}}
			</option>
		</select>
		<br>
		<span>Selected: {{selected}}</span>
	</div>
	<script>
		new Vue({
			el: "#root",
			data: {
				selected:'B',
				options:[
					{text:'One', value:'A'},
					{text:'Two', value:'B'},
					{text:'Three', value:'C'}
				]
			}
		})
	</script>
</body>

</html>
2、组件
2.1 基础
组件是可复用的 Vue 实例,且带有一个名字。我们可以在一个通过 new Vue 创建的 Vue 根实例中,把这个组件作为自定义元素来使用。
两个例子:
(1)任务列表
Vue 自定义的 <slot> 元素可以让我们向一个组件传递内容:
main.js
Vue.component('task',{
    template:'<li><slot></slot></li>'
});

new Vue({
    el:'#root'
})
index.html
<!DOCTYPE html>
<html lang="en">
<head>
<meta charset="utf-8" />
<title>组件
</title>
<script src="./vue.js"></script>
<script src="./main.js"></script>
</head>
<body>
<div id="root">
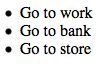
<task>Go to work</task>
<task>Go to bank</task>
<task>Go to store</task>
</div>
</body>
</html>理想结果:
![]()
但我这里显示这样,原因是JS代码加载顺序的问题,具体看https://www.jianshu.com/p/86250c123e53
![]()
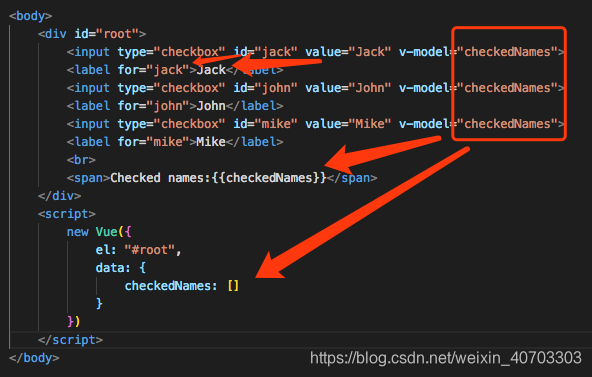
(2)button-counter
main.js
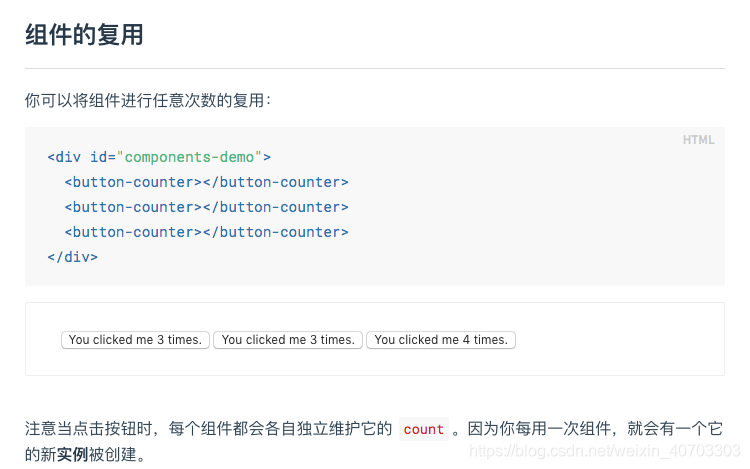
Vue.component('button-counter', {
    data: function () {
      return {
        count: 0
      }
    },
    template: '<button v-on:click="count++">You clicked me {{ count }} times.</button>'
  })

new Vue({
    el: '#root'
})
index.html
<!DOCTYPE html>
<html lang="en">

<head>
	<meta charset="utf-8" />
	<title>计算属性
	</title>
	<script src="./vue.js"></script>

</head>

<body>
	<div id="root">
		<button-counter></button-counter>
	</div>
	<script src="./main.js"></script>
</body>

</html>
结果
![]()
以下参考官方文档
2.2 组件的复用
为了能在模板中使用,这些组件必须先注册以便 Vue 能够识别。这里有两种组件的注册类型:全局注册和局部注册。至此,我们的组件都只是通过 Vue.component 全局注册的:

2.3 局部与全局组件
<!DOCTYPE html>
<html>

<head>
	<link rel="stylesheet" href="https://cdnjs.cloudflare.com/ajax/libs/bulma/0.2.3/css/bulma.css">
	<style type="text/css">
		body {
			padding-top: 40px;
		}
	</style>
	<script src="./vue.js"></script>
</head>

<body>
	<div id="root">
		<div>
			<input v-model="inputValue">
			<button @click="handleSubmit">提交</button>
        </div>
		<ul>
			<todo-item></todo-item>
		</ul>
	</div>
	<script>
        //全局组件的写法
//            Vue.component('todo-item',{
//                template:'<li>item</li>'
//            })

		var TodoItem = {
			template: '<li>item</li>'
		}
		new Vue({
			el: "#root",
			components:{"todo-item":TodoItem},
			data: {
				inputValue:'',
				list: []
			},
			methods:{
				handleSubmit:function(){
					this.list.push(this.inputValue);
					this.inputValue=''
				}
			}
		})
	</script>
</body>

</html> 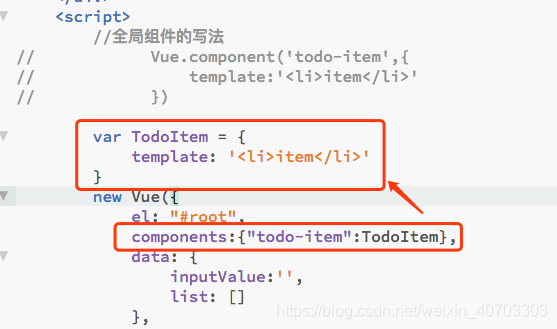
2.4 组件引用组件
定义一个 task-list 组件来显示任务列表
main.js
Vue.component('task-list', {
    template: `
    <div>
        <task v-for="task in tasks">{{ task.description }}</task>
    </div>
`,
    data() {
        return {
            tasks: [{ description: 'Go to work', completed: false },
            { description: 'Go to bank', completed: false },
            { description: 'Go to store', completed: false },
            ]
        }
    }
})
Vue.component('task', {
    template: '<li><slot></slot></li>'
});
new Vue({
    el: '#root'
})
index.html
<!DOCTYPE html>
<html lang="en">

<head>
	<meta charset="utf-8" />
	<title>计算属性
	</title>
	<script src="./vue.js"></script>
</head>

<body>
	<div id="root">
		<task-list>Go to work</task-list>
		<script src="./main.js"></script>
	</div>
</body>

</html>
结果:
练习1 Message
参考 https://learnku.com/docs/learn-vue2/9-component-exercises-message/2483
首先我们需要引入样式跟组件:
<!DOCTYPE html>

<html>
    <head>
        <link rel="stylesheet" href="https://cdnjs.cloudflare.com/ajax/libs/bulma/0.2.3/css/bulma.css">
        <style type="text/css">
            body{
                padding-top: 40px;
            }
        </style>
    </head>

    <body>
        <div id="root" class="container">
                <article class="message">
                    <div class="message-header">
                        <p>Hello World</p>
                        <button class="delete" aria-label="delete"></button>
                    </div>
                    <div class="message-body">
                        Lorem ipsum dolor sit amet, consectetur adipiscing elit. <strong>Pellentesque risus mi</strong>, tempus quis placerat ut, porta nec nulla. Vestibulum rhoncus ac ex sit amet fringilla. Nullam gravida purus diam, et dictum <a>felis venenatis</a> efficitur. Aenean ac <em>eleifend lacus</em>, in mollis lectus. Donec sodales, arcu et sollicitudin porttitor, tortor urna tempor ligula, id porttitor mi magna a neque. Donec dui urna, vehicula et sem eget, facilisis sodales sem.
                    </div>
                </article>
        </div>

        <script src="https://unpkg.com/vue@2.1.3/dist/vue.js"></script>

        <script src="main.js"></script>
    </body>
</html>
效果:

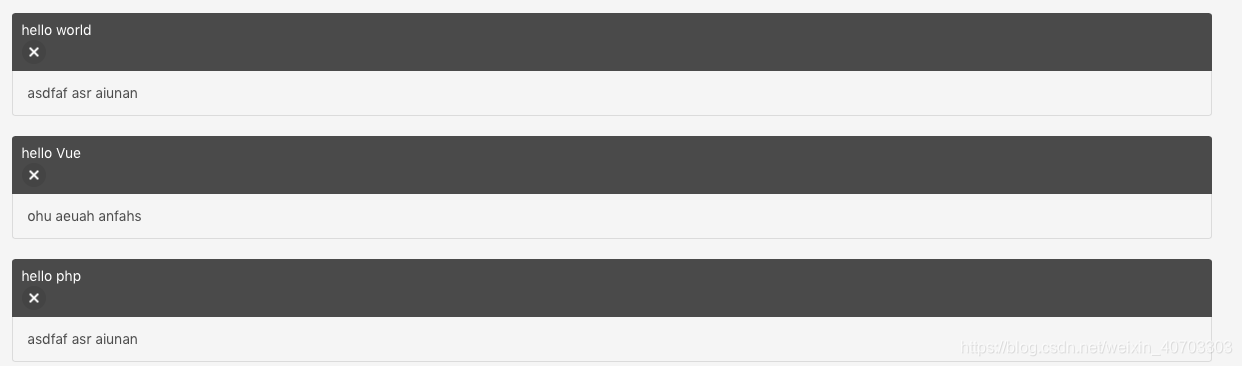
我们的组件包含三个部分,标题,内容和删除按钮,所以我们会有 title 跟 body 属性,以及删除操作。我们将通过是否显示组件可见来控制删除操作。
main.js
Vue.component('message', {
    props:['title','body'],
    data(){
        return {
            isVisiable:true
        }
    },
    template:`
    <article class="message" v-show="isVisiable">
        <div class="message-header">
            <p>{{title}}</p>
            <button class="delete" aria-label="delete" @click='isVisiable=false'></button>
        </div>
        <div class="message-body">
            {{body}}
        </div>
    </article>
    `
  })

new Vue({
    el: '#root'
})
index.html
<!DOCTYPE html>
<html lang="en">

<head>
	<meta charset="utf-8" />

	<link rel="stylesheet" href="https://cdnjs.cloudflare.com/ajax/libs/bulma/0.2.3/css/bulma.css">
	<style type="text/css">
		body {
			padding-top: 40px;
		}
	</style>
</head>

<body>
	<div id="root" class="container">
		<message title="hello world" body="asdfaf asr aiunan"></message>
		<message title="hello Vue" body="ohu aeuah anfahs"></message>
		<message title="hello php" body="asdfaf asr aiunan "></message>
	</div>
	<script src="./vue.js"></script>
	<script src="./main.js"></script>
</body>

</html>
结果
练习2 Tabs
index.html
<!DOCTYPE html>

<html>
    <head>
        <link rel="stylesheet" href="https://cdnjs.cloudflare.com/ajax/libs/bulma/0.2.3/css/bulma.css">
        <style type="text/css">
            body{
                padding-top: 40px;
            }
        </style>
    </head>

    <body>
        <div id="root" class="container">
            <tabs>
                <tab name="About us">
                    <h1>Here is the content about our tabs</h1>
                </tab>

                <tab name="About our culture">
                    <h1>Here is the content about our culture</h1>
                </tab>

                <tab name="About our vision">
                    <h1>Here is the content about our vision</h1>
                </tab>
            </tabs>
        </div>

        <script src="https://unpkg.com/vue@2.1.3/dist/vue.js"></script>

        <script src="main.js"></script>
    </body>
</html>所以我们将会有两个组件:tabs 和 tab,tabs 中包含多个 tab。首先我们来注册 tabs 和 tab 组件:
main.js
Vue.component('tabs',{
template:`
<div>
<div class="tabs">
<ul>
<li v-for="tab in tabs">
<a href="#">{{ tab.name }}</a>
</li>
</ul>
</div>
<div class="tabs-details">
<slot></slot>
</div>
<div>
`,
data(){
return { tabs:[] };
},
created() {
this.tabs = this.$children;
},
});
Vue.component('tab',{
template:`
<div><slot></div></div>
`,
props:{
name:{ required:true },
}
});
new Vue({
el:'#root'
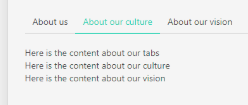
});页面效果
设置选中状态:
main.js
Vue.component('tabs',{
    template:`
    <div>
        <div class="tabs">
            <ul>
                <li v-for="tab in tabs" :class="{'is-active':tab.selected}">
                    <a href="#">{{ tab.name }}</a>
                </li>
            </ul>
        </div>
        .
        .
    <div>
    `,
    .
    .
});

Vue.component('tab',{
    template:`
        <div><slot></div></div>
    `,

    props:{
        name:{ required:true },
        selected:{ default:false }
    }
});

new Vue({
    el:'#root'
});
我们默认 tab 组件的 selected 属性为 false,那么:class="{'is-active':tab.selected}" 则表示我们默认 is-active 类不存在。接下来我们给第一个 tab 组件绑定 selected 属性为 true,显示为选中状态:
index.html
.
.
<div id="root" class="container">
        <tabs>
            <tab name="About us" :selected="true">
                <h1>Here is the content about our tabs</h1>
            </tab>

            <tab name="About our culture">
                <h1>Here is the content about our culture</h1>
            </tab>

            <tab name="About our vision">
                <h1>Here is the content about our vision</h1>
            </tab>
        </tabs>
    </div>
    .
    .
页面效果

我们点击标签,触发 selectTab 方法,改变其他组件的 selected 的属性值。但是这样在 Vue 中是行不通的:
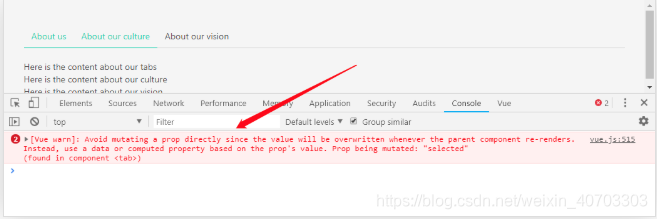
组件内不能修改 props 的值,同时修改的值也不会同步到组件外层,即调用组件方不知道组件内部当前的状态是什么。
所有的 prop 都使得其父子 prop 之间形成了一个 单向下行绑定:父级 prop 的更新会向下流动到子组件中,但是反过来则不行。这样会防止从子组件意外改变父级组件的状态,从而导致你的应用的数据流向难以理解。
额外的,每次父级组件发生更新时,子组件中所有的 prop 都将会刷新为最新的值。这意味着你不应该在一个子组件内部改变 prop。如果你这样做了,Vue 会在浏览器的控制台中发出警告。
然而我们现在的确想做到父子组件间的双向通信,我们可以这么做:
main.js
Vue.component('tabs',{
    template:`
    <div>
        <div class="tabs">
            <ul>
                <li v-for="tab in tabs" :class="{'is-active':tab.isActive}">
                    <a href="#" @click="selectTab(tab)">{{ tab.name }}</a>
                </li>
            </ul>
        </div>

        <div class="tabs-details">
            <slot></slot>
        </div>
    <div>
    `,

    data(){
        return { tabs:[] };
    },

    created() {
        this.tabs = this.$children;
    },

    methods:{
        selectTab(selectedTab){
            this.tabs.forEach(tab => {
                tab.isActive = (tab.name == selectedTab.name);
            });
        }
    }
});

Vue.component('tab',{
    template:`
        <div><slot></div></div>
    `,

    props:{
        name:{ required:true },
        selected:{ default:false }
    },

    data() {
        return {
            isActive:false
        }
    },

    mounted() {
        this.isActive = this.selected;
    },
});

new Vue({
    el:'#root'
});
我们将样式关联到 isActive 数据属性中,然后进行动态切换
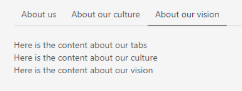
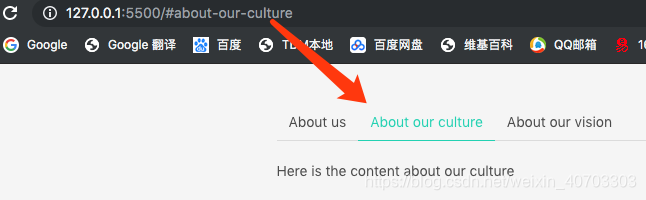
接下来我们进行最后的步骤:切换标签时动态显示不同的内容,并且更新链接。对于第一个问题,我们只需设置内容显示与否由组件的 isActive 是否为 true 即可;对于第二个问题,标签的链接属于不会变化的内容,计算属性 可以帮我们做到:
main.js
Vue.component('tabs', {
    template:`
    <div>
        <div class="tabs">
            <ul>
                <li v-for="tab in tabs" :class="{'is-active':tab.isActive}">
                    <a :href="tab.href" @click="selectTab(tab)">{{tab.name}} </a>
                </li>
            </ul>
        </div>
        <div class="tabs-details">
            <slot></slot>
        </div>
    </div>
    `,
    data(){
        return {tabs:[]}
    },
    created(){
        this.tabs = this.$children;
    },
    methods:{
        selectTab(selectedTab){
            this.tabs.forEach(tab => {
                // tab.selected=(tab.name == selectedTab.name);
                tab.isActive = (tab.name == selectedTab.name);
            });
        }
    }
  });
  Vue.component('tab',{
      template:`
        <div v-show="isActive"><slot></slot></div>
      `,
      props:{
          name:{required:true},
          selected:{default:false}
      },
      data(){
          return {
              isActive:false
          }
      },
      computed:{
        href(){
            return '#' + this.name.toLowerCase().replace(/ /g,'-');
        }
      },
      mounted(){
          this.isActive = this.selected;
      }
  });

new Vue({
    el: '#root',
})
最终效果:
3、组件通信
3.1 父组件向子组件传值和传方法
(1)Prop
prop 是父组件用来传递数据的一个自定义属性。
父组件的数据需要通过 props 把数据传给子组件,子组件需要显式地用 props 选项声明 "prop":
<div id="app">
    <child message="hello!"></child>
</div>

<script>
// 注册
Vue.component('child', {
  // 声明 props
  props: ['message'],
  // 同样也可以在 vm 实例中像 "this.message" 这样使用
  template: '<span>{{ message }}</span>'
})
// 创建根实例
new Vue({
  el: '#app'
})
</script>
(2)动态 Prop
类似于用 v-bind 绑定 HTML 特性到一个表达式,也可以用 v-bind 动态绑定 props 的值到父组件的数据中。每当父组件的数据变化时,该变化也会传导给子组件:
父组件的数据是parentMsg,子组件child想要获取父组件的值需要用v-bind 绑定该值,在组件内部用prop获取
<div id="app">
    <div>
      <input v-model="parentMsg">
      <br>
      <child v-bind:message="parentMsg"></child>
    </div>
</div>

<script>
// 注册
Vue.component('child', {
  // 声明 props
  props: ['message'],
  // 同样也可以在 vm 实例中像 "this.message" 这样使用
  template: '<span>{{ message }}</span>'
})
// 创建根实例
new Vue({
  el: '#app',
  data: {
    parentMsg: '父组件内容'
  }
})
</script>
注意: prop 是单向绑定的:当父组件的属性变化时,将传导给子组件,但是不会反过来。
3.2 子组件向父组件传值
父组件是使用 props 传递数据给子组件,但如果子组件要把数据传递回去,就需要使用自定义事件!
我们可以使用 v-on 绑定自定义事件, 每个 Vue 实例都实现了事件接口(Events interface),即:
- 使用
$on(eventName)监听事件 - 使用
$emit(eventName)触发事件
另外,父组件可以在使用子组件的地方直接用 v-on 来监听子组件触发的事件( 用$emit进行触发)
以下实例中子组件已经和它外部完全解耦了。它所做的只是触发一个父组件关心的内部事件。
例1
<div id="app">
    <div id="counter-event-example">
      <p>{{ total }}</p>
      <button-counter v-on:increment="incrementTotal"></button-counter>
      <button-counter v-on:increment="incrementTotal"></button-counter>
    </div>
</div>

<script>
Vue.component('button-counter', {
  template: '<button v-on:click="incrementHandler">{{ counter }}</button>',
  data: function () {
    return {
      counter: 0
    }
  },
  methods: {
    incrementHandler: function () {
      this.counter += 1
      this.$emit('increment')
    }
  },
})
new Vue({
  el: '#counter-event-example',
  data: {
    total: 0
  },
  methods: {
    incrementTotal: function () {
      this.total += 1
    }
  }
})
</script>
结果

例2
<!DOCTYPE html>
<html>
<head>
	<link rel="stylesheet" href="https://cdnjs.cloudflare.com/ajax/libs/bulma/0.2.3/css/bulma.css">
	<style type="text/css">
		body {
			padding-top: 40px;
		}
	</style>
	<script src = "./vue.js" ></script>
</head>
<body>
	<div id="app">
		<div>
			<child @fuc="show"></child>
		</div>
	</div>

	<script>
		// 注册
		Vue.component('child', {
			template: "<input type='button' value='这是子组件的按钮' @click='myClick'>",
			methods:{
				myClick(){
					this.$emit('fuc')
				}
			}
		})
		// 创建根实例
		new Vue({
			el: '#app',
			data: {

			},
			methods: {
				show() {
					alert("这是父组件的方法")
				}
			}
		})
	</script>
</body>

</html>
结果:
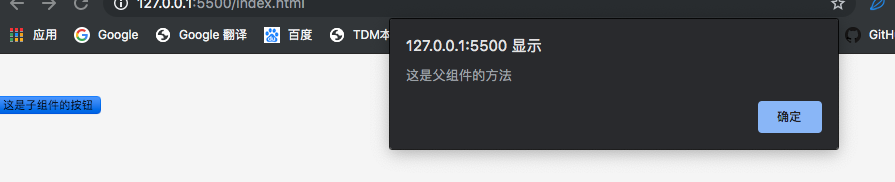
如果要传参的话可以这样改:

例3
main.js
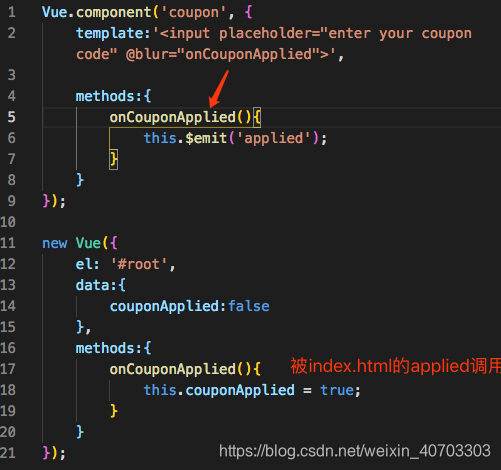
Vue.component('coupon', {
    template:'<input placeholder="enter your coupon code" @blur="onCouponApplied">',

    methods:{
        onCouponApplied(){
            this.$emit('applied');
        }
    }
});

new Vue({
    el: '#root',
    data:{
        couponApplied:false
    },
    methods:{
        onCouponApplied(){
            this.couponApplied = true;
        }
    }
});
index.html
<!DOCTYPE html>
<html lang="en">
<head>
<meta charset="utf-8" />
<link rel="stylesheet" href="https://cdnjs.cloudflare.com/ajax/libs/bulma/0.2.3/css/bulma.css">
<style type="text/css">
body {
padding-top: 40px;
}
</style>
</head>
<body>
<div id="root" class="container">
<coupon @applied="onCouponApplied"></coupon>
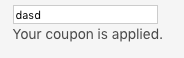
<h1 v-if="couponApplied">Your coupon is applied.</h1>
</div>
<script src="./vue.js"></script>
<script src="./main.js"></script>
</body>
</html>this.$emit('applied') 会触发在当前实例上的 applied(在index.html中,@applied="onCouponApplied")事件,而父组件监听到 applied 事件被触发,会运行父组件上的 onCouponApplied() 方法,从而更改 couponApplied 属性值为 true。
结果:
3.3 子组件间通信
当有多个子组件,并且其中一个子组件想要通知其他子组件时。
main.js
window.Event = new Vue();
Vue.component('coupon', {
    template:'<input placeholder="enter your coupon code" @blur="onCouponApplied">',

    methods:{
        onCouponApplied(){
            Event.$emit('applied');
        }
    }
});

new Vue({
    el: '#root',
    data:{
        couponApplied:false
    },
   created(){
       Event.$on('applied',() => alert('Handing it!'));
   }
});请注意,我们实例化了一个共用的 Vue 实例,然后我们可以借助这个共用的实例,在任一组件上进行触发和监听事件。这样一来,组件间就可以互相通信。
index.html
<!DOCTYPE html>
<html lang="en">

<head>
	<meta charset="utf-8" />

	<link rel="stylesheet" href="https://cdnjs.cloudflare.com/ajax/libs/bulma/0.2.3/css/bulma.css">
	<style type="text/css">
		body {
			padding-top: 40px;
		}
	</style>
</head>

<body>
	<div id="root" class="container">
		<coupon></coupon>
		<h1 v-if="couponApplied">Your coupon is applied.</h1>
	</div>

	<script src="./vue.js"></script>
	<script src="./main.js"></script>
</body>
</html>
结果

4 过滤器
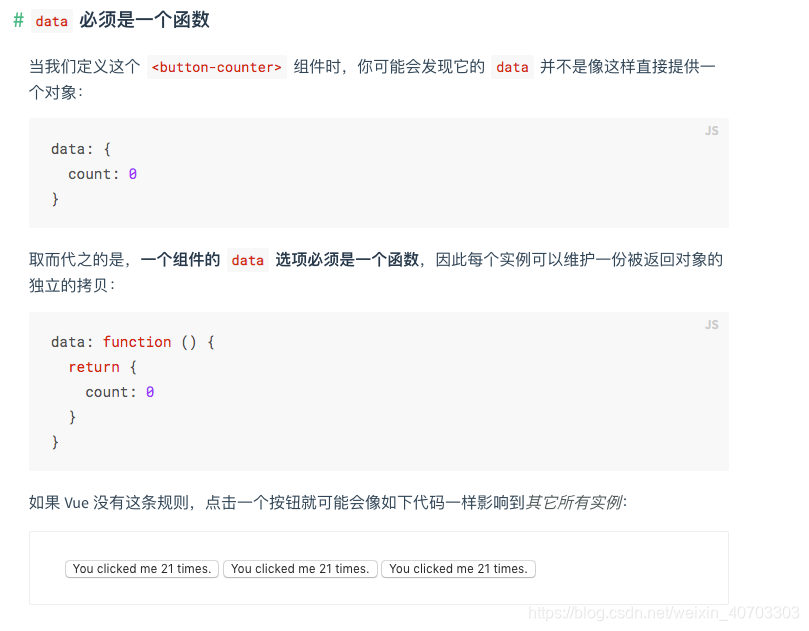
4.1 全局过滤器
格式是要插值表达式里的参数后加一个管道符 ' | 过滤器名称 '
<!DOCTYPE html>
<html>

<head>
    <link rel="stylesheet" href="https://cdnjs.cloudflare.com/ajax/libs/bulma/0.2.3/css/bulma.css">
    <style type="text/css">
        body {
            padding-top: 40px;
        }
    </style>
    <script src="./vue.js"></script>
</head>

<body>
    <div id="root">
        <p>{{msg | msgFormat('疯狂')}}</p>
    </div>
    <script>
        //定义一个全局过滤器,叫做msgFormat
        Vue.filter('msgFormat',function(msg,arg){
            return msg.replace(/单纯/g,arg)
        })
        new Vue({
            el: '#root',
            data: {
                msg: '单纯的少年,单纯的天'
            }
        });
    </script>
</body></html>
结果
![]()
也可以加多个过滤器
<!DOCTYPE html>
<html>

<head>
    <link rel="stylesheet" href="https://cdnjs.cloudflare.com/ajax/libs/bulma/0.2.3/css/bulma.css">
    <style type="text/css">
        body {
            padding-top: 40px;
        }
    </style>
    <script src="./vue.js"></script>
</head>

<body>
    <div id="root">
        <p>{{msg | msgFormat('疯狂')|test}}</p>
    </div>
    <script>
        //定义一个全局过滤器,叫做msgFormat
        Vue.filter('msgFormat',function(msg,arg){
            return msg.replace(/单纯/g,arg)
        }),
        Vue.filter('test',function(msg){
            return msg + '==='
        })
        new Vue({
            el: '#root',
            data: {
                msg: '单纯的少年,单纯的天'
            }
        });
    </script>
</body></html>
p标签里的插值表达是是管道的写法,msg传给第一个管道,处理完后再传给第二个管道处理
4.2 私有过滤器
https://www.cnblogs.com/mrszhou/p/7858994.html


 2010
2010

 被折叠的 条评论
为什么被折叠?
被折叠的 条评论
为什么被折叠?
 到【灌水乐园】发言


