


 本文介绍如何在SpringSecurity实战项目中动态管理Restful风格的权限,通过JWT实现身份认证和授权。涉及JWTAuthenticationFilter、JWTAuthorizationFilter的配置,以及数据库表的修改,权限判断的增强等。
文章目录
- 源码地址:
- 一、分析
- 二、 修改
-
- 1. 修改permission表
- 2. 实现 GrantedAuthority 接口
- 3.修改 MyAccessDecisionManager 的decide 方法
- 4. 修改MyInvocationSecurityMetadataSourceService 的getAttributes 方法
- 5.添加JwtUser和LoginUser
- 6.添加身份认证过滤器:JWTAuthenticationFilter
- 7.添加鉴权过滤器:JJWTAuthorizationFilter
- 8.添加JwtTokenUtils
- 9.配置SpringSecurity,关闭csrf,添加两个过滤器
- 10. 修改HomeController
- 三、准备数据
- 四、测试
- 参考资料:
上一篇博客 SpringSecurity 实战项目(二)只是实现了用户、角色、权限的动态管理,但是其权限管理是有缺陷的,他不支持restful风格的接口权限管理,因为他无法区分客户端的请求方式。
本片博客是为了弥补此缺陷的,本篇博客将在 SpringSecurity 实战项目(二)的基础上进行修改使其支持restful 风格的接口的权限管理。
源码地址:
源码地址:https://gitee.com/zenghua3300/SpringSecurity
喜欢的小伙伴麻烦帮点一个star
如果是刚接触security的小伙伴,可以先看下这两篇基础博客
security认证过程:
security授权过程:
JWT全面解读、详细使用步骤:
重要
本文设计和代码是基于 以下博客(请点击)
进行修改。
一、分析
-
首先分析一下工作量吧,因为要支持
restful风格的接口,那么我们在判断用户是不是有权限访问的时候不仅要判断url还要判断请求方式。 所以我门需要修改数据库表,因为我门的权限表还没有method字段。 -
由于要判断
url和method所以要在CustomUserService类的loadUserByUsername方法中要添加 权限的url和method。但是SimpleGrantedAuthority只支持传入一个参数。 所以我门考虑要再写一个类 实现GrantedAuthority接口,并在构造函数中传入两个参数。嘻嘻。 -
由于我们不仅要判断
url还要 判断请求方法,所以当然要修改MyAccessDecisionManager的decide方法的内容了。
因为:
decide方法是判定是否拥有权限的决策方法 ,三个参数的含义分别为:
//authentication是释CustomUserService中循环添加到GrantedAuthority对象中的权限信息集合,相当于是自己定义的匹配规则,项目中把权限规则存在数据库Sys_permission表中
//object包含客户端发起的请求的requset信息,可转换为HttpServletRequest request = ((FilterInvocation) object).getHttpRequest();
//configAttributes为MyInvocationSecurityMetadataSource的getAttributes(Object object)这个方法返回的结果,此方法是为了判定用户请求的url是否在权限表中,如果在权限表中,则返回给decide方法,用来判定用户是否有此权限。如果不在权限表中则放行。这个项目中直接全部都拦截,全部都交给decide方法
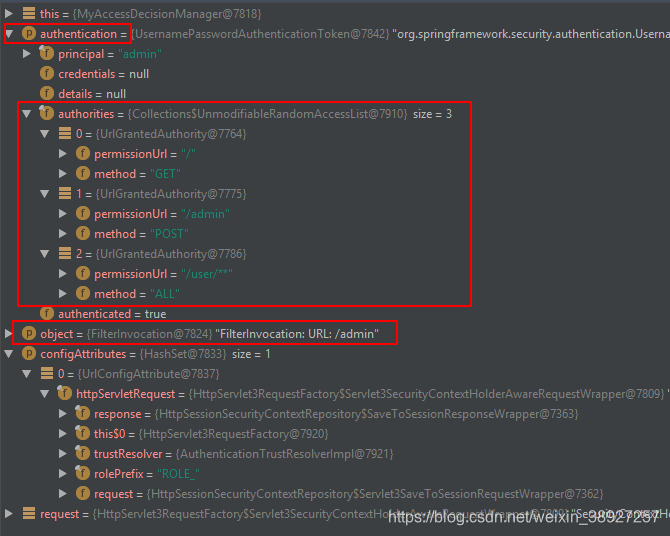
我们发现
object为当前请求的url:/persons, 那么getAttributes方法就是使用当前的访问资源路径去匹配我们自己定义的匹配规则。
- 当然在 修改一下
MyInvocationSecurityMetadataSourceService的getAttributes
方法。//此方法是为了判定用户请求的url是否在权限表中,如果在权限表中,则返回给decide
方法,用来判定用户是否有此权限。如果不在权限表中则放行。
因为我不想每一次来了请求,都先要匹配一下权限表中的信息是不是包含此url,
我准备直接拦截,不管请求的url 是什么都直接拦截,
然后在MyAccessDecisionManager的decide 方法中做 拦截还是放行的决策。
配置拦截器
可以说到目前为止这是最复杂的一个步骤,其实搞清楚了还是挺简单的,网上挺多人都更倾向于使用shiro,但是偶尔也要尝试一下新东西的嘛,但是当时我在摸索的时候遇到挺多坑,当时也已经到了思考人生的地步了 框架不是为了简化开发吗!为什么!明明jwt加上权限框架是双倍的快乐!
回到正题,到底要怎么配置呢?使用过shiro的人会知道,鉴权的话需要自己实现一个realm,重写两个方法,第一是用户验证,第二是鉴权。在spring-security中也不例外,这边需要实现两个过滤器。使用JWTAuthenticationFilter去进行用户账号的验证,使用JWTAuthorizationFilter去进行用户权限的验证。
JWTAuthenticationFilter
JWTAuthenticationFilter继承于UsernamePasswordAuthenticationFilter
该拦截器用于获取用户登录的信息,只需创建一个token并调用authenticationManager.authenticate()让spring-security去进行验证就可以了,不用自己查数据库再对比密码了,这一步交给spring去操作。
这个操作有点像是shiro的subject.login(new UsernamePasswordToken()),验证的事情交给框架。
下边会献上这一部分的代码。
JWTAuthorizationFilter
验证成功当然就是进行鉴权了,每一次需要权限的请求都需要检查该用户是否有该权限去操作该资源,当然这也是框架帮我们做的,那么我们需要做什么呢?很简单,只要告诉spring-security该用户是否已登录,是什么角色,拥有什么权限就可以了。
JWTAuthenticationFilter继承于BasicAuthenticationFilter,至于为什么要继承这个我也不太清楚了,这个我也是网上看到的其中一种实现,实在springSecurity苦手,不过我觉得不继承这个也没事呢(实现以下filter接口或者继承其他filter实现子类也可以吧)只要确保过滤器的顺序,JWTAuthorizationFilter在JWTAuthenticationFilter后面就没问题了。
配置SpringSecurity
到这里基本操作都写好啦,现在就需要我们将这些辛苦写好的“组件”组合到一起发挥作用了,那就需要配置了。需要开启一下注解@EnableWebSecurity然后再继承一下WebSecurityConfigurerAdapter就可以啦,springboot就是可以为所欲为~
- 关闭
csrf - 添加
restful风格的接口 - 接着就可以拿着Token去访问资源,实现
单点登录
好了分析完了,接下来就是编码了。
JWT工具类
<dependency>
    <groupId>io.jsonwebtoken</groupId>
    <artifactId>jjwt</artifactId>
    <version>0.9.0</version>
</dependency>
二、 修改
1. 修改permission表
添加method字段,当然Permission的java bean中 也要添加此属性和其get set方法。
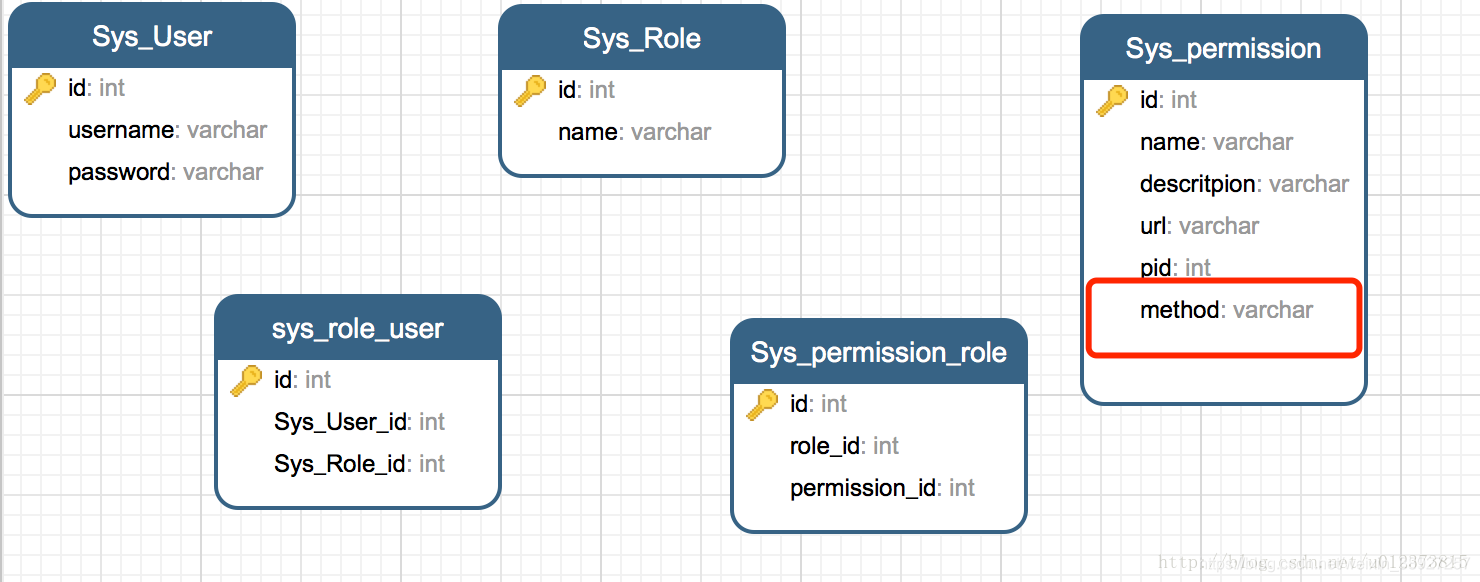
  //请求方法
    private String method;
      public String getMethod() {

        return method;
    }

    public void setMethod(String method) {

        this.method = method;
    }
2. 实现 GrantedAuthority 接口
新建java类MyGrantedAuthority实现 GrantedAuthority接口
package com.us.example.service;

import org.springframework.security.core.GrantedAuthority;

/**
 * Created by yangyibo on 17/2/15.
 */
public class MyGrantedAuthority implements GrantedAuthority {


    private String url;
    private String method;

    public String getPermissionUrl() {

        return url;
    }

    public void setPermissionUrl(String permissionUrl) {

        this.url = permissionUrl;
    }

    public String getMethod() {

        return method;
    }

    public void setMethod(String method) {

        this.method = method;
    }

    public MyGrantedAuthority(String url, String method) {

        this.url = url;
        this.method = method;
    }

    @Override
    public String getAuthority() {

        return this.url + ";" + this.method;
    }
}
在CustomUserService类中使用MyGrantedAuthority
public UserDetails loadUserByUsername(String username) {

        SysUser user = userDao.findByUserName(username);
        if (user != null) {

            List<Permission> permissions = permissionDao.findByAdminUserId(user.getId());
            List<GrantedAuthority> grantedAuthorities = new ArrayList<>();
            for (Permission permission : permissions) {

                if (permission != null && permission.getName() != null) {


                    GrantedAuthority grantedAuthority = new MyGrantedAuthority(permission.getUrl(), permission.getMethod());
                    grantedAuthorities.add(grantedAuthority);
                }
            }
            //返回JwtUser类型的对象
            return new JwtUser(user.getUsername(), user.getPassword(), grantedAuthorities);

        } else {

            throw new UsernameNotFoundException("admin: " + username + " do not exist!");
        }
    }
3.修改 MyAccessDecisionManager 的decide 方法
package com.us.example.service;

import com.us.example.security.UrlGrantedAuthority;
import org.apache.log4j.Logger;
import org.springframework.security.access.AccessDecisionManager;
import org.springframework.security.access.AccessDeniedException;
import org.springframework.security.access.ConfigAttribute;
import org.springframework.security.authentication.InsufficientAuthenticationException;
import org.springframework.security.core.Authentication;
import org.springframework.security.core.GrantedAuthority;
import org.springframework.security.web.FilterInvocation;
import org.springframework.security.web.util.matcher.AntPathRequestMatcher;
import org.springframework.stereotype.Service;

import javax.servlet.http.HttpServletRequest;
import java.util.Collection;

/**
 */
@Service
public class MyAccessDecisionManager implements AccessDecisionManager {

    static Logger logger = Logger.getLogger(MyAccessDecisionManager.
最低0.47元/天 解锁文章


 被折叠的 条评论
为什么被折叠?
被折叠的 条评论
为什么被折叠?
 到【灌水乐园】发言


