


Springboot3学习——接入MyBatis(二)
前言
上文我们使用官方模版,成功运行了Springboot项目。详见Springoot3学习——搭建SpringBoot(一)
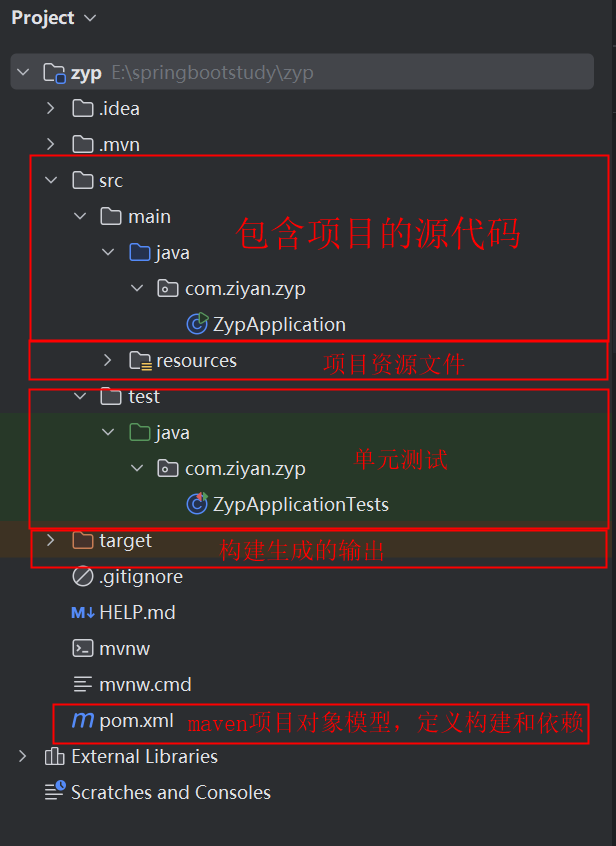
目录结构
如下图所示
整合MyBatis
1、在项目对象模型pom.xml中插入mybatis的配置
		<dependency>
			<groupId>org.mybatis.spring.boot</groupId>
			<artifactId>mybatis-spring-boot-starter</artifactId>
			<version>3.0.3</version>
		</dependency>
		<dependency>
			<groupId>mysql</groupId>
			<artifactId>mysql-connector-java</artifactId>
			<version>8.0.33</version>
		</dependency>
2、添加数据库连接相关配置,application.properties
spring.datasource.url=jdbc:mysql://localhost:3306/sugar
spring.datasource.username=root
spring.datasource.password=lyh2016
spring.datasource.driver-class-name=com.mysql.jdbc.Driver
3、创建数据库sugar以及user表
SET NAMES utf8mb4;
SET FOREIGN_KEY_CHECKS = 0;

-- ----------------------------
-- Table structure for user
-- ----------------------------
DROP TABLE IF EXISTS `user`;
CREATE TABLE `user`  (
  `userid` varchar(50) CHARACTER SET utf8 COLLATE utf8_general_ci NOT NULL COMMENT '用户编号',
  `username` varchar(50) CHARACTER SET utf8 COLLATE utf8_general_ci NOT NULL COMMENT '用户名称',
  `dept` varchar(50) CHARACTER SET utf8 COLLATE utf8_general_ci NULL DEFAULT NULL COMMENT '所属部门',
  `status` varchar(30) CHARACTER SET utf8 COLLATE utf8_general_ci NOT NULL COMMENT '用户状态 ',
  `password` varchar(50) CHARACTER SET utf8 COLLATE utf8_general_ci NOT NULL COMMENT '密码',
  `gender` varchar(30) CHARACTER SET utf8 COLLATE utf8_general_ci NULL DEFAULT NULL COMMENT '性别',
  `createuid` varchar(50) CHARACTER SET utf8 COLLATE utf8_general_ci NULL DEFAULT NULL COMMENT '创建用户',
  `transdatetime` datetime NULL DEFAULT NULL COMMENT '创建时间',
  PRIMARY KEY (`userid`) USING BTREE,
  INDEX `userid`(`userid`) USING BTREE
) ENGINE = InnoDB CHARACTER SET = gbk COLLATE = gbk_chinese_ci ROW_FORMAT = DYNAMIC;

-- ----------------------------
-- Records of user
-- ----------------------------
INSERT INTO `user` VALUES ('SV001', 'admin', 'IT', '1', '123', '男', 'admin', '2024-10-16 13:34:00');
创建三层以及对应demo代码
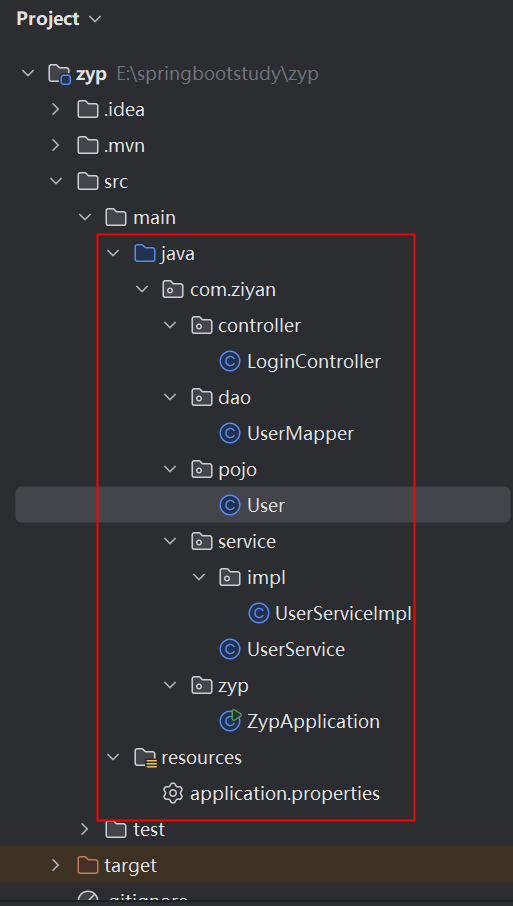
创建包,分别是controller/service/impl/dao/pojo, 创建后目录如下
controller:存放控制器类,这些类处理HTTP请求,并与服务层进行交互。service:存放服务接口,定义业务逻辑,由服务实现类实现。impl:存放服务接口的实现类,是服务层的具体实现。dao:数据访问层,存放与数据库交互的接口,通常与数据库中的表对应。pojo:Plain Old Java Object的缩写,存放简单的Java对象,这些对象通常用于封装数据具体代码如下
添加User
package com.ziyan.pojo;

public class User {
    private String userid;
    private String username;
    private String dept;
    private String status;
    private String password;
    private String gender;
    private String createruid;
    private String transdatetime;

    public String getUserid() {
        return userid;
    }

    public void setUserid(String userid) {
        this.userid = userid;
    }

    public String getUsername() {
        return username;
    }

    public void setUsername(String username) {
        this.username = username;
    }

    public String getDept() {
        return dept;
    }

    public void setDept(String dept) {
        this.dept = dept;
    }

    public String getStatus() {
        return status;
    }

    public void setStatus(String status) {
        this.status = status;
    }

    public String getPassword() {
        return password;
    }

    public void setPassword(String password) {
        this.password = password;
    }

    public String getGender() {
        return gender;
    }

    public void setGender(String gender) {
        this.gender = gender;
    }

    public String getCreateruid() {
        return createruid;
    }

    public void setCreateruid(String createruid) {
        this.createruid = createruid;
    }

    public String getTransdatetime() {
        return transdatetime;
    }

    public void setTransdatetime(String transdatetime) {
        this.transdatetime = transdatetime;
    }
}
添加userMapper (os:为什么叫userMapper,而不叫UserDao啊,原来主要是因为MyBatis的官方习惯和约定俗成的命名规则,其实一样)
package com.ziyan.dao;

import com.ziyan.pojo.User;
import org.apache.ibatis.annotations.Mapper;
import org.apache.ibatis.annotations.Select;

@Mapper
public interface UserMapper {
    @Select("SELECT userid,username,dept,gender FROM USER WHERE userid=#{userid}")
    User getUser(String userid);
}
添加UserService
package com.ziyan.service;

import com.ziyan.pojo.User;

public interface UserService {
    User getUser(String userid);
}
添加UserServiceImpl
package com.ziyan.service.impl;

import com.ziyan.dao.UserMapper;
import com.ziyan.pojo.User;
import com.ziyan.service.UserService;
import org.springframework.beans.factory.annotation.Autowired;
import org.springframework.stereotype.Service;

@Service
public class UserServiceImpl implements UserService {
    @Autowired
    UserMapper userMapper;

    @Override
    public User getUser(String userid) {
        return userMapper.getUser(userid);
    }
}
添加LoginController
package com.ziyan.controller;

import com.ziyan.pojo.User;
import com.ziyan.service.UserService;
import org.springframework.beans.factory.annotation.Autowired;
import org.springframework.web.bind.annotation.GetMapping;
import org.springframework.web.bind.annotation.RestController;

@RestController
public class LoginController {
    @Autowired
    UserService userService;
    @GetMapping("/show")
    public User getUser(String userid){
        return userService.getUser(userid);
    }
}
(ps:这边需要引入注解@RestController,需要的依赖spring-boot-starter-web)
<dependency>
	<groupId>org.springframework.boot</groupId>
	<artifactId>spring-boot-starter-web</artifactId>
</dependency>
修改ZypApplication,添加@ComponentScan,@MapperScan注解,并指定目录
@ComponentScan(basePackages = {"com.ziyan.controller","com.ziyan.service"})
@MapperScan(basePackages = {"com.ziyan.dao"})
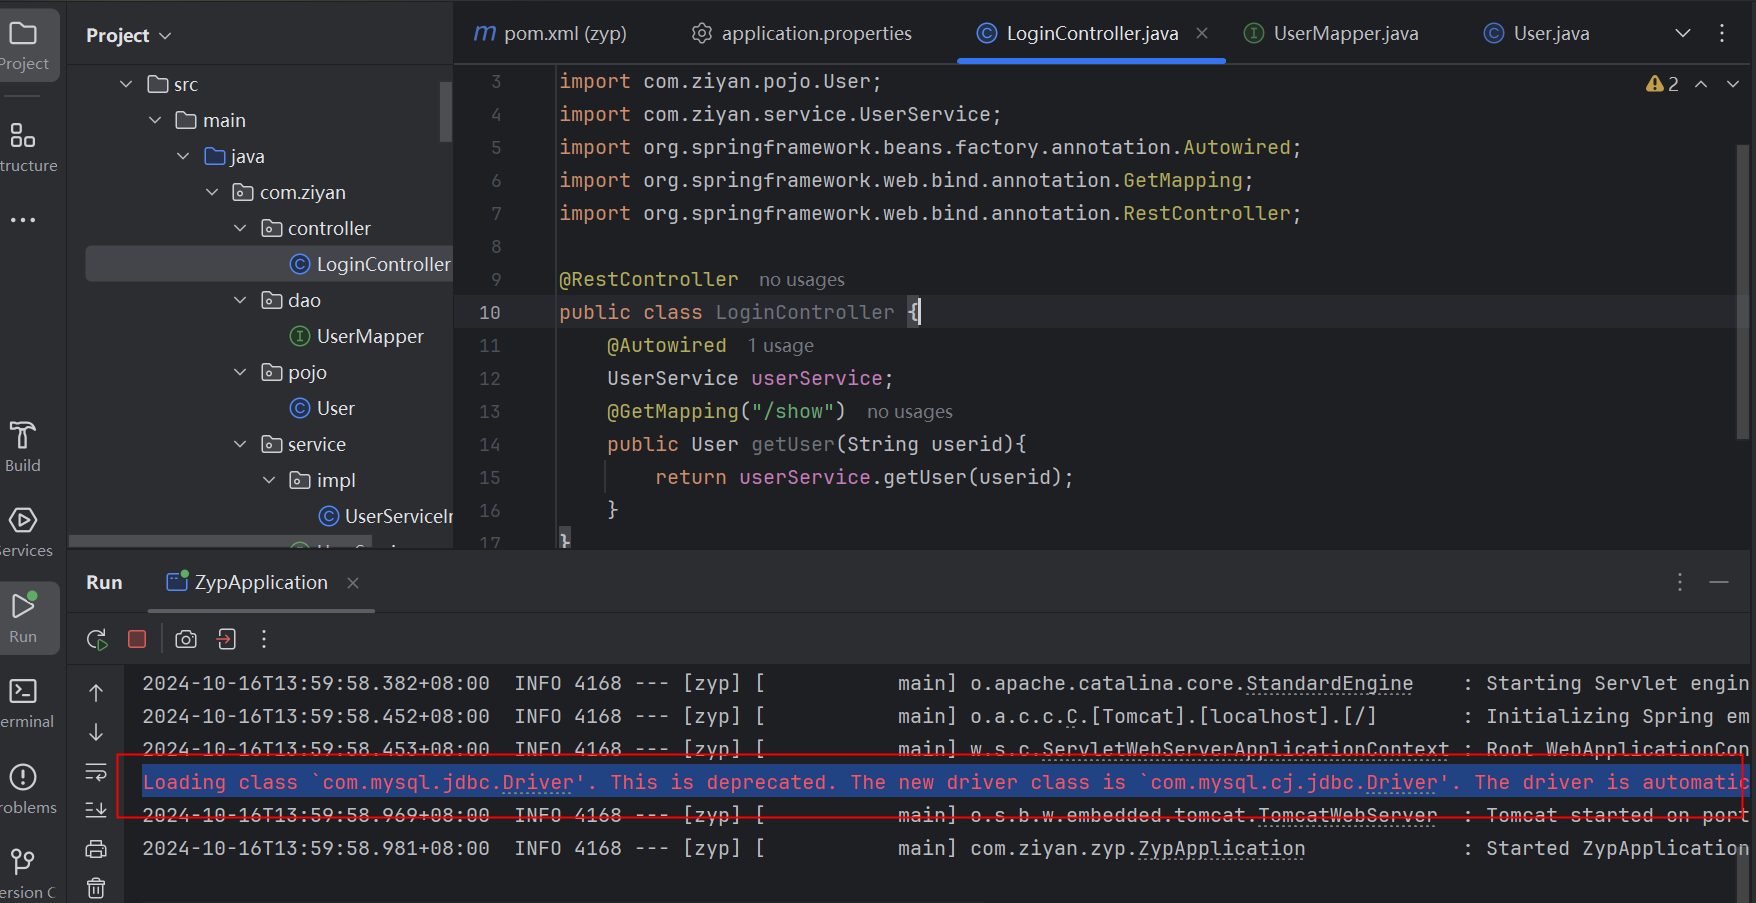
运行成功
如下图:
若出现提示:Loading class
com.mysql.jdbc.Driver'. This is deprecated. The new driver class iscom.mysql.cj.jdbc.Driver’. The driver is automatically registered via the SPI and manual loading of the driver class is generally unnecessary.报错
ps:这个报错信息表明你正在尝试加载一个已经不再被推荐使用的MySQL JDBC驱动类
com.mysql.jdbc.Driver。从MySQL Connector/J 5.1版本开始,推荐使用com.mysql.cj.jdbc.Driver这个新的驱动类。我们的MySql是8.0的,修改配置文件。spring.datasource.driver-class-name=com.mysql.cj.jdbc.Driver


 被折叠的 条评论
为什么被折叠?
被折叠的 条评论
为什么被折叠?
 到【灌水乐园】发言


