


一、简介
阴影贴图(Shadow mapping)是在三维计算机图形中加入阴影的过程。也叫做光照贴图(Light Mapping)—这是一种可以在不减少帧率的情况下达到真实感光照和阴影效果的方法。
二、阴影贴图及PCF
渲染万向阴影:
glViewport(0, 0, SCR_WIDTH, SCR_HEIGHT);
glClear(GL_COLOR_BUFFER_BIT | GL_DEPTH_BUFFER_BIT);
shader.Use();
// … send uniforms to shader (including light’s far_plane value)
glActiveTexture(GL_TEXTURE0);
glBindTexture(GL_TEXTURE_CUBE_MAP, depthCubemap);
// … bind other textures
RenderScene();
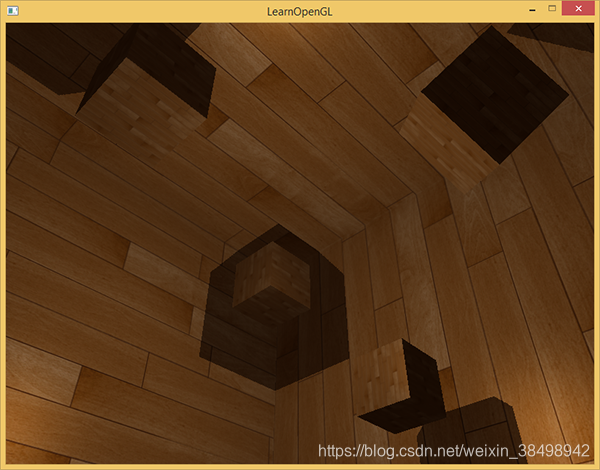
这里的renderScene函数在一个大立方体房间中渲染一些立方体,它们散落在大立方体各处,光源在场景中央。
顶点着色器和像素着色器和原来的阴影映射着色器大部分都一样:不同之处是在光空间中像素着色器不再需要一个fragment位置,现在我们可以使用一个方向向量采样深度值。
因为这个顶点着色器不再需要将他的位置向量变换到光空间,所以我们可以去掉FragPosLightSpace变量:
#version 330 core
layout (location = 0) in vec3 position;
layout (location = 1) in vec3 normal;
layout (location = 2) in vec2 texCoords;
out vec2 TexCoords;
out VS_OUT {
vec3 FragPos;
vec3 Normal;
vec2 TexCoords;
} vs_out;
uniform mat4 projection;
uniform mat4 view;
uniform mat4 model;
void main()
{
gl_Position = projection * view * model * vec4(position, 1.0f);
vs_out.FragPos = vec3(model * vec4(position, 1.0));
vs_out.Normal = transpose(inverse(mat3(model))) * normal;
vs_out.TexCoords = texCoords;
}
片段着色器的Blinn-Phong光照代码和我们之前阴影相乘的结尾部分一样:
#version 330 core
out vec4 FragColor;
in VS_OUT {
vec3 FragPos;
vec3 Normal;
vec2 TexCoords;
} fs_in;
uniform sampler2D diffuseTexture;
uniform samplerCube depthMap;
uniform vec3 lightPos;
uniform vec3 viewPos;
uniform float far_plane;
float ShadowCalculation(vec3 fragPos)
{
[…]
}
void main()
{
vec3 color = texture(diffuseTexture, fs_in.TexCoords).rgb;
vec3 normal = normalize(fs_in.Normal);
vec3 lightColor = vec3(0.3);
// Ambient
vec3 ambient = 0.3 * color;
// Diffuse
vec3 lightDir = normalize(lightPos - fs_in.FragPos);
float diff = max(dot(lightDir, normal), 0.0);
vec3 diffuse = diff * lightColor;
// Specular
vec3 viewDir = normalize(viewPos - fs_in.FragPos);
vec3 reflectDir = reflect(-lightDir, normal);
float spec = 0.0;
vec3 halfwayDir = normalize(lightDir + viewDir);
spec = pow(max(dot(normal, halfwayDir), 0.0), 64.0);
vec3 specular = spec * lightColor;
// Calculate shadow
float shadow = ShadowCalculation(fs_in.FragPos);
vec3 lighting = (ambient + (1.0 - shadow) * (diffuse + specular)) * color;
FragColor = vec4(lighting, 1.0f);
}
有一些细微的不同:光照代码一样,但我们现在有了一个uniform变量samplerCube,shadowCalculation函数用fragment的位置作为它的参数,取代了光空间的fragment位置。我们现在还要引入光的视锥的远平面值,后面我们会需要它。像素着色器的最后,我们计算出阴影元素,当fragment在阴影中时它是1.0,不在阴影中时是0.0。我们使用计算出来的阴影元素去影响光照的diffuse和specular元素。
在ShadowCalculation函数中有很多不同之处,现在是从立方体贴图中进行采样,不再使用2D纹理了。我们来一步一步的讨论一下的它的内容。
我们需要做的第一件事是获取立方体贴图的森都。你可能已经从教程的立方体贴图部分想到,我们已经将深度储存为fragment和光位置之间的距离了;我们这里采用相似的处理方式:
float ShadowCalculation(vec3 fragPos)
{
vec3 fragToLight = fragPos - lightPos;
float closestDepth = texture(depthMap, fragToLight).r;
}
在这里,我们得到了fragment的位置与光的位置之间的不同的向量,使用这个向量作为一个方向向量去对立方体贴图进行采样。方向向量不需要是单位向量,所以无需对它进行标准化。最后的closestDepth是光源和它最接近的可见fragment之间的标准化的深度值。
closestDepth值现在在0到1的范围内了,所以我们先将其转换会0到far_plane的范围,这需要把他乘以far_plane:
closestDepth *= far_plane;
下一步我们获取当前fragment和光源之间的深度值,我们可以简单的使用fragToLight的长度来获取它,这取决于我们如何计算立方体贴图中的深度值:
float currentDepth = length(fragToLight);
返回的是和closestDepth范围相同的深度值。
现在我们可以将两个深度值对比一下,看看哪一个更接近,以此决定当前的fragment是否在阴影当中。我们还要包含一个阴影偏移,所以才能避免阴影失真,这在前面教程中已经讨论过了。
float bias = 0.05;
float shadow = currentDepth - bias > closestDepth ? 1.0 : 0.0;
完整的ShadowCalculation现在变成了这样:
float ShadowCalculation(vec3 fragPos)
{
// Get vector between fragment position and light position
vec3 fragToLight = fragPos - lightPos;
// Use the light to fragment vector to sample from the depth map
float closestDepth = texture(depthMap, fragToLight).r;
// It is currently in linear range between [0,1]. Re-transform back to original value
closestDepth *= far_plane;
// Now get current linear depth as the length between the fragment and light position
float currentDepth = length(fragToLight);
// Now test for shadows
float bias = 0.05;
float shadow = currentDepth - bias > closestDepth ? 1.0 : 0.0;
return shadow;
}
有了这些着色器,我们已经能得到非常好的阴影效果了,这次从一个点光源所有周围方向上都有阴影。有一个位于场景中心的点光源,看起来会像这样:
PCF
由于万向阴影贴图基于传统阴影映射的原则,它便也继承了由解析度产生的非真实感。如果你放大就会看到锯齿边了。PCF或称Percentage-closer filtering允许我们通过对fragment位置周围过滤多个样本,并对结果平均化。
如果我们用和前面教程同样的那个简单的PCF过滤器,并加入第三个维度,就是这样的:
float shadow = 0.0;
float bias = 0.05;
float samples = 4.0;
float offset = 0.1;
for(float x = -offset; x < offset; x += offset / (samples * 0.5))
{
for(float y = -offset; y < offset; y += offset / (samples * 0.5))
{
for(float z = -offset; z < offset; z += offset / (samples * 0.5))
{
float closestDepth = texture(depthMap, fragToLight + vec3(x, y, z)).r;
closestDepth *= far_plane; // Undo mapping [0;1]
if(currentDepth - bias > closestDepth)
shadow += 1.0;
}
}
}
shadow /= (samples * samples * samples);
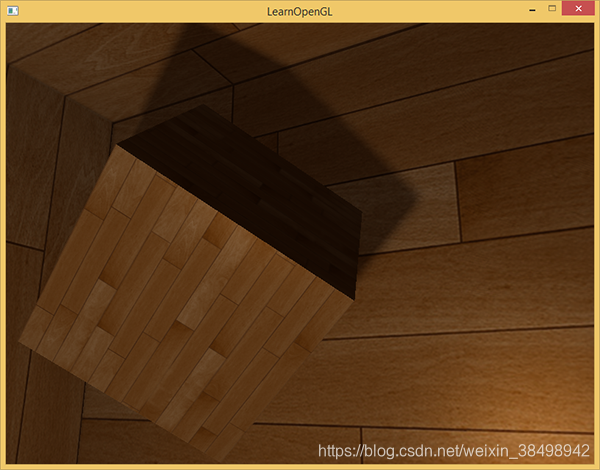
这段代码和我们传统的阴影映射没有多少不同。这里我们根据样本的数量动态计算了纹理偏移量,我们在三个轴向采样三次,最后对子样本进行平均化。
现在阴影看起来更加柔和平滑了,由此得到更加真实的效果:
然而,samples设置为4.0,每个fragment我们会得到总共64个样本,这太多了!
大多数这些样本都是多余的,它们在原始方向向量近处采样,不如在采样方向向量的垂直方向进行采样更有意义。可是,没有(简单的)方式能够指出哪一个子方向是多余的,这就难了。有个技巧可以使用,用一个偏移量方向数组,它们差不多都是分开的,每一个指向完全不同的方向,剔除彼此接近的那些子方向。下面就是一个有着20个偏移方向的数组:
vec3 sampleOffsetDirections[20] = vec3[]
(
vec3( 1, 1, 1), vec3( 1, -1, 1), vec3(-1, -1, 1), vec3(-1, 1, 1),
vec3( 1, 1, -1), vec3( 1, -1, -1), vec3(-1, -1, -1), vec3(-1, 1, -1),
vec3( 1, 1, 0), vec3( 1, -1, 0), vec3(-1, -1, 0), vec3(-1, 1, 0),
vec3( 1, 0, 1), vec3(-1, 0, 1), vec3( 1, 0, -1), vec3(-1, 0, -1),
vec3( 0, 1, 1), vec3( 0, -1, 1), vec3( 0, -1, -1), vec3( 0, 1, -1)
);
然后我们把PCF算法与从sampleOffsetDirections得到的样本数量进行适配,使用它们从立方体贴图里采样。这么做的好处是与之前的PCF算法相比,我们需要的样本数量变少了。
float shadow = 0.0;
float bias = 0.15;
int samples = 20;
float viewDistance = length(viewPos - fragPos);
float diskRadius = 0.05;
for(int i = 0; i < samples; ++i)
{
float closestDepth = texture(depthMap, fragToLight + sampleOffsetDirections[i] * diskRadius).r;
closestDepth *= far_plane; // Undo mapping [0;1]
if(currentDepth - bias > closestDepth)
shadow += 1.0;
}
shadow /= float(samples);
这里我们把一个偏移量添加到指定的diskRadius中,它在fragToLight方向向量周围从立方体贴图里采样。
另一个在这里可以应用的有意思的技巧是,我们可以基于观察者里一个fragment的距离来改变diskRadius;这样我们就能根据观察者的距离来增加偏移半径了,当距离更远的时候阴影更柔和,更近了就更锐利。
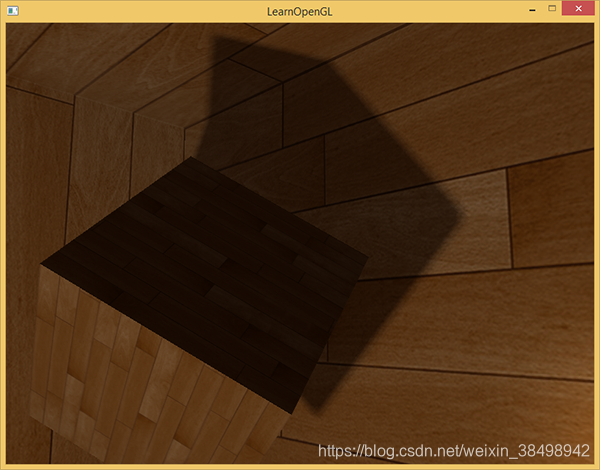
float diskRadius = (1.0 + (viewDistance / far_plane)) / 25.0;
PCF算法的结果如果没有变得更好,也是非常不错的,这是柔和的阴影效果:


 789
789

 被折叠的 条评论
为什么被折叠?
被折叠的 条评论
为什么被折叠?
 到【灌水乐园】发言


