


 本文介绍如何在Windows和Linux环境下安装与配置Zookeeper、Kafka及Canal,涵盖从下载到启动的全过程,并针对常见问题提供了解决方案。
安装zookeeper
下载zookeeper,网址为: https://www.apache.org/dyn/closer.lua/zookeeper/zookeeper-3.8.0/apache-zookeeper-3.8.0-bin.tar.gz,然后解压。
将zoo_sample.cfg重命名为zoo.cfg。
修改zoo.cfg:
dataDir=C:\dev-env\apache-zookeeper-3.8.0-bin\data
添加系统变量:ZOOKEEPER_HOME=C:\dev-env\apache-zookeeper-3.8.0-bin。
编辑Path系统变量,添加路径:C:\dev-env\apache-zookeeper-3.8.0-bin\bin。
在windows下启动:打开新的cmd,输入“zkServer“,运行Zookeeper。
在linux(192.168.80.109)下启动:
/opt/apache-zookeeper-3.8.0-bin/bin/zkServer.shstart
在linux(192.168.80.110)下启动:
/opt/project/im-end-test/apache-zookeeper-3.8.0-bin/bin/zkServer.shstart
在linux(172.16.95.201)下启动:
/home/apache-zookeeper-3.8.0-bin/bin/zkServer.shstart
在linux(172.16.95.81)下启动:
/data/apache-zookeeper-3.8.0-bin/bin/zkServer.shstart
安装kafka
下载kafka,下载地址: https://archive.apache.org/dist/kafka/2.8.0/kafka_2.13-2.8.0.tgz,然后解压。
修改配置文件server.properties:
log.dirs=C:\dev-env\kafka_2.13-2.8.0\kafka-logs

# 允许外部端口连接
listeners=PLAINTEXT://0.0.0.0:9092
# 外部代理地址
advertised.listeners=PLAINTEXT://127.0.0.1:9092

num.partitions=1
auto.create.topics.enable=true
delete.topic.enable=true
将目录C:\dev-env\kafka_2.13-2.8.0\bin\windows加入到PATH环境变量中。
在windows下启动:
kafka-server-start.batC:\dev-env\kafka_2.13-2.8.0\config\server.properties
在linux下启动:
192.168.80.109:
nohup /opt/kafka_2.13-2.8.0/bin/kafka-server-start.sh/opt/kafka_2.13-2.8.0/config/server.properties >/opt/kafka_2.13-2.8.0/logs/kafka.log 2>&1 &
192.168.80.110:
nohup/opt/project/im-end-test/kafka_2.13-2.8.0/bin/kafka-server-start.sh/opt/project/im-end-test/kafka_2.13-2.8.0/config/server.properties >/opt/project/im-end-test/kafka_2.13-2.8.0/logs/kafka.log 2>&1 &
172.16.95.201:
nohup /home/kafka_2.13-2.8.0/bin/kafka-server-start.sh/home/kafka_2.13-2.8.0/config/server.properties >/home/kafka_2.13-2.8.0/logs/kafka.log 2>&1 &
172.16.95.81:
nohup /data/kafka_2.13-2.8.0/bin/kafka-server-start.sh/data/kafka_2.13-2.8.0/config/server.properties >/data/kafka_2.13-2.8.0/logs/kafka.log 2>&1 &
查看主题:
C:\dev-env\kafka_2.13-2.8.0\bin>kafka-topics.bat--describe --zookeeper localhost:2181 --topic im-end
Topic:im-end   TopicId: veQge0d4Q5m4noBymhglsgPartitionCount: 1      ReplicationFactor: 1    Configs:
        Topic: im-end   Partition: 0    Leader: 0       Replicas: 0     Isr: 0
查看主题
[root@im-serverbin]# /opt/kafka_2.13-2.8.0/bin/kafka-topics.sh--list --zookeeper localhost:2181
__consumer_offsets
im-end
im-end-dev
创建主题
[root@im-serverbin]# /opt/kafka_2.13-2.8.0/bin/kafka-topics.sh--create --zookeeper localhost:2181 --replication-factor 1 --partitions 1--topic im-end-test
Created topicim-end-test.
删除主题
[root@im-serverbin]# /opt/kafka_2.13-2.8.0/bin/kafka-topics.sh  --delete --zookeeper localhost:2181 --topicim-end
Topic im-end ismarked for deletion.
Note: This willhave no impact if delete.topic.enable is not set to true.
注意:删除主题之前要先将生产者和消费者进程都关闭,并且server.properties文件中配置如下:
auto.create.topics.enable=false# 注意:删除主题之后要将这个改为true
delete.topic.enable=true
生产者发送消息,消费者消费消息:
C:\dev-env\kafka_2.13-2.8.0\bin>kafka-console-producer.bat--broker-list localhost:9092 --topic im-end
C:\dev-env\kafka_2.13-2.8.0\bin>kafka-console-consumer.bat--bootstrap-server localhost:2181 --topic im-end
注意事项:
如果mysql修改了表结构,则kafka必须重启,否则还会延续之前使用的表结构。
安装canal
下载canal,地址为: https://github.com/alibaba/canal/releases/download/canal-1.1.4/canal.deployer-1.1.4.tar.gz,然后解压。
修改example/instance.properties:
canal.instance.master.address=192.168.80.109:3306
canal.instance.filter.regex=im-erp9\\..*# 表示只处理im-erp9数据库中的所有表
canal.instance.filter.black.regex=im-erp9.chat_pair# 表示过滤掉数据库im-erp9的chat_pair表。多个表之间用逗号分割
canal.mq.topic=im-end# 注意这个主题要跟java程序中的主题一致
修改canal.properties:
canal.serverMode= kafka
canal.mq.servers= 192.168.80.109:9092
将目录C:\dev-env\canal.deployer-1.1.4\bin放到PATH环境变量中。
Windows下启动:
C:\dev-env\canal.deployer-1.1.4\bin>startup.bat #必须到canal的安装目录的bin目录下执行startup.bat才行,否则无法获取mysql的bin log
start cmd :  java  -Xms128m -Xmx512m -XX:PermSize=128m -Djava.awt.headless=true -Djava.net.preferIPv4Stack=true-Dapplication.codeset=UTF-8 -Dfile.encoding=UTF-8  -server -Xdebug -Xnoagent-Djava.compiler=NONE-Xrunjdwp:transport=dt_socket,address=9099,server=y,suspend=n  -DappName=otter-canal-Dlogback.configurationFile="" -Dcanal.conf="C:\dev-env\canal.deployer-1.1.4\bin\\..\conf\canal.properties"-classpath"C:\dev-env\canal.deployer-1.1.4\bin\\..\conf\..\lib\*;C:\dev-env\canal.deployer-1.1.4\bin\\..\conf"java   -Xms128m -Xmx512m-XX:PermSize=128m -Djava.awt.headless=true -Djava.net.preferIPv4Stack=true-Dapplication.codeset=UTF-8 -Dfile.encoding=UTF-8  -server -Xdebug -Xnoagent-Djava.compiler=NONE-Xrunjdwp:transport=dt_socket,address=9099,server=y,suspend=n  -DappName=otter-canal-Dlogback.configurationFile="" -Dcanal.conf="C:\dev-env\canal.deployer-1.1.4\bin\\..\conf\canal.properties"-classpath"C:\dev-env\canal.deployer-1.1.4\bin\\..\conf\..\lib\*;C:\dev-env\canal.deployer-1.1.4\bin\\..\conf"com.alibaba.otter.canal.deployer.CanalLauncher
Java HotSpot(TM)64-Bit Server VM warning: ignoring option PermSize=128m; support was removed in8.0
Listening fortransport dt_socket at address: 9099
Failed toinstantiate [ch.qos.logback.classic.LoggerContext]
Reportedexception:
ch.qos.logback.core.LogbackException: Unexpected filename extensionof file [file:/C:/dev-env/canal.deployer-1.1.4/conf/]. Should be either .groovyor .xml
        atch.qos.logback.classic.util.ContextInitializer.configureByResource(ContextInitializer.java:79)
        atch.qos.logback.classic.util.ContextInitializer.autoConfig(ContextInitializer.java:152)
        atorg.slf4j.impl.StaticLoggerBinder.init(StaticLoggerBinder.java:85)
        atorg.slf4j.impl.StaticLoggerBinder.<clinit>(StaticLoggerBinder.java:55)
        atorg.slf4j.LoggerFactory.bind(LoggerFactory.java:141)
        atorg.slf4j.LoggerFactory.performInitialization(LoggerFactory.java:120)
        atorg.slf4j.LoggerFactory.getILoggerFactory(LoggerFactory.java:331)
        atorg.slf4j.LoggerFactory.getLogger(LoggerFactory.java:283)
        at org.slf4j.LoggerFactory.getLogger(LoggerFactory.java:304)
        atcom.alibaba.otter.canal.deployer.CanalLauncher.<clinit>(CanalLauncher.java:29)
此时需要修改startup.bat文件,删除-Dlogback.configurationFile="%logback_configurationFile%"。
Linux(192.168.80.109)下启动:
/opt/canal/bin/startup.sh&
Linux(192.168.80.110)下启动:
/opt/project/im-end-test/canal/bin/startup.sh&
Linux(172.16.95.201)下启动:
/home/canal/bin/startup.sh&
Linux(172.16.95.81)下启动:
/data/canal/bin/startup.sh&
常见错误一:Could not find first log file name in binary log index file
解决方法:在mysql上执行show masterstatus;,结果如下:

修改配置文件conf/example/meta.dat,如下:
{
  "clientDatas": [
    {
      "clientIdentity": {
        "clientId": 1001,
        "destination":"example",
        "filter": ""
      },
      "cursor": {
        "identity": {
          "slaveId": -1,
          "sourceAddress": {
            "address":"127.0.0.1",
            "port": 3306
          }
        },
        "postion": {
          "gtid": "",
          "included": false,
          "journalName": "mysql-bin.000001",
          "position": 492,
          "serverId": 1,
          "timestamp":1650433690000
        }
      }
    }
  ],
  "destination":"example"
}
也就是要修改journalName和position。可能还要修改conf/example/instance.properties,如下:
# position info
canal.instance.master.address=127.0.0.1:3306
canal.instance.master.journal.name=mysql-bin.000001
canal.instance.master.position=
canal.instance.master.timestamp=
canal.instance.master.gtid=
清空数据并重启,解决无法同步数据的问题
如果出现无法同步的情况,则按照下列步骤操作:
删除C:\Users\lishe\dev-envapache-zookeeper-3.8.0-bindata和C:\Users\lishe\dev-envkafka_2.13-2.8.0kafka-logs。
删除C:\dev-env\kafka_2.13-2.8.0\kafka-logs。
删除C:\dev-env\kafka_2.13-2.8.0\logs。
删除C:\dev-env\apache-zookeeper-3.8.0-bin\data。
删除C:\dev-env\canal.deployer-1.1.4\logs。
删除C:\dev-env\canal.deployer-1.1.4\conf\example目录下的h2.mv.db(表结构文件)和meta.dat(binlog文件)文件,再执行reset master,然后重启canal。
解决数据同步一段时间之后,就无法自动同步的问题
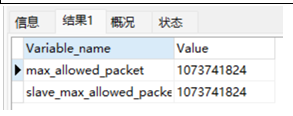
原因是mysql的packet太小了,而实际的包大于packet大小的设置,因此数据被截取了,而canal是按照偏移量来解析数据,所以无法解析。解决方法就是加大packet的大小,如下:
set GLOBALmax_allowed_packet = 1073741824;
SHOW GLOBALVARIABLES LIKE "%max_allowed_packet%";
注意:max_allowed_packet的大小不会超过slave_max_allowed_packet的大小。


 201
201

 被折叠的 条评论
为什么被折叠?
被折叠的 条评论
为什么被折叠?
 到【灌水乐园】发言


