


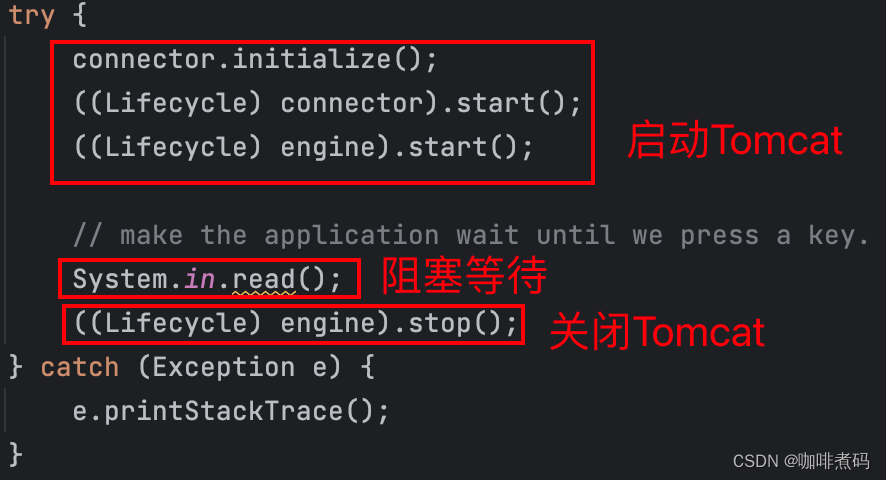
通过前面文章的学习,我们已经了解了连接器,四大容器是如何配合工作的,在源码中提供的示例也都是“一个连接器”+“一个顶层容器”的结构。并且启动方式是分别启动连接器和容器,类似下面代码
connector.setContainer(engine);
try {
    connector.initialize();
    ((Lifecycle) connector).start();
    ((Lifecycle) engine).start();

    // make the application wait until we press a key.
    System.in.read();
    ((Lifecycle) engine).stop();
} catch (Exception e) {
    e.printStackTrace();
}连接器要运行起来需要执行两个方法 initialize() 与 start(),容器要运行起来只需执行一个方法 start()。
之前的设计存在两个问题:
1.Tomcat中不应该仅有支持HTTP协议的连接器,还应该有支持HTTPS等协议的连接器,所以连接器有多种类型。多个连接器可以关联同一个容器,不同的连接器将请求统一处理成容器需要的同一种对象即可,这种多对一的结构该如何设计?
2.之前章节的程序架构中,缺少一种关闭Tomcat的机制,仅仅是通过 System.in.read(); 来阻塞程序运行,还需要手动在控制台输入东西才能走关闭流程。
Tomcat设计了两个组件来解决上面两个问题:服务器组件(Server),服务组件(Service)。
Service组件
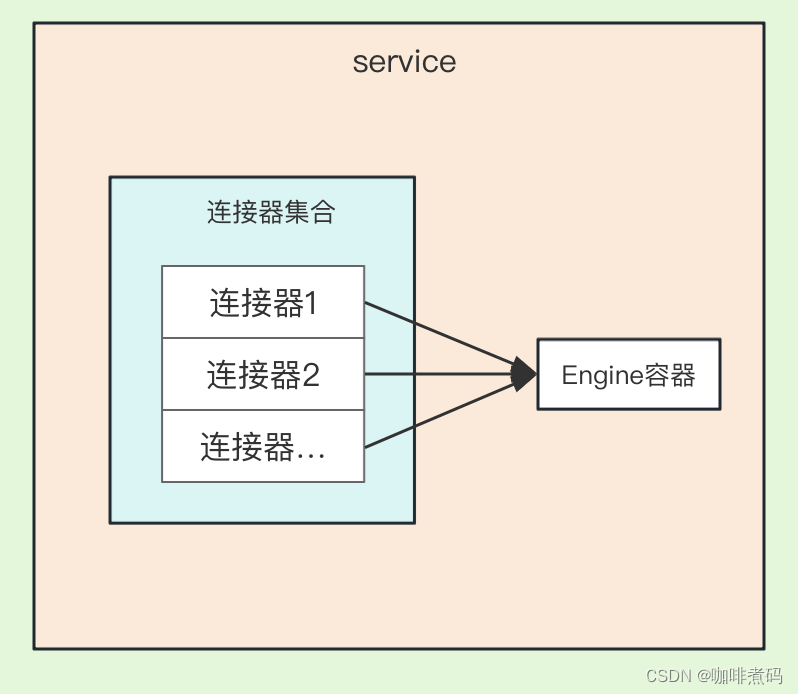
先看第一个问题,Tomcat提供了Service组件来将连接器和容器包装起来,并向外提供 initialize() 与 start() 两个方法。他们之间的关系如下图所示
Service组件的标准实现类为StandardService,在StandardService的 initialize()方法中,调用了所有连接器的 initialize() 方法,代码如下
// 连接器数组
private Connector[] connectors = new Connector[0];

public void initialize() throws LifecycleException {
    if (initialized) throw new LifecycleException(sm.getString("standardService.initialize.initialized"));
    initialized = true;

    // Initialize our defined Connectors
    synchronized (connectors) {
        for (Connector connector : connectors) {
            connector.initialize();
        }
    }
}
StandardService的 start()方法中,调用了容器的start() 方法和所有连接器的 start() 方法,代码如下
private Connector[] connectors = new Connector[0];
private Container container = null;

public void start() throws LifecycleException {

    // Validate and update our current component state
    if (started) {
        throw new LifecycleException(sm.getString("standardService.start.started"));
    }

    // 通知事件监听器
    lifecycle.fireLifecycleEvent(BEFORE_START_EVENT, null);
    lifecycle.fireLifecycleEvent(START_EVENT, null);
    started = true;

    // 先启动容器
    if (container != null) {
        synchronized (container) {
            if (container instanceof Lifecycle) {
                ((Lifecycle) container).start();
            }
        }
    }

    // 再启动连接器
    synchronized (connectors) {
        for (Connector connector : connectors) {
            if (connector instanceof Lifecycle) {
                ((Lifecycle) connector).start();
            }
        }
    }

    // 通知事件监听器
    lifecycle.fireLifecycleEvent(AFTER_START_EVENT, null);

}
所以呢,Service组件的作用就是将连接器与容器的 initialize() 与 start() 两个方法的入口收束了一下。
Server组件
Tomcat中是支持多个Service组件实例的,如果存在多个Service组件实例的话,那么他们的 initialize() 与 start() 两个方法就又散开了,又要各启动各的,为了解决这个问题,Tomcat引入Server组件,将Service组件的 initialize() 与 start() 两个方法 再次收束一下,他们的结构如下图所示

Server组件的标准实现类为StandardServer,StandardServer的 initialize() 方法调用了所有Service组件的 initialize() 方法
private Service[] services = new Service[0];

public void initialize() throws LifecycleException {
    if (initialized) throw new LifecycleException(sm.getString("standardServer.initialize.initialized"));
    initialized = true;

    // 初始化所有Service组件
    for (int i = 0; i < services.length; i++) {
        services[i].initialize();
    }
}
StandardServer的 start() 方法调用了所有Service组件的 start() 方法
private Service[] services = new Service[0];

public void start() throws LifecycleException {

    // 防止重复指定start() 方法
    if (started) {
        throw new LifecycleException(sm.getString("standardServer.start.started"));
    }
    // 通知事件监听器
    lifecycle.fireLifecycleEvent(BEFORE_START_EVENT, null);
    lifecycle.fireLifecycleEvent(START_EVENT, null);
    started = true;

    // 启动所有Services
    synchronized (services) {
        for (Service service : services) {
            if (service instanceof Lifecycle) {
                ((Lifecycle) service).start();
            }
        }
    }

    // 通知事件监听器
    lifecycle.fireLifecycleEvent(AFTER_START_EVENT, null);

}
Server组件就是Tomcat的顶层组件了,上面提到的initialize() 和 start() 方法是启动Tomcat需要的两个方法,这两个方法执行完后,整个Tomcat服务就可以开始工作了。
什么情况下会用到多个Service组件实例呢?网上搜的内容看的云里雾里,总结起来就是:我们平时候开发基本不会用到多Service实例,所以这块的内容可以不求甚解😂。
接下来是如何关闭Tomcat服务
先来看关闭Tomcat服务需要调用的方法:StandardServer#stop(), 该方法通过调用所有Service组件的 stop() 方法进而层层调用各个组件和容器的 stop() 方法,将Tomcat服务正常关闭掉。
public void stop() throws LifecycleException {

    // Validate and update our current component state
    if (!started) {
        throw new LifecycleException(sm.getString("standardServer.stop.notStarted"));
    }

    // 通知事件监听器
    lifecycle.fireLifecycleEvent(BEFORE_STOP_EVENT, null);
    lifecycle.fireLifecycleEvent(STOP_EVENT, null);
    started = false;

    // 停止所有Service组件
    for (Service service : services) {
        if (service instanceof Lifecycle) {
            ((Lifecycle) service).stop();
        }
    }

    // 通知事件监听器
    lifecycle.fireLifecycleEvent(AFTER_STOP_EVENT, null);

}
如何触发stop() 方法的执行呢?
在之前的启动类中,start() 方法后会紧跟着 【System.in.read();】 来阻塞启动线程,并且 【System.in.read(); 】后紧跟着 stop() 方法。这个逻辑编排是没有问题的,主要就是这个 【System.in.read(); 】不像是个正常操作。StandardServer中提供了await() 方法来替代这个阻塞操作。
StandardServer的 await() 方法大致逻辑是这样:这个方法会创建一个ServerSocket,阻塞监听某个端口(默认8005),如果该ServerSocket收到Socket连接,并且接收到的消息是提前定义好的“关闭Tomcat”(shutdown)的指令时,该方法会结束阻塞并返回,否则会继续阻塞等待下一个请求。
也就是说 await() 通过一个TCP消息来达到结束阻塞的目的,比之前通过控制台输入字符来结束阻塞 高大上了很多。
await方法的代码如下
// 关闭Tomcat的指令
private String shutdown = "SHUTDOWN";
public void await() {
// 创建一个server socket去阻塞等待
ServerSocket serverSocket = null;
try {
serverSocket = new ServerSocket(port, 1, InetAddress.getByName("127.0.0.1"));
} catch (IOException e) {
System.err.println("StandardServer.await: create[" + port + "]: " + e);
e.printStackTrace();
System.exit(1);
}
// 循环等待链接并验证是不是shutdown命令
while (true) {
// 等待下一个链接
Socket socket = null;
InputStream stream = null;
try {
socket = serverSocket.accept();
socket.setSoTimeout(10 * 1000); // Ten seconds
stream = socket.getInputStream();
} catch (AccessControlException ace) {
System.err.println("StandardServer.accept security exception: " + ace.getMessage());
continue;
} catch (IOException e) {
System.err.println("StandardServer.await: accept: " + e);
e.printStackTrace();
System.exit(1);
}
// Read a set of characters from the socket
StringBuffer command = new StringBuffer();
int expected = 1024; // Cut off to avoid DoS attack
while (expected < shutdown.length()) {
if (random == null) {
random = new Random(System.currentTimeMillis());
}
expected += (random.nextInt() % 1024);
}
while (expected > 0) {
int ch = -1;
try {
ch = stream.read();
} catch (IOException e) {
System.err.println("StandardServer.await: read: " + e);
e.printStackTrace();
ch = -1;
}
if (ch < 32) // Control character or EOF terminates loop
break;
command.append((char) ch);
expected--;
}
// 关闭该socket连接
try {
socket.close();
} catch (IOException e) {
;
}
// 判断收到的指令是不是shutdown指令,如果是则结束监听,否则继续阻塞监听
boolean match = command.toString().equals(shutdown);
if (match) {
break;
} else {
System.err.println("StandardServer.await: Invalid command '" + command.toString() + "' received");
}
} // while end
// 收到了shutdown命令,关闭 server socket 并返回
try {
serverSocket.close();
} catch (IOException e) {
;
}
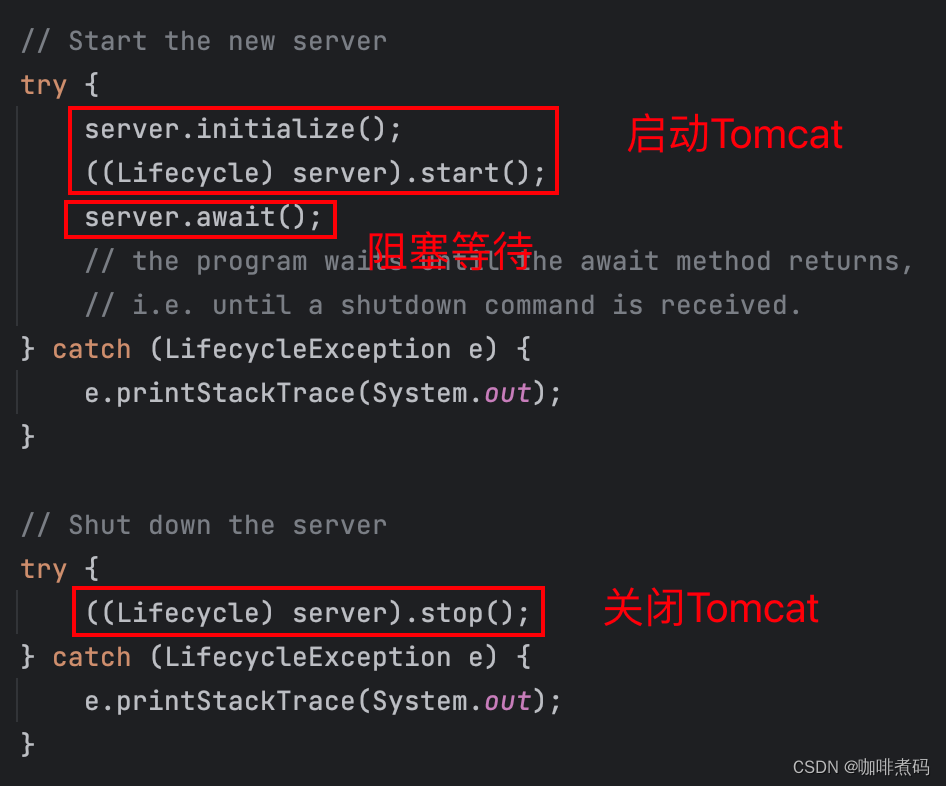
}await() 方法只是实现了一个阻塞逻辑,并提供了一个结束阻塞的方法。那么接下来只要将 await() 方法放在 start() 和 stop() 两个方法的中间即可。start() 方法执行后,Tomcat启动成功;接着await() 方法执行,启动线程进入阻塞状态;等到 await() 方法中的server socket收到关闭指令后,await() 方法结束阻塞并返回;接着就执行到stop() 方法,Tomcat就能正常关闭掉了。
这几个方法的逻辑编排如下图所示
下面是本章内容的启动类Bootstrap,与发送关闭Tomcat命令的工具类Stopper。
package ex14.pyrmont.startup;

import ex14.pyrmont.core.SimpleContextConfig;
import org.apache.catalina.Connector;
import org.apache.catalina.Context;
import org.apache.catalina.Engine;
import org.apache.catalina.Host;
import org.apache.catalina.Lifecycle;
import org.apache.catalina.LifecycleException;
import org.apache.catalina.LifecycleListener;
import org.apache.catalina.Loader;
import org.apache.catalina.Server;
import org.apache.catalina.Service;
import org.apache.catalina.Wrapper;
import org.apache.catalina.connector.http.HttpConnector;
import org.apache.catalina.core.StandardContext;
import org.apache.catalina.core.StandardEngine;
import org.apache.catalina.core.StandardHost;
import org.apache.catalina.core.StandardServer;
import org.apache.catalina.core.StandardService;
import org.apache.catalina.core.StandardWrapper;
import org.apache.catalina.loader.WebappLoader;

public final class Bootstrap {
  public static void main(String[] args) {

    System.setProperty("catalina.base", System.getProperty("user.dir"));
    Connector connector = new HttpConnector();

    Wrapper wrapper1 = new StandardWrapper();
    wrapper1.setName("Primitive");
    wrapper1.setServletClass("PrimitiveServlet");
    Wrapper wrapper2 = new StandardWrapper();
    wrapper2.setName("Modern");
    wrapper2.setServletClass("ModernServlet");

    Context context = new StandardContext();
    // StandardContext's start method adds a default mapper
    context.setPath("/app1");
    context.setDocBase("app1");

    context.addChild(wrapper1);
    context.addChild(wrapper2);

    LifecycleListener listener = new SimpleContextConfig();
    ((Lifecycle) context).addLifecycleListener(listener);

    Host host = new StandardHost();
    host.addChild(context);
    host.setName("localhost");
    host.setAppBase("webapps");

    Loader loader = new WebappLoader();
    context.setLoader(loader);
    // context.addServletMapping(pattern, name);
    context.addServletMapping("/Primitive", "Primitive");
    context.addServletMapping("/Modern", "Modern");

    Engine engine = new StandardEngine();
    engine.addChild(host);
    engine.setDefaultHost("localhost");

    Service service = new StandardService();
    service.setName("Stand-alone Service");
    Server server = new StandardServer();
    server.addService(service);
    service.addConnector(connector);

    //StandardService class's setContainer will call all its connector's setContainer method
    service.setContainer(engine);

    // Start the new server
    if (server instanceof Lifecycle) {
      try {
        server.initialize();
        ((Lifecycle) server).start();
        server.await();
        // the program waits until the await method returns,
        // i.e. until a shutdown command is received.
      }
      catch (LifecycleException e) {
        e.printStackTrace(System.out);
      }
    }

    // Shut down the server
    if (server instanceof Lifecycle) {
      try {
        ((Lifecycle) server).stop();
      }
      catch (LifecycleException e) {
        e.printStackTrace(System.out);
      }
    }
  }
}
package ex14.pyrmont.startup;
import java.io.IOException;
import java.io.OutputStream;
import java.net.Socket;
public class Stopper {
public static void main(String[] args) {
// the following code is taken from the Stop method of
// the org.apache.catalina.startup.Catalina class
int port = 8005;
try {
Socket socket = new Socket("127.0.0.1", port);
OutputStream stream = socket.getOutputStream();
String shutdown = "SHUTDOWN";
for (int i = 0; i < shutdown.length(); i++)
stream.write(shutdown.charAt(i));
stream.flush();
stream.close();
socket.close();
System.out.println("The server was successfully shut down.");
} catch (IOException e) {
System.out.println("Error. The server has not been started.");
}
}
}OK,这一章的内容就到这里。本章主要讲解了Server与Service两个组件,Server组件是Tomcat的顶层组件,它提供了启停Tomcat的方法。下一章来看一个更万无一失的关闭Tomcat的方案:关闭钩子(ShutdownHook)。


 被折叠的 条评论
为什么被折叠?
被折叠的 条评论
为什么被折叠?
 到【灌水乐园】发言


