


前面很多篇文章都在介绍Context与Wrapper两个容器,因为这两个容器确实也比较重要,与我们日常开发也息息相关,但是Catalina是存在四个容器的,这一章就来简单看看Host与Engine这两个容器。
再次展示下Catalina的容器结构,Engine为最顶层的容器,父容器与子容器为一对多的关系,最底层的容器为Wrapper容器,Wrapper容器不再拥有子容器。
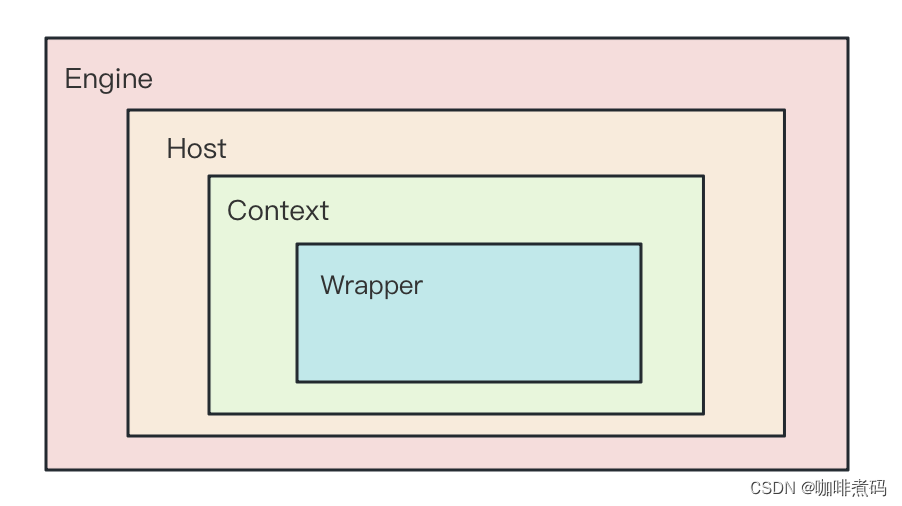
Context容器代表一个Web应用,Wrapper容器代表Web应用中的一个servlet,那么Host与Engine代表啥呢,下面通过梳理Engine、Host与Context三者的关系来说明一下。
Host容器与Context容器
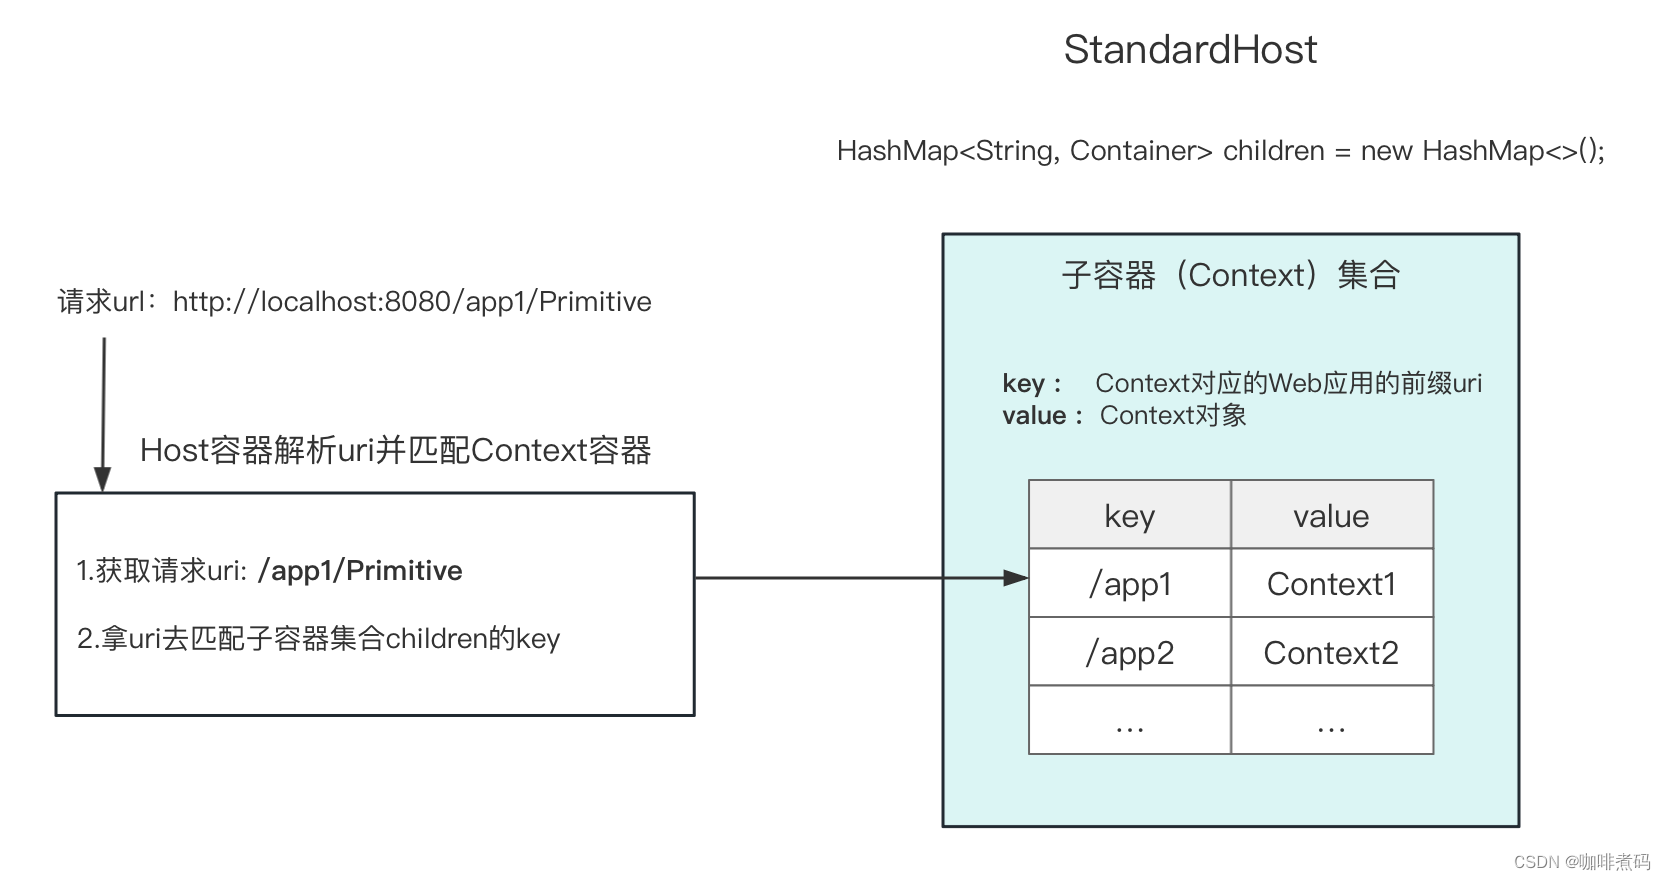
一个Tomcat中可以布有多个Web应用,也就是可以有多个Context容器实例。至于如何将请求分发到指定Context中,则是Host容器的任务了。StandardHost类是Host容器的标准实现。
下面通过一张图来展示下Host容器寻址Context容器的过程
根据uri去匹配Context容器的逻辑是一个循环判断的逻辑,代码在StandardHost#map() 方法中,下面是精简后的代码
public Context map(String uri) {

    Context context = null;
    String mapuri = uri;
    while (true) {
        context = (Context) findChild(mapuri);
        if (context != null) {
            break;
        }
        int slash = mapuri.lastIndexOf('/');
        if (slash < 0) {
            break;
        }
        mapuri = mapuri.substring(0, slash);
    }

    // 如果没有匹配上就用默认的Context
    if (context == null) {
        context = (Context) findChild("");
    }

    return (context);

}
假如请求的uri是【/app1/Primitive】,那么拿uri去匹配Context的步骤是这样的
- 先拿“/app1/Primitive”去匹配,没有匹配上
- 去掉最后的一个“/”后面的内容,uri变为“/app1”,再去匹配,匹配上了,拿到结果
如果最终也没有匹配上,就取默认的Context来用,默认Context在children中的key为空字符串。像我们使用SpringBoot开发项目的话,项目针对的Context在Host children中的key就为空字符串。
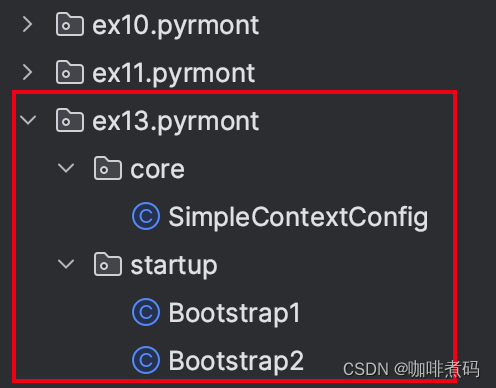
书中源码给了一个以Host为顶级容器的示例,我将启动类展示出来,感兴趣的可以下源码来自己试试
package ex13.pyrmont.startup;

//explain Host

import ex13.pyrmont.core.SimpleContextConfig;
import org.apache.catalina.*;
import org.apache.catalina.connector.http.HttpConnector;
import org.apache.catalina.core.StandardContext;
import org.apache.catalina.core.StandardHost;
import org.apache.catalina.core.StandardWrapper;
import org.apache.catalina.loader.WebappLoader;


public final class Bootstrap1 {
    public static void main(String[] args) {
        //invoke: http://localhost:8080/app1/Primitive or http://localhost:8080/app1/Modern
        System.setProperty("catalina.base", System.getProperty("user.dir"));
        Connector connector = new HttpConnector();

        Wrapper wrapper1 = new StandardWrapper();
        wrapper1.setName("Primitive");
        wrapper1.setServletClass("PrimitiveServlet");
        Wrapper wrapper2 = new StandardWrapper();
        wrapper2.setName("Modern");
        wrapper2.setServletClass("ModernServlet");

        Context context = new StandardContext();
        // StandardContext's start method adds a default mapper
        context.setPath("/app1");
        context.setDocBase("app1");

        context.addChild(wrapper1);
        context.addChild(wrapper2);

        LifecycleListener listener = new SimpleContextConfig();
        ((Lifecycle) context).addLifecycleListener(listener);

        Host host = new StandardHost();
        host.addChild(context);
        host.setName("localhost");
        host.setAppBase("webapps");

        Loader loader = new WebappLoader();
        context.setLoader(loader);
        // context.addServletMapping(pattern, name);
        context.addServletMapping("/Primitive", "Primitive");
        context.addServletMapping("/Modern", "Modern");

        connector.setContainer(host);
        try {
            connector.initialize();
            ((Lifecycle) connector).start();
            ((Lifecycle) host).start();

            // make the application wait until we press a key.
            System.in.read();
            ((Lifecycle) host).stop();
        } catch (Exception e) {
            e.printStackTrace();
        }
    }
}
Engine容器与Host容器
host,顾名思义,url中的host可以是域名也可以是ip。Host容器对应的也就是url中的host,每个Host容器实例都被安排接收其对应的“url中带有相关host的请求”。至于如何将一个请求分发到指定Host容器实例中,则是Engine容器的任务了,Engine容器是顶层容器,它不会再有父容器。StandardEngine类是Engine容器的标准实现。
如果Engine容器作为顶层容器的话,连接器则与Engine容器做关联,一个请求进来后,连接器则会将请求抛入Engine的invoke()方法,Engine再将请求给到指定的Host,Host再给到指定的Context,Context再给到指定的Wrapper,层层流转下来,请求就到达了指定的servlet中,servlet会对请求进行处理与反馈,然后将反馈结果层层上抛,最终给到连接器,连接器将结果返回给客户端,一个请求的寻址与处理流程就完成了。
我们通过一张图来展示下Engine容器寻址Host容器的过程
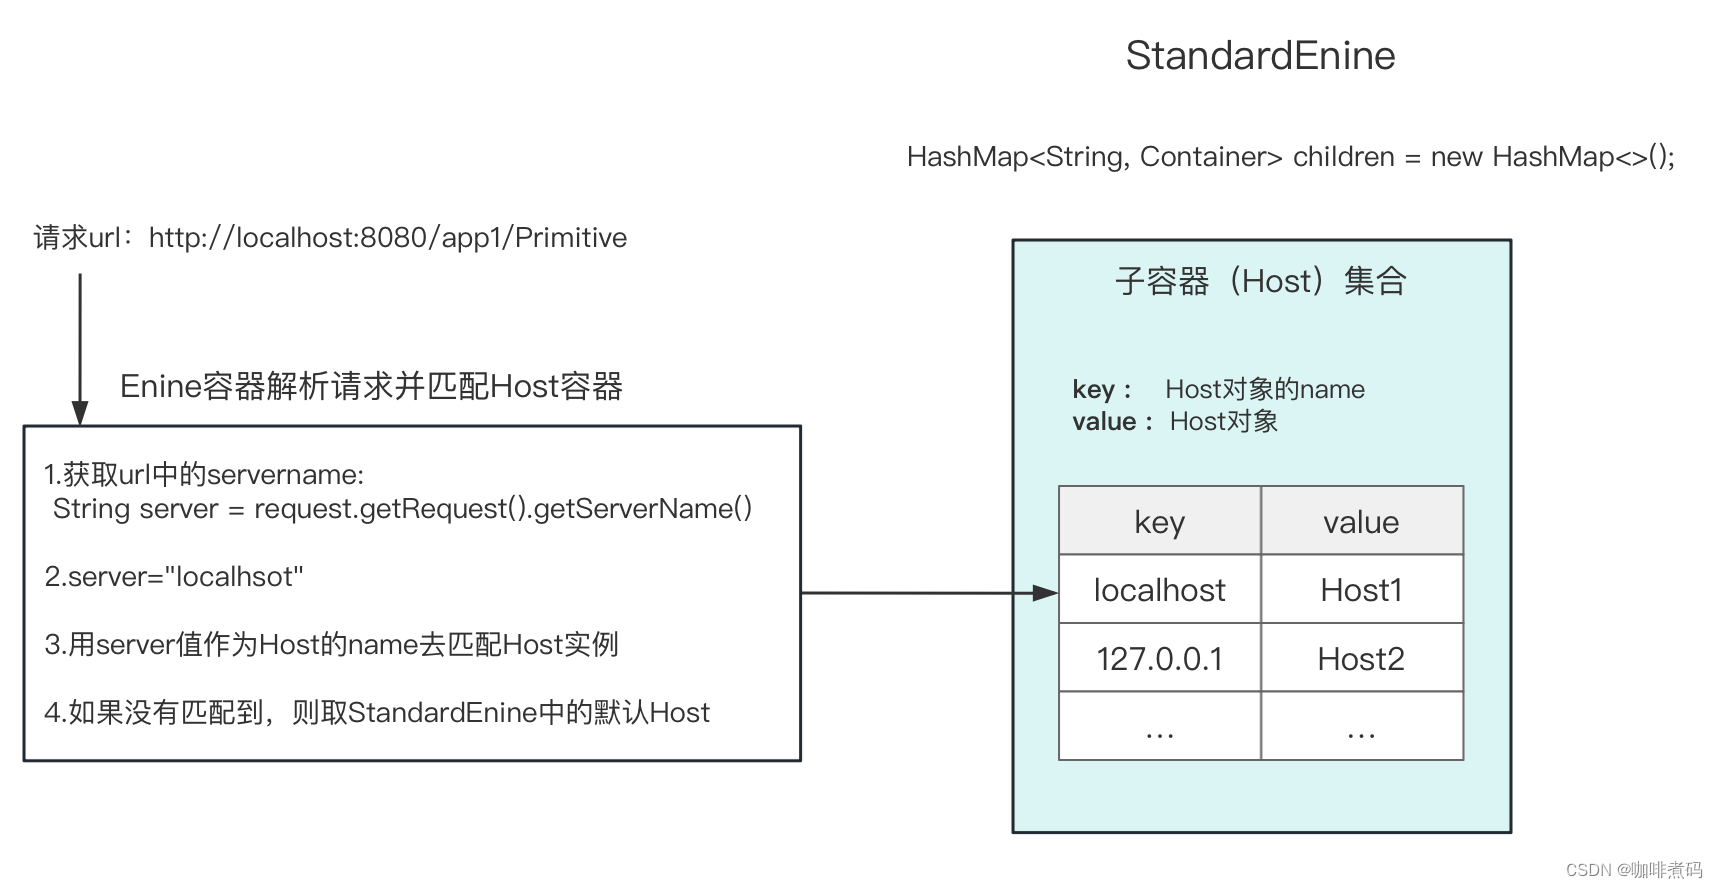
简单来说就是解析请求url中的host字符串,然后拿这个host字符串当做Host实例的name去 子容器map集合 "children" 中去匹配Host容器实例,匹配不上的话就用默认Host,默认Host一般为key=localhost 的这个Host。用SpringBoot开发的项目中就只有一个 key为 localhsot 的Host实例,默认Host也是它。
书中源码给了一个以Engine为顶级容器的示例,我将启动类展示出来,感兴趣的可以下源码来自己试试
package ex13.pyrmont.startup;

//Use engine

import ex13.pyrmont.core.SimpleContextConfig;
import org.apache.catalina.*;
import org.apache.catalina.connector.http.HttpConnector;
import org.apache.catalina.core.StandardContext;
import org.apache.catalina.core.StandardEngine;
import org.apache.catalina.core.StandardHost;
import org.apache.catalina.core.StandardWrapper;
import org.apache.catalina.loader.WebappLoader;


public final class Bootstrap2 {
    public static void main(String[] args) {
        //invoke: http://localhost:8080/app1/Primitive or http://localhost:8080/app1/Modern
        System.setProperty("catalina.base", System.getProperty("user.dir"));
        Connector connector = new HttpConnector();

        Wrapper wrapper1 = new StandardWrapper();
        wrapper1.setName("Primitive");
        wrapper1.setServletClass("PrimitiveServlet");
        Wrapper wrapper2 = new StandardWrapper();
        wrapper2.setName("Modern");
        wrapper2.setServletClass("ModernServlet");

        Context context = new StandardContext();
        // StandardContext's start method adds a default mapper
        context.setPath("/app1");
        context.setDocBase("app1");

        context.addChild(wrapper1);
        context.addChild(wrapper2);

        LifecycleListener listener = new SimpleContextConfig();
        ((Lifecycle) context).addLifecycleListener(listener);

        Host host = new StandardHost();
        host.addChild(context);
        host.setName("localhost");
        host.setAppBase("webapps");

        Loader loader = new WebappLoader();
        context.setLoader(loader);
        // context.addServletMapping(pattern, name);
        context.addServletMapping("/Primitive", "Primitive");
        context.addServletMapping("/Modern", "Modern");

        Engine engine = new StandardEngine();
        engine.addChild(host);
        engine.setDefaultHost("localhost");

        connector.setContainer(engine);
        try {
            connector.initialize();
            ((Lifecycle) connector).start();
            ((Lifecycle) engine).start();

            // make the application wait until we press a key.
            System.in.read();
            ((Lifecycle) engine).stop();
        } catch (Exception e) {
            e.printStackTrace();
        }
    }
}
Engine与Host 两个容器的主要内容就是上面这些,涉及到的类也是容器老生常谈的几种类,容器标准实现类 StandardEngine,StandardHost;容器Pipeline的基础阀 StandardEngineValve,StandardHostValve;容器相关的映射器 StandardEngineMapper,StandardHostMapper,这些映射器在Tomcat4中还存在,现在使用的Tomcat版本已经不存在这些映射器了,根据请求获取Host、Context的这些逻辑都放在了request对象中来实现了。想看看源码的看看这几个类就行。
本章内容就介绍到这里,Engine与Host两个容器的功能与我们的开发工作 关联并不太多,我们了解其工作方式即可。
源码分享
https://gitee.com/huo-ming-lu/HowTomcatWorks
这一篇在源码中有两个示例,感兴趣的同学可以自己运行看看


 3072
3072

 被折叠的 条评论
为什么被折叠?
被折叠的 条评论
为什么被折叠?
 到【灌水乐园】发言


