


 这篇博客介绍了如何在iOS应用中创建和自定义标签导航,包括使用Xcode模板创建Tabbed App,增加Tab数量,设置标签的图标和文字,以及为每个场景添加对应的ViewController类。此外,还提供了源码下载链接以便读者实践。
笔记对应代码实现的原工程github地址,里面有所有的资源,可以下载下来对照练习,工程地址为:https://github.com/cmyeyi/TabNavigationSimple
目录
1.2.4 给每个场景添加对应的ViewController类
1.3.1 修改AppDelegate添加ViewControllers
1 标签导航
1.1 概述
标签导航几乎是ios应用开发中用到的最多的一种导航模式,与android中的Tab一样,标签栏在底部,将应用按照功能划分为多个功能模块,彼此之间独立,通过tab来切换各个功能模块,如下图:

1.2 创建Tabbed Application
1.2.1 xcode模版直接创建Tabbed App
在创建工程的时候xcode是提供了Tabbed App的模版的,如下图:

创建完毕工程后默认是故事板,打开会看到三个Scene(场景)通过线条连接在一起,这些线就是Segue(过渡),最右边有一个箭头指向Tab Bar Controller,表示它是首页第一个视图控制器,也是第一个场景,第一个和用户交互的页面,两条连线将Tab Bar Controller和First View和Second View连接,这是两个过渡,

运行结果如下:

1.2.2 修改模版增加Tab
上面的模版已经给我们默认添加了2个tab,一般来说我们的应用至少有4个tab,现在我们有新需求,增加两个tab,共4组,[首页、风景、妹子、帅哥]
步骤:
1)从对象库中拖两个View Controller到设计界面中
2)按住control键,按住Tab Bar Controller拖拽到新添加的View Controller上,弹出对话框
3)选中弹出对话框中的view controllers
4)修改界面布局文字

gif步骤图如下:

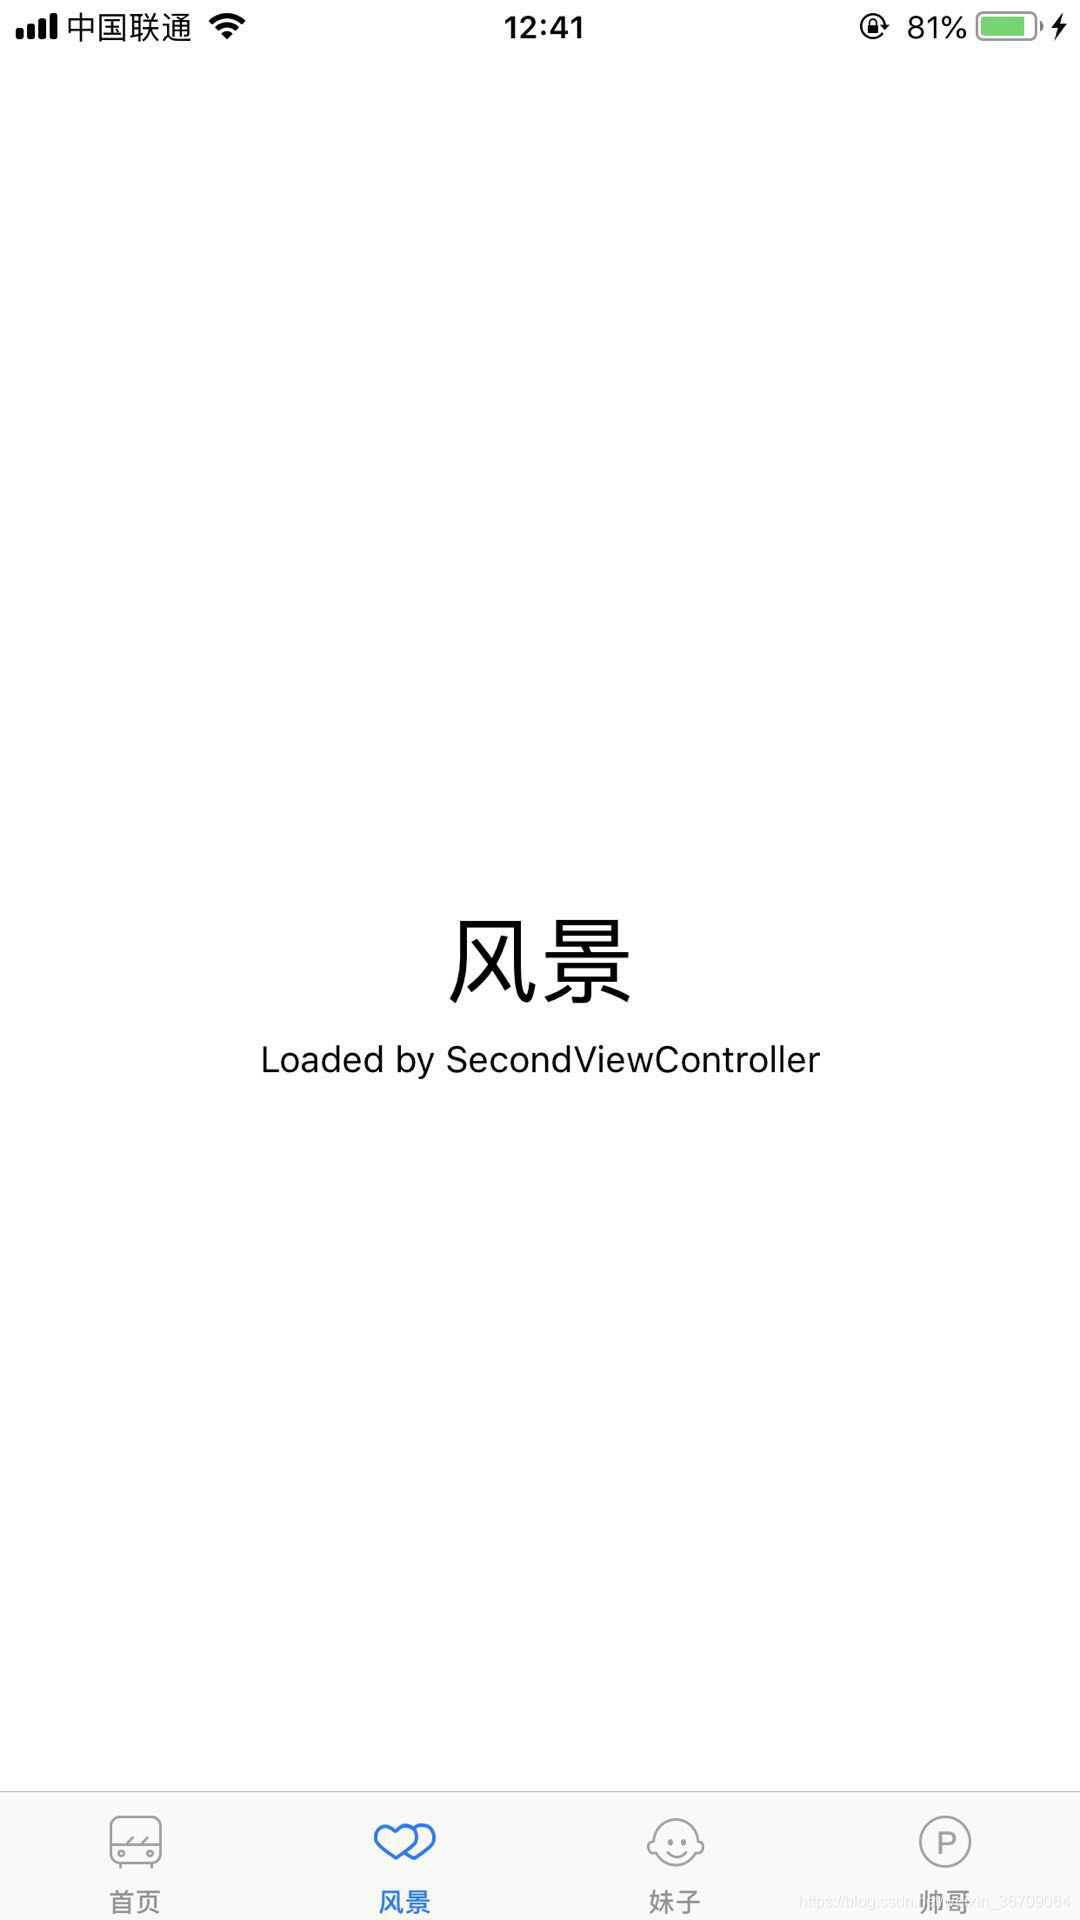
最后如下图效果:

运行到手机上的效果如下:

1.2.3 添加标签的icon和文字
可以看到运行效果,tab上没有icon和对应的文字。
1)添加图片资源到Assets.xcassets中
2)修改icon和文字如下图,红色标注,title修改的是tabItem的文字,image是Tab的icon
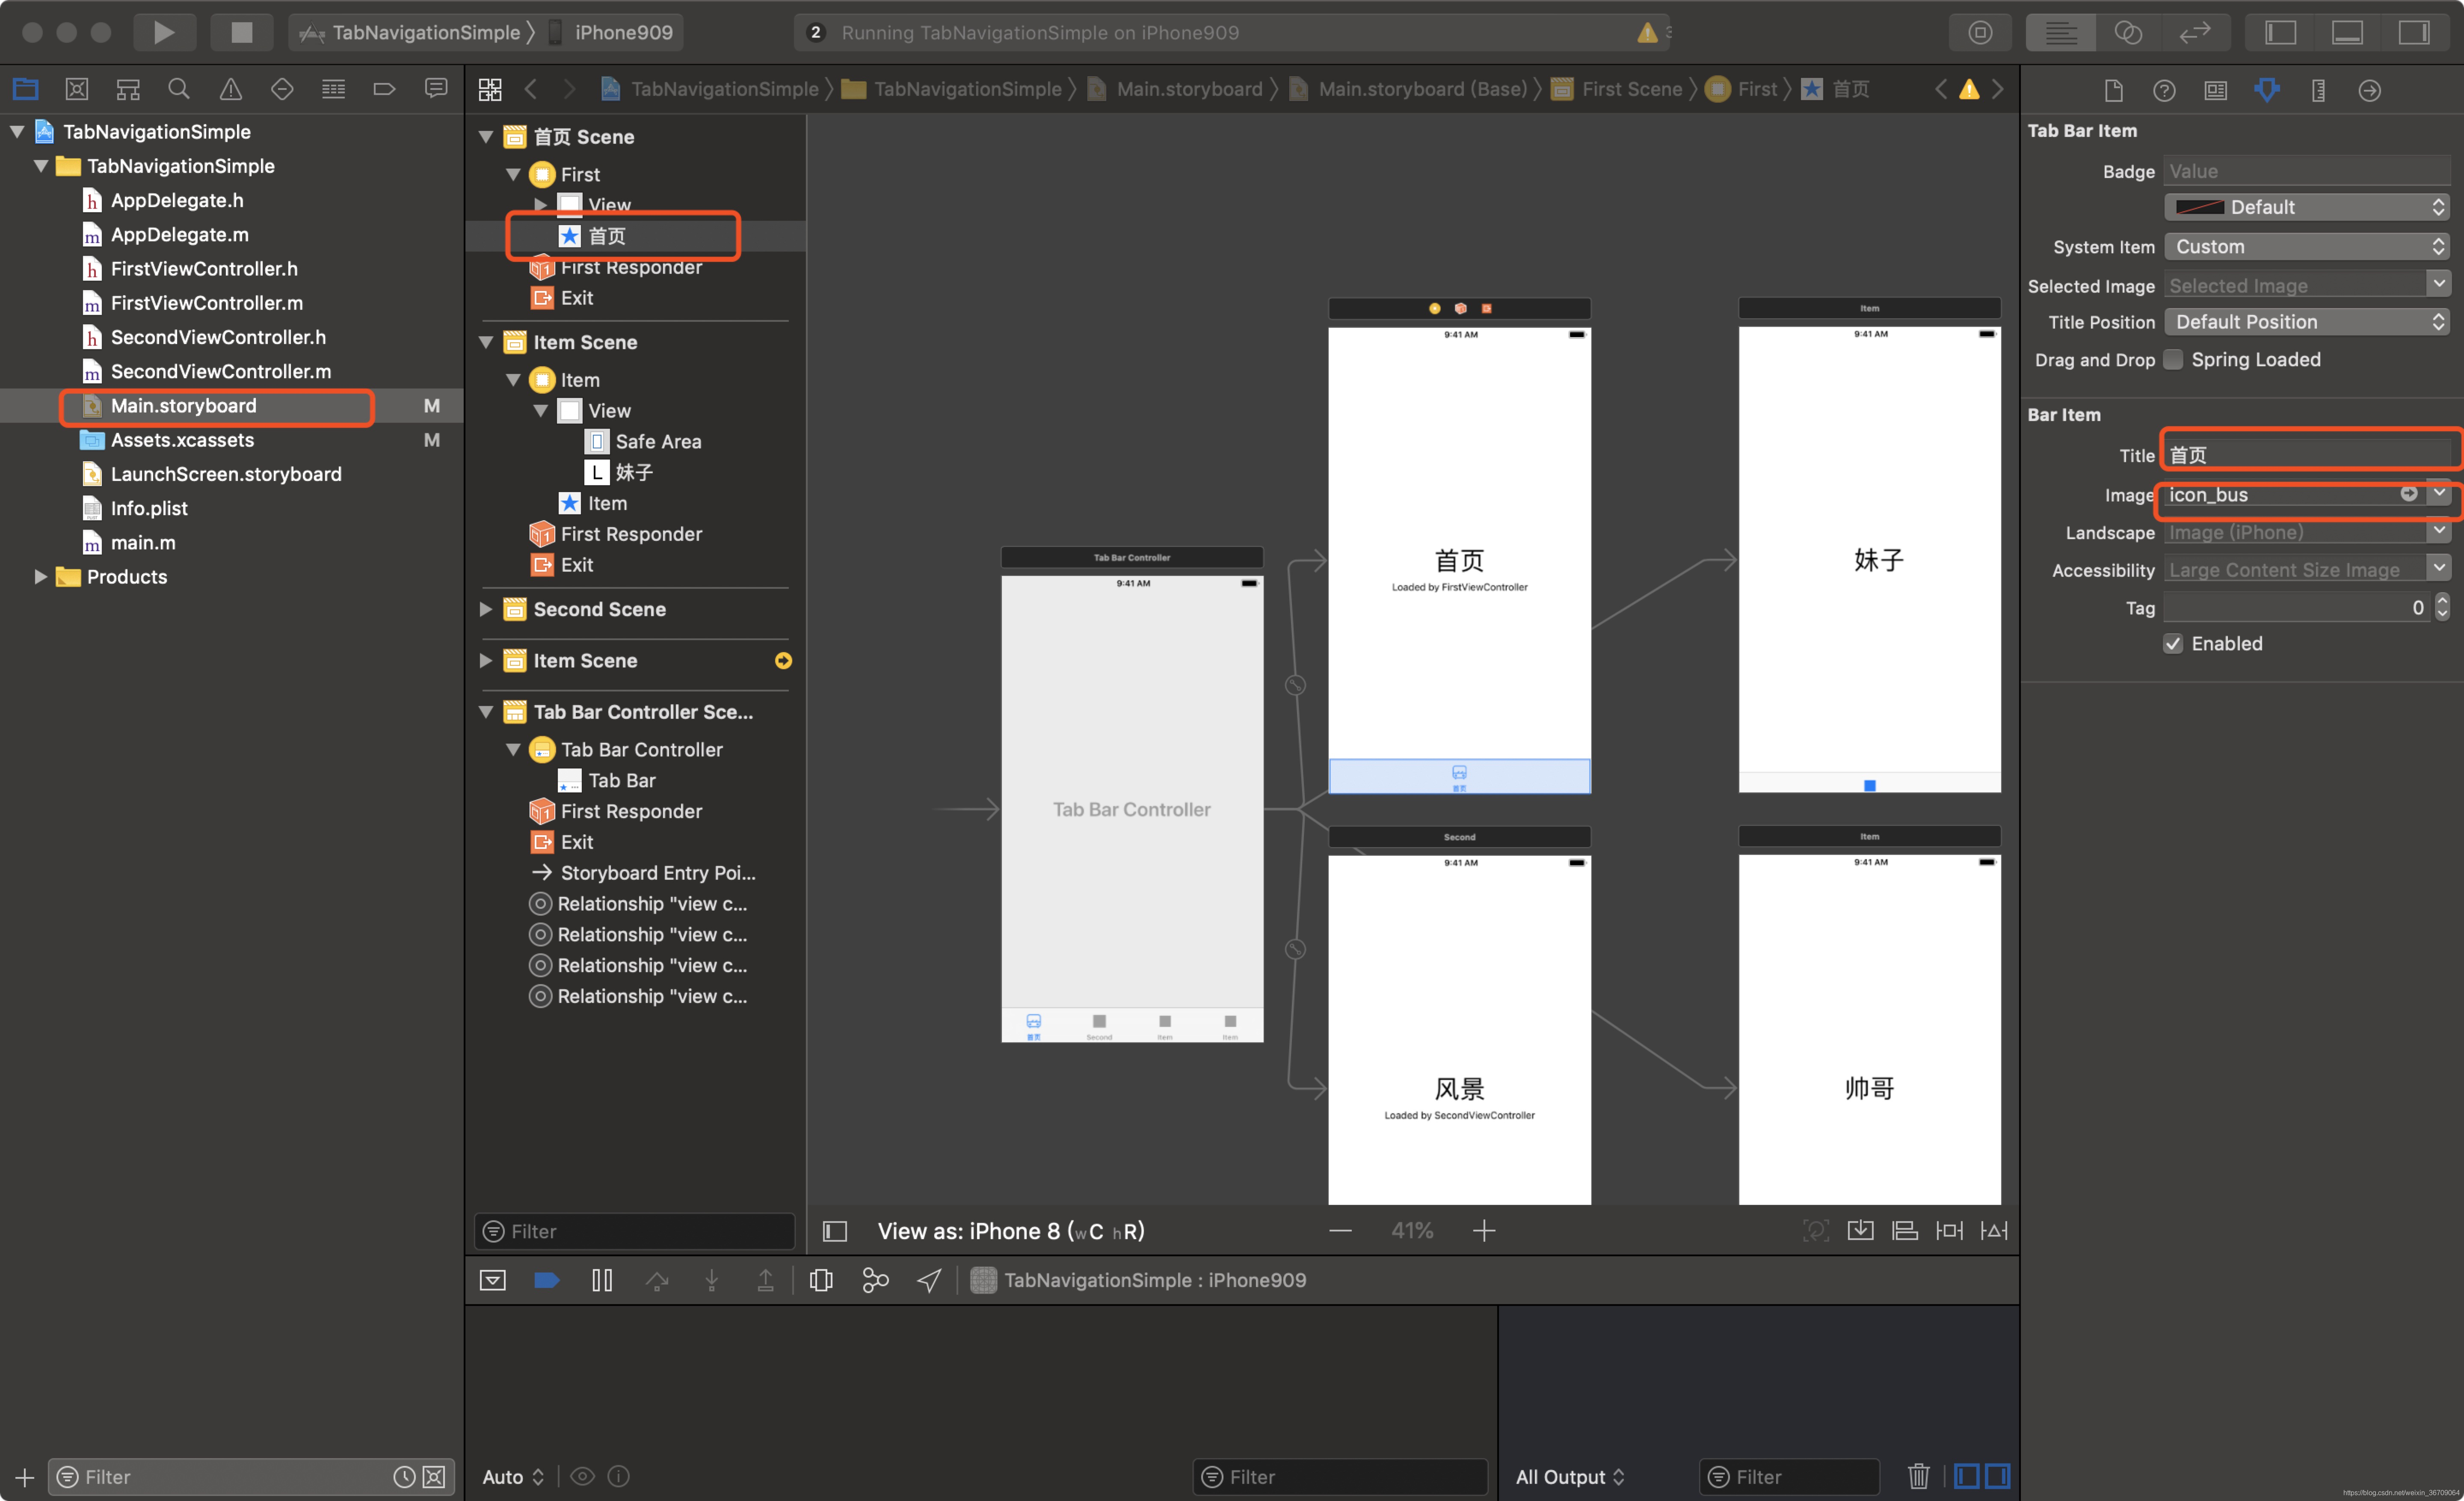
3)修改完毕后的效果图
1.2.4 给每个场景添加对应的ViewController类
目前已经有了FirstViewController和SecondViewController分别对应首页和风景,现在还需要添加两个GirlViewController(妹子)、BoyViewController(帅哥),但是名字似乎不太好,还是修改一下,修改比较麻烦,直接删除FirstViewController和SecondViewController得了,再添MainViewController(首页),SceneryViewController(风景)。
创建Cocoa Touch Class,也就是新建个ViewController类,很简单,分别创建GirlViewController(妹子)、BoyViewController(帅哥)、MainViewController(首页),SceneryViewController(风景)
关联故事板中的场景和ViewController类,如下图:注意可能会遇到没办法修改Custom Class,那是因为没有真正选中,要点击最左边红色框标注的,比如“首页 Scene”,“风景 Scene”,不是点击空白的故事板中的页面,那样是无法选中ViewController的。

1.2.5 类源码
在故事板中给每一个场景添加一个UILabel和UIImageView,然后拖拽连线生成属性变量imageView,给这个imageView一张图片资源,这里之给出一个MainViewController的源码,其他类似,图片资源事先准备好,图片名字叫main,后缀可以不用。
#import "MainViewController.h"

@interface MainViewController ()
@property (strong, nonatomic) IBOutlet UIImageView *imageView;

@end

@implementation MainViewController

- (void)viewDidLoad {
    [super viewDidLoad];
    // Do any additional setup after loading the view.

    self.imageView.backgroundColor = UIColor.orangeColor;//设置ImagedView背景为橙色
    self.imageView.contentMode = UIViewContentModeScaleAspectFill;//设置画图片内容显示的模式
    self.imageView.clipsToBounds = YES;//不设置这个的话上面的contentMode不起作用,依然会变形
    [self.imageView setImage:[UIImage imageNamed:@"main"]];
}


@end
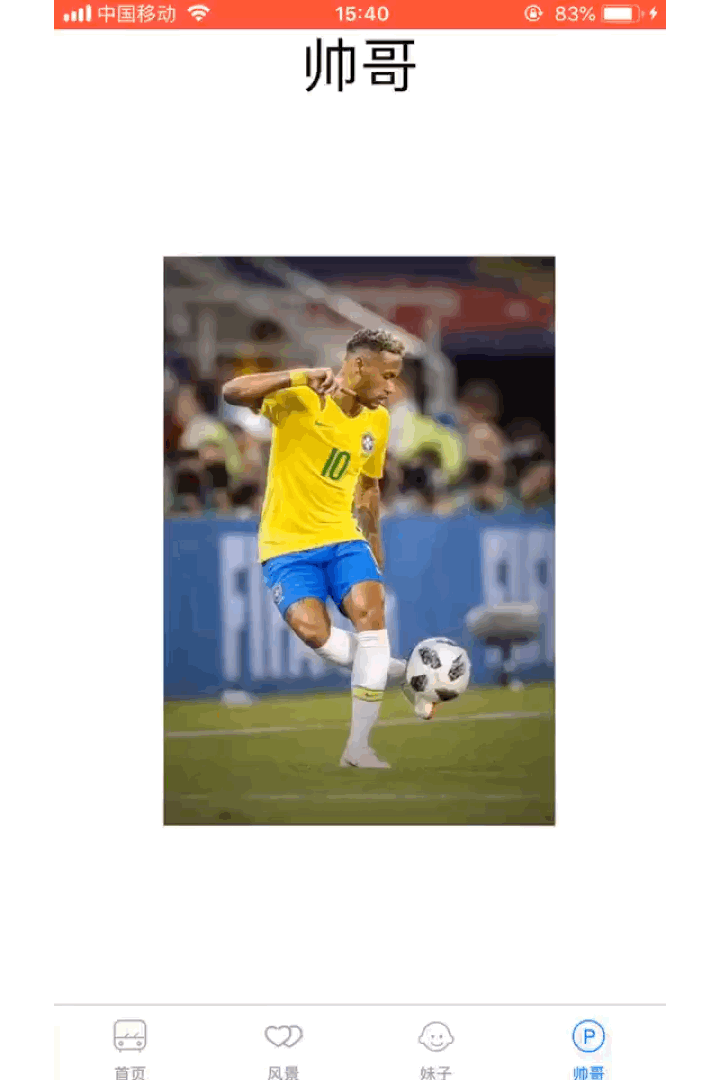
1.2.6 运行效果
1.3 代码实现
下面实现按照以下框架:
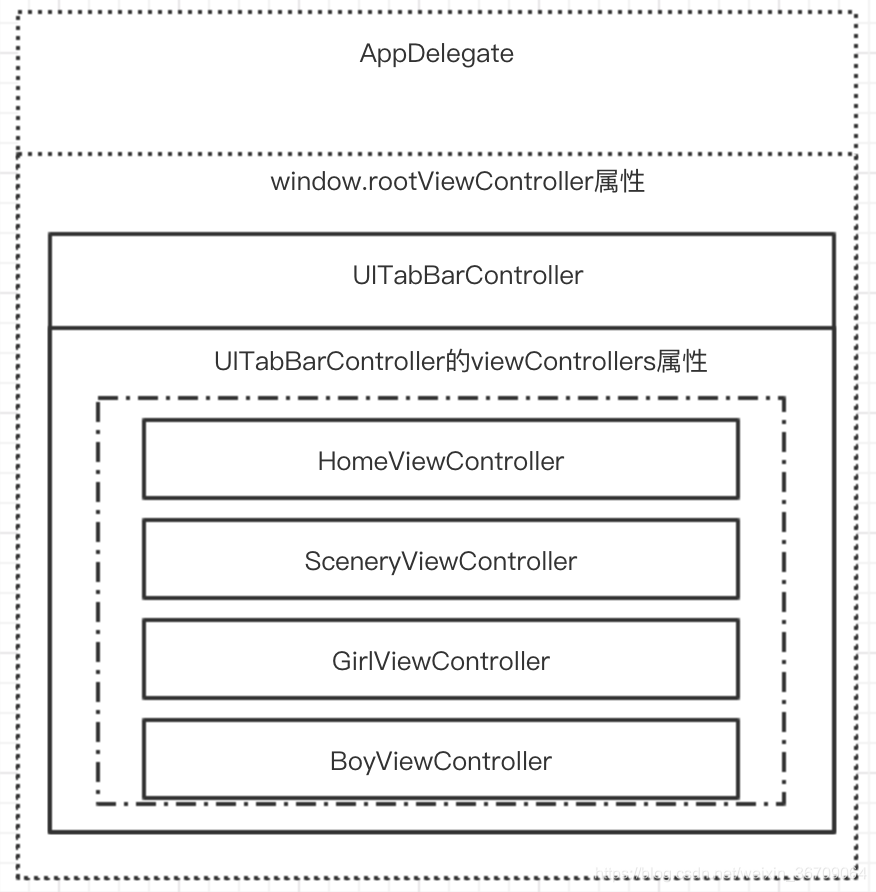
1.3.1 修改AppDelegate添加ViewControllers
AppDelegate相当于Android的Application。
通过代码来实现上面的效果需要从AppDelegate中修改,第一个函数中,也就是下面函数中添加代码:
#import "AppDelegate.h"
#import "HomeViewController.h"
#import "SceneryViewController.h"
#import "GirlViewController.h"
#import "BoyViewController.h"
@interface AppDelegate ()

@end

@implementation AppDelegate


- (BOOL)application:(UIApplication *)application didFinishLaunchingWithOptions:(NSDictionary *)launchOptions {
    // Override point for customization after application launch.

    CGRect screnn = [[UIScreen mainScreen] bounds];
    self.window = [[UIWindow alloc] initWithFrame:screnn];

    //添加底部TabBarController
    UITabBarController *tabBarController = [[UITabBarController alloc] init];
    self.window.rootViewController = tabBarController;//根容器设置

    //初始化首页UIViewController
    UIViewController *mainViewController = [[HomeViewController alloc] initWithNibName:@"HomeViewController" bundle:nil];
    //初始化风景UIViewController
    UIViewController *sceneryViewController = [[SceneryViewController alloc] initWithNibName:@"SceneryViewController" bundle:nil];
    //初始化妹子UIViewController
    UIViewController *girlViewController = [[GirlViewController alloc] initWithNibName:@"GirlViewController" bundle:nil];
    //初始化帅哥UIViewController
    UIViewController *boyViewController =  [[BoyViewController alloc] initWithNibName:@"BoyViewController" bundle:nil];
    //将初始化好的UIViewController添加到UITabBarController中
    tabBarController.viewControllers = @[mainViewController,sceneryViewController,girlViewController,boyViewController];


    [self.window makeKeyAndVisible];
    return YES;
}


- (void)applicationWillResignActive:(UIApplication *)application {
    // Sent when the application is about to move from active to inactive state. This can occur for certain types of temporary interruptions (such as an incoming phone call or SMS message) or when the user quits the application and it begins the transition to the background state.
    // Use this method to pause ongoing tasks, disable timers, and invalidate graphics rendering callbacks. Games should use this method to pause the game.
}


- (void)applicationDidEnterBackground:(UIApplication *)application {
    // Use this method to release shared resources, save user data, invalidate timers, and store enough application state information to restore your application to its current state in case it is terminated later.
    // If your application supports background execution, this method is called instead of applicationWillTerminate: when the user quits.
}


- (void)applicationWillEnterForeground:(UIApplication *)application {
    // Called as part of the transition from the background to the active state; here you can undo many of the changes made on entering the background.
}


- (void)applicationDidBecomeActive:(UIApplication *)application {
    // Restart any tasks that were paused (or not yet started) while the application was inactive. If the application was previously in the background, optionally refresh the user interface.
}


- (void)applicationWillTerminate:(UIApplication *)application {
    // Called when the application is about to terminate. Save data if appropriate. See also applicationDidEnterBackground:.
}


@end
注意,这里创建的各个ViewController都是通过xib布局的,这里不熟悉的可以参考《IOS 学习笔记 使用xib文件构建界面》操作。
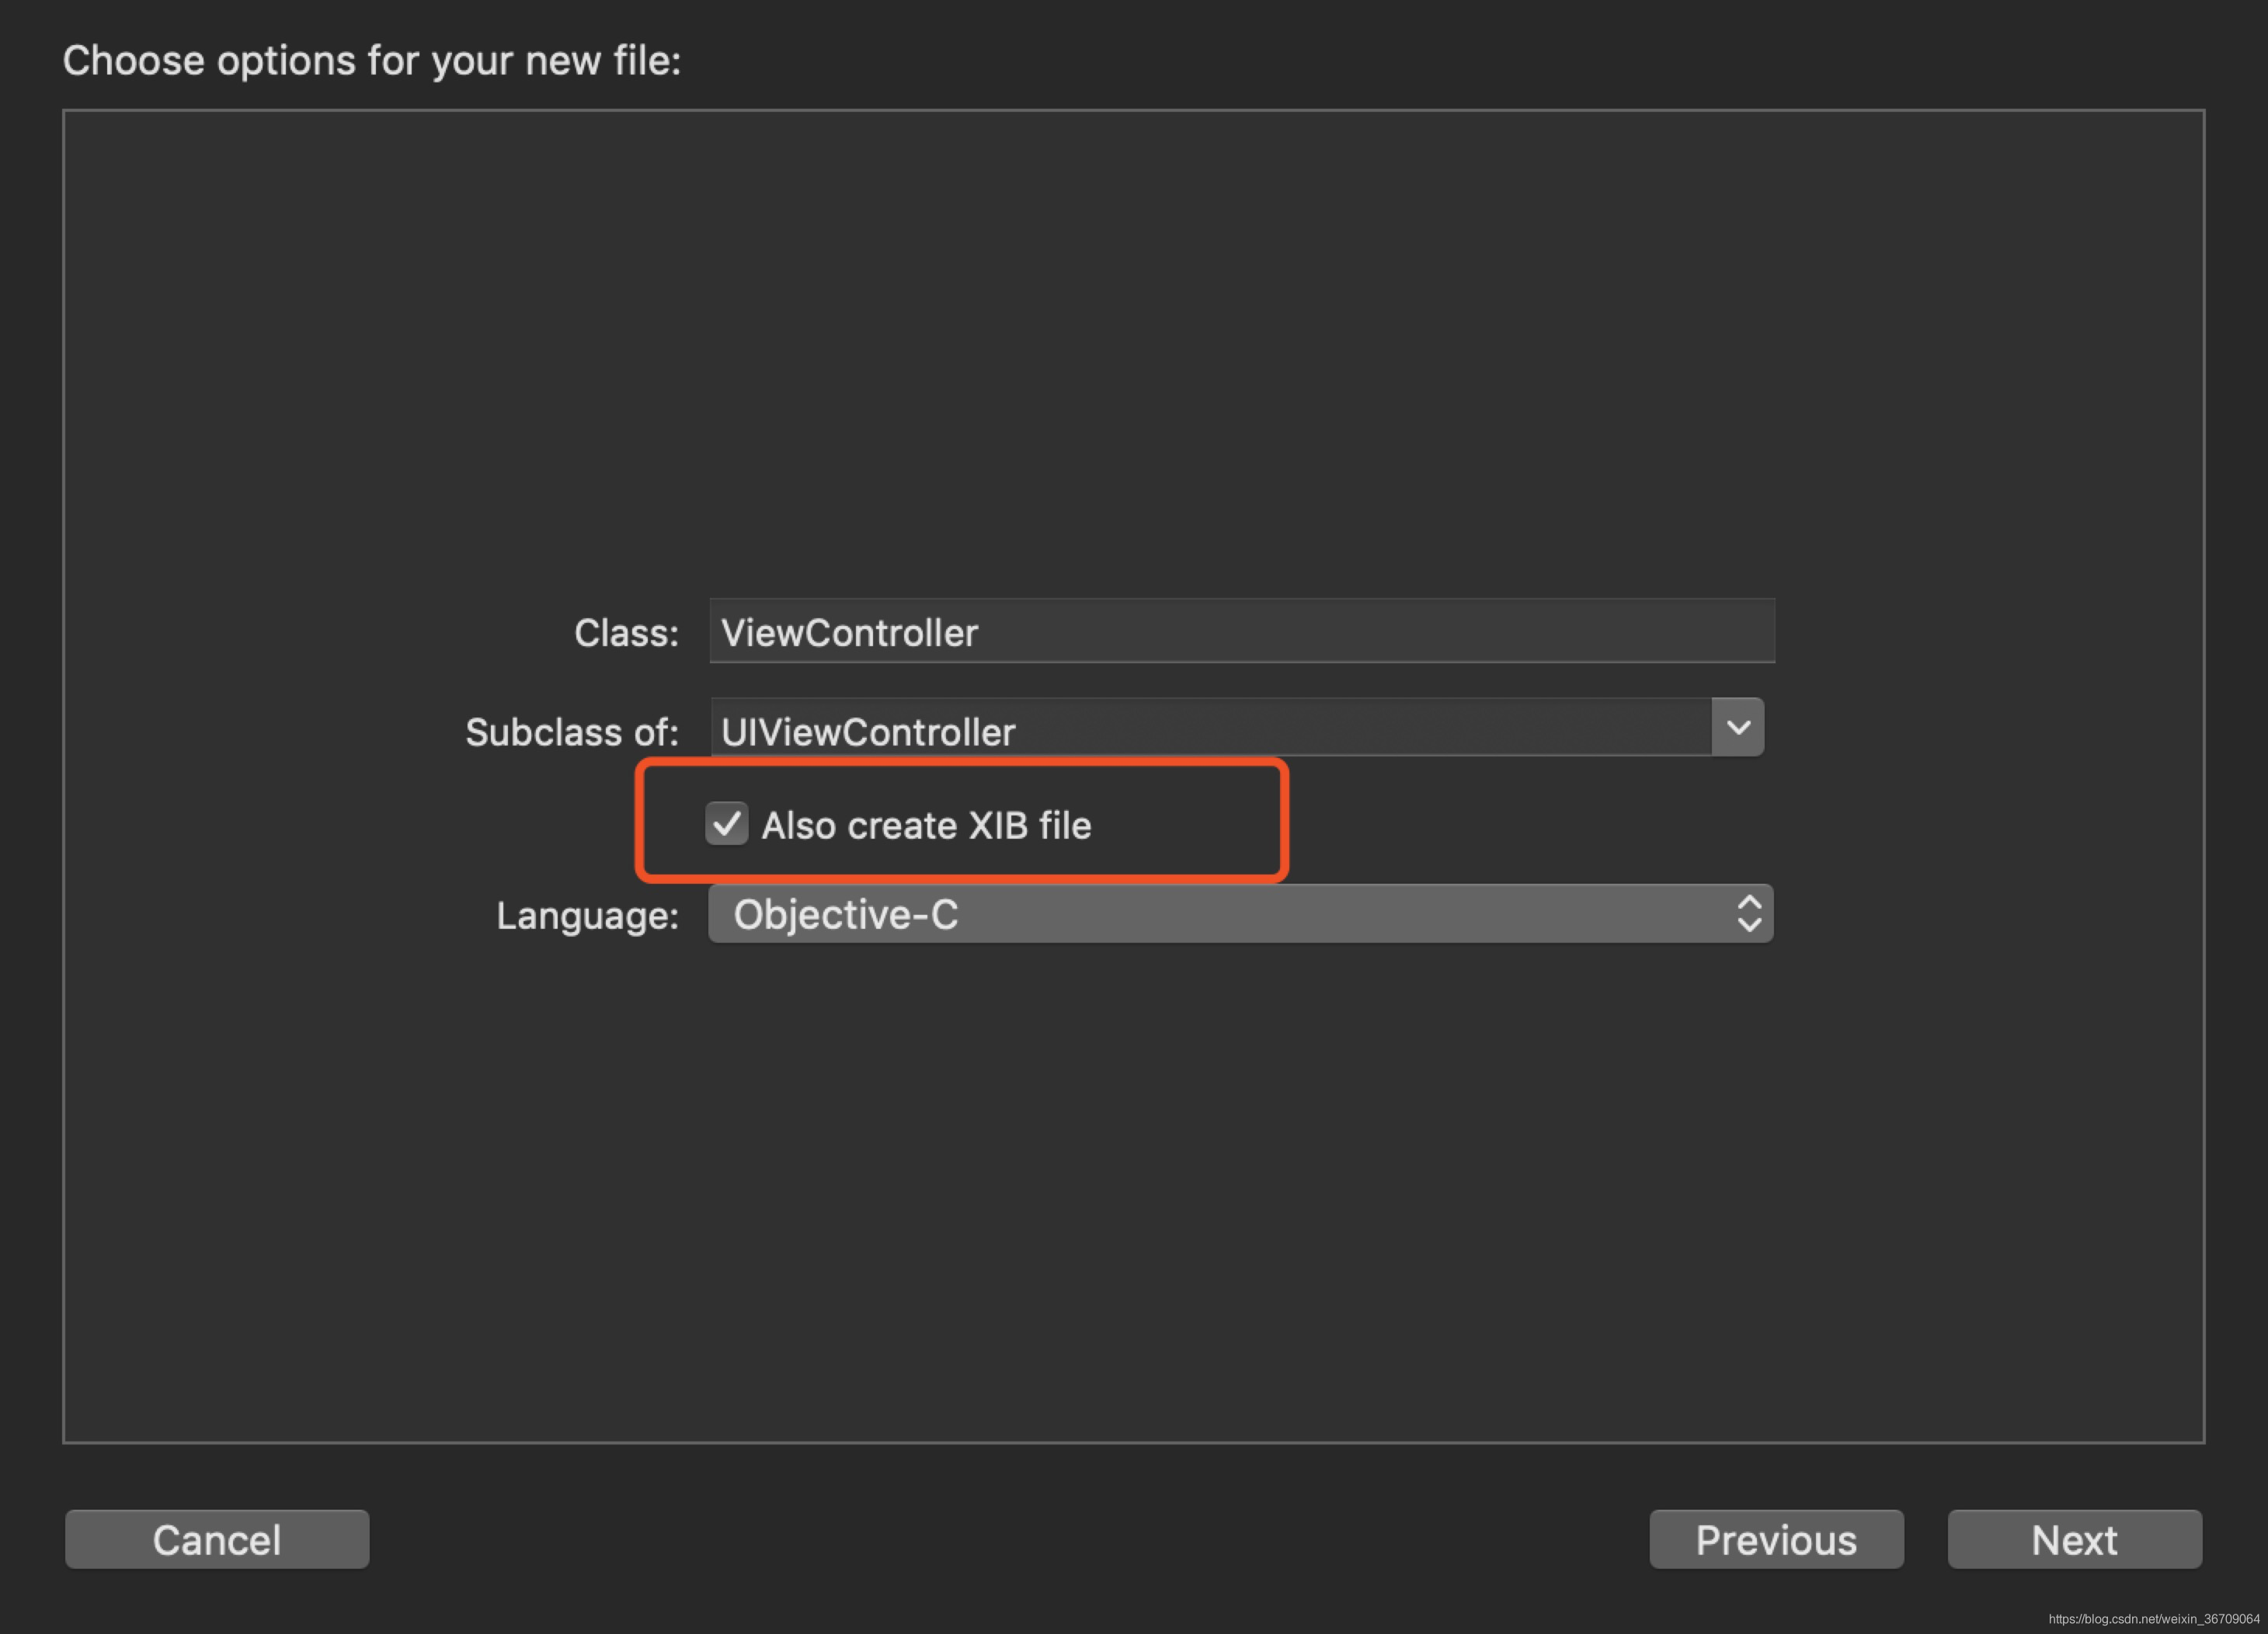
这里需要创建四个ViewController,分别是HomeViewController、SceneryViewController、GirlViewController、BoyViewController,创建各个ViewController的时候注意勾选“Also create XIB file”,否则initWithNibName初始化的时候报错:"Could not load NIB in bundle..."
1.3.2 添加TAB的iocn和文字
添加tab上的icon和文字可能暂时不知道怎么下手,因为这里通过xib布局每一个页面,添加tab上的icon和文字则需要重写每一个ViewController的initWithNibName方法,如下,这里只是给出一个例子:
#import "HomeViewController.h"

@interface HomeViewController ()

@end

@implementation HomeViewController

- (void)viewDidLoad {
    [super viewDidLoad];
    // Do any additional setup after loading the view from its nib.
}


- (instancetype)initWithNibName:(NSString *)nibNameOrNil bundle:(NSBundle *)nibBundleOrNil {
    self = [super initWithNibName:nibNameOrNil bundle:nibBundleOrNil];
    if(self) {
        self.title = @"首页";
        self.tabBarItem.image = [UIImage imageNamed:@"icon_bus"];
    }

    return self;
}

@end
1.3.3 源码下载
下面是git上源码的地址:https://github.com/cmyeyi/TabNavigationSimple,点击下载源码,有图片资源可以练习
1.3.4 运行效果


 1094
1094

 被折叠的 条评论
为什么被折叠?
被折叠的 条评论
为什么被折叠?
 到【灌水乐园】发言


