


 本文详细介绍了OpenNI2 SDK的安装配置步骤及如何使用C++编程语言实现简单的Kinect设备数据流读取。从环境搭建到代码示例,帮助读者快速上手OpenNI2 SDK。
对于新的东西总是很有激情,昨天安装了最新版的OpenNI 2 SDK,发现很多东西跟之前的不太一样了,今天根据OpenNI 2自带的程序捯饬捯饬,初看怎么使用,废话不多说,直接上图说话。
1. 创建新的C++控制台项目MyMyOpenNI2SimpleView,具体省去;
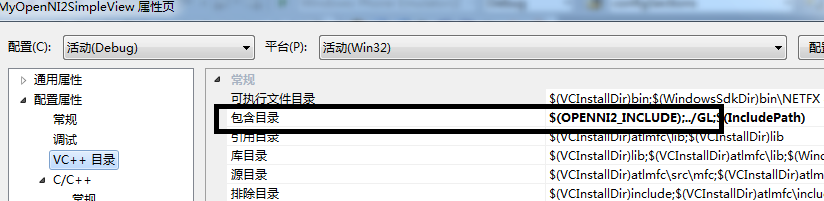
2. 首先跟使用传统的OpenCV等类似,都需要进行配置,右键点击项目,选择属性窗口,选择VC++目录,在右边包含目录中输入需要载录库的include文件夹,其中包括OPenNI2的include文件夹和需要用到的GL文件夹;
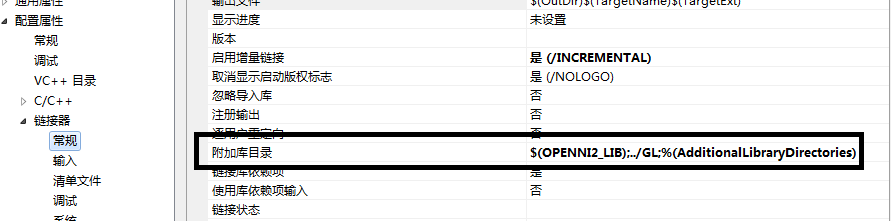
3. 接着同样在属性页的“l链接器”中的“常规”选项的“附件库目录”中输入OpenNI2的lib文件夹,和GL文件夹;
4. 最后在链接器下的“输入”选项的的附加依赖项输入所需要的OpenNI2.lib和Glut32.lib。

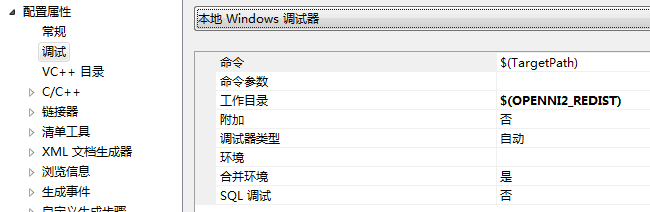
最后需要将“C:\Program Files\OpenNI2\Redist”文件夹加入到工程中,我的做法是在“调试”的工作目录指到该文件夹下
5. 基本配置完之后,开始编写代码了,主要有以下几个步骤:
5.1 include OpenNI.h,基本要用到的OpenNI C++ API都在openni这个namespace下。
5.2 使用openni::OpenNI::initialize()函数初始化OpenNI环境。
5.3 新建openni::Device对象device,然后利用函数device.open()打开设备,其中函数参数为制定装置的URI。
5.4 新建openni::VideoStream对象,利用它的create()函数,指定这个VideoStrea要使用的装置的哪个感应器(红外线、彩色影像和深度影像)。创建完之后,就可以利用start()和stop()函数来控制数据流的读取和停止操作。
5.5 根据获取的数据流进行一些你自己的处理和操作。
5.6 当不再使用感应器资源数据流时,首先需要使用函数destroy()关闭VideoStream流。
5.7 然后利用设备对象device的close()函数关闭装置,最后利用openni::OpenNI::shutdown()来关闭整个OpenNI环境。
6. 上main()函数代码:
#include "stdafx.h"
#include <iostream>
#include <OpenNI.h>
#include "Viewer.h"
int main(int argc, char** argv)
{
openni::Status rc = openni::STATUS_OK;
openni::Device device;
openni::VideoStream depth, color;
const char* deviceURI = openni::ANY_DEVICE;
// 1. 初始化OpenNI.
rc = openni::OpenNI::initialize();
// 2. 打开Kinect设备,这里deviceURI设置为openni::ANY_DEVICE
/*
* (1) 如果有多个装置,xiangyao指定要用哪个装置的话,需要先通过
* static void openni::OpenNI::enumerateDevices(Array<DeviceInfo>* deviceInfoList)
* 这个函数获取可使用的装置列表,在通过指定的URI的方式,来指定要开启的装置;
* (2) 如果没有要特别指定的话或者只有一个装置的话,则是用openni::ANY_DEVICE作为URI,让系统
* 决定要使用的装置.
*/
rc = device.open(deviceURI);
// 3. openni::SENSOR_DEPTH表示创建深度数据流;
/************************************************************************/
/* 这里的create()函数的第二个参数是一个枚举类型enum openni::SensorType,主要有
* 三个Enumerator:SENSOR_IR, SENSOR_COLOR和SENSOR_DEPTH.通过字面也知道他们是
* 分别要获取哪个类型的数据流信息。
*/
/************************************************************************/
rc = depth.create(device, openni::SENSOR_DEPTH);
if (rc == openni::STATUS_OK)
{
// 4. 透过start和stop函数来控制数据流的读取。
rc = depth.start();
if (rc != openni::STATUS_OK)
{
printf("SimpleViewer: Couldn't start depth stream:\n%s\n", openni::OpenNI::getExtendedError());
depth.destroy();
}
}
else
{
printf("SimpleViewer: Couldn't find depth stream:\n%s\n", openni::OpenNI::getExtendedError());
}
// 同样的利用openni::SENSOR_COLOR读取颜色图像数据流。
rc = color.create(device, openni::SENSOR_COLOR);
if (rc == openni::STATUS_OK)
{
rc = color.start();
if (rc != openni::STATUS_OK)
{
printf("SimpleViewer: Couldn't start color stream:\n%s\n", openni::OpenNI::getExtendedError());
color.destroy();
}
}
else
{
printf("SimpleViewer: Couldn't find color stream:\n%s\n", openni::OpenNI::getExtendedError());
}
if (!depth.isValid() || !color.isValid())
{
printf("SimpleViewer: No valid streams. Exiting\n");
openni::OpenNI::shutdown();
return 2;
}
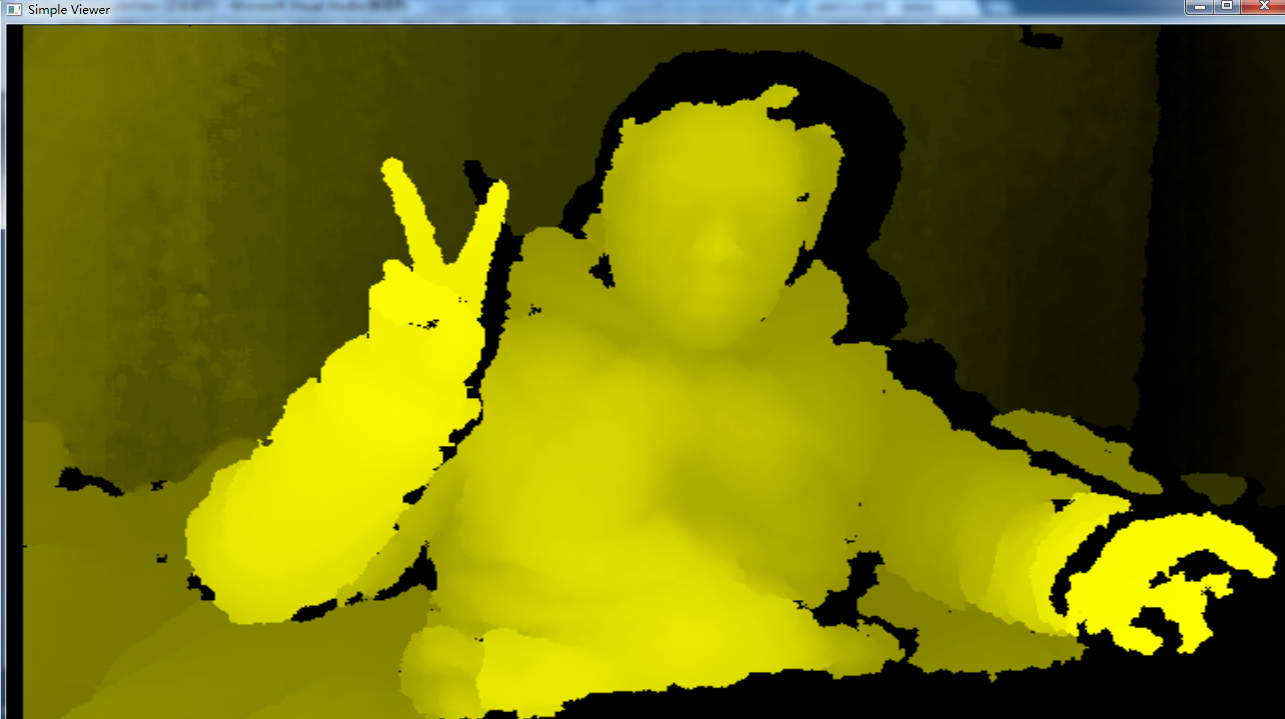
// 5. 根据获取到的深度数据流和彩色图像数据流,创建SampleViewer对象,显示深度图像。
SampleViewer sampleViewer("Simple Viewer", device, depth, color);
rc = sampleViewer.init(argc, argv);
if (rc != openni::STATUS_OK)
{
openni::OpenNI::shutdown();
return 3;
}
sampleViewer.run();
}
7. 利用到的SampleView类文件在OpenNI SDK中有提供,最后上图(2~~~):
留住安装和配置过程以防下次自己忘了,或者给大家做个小参考。写的很水,请大家多多指导哦~~~


 5322
5322

 被折叠的 条评论
为什么被折叠?
被折叠的 条评论
为什么被折叠?
 到【灌水乐园】发言


