


使用 maven构建项目,那么肯定要搭建maven私服了
一 : 下载安装包
nexus-2.14.4-03-bundle.tar.gz
下载地址 : https://www.sonatype.com/download-oss-sonatype
二 : 解压到相应的目录下
 # cd /usr/local
 # mkdir nexus
 # tar -xzvf nexus-2.11.2-03-bundle.tar.gz -C nexus
查看安装文件
 # cd nexus
 # ls
 nexus-2.11.2-03   sonatype-work
三 : 修改配置文件
[root@iz2zecw1gpc5cduk9e3usgz conf]# pwd
/usr/local/nexus/nexus-2.14.4-03/conf
[root@iz2zecw1gpc5cduk9e3usgz conf]# ls
jetty-http-redirect-to-https.xml  jetty-jmx.xml         jetty.xml           logback.xml
jetty-https.xml                   jetty-requestlog.xml  logback-access.xml  nexus.properties
[root@iz2zecw1gpc5cduk9e3usgz conf]# vim nexus.properties
1, 配置端口
# Sonatype Nexus
# ==============
# This is the most basic configuration of Nexus.

# Jetty section
application-port=8081     // 这里就是 nexus端口了
application-host=0.0.0.0
nexus-webapp=${bundleBasedir}/nexus
nexus-webapp-context-path=/nexus

# Nexus section
nexus-work=${bundleBasedir}/../sonatype-work/nexus
runtime=${bundleBasedir}/nexus/WEB-INF

# orientdb buffer size in megabytes
storage.diskCache.bufferSize=4096
2, 配置用户
[root@iz2zecw1gpc5cduk9e3usgz bin]# pwd
/usr/local/nexus/nexus-2.14.4-03/bin
[root@iz2zecw1gpc5cduk9e3usgz bin]# ls
jsw  nexus  nexus.bat
[root@iz2zecw1gpc5cduk9e3usgz bin]# vim nexus
# Set this to the root of the Nexus installation
NEXUS_HOME=".."

# If specified, the Wrapper will be run as the specified user.

# IMPORTANT - Make sure that the user has the required privileges
# to write into the Nexus installation directory.

# NOTE - This will set the user which is used to run the Wrapper as well as
#  the JVM and is not useful in situations where a privileged resource or
#  port needs to be allocated prior to the user being changed.
#RUN_AS_USER=
RUN_AS_USER=root    // 配置用户


# Application
APP_NAME="nexus"
APP_LONG_NAME="Nexus OSS"
四 : 启动nexus
# /usr/local/nexus/nexus-2.11.2-03/bin/nexus start
****************************************

WARNING - NOT RECOMMENDED TO RUN AS ROOT

****************************************

Starting Nexus OSS...

Started Nexus OSS.
五 : 测试
在浏览器打开:http://ip:8081/nexus,登录:用户名admin 默认密码:admin123
六 : 配置仓库
登录系统后点击左侧菜单栏Views/Repositories下的Repositories选择Central仓库点击下边的Configuration把Download Remote Indexes属性设为True保存即可。

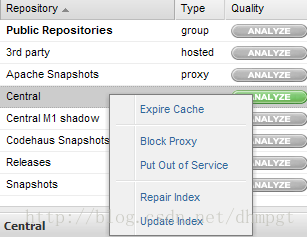
然后在Central仓库上右键然后点击Repair Index 即可下载中心仓库的索引文件,稍等几分钟点击下边的Browse Index即可看见下载的索引文件。
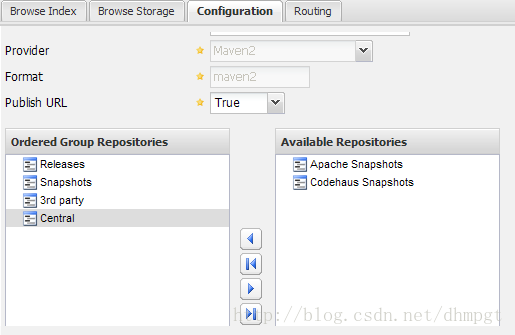
往Public Repositories中添加Central仓库,点击Public Repositories在Configuration选项卡中把Central移到左侧即可。
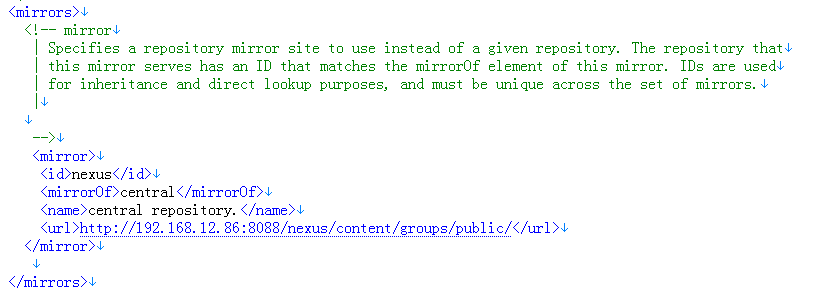
在mirrors添加mirror节点地址指向建立的私有仓库地址,mirrorOf属性值设为central为了覆盖超级pom中指定的central地址,如下


 624
624

 被折叠的 条评论
为什么被折叠?
被折叠的 条评论
为什么被折叠?
 到【灌水乐园】发言


