


 本文介绍如何搭建Elasticsearch集群,并通过River插件实现MongoDB与Elasticsearch之间的数据同步。包括集群配置、索引创建、映射设置及同步脚本编写等关键步骤。

MM"为啥mongo是2台,es只有一台"
我“放着我来,集群准备”
~~~~~~~~~~~~~~~~~~~~~~~~~
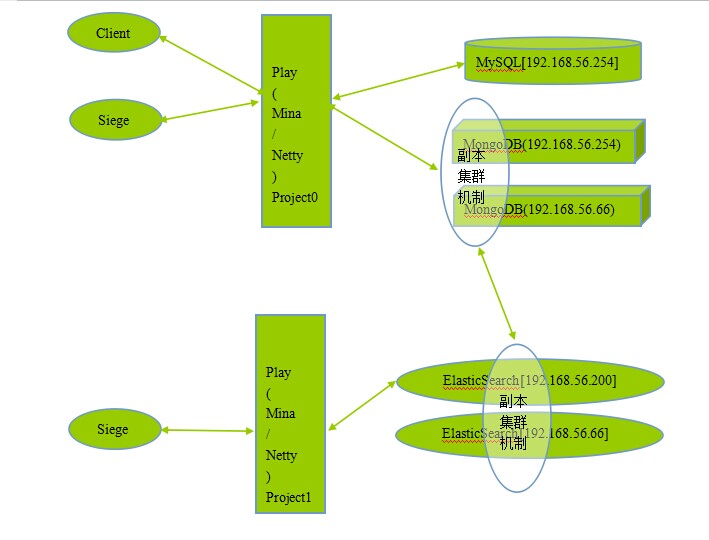
安装前提:已经按照上一篇文章完成单机部署及插件安装了。
然后:
在66上执行:
scp -r root@192.168.56.200:/usr/local/elasticsearch-1.1.0 ./Vi config/elasticsearch.yml
修改下node的名字即可。
启动时,分别启动2个节点,集群就是这么简单。
root@ubuntu:~# curl localhost:9200/_cluster/health?pretty
{
  "cluster_name" : "elasticsearch_cluster",
  "status" : "green",
  "timed_out" : false,
  "number_of_nodes" : 2,
  "number_of_data_nodes" : 2,
  "active_primary_shards" : 1,
  "active_shards" : 2,
  "relocating_shards" : 0,
  "initializing_shards" : 0,
  "unassigned_shards" : 0
}
下面开始从MongoDB里拉取任务。
脚本如下:
8.1 创建索引
选择任何一个服务器,执行...
curl -i -XPUT  'localhost:9200/test' -d '
{
   "settings" :
   {
      "number_of_shards" : 2,
      "number_of_replicas" : 1
   }
}
'
响应如下:
HTTP/1.1 200 OK
Content-Type: application/json; charset=UTF-8
Content-Length: 21

{"acknowledged":true}

8.2 创建映射
curl -i -XPUT  'http://localhost:9200/test/_mapping/blog' -d '
{
	"properties":
	{
	"_id":{"type":"string","index":"not_analyzed"},
	"category":{"type":"string","index":"not_analyzed"},
	"title":{"type":"string","index":"analyzed","analyzer":"mmseg"},
	"abstract":{"type":"string","index":"analyzed","analyzer":"mmseg"},
	"content":{"type":"string","index":"analyzed","analyzer":"mmseg"},
	"tags":{"type":"string","index":"analyzed","analyzer":"whitespace"}
	}
}
'
响应如下:
HTTP/1.1 200 OK
Content-Type: application/json; charset=UTF-8
Content-Length: 21

{"acknowledged":true}
8.3 创建拉取脚本
与mysql不同,这里指定一个即可。
curl -XPUT "localhost:9200/_river/river-mongodb/_meta" -d '
{
"type": "mongodb",
"mongodb":
{
"servers":
[
{ "host": "192.168.56.254", "port": "27017" },
{ "host": "192.168.56.66", "port": "27018" }
],
"options":
{
"secondary_read_preference" : true,
"exclude_fields": ["category"],
"skip_initial_import" : false
},
"db": "test",
"collection": "blog",
"gridfs": false
},
"index":
{
"name": "test",
"type": "blog"
}
}'
响应如下:
{"_index":"_river","_type":"river-mongodb","_id":"_meta","_version":1,"created":true}
下一篇:
http://my.oschina.net/qiangzigege/blog/276726


 1949
1949

 被折叠的 条评论
为什么被折叠?
被折叠的 条评论
为什么被折叠?
 到【灌水乐园】发言


