


 本文介绍连通区域分析中的两种方法:两遍扫描法(Two-Pass)与种子填充法(Seed-Filling),并提供了这两种方法的OpenCV+C++实现。连通区域分析广泛应用于图像处理领域,如OCR字符分割、视觉跟踪中的运动目标提取等。
【摘要】
本文主要介绍在CVPR和图像处理领域中较为常用的一种图像区域(Blob)提取的方法——连通性分析法(连通区域标记法)。文中介绍了两种常见的连通性分析的算法:1)Two-pass;2)Seed-Filling种子填充,并给出了两个算法的基于OpenCV的C++实现代码。
一、连通区域分析
连通区域(Connected Component)一般是指图像中具有相同像素值且位置相邻的前景像素点组成的图像区域(Region,Blob)。连通区域分析(Connected Component Analysis,Connected Component Labeling)是指将图像中的各个连通区域找出并标记。
连通区域分析是一种在CVPR和图像分析处理的众多应用领域中较为常用和基本的方法。例如:OCR识别中字符分割提取(车牌识别、文本识别、字幕识别等)、视觉跟踪中的运动前景目标分割与提取(行人入侵检测、遗留物体检测、基于视觉的车辆检测与跟踪等)、医学图像处理(感兴趣目标区域提取)、等等。也就是说,在需要将前景目标提取出来以便后续进行处理的应用场景中都能够用到连通区域分析方法,通常连通区域分析处理的对象是一张二值化后的图像。
二、连通区域分析的算法
从连通区域的定义可以知道,一个连通区域是由具有相同像素值的相邻像素组成像素集合,因此,我们就可以通过这两个条件在图像中寻找连通区域,对于找到的每个连通区域,我们赋予其一个唯一的标识(Label),以区别其他连通区域。
连通区域分析有基本的算法,也有其改进算法,本文介绍其中的两种常见算法:
1)Two-Pass法;2)Seed-Filling种子填充法;
Note:
a、这里的扫描指的是按行或按列访问以便图像的所有像素,本文算法采用的是按行扫描方式;
b、图像记为B,为二值图像:前景像素(pixel value = 1),背景像素(pixel value = 0)
c、label从2开始计数;
d、像素相邻关系:4-领域、8-领域,本文算法采用4-邻域;


4—领域图例 8—领域图例
1)Two-Pass(两遍扫描法)
两遍扫描法,正如其名,指的就是通过扫描两遍图像,就可以将图像中存在的所有连通区域找出并标记。思路:第一遍扫描时赋予每个像素位置一个label,扫描过程中同一个连通区域内的像素集合中可能会被赋予一个或多个不同label,因此需要将这些属于同一个连通区域但具有不同值的label合并,也就是记录它们之间的相等关系;第二遍扫描就是将具有相等关系的equal_labels所标记的像素归为一个连通区域并赋予一个相同的label(通常这个label是equal_labels中的最小值)。
下面给出Two-Pass算法的简单步骤:
(1)第一次扫描:
访问当前像素B(x,y),如果B(x,y) == 1:
a、如果B(x,y)的领域中像素值都为0,则赋予B(x,y)一个新的label:
label += 1, B(x,y) = label;
b、如果B(x,y)的领域中有像素值 > 1的像素Neighbors:
1)将Neighbors中的最小值赋予给B(x,y):
B(x,y) = min{Neighbors}
2)记录Neighbors中各个值(label)之间的相等关系,即这些值(label)同属同一个连通区域;
labelSet[i] = { label_m, .., label_n },labelSet[i]中的所有label都属于同一个连通区域(注:这里可以有多种实现方式,只要能够记录这些具有相等关系的label之间的关系即可)
(2)第二次扫描:
访问当前像素B(x,y),如果B(x,y) > 1:
a、找到与label = B(x,y)同属相等关系的一个最小label值,赋予给B(x,y);
完成扫描后,图像中具有相同label值的像素就组成了同一个连通区域。
下面这张图动态地演示了Two-pass算法:

2)Seed Filling(种子填充法)
种子填充方法来源于计算机图形学,常用于对某个图形进行填充。思路:选取一个前景像素点作为种子,然后根据连通区域的两个基本条件(像素值相同、位置相邻)将与种子相邻的前景像素合并到同一个像素集合中,最后得到的该像素集合则为一个连通区域。
下面给出基于种子填充法的连通区域分析方法:
(1)扫描图像,直到当前像素点B(x,y) == 1:
a、将B(x,y)作为种子(像素位置),并赋予其一个label,然后将该种子相邻的所有前景像素都压入栈中;
b、弹出栈顶像素,赋予其相同的label,然后再将与该栈顶像素相邻的所有前景像素都压入栈中;
c、重复b步骤,直到栈为空;
此时,便找到了图像B中的一个连通区域,该区域内的像素值被标记为label;
(2)重复第(1)步,直到扫描结束;
扫描结束后,就可以得到图像B中所有的连通区域;
下面这张图动态地演示了Seed-Filling算法:

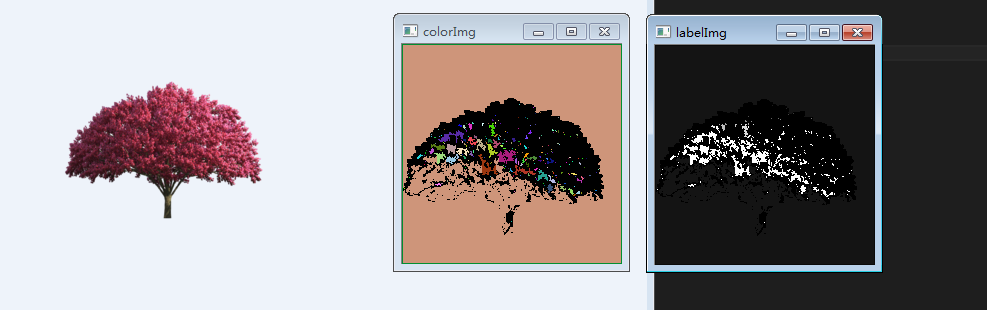
三、实验演示
1)前景二值图像

2)连通区域分析方法标记后得到的label图像
Two-pass算法:

Seed-filling算法:

注:为了显示方便,将像素值乘以了一个整数进行放大。
3)color后的label图像
Two-pass算法:

Seed-filling算法:

四、代码
1)Two-pass算法的一种实现
说明:基于OpenCV和C++实现,领域:4-领域。实现与算法描述稍有差别(具体为记录具有相等关系的label方法实现上)。
2)Seed-Filling种子填充方法
说明:基于OpenCV和C++实现;领域:4-领域。
3)颜色标记(用于显示)
4.测试程序
#include <iostream>
#include <string>
#include <list>
#include <vector>
#include <map>
#include <stack>

#include <opencv2/imgproc/imgproc.hpp>
#include <opencv2/highgui/highgui.hpp>


void icvprCcaByTwoPass(const cv::Mat& _binImg, cv::Mat& _lableImg)
{
    // connected component analysis (4-component)
    // use two-pass algorithm
    // 1. first pass: label each foreground pixel with a label
    // 2. second pass: visit each labeled pixel and merge neighbor labels
    //
    // foreground pixel: _binImg(x,y) = 1
    // background pixel: _binImg(x,y) = 0


    if (_binImg.empty() ||
        _binImg.type() != CV_8UC1)
    {
        return;
    }

    // 1. first pass

    _lableImg.release();
    _binImg.convertTo(_lableImg, CV_32SC1);

    int label = 1;  // start by 2
    std::vector<int> labelSet;
    labelSet.push_back(0);   // background: 0
    labelSet.push_back(1);   // foreground: 1

    int rows = _binImg.rows - 1;
    int cols = _binImg.cols - 1;
    for (int i = 1; i < rows; i++)
    {
        int* data_preRow = _lableImg.ptr<int>(i - 1);
        int* data_curRow = _lableImg.ptr<int>(i);
        for (int j = 1; j < cols; j++)
        {
            if (data_curRow[j] == 1)
            {
                std::vector<int> neighborLabels;
                neighborLabels.reserve(2);
                int leftPixel = data_curRow[j - 1];
                int upPixel = data_preRow[j];
                if (leftPixel > 1)
                {
                    neighborLabels.push_back(leftPixel);
                }
                if (upPixel > 1)
                {
                    neighborLabels.push_back(upPixel);
                }

                if (neighborLabels.empty())
                {
                    labelSet.push_back(++label);  // assign to a new label
                    data_curRow[j] = label;
                    labelSet[label] = label;
                }
                else
                {
                    std::sort(neighborLabels.begin(), neighborLabels.end());
                    int smallestLabel = neighborLabels[0];
                    data_curRow[j] = smallestLabel;

                    // save equivalence
                    for (size_t k = 1; k < neighborLabels.size(); k++)
                    {
                        int tempLabel = neighborLabels[k];
                        int& oldSmallestLabel = labelSet[tempLabel];
                        if (oldSmallestLabel > smallestLabel)
                        {
                            labelSet[oldSmallestLabel] = smallestLabel;
                            oldSmallestLabel = smallestLabel;
                        }
                        else if (oldSmallestLabel < smallestLabel)
                        {
                            labelSet[smallestLabel] = oldSmallestLabel;
                        }
                    }
                }
            }
        }
    }

    // update equivalent labels
    // assigned with the smallest label in each equivalent label set
    for (size_t i = 2; i < labelSet.size(); i++)
    {
        int curLabel = labelSet[i];
        int preLabel = labelSet[curLabel];
        while (preLabel != curLabel)
        {
            curLabel = preLabel;
            preLabel = labelSet[preLabel];
        }
        labelSet[i] = curLabel;
    }


    // 2. second pass
    for (int i = 0; i < rows; i++)
    {
        int* data = _lableImg.ptr<int>(i);
        for (int j = 0; j < cols; j++)
        {
            int& pixelLabel = data[j];
            pixelLabel = labelSet[pixelLabel];
        }
    }
}
void icvprCcaBySeedFill(const cv::Mat& _binImg, cv::Mat& _lableImg)
{
    // connected component analysis (4-component)
    // use seed filling algorithm
    // 1. begin with a foreground pixel and push its foreground neighbors into a stack;
    // 2. pop the top pixel on the stack and label it with the same label until the stack is empty
    //
    // foreground pixel: _binImg(x,y) = 1
    // background pixel: _binImg(x,y) = 0


    if (_binImg.empty() ||
        _binImg.type() != CV_8UC1)
    {
        return;
    }

    _lableImg.release();
    _binImg.convertTo(_lableImg, CV_32SC1);

    int label = 1;  // start by 2

    int rows = _binImg.rows - 1;
    int cols = _binImg.cols - 1;
    for (int i = 1; i < rows - 1; i++)
    {
        int* data = _lableImg.ptr<int>(i);
        for (int j = 1; j < cols - 1; j++)
        {
            if (data[j] == 1)
            {
                std::stack<std::pair<int, int>> neighborPixels;
                neighborPixels.push(std::pair<int, int>(i, j));     // pixel position: <i,j>
                ++label;  // begin with a new label
                while (!neighborPixels.empty())
                {
                    // get the top pixel on the stack and label it with the same label
                    std::pair<int, int> curPixel = neighborPixels.top();
                    int curX = curPixel.first;
                    int curY = curPixel.second;
                    _lableImg.at<int>(curX, curY) = label;

                    // pop the top pixel
                    neighborPixels.pop();

                    // push the 4-neighbors (foreground pixels)
                    if (_lableImg.at<int>(curX, curY - 1) == 1)
                    {// left pixel
                        neighborPixels.push(std::pair<int, int>(curX, curY - 1));
                    }
                    if (_lableImg.at<int>(curX, curY + 1) == 1)
                    {// right pixel
                        neighborPixels.push(std::pair<int, int>(curX, curY + 1));
                    }
                    if (_lableImg.at<int>(curX - 1, curY) == 1)
                    {// up pixel
                        neighborPixels.push(std::pair<int, int>(curX - 1, curY));
                    }
                    if (_lableImg.at<int>(curX + 1, curY) == 1)
                    {// down pixel
                        neighborPixels.push(std::pair<int, int>(curX + 1, curY));
                    }
                }
            }
        }
    }
}

cv::Scalar icvprGetRandomColor()
{
    uchar r = 255 * (rand() / (1.0 + RAND_MAX));
    uchar g = 255 * (rand() / (1.0 + RAND_MAX));
    uchar b = 255 * (rand() / (1.0 + RAND_MAX));
    return cv::Scalar(b, g, r);
}


void icvprLabelColor(const cv::Mat& _labelImg, cv::Mat& _colorLabelImg)
{
    if (_labelImg.empty() ||
        _labelImg.type() != CV_32SC1)
    {
        return;
    }

    std::map<int, cv::Scalar> colors;

    int rows = _labelImg.rows;
    int cols = _labelImg.cols;

    _colorLabelImg.release();
    _colorLabelImg.create(rows, cols, CV_8UC3);
    _colorLabelImg = cv::Scalar::all(0);

    for (int i = 0; i < rows; i++)
    {
        const int* data_src = (int*)_labelImg.ptr<int>(i);
        uchar* data_dst = _colorLabelImg.ptr<uchar>(i);
        for (int j = 0; j < cols; j++)
        {
            int pixelValue = data_src[j];
            if (pixelValue > 1)
            {
                if (colors.count(pixelValue) <= 0)
                {
                    colors[pixelValue] = icvprGetRandomColor();
                }
                cv::Scalar color = colors[pixelValue];
                *data_dst++ = color[0];
                *data_dst++ = color[1];
                *data_dst++ = color[2];
            }
            else
            {
                data_dst++;
                data_dst++;
                data_dst++;
            }
        }
    }
}


int main(int argc, char** argv)
{
    cv::Mat binImage = cv::imread("mm.png", 0);
    cv::threshold(binImage, binImage, 50, 1, CV_THRESH_BINARY_INV);

    // connected component labeling
    cv::Mat labelImg;
    icvprCcaByTwoPass(binImage, labelImg);
    //icvprCcaBySeedFill(binImage, labelImg) ;

    // show result
    cv::Mat grayImg;
    labelImg *= 10;
    labelImg.convertTo(grayImg, CV_8UC1);
    cv::imshow("labelImg", grayImg);

    cv::Mat colorLabelImg;
    icvprLabelColor(labelImg, colorLabelImg);
    cv::imshow("colorImg", colorLabelImg);
    cv::waitKey(0);

    return 0;
}
结果:
在MATLAB里求解最大连通域用bwlabel就行了,在OpenCV中没有看到现成的函数
本程序的主要结构是:
1.读彩色bmp文件,提取Green通道
2.中值滤波,Otsu二值化
3.形态学操作去除小细节
4.标注连通域
5.求解最大连通域
#include <cv.h>
#include <highgui.h>
#include <cxcore.h>
#include <vector>
#include <algorithm>
using namespace std;

///////////////////////////////////////////////
void CMy20111114qian的matlab程序转opencvDlg::OnBnClickedButton1()
{
    IplImage *src = cvLoadImage("before.bmp", CV_LOAD_IMAGE_COLOR);//读取图像文件
    cvNamedWindow("origin");
    cvShowImage("origin", src);//显示原始图像
    //摄像机保存的图像是32位的,有R、G、B和Alpha通道
    //图像中实际存储顺序是B、G、R
    IplImage *blue = cvCreateImage(cvGetSize(src), IPL_DEPTH_8U, 1);//制作一个单通道图像
    IplImage *green = cvCreateImage(cvGetSize(src), IPL_DEPTH_8U, 1);//制作一个单通道图像
    IplImage *red = cvCreateImage(cvGetSize(src), IPL_DEPTH_8U, 1);//制作一个单通道图像
    cvSplit(src, blue, green, red, NULL);//分割颜色通道
    cvSmooth(green, green, CV_MEDIAN, 7);//7*7中值滤波
    cvThreshold(green, green, 0.0, 255.0, CV_THRESH_BINARY | CV_THRESH_OTSU);//OTSU法二值化
    {
        IplConvKernel *element = cvCreateStructuringElementEx(5, 5, 0, 0, CV_SHAPE_ELLIPSE);//定义形态学结构指针
        cvMorphologyEx(green, green, NULL, element, CV_MOP_OPEN);//开运算,去除比结构元素小的亮点
        cvReleaseStructuringElement(&element);
    }
    cvNamedWindow("binary");
    cvShowImage("binary", green);//显示二值化图像
    {
        int color = 254;// 从254开始,因此连通域不能多于253个
        CvSize sz = cvGetSize(green);
        int w;
        int h;
        for (w = 0; w < sz.width; w++)
        {
            for (h = 0; h < sz.height; h++)
            {
                if (color > 0)
                {
                    if (CV_IMAGE_ELEM(green, unsigned char, h, w) == 255)
                    {
                        cvFloodFill(green, cvPoint(w, h), CV_RGB(color, color, color));//把各连通域标记上颜色
                        color--;
                    }
                }
            }
        }
        cvNamedWindow("labeled");
        cvShowImage("labeled", green);//显示标记后的图像
        int colorsum[255] = { 0 };
        for (w = 0; w < sz.width; w++)
        {
            for (h = 0; h < sz.height; h++)
            {
                if (CV_IMAGE_ELEM(green, unsigned char, h, w) > 0)//不对0值计数,不可能为255
                {
                    colorsum[CV_IMAGE_ELEM(green, unsigned char, h, w)]++;//统计每种颜色的数量
                }
            }
        }
        vector<int> v1(colorsum, colorsum + 255);//用数组初始化vector
        int maxcolorsum = max_element(v1.begin(), v1.end()) - v1.begin();//求出最多数量的颜色
        for (w = 0; w < sz.width; w++)
        {
            for (h = 0; h < sz.height; h++)
            {
                if (CV_IMAGE_ELEM(green, unsigned char, h, w) == maxcolorsum)
                {
                    CV_IMAGE_ELEM(green, unsigned char, h, w) = 255;//只把最多数量的颜色标为255
                }
                else
                {
                    CV_IMAGE_ELEM(green, unsigned char, h, w) = 0;//其他标为0
                }
            }
        }
        cvNamedWindow("最大连通域");
        cvShowImage("最大连通域", green);//显示最大连通域
    }
    cvReleaseImage(&src);
    cvReleaseImage(&blue);
    cvReleaseImage(&green);
    cvReleaseImage(&red);
}
reference:
OpenCV_连通区域分析(Connected Component Analysis-Labeling)


 703
703

 被折叠的 条评论
为什么被折叠?
被折叠的 条评论
为什么被折叠?
 到【灌水乐园】发言


