


首先看要实现的额效果图
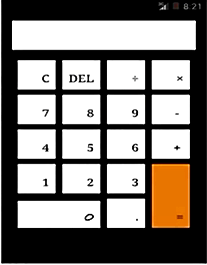
第一步我们要实现的是显示器的显示过程
1.在activity_main.xml中实现一个编辑框
<EditText
android:layout_width="fill_parent"
android:layout_height="60dip"
android:id="@+id/et_input"/>
此时得到的是不能显示编辑框,我们需要关联一个 android:background="@drawable/white_bg"
但是如果此时没有color.xml文件是就会报错
我们可以新建一个drawable文件夹并且在文件夹中创建一个xml的文件,并且root element中选择shap的造型
在文件中需要添加corners(为了倒圆角)和 solid(填充实体颜色为白色)
此时应当注意如果value文件夹下没有color.xml的文件时应当创建那么一个文件
drawable下的文件
<?xml version="1.0" encoding="utf-8"?>
<shape xmlns:android="http://schemas.android.com/apk/res/android" >
    <corners android:radius="5dp"/>
    <solid
        android:color="@color/white"/>
    <!--
	<gradient
	    android:startColor="@color/white"
	    android:endColor="@color/red"
	    />
	<stroke
	   android:width="1dp"
	   android:color="@color/black" />-->
</shape>
color的文件
<?xml version="1.0" encoding="utf-8"?>
<resources>
    <color name="white">#ffffffff</color>
    <color name="grey">#ffDEDEDE</color>
    <color name="orange">#ffff9933</color>
    <color name="ashen">#ffcc6633</color>
    <color name="red">#FC0000</color>
    <color name="black">#000000</color>
</resources>
2.此时我们开县输入的内容可以编辑,但这不符合实际情况 因此我们应该加入属性
android:editable="false"
3.但是我们还发现一般的计算器是按靠右的
加入属性 android:gravity="right|bottom"
此时我们可以得到一个显示框了
二。按钮的实现
1.实现一个布局 观察图片我们可以得知是一个直线布局
<LinearLayout
    android:layout_width="fill_parent"
    android:layout_height="wrap_content"
    android:layout_marginTop="20dp"
    android:orientation="horizontal"
    android:gravity="center_horizontal">
</linearLayout>
2.在布局下面添加按钮
    <Button
        android:layout_width="60dp"
        android:layout_height="60dp"
        android:text="C"
        android:textSize="20sp"
        android:gravity="right|bottom"
        android:id="@+id/btn_clear"/>
其中的android:gravity="right|bottom"是对控件中的文字进行靠哪边的处理
android:layout_marginTop 是向下靠 表示对于据内边框顶部
我们可以把android布局简单的理解为html中的布局
-------------------------------------------------------------------------
可以说到了这个时候我们就已经把安卓的前台样式搞定了下面就是制作相对应的事件了
下面我们转到主文件MainActivity,java中
首先观察图片我们可以得知 输入狂是对我们每一次操作的一个点击事件进行关联的
因此第一步我们要 impletement Onclicklistener接口
接下来就是实例化对象
过程:
对对象进行声明
Button btn_0;
2.对对象进行匹配id
btn_0=(Button)findviewbyId(R.id.btn_0);
特别注意:在显示控制面板的时候其中比为R.id.et_showview与对象的名称无关
贴上代码
 public class MainActivity extends Activity implements OnClickListener {
// 重写按钮
 Button btn_0;//0数字按钮
 Button btn_1;//1数字按钮
 Button btn_2;//2数字按钮
 Button btn_3;//3数字按钮
 Button btn_4;//4数字按钮
 Button btn_5;//5数字按钮
 Button btn_6;//6数字按钮
 Button btn_7;//7数字按钮
 Button btn_8;//8数字按钮
 Button btn_9;//9数字按钮
 Button btn_point;//点数字按钮
 Button btn_clear;//清除按钮;
 Button btn_del;//删除按钮;
 Button btn_multiply;//乘法按钮;
 Button btn_plus;//加法按钮;
 Button btn_minus;//减法按钮;
 Button btn_divide;//除法按钮;
 Button btn_equle;//等于按钮;
 EditText et_input;//显示输入内容的显示屏
 @Override
 protected void onCreate(Bundle savedInstanceState) {
  super.onCreate(savedInstanceState);
  setContentView(R.layout.activity_main);
  btn_1=(Button)findViewById(R.id.btn_1);
  btn_2=(Button)findViewById(R.id.btn_2);
  btn_3=(Button)findViewById(R.id.btn_3);
  btn_4=(Button)findViewById(R.id.btn_4);
  btn_5=(Button)findViewById(R.id.btn_5);
  btn_6=(Button)findViewById(R.id.btn_6);
  btn_7=(Button)findViewById(R.id.btn_7);
  btn_8=(Button)findViewById(R.id.btn_8);
  btn_9=(Button)findViewById(R.id.btn_9);
  btn_point=(Button)findViewById(R.id.btn_point);
  btn_clear=(Button)findViewById(R.id.btn_clear);
  btn_plus=(Button)findViewById(R.id.btn_pluse);
  btn_minus=(Button)findViewById(R.id.btn_minus);
  btn_multiply=(Button)findViewById(R.id.btn_multiply);
  btn_divide=(Button)findViewById(R.id.btn_divide);
  btn_equle=(Button)findViewById(R.id.btn_equal);
  et_input=(EditText)findViewById(R.id.et_showview);
特别记住如果其中又出现错误 有可能是在导入的时候发生了错误。
二。实例化完 我们就要对每个对象设置监听点击事件
三。重写点击事件函数
1.定义一个相应的事件函数
2.定义一个结果的返回函数
定义一个double类型的r作为结果输出
1.首先要确定是否清零 如果清零的话那么下面的函数也不会执行 因此这个时候我们可以定义一个变量,用布尔类型来进行传参,并且在函数执行的一开始就将函数设置为true .
2. 得到屏幕的文字将其转换为字符串的形式,由于IndexOF(查找到索引值,即位置) 和substring(用于截取该位置上的所有字母) 是在String下的一个方法
3.将字符串转换成一个相对应的数字
4.最后利用多分枝的结构,if。。。else..将检测字符是否类型并作相应的运算(注意被除数被能为0)
例:if(op.equals="+"){r=arg1+arg2;}
5.如果没有小数点的话我们将其强制转化为整型


 5140
5140

 被折叠的 条评论
为什么被折叠?
被折叠的 条评论
为什么被折叠?
 到【灌水乐园】发言


