


 本文展示了如何使用OpenCV库检测图像中的人形,并通过算法去除嵌套的矩形框以实现去重。包括检测、去重过程及最终展示结果。
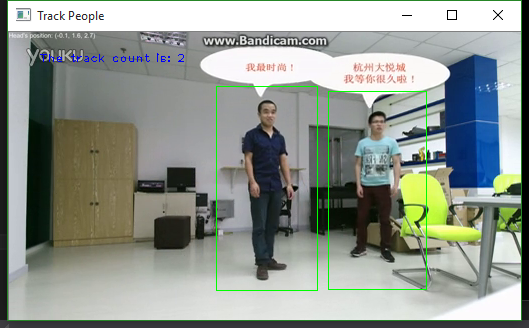
#include "iostream"
#include "queue"
using namespace std;
#include "opencv2/opencv.hpp"
#include "Windows.h"
#include "opencv2/core/core.hpp"
#include "opencv2/highgui/highgui.hpp"
#include "opencv2/imgproc/imgproc.hpp"
#include "opencv2/objdetect/objdetect.hpp"
using namespace cv;

int main()
{
    try{

        IplImage *pFrame = NULL;
        CvCapture *pCapture = NULL;
        //pCapture = cvCreateCameraCapture(-1);
        //pCapture = cvCaptureFromCAM(0);
        pCapture = cvCaptureFromFile("C:\\C_C++ code\\Photo and video\\TextVideo2.flv");
        //pCapture = cvCaptureFromFile("C:\\C_C++ code\\Photo and video\\TextVideo1.flv");
        if (!pCapture)
        {
            cout << "File opened fail..." << endl;
            return -1;
        }

        Mat img;
        HOGDescriptor hog;
        Rect r;
        int nNum = 0;
        hog.setSVMDetector(HOGDescriptor::getDefaultPeopleDetector());
        vector<Rect> found,found1;
        int i, j;
        char str[100];
        while (pFrame = cvQueryFrame(pCapture))
        {
            nNum++;
            Mat img = cvarrToMat(pFrame, 0); //IplImage turn into Mat

            if (nNum >= 3)
            {
                //进行检测
                hog.detectMultiScale(img, found);

                found1.clear();
                //-------------------去除嵌套的矩形框------------------------
                for (i = 0; i < found.size(); i++)
                {
                    r = found[i];
                    for (j = 0; j < found.size(); j++)
                    {
                        if ( i != j && ((r&found[j]) == r) )
                        {
                            break;
                        }
                    }
                    if (j == found.size())
                    {
                        found1.push_back(r);
                    }
                }
                //画长方形 框出行人

                for (i = 0; i < found1.size(); i++)
                {
                    r = found1[i];
                    rectangle(img, r, Scalar(0, 255, 0), 1);
                }
                nNum = 0;
            }

            for (int i = 0; i < found1.size(); i++)
            {
                r = found1[i];
                rectangle(img, r, Scalar(0, 255, 0), 1);
            }
            sprintf(str, "The track count is: %d", found1.size());

            putText(img, str, cvPoint(30, 30), CV_FONT_HERSHEY_PLAIN, 0.8,CV_RGB(0, 0, 250),1,8);

            imshow("Track People", img);
            if (cvWaitKey(35) >= 0)
                break;
        }
    }
    catch (exception &e)
    {
        cout << e.what() << endl;
    }

    return 1;
}
效果:
图片人形测试:
#include "iostream"
#include "queue"
using namespace std;
#include "opencv2/opencv.hpp"
#include "Windows.h"
#include "opencv2/core/core.hpp"
#include "opencv2/highgui/highgui.hpp"
#include "opencv2/imgproc/imgproc.hpp"
#include "opencv2/objdetect/objdetect.hpp"
int main(int argc, char** argv){
    Mat img;
    vector<Rect> found;

    img = imread("C:\\C_C++ code\\Photo and video\\text006.jpg");

    HOGDescriptor defaultHog;
    defaultHog.setSVMDetector(HOGDescriptor::getDefaultPeopleDetector());

    //进行检测
    defaultHog.detectMultiScale(img, found);

    //画长方形,框出行人
    for (int i = 0; i < found.size(); i++){
        Rect r = found[i];
        rectangle(img, r, Scalar(0, 255, 0), 1);
    }
    namedWindow("检测行人", CV_WINDOW_AUTOSIZE);
    imshow("检测行人", img);

    waitKey(0);

    return 0;
}

边框嵌套去重:
int main(int argc, char** argv){
    Mat img;
    vector<Rect> found, foundRect;

    img = imread("C:\\C_C++ code\\Photo and video\\text007.jpg");

    HOGDescriptor defaultHog;
    defaultHog.setSVMDetector(HOGDescriptor::getDefaultPeopleDetector());

    //进行检测
    defaultHog.detectMultiScale(img, found);

    //遍历found寻找没有被嵌套的长方形
    for (int i = 0; i < found.size(); i++){
        Rect r = found[i];

        int j = 0;
        for (; j < found.size(); j++){
            //如果时嵌套的就推出循环
            if (j != i && (r & found[j]) == r)
                break;
        }
        if (j == found.size()){
            foundRect.push_back(r);
        }
    }

    //画长方形,圈出行人
    for (int i = 0; i < foundRect.size(); i++){
        Rect r = foundRect[i];
        rectangle(img, r.tl(), r.br(), Scalar(0, 0, 255), 3);
    }

    namedWindow("检测行人", CV_WINDOW_AUTOSIZE);
    imshow("检测行人", img);

    waitKey(0);
    return 0;
}
int main()
{
    Mat image = imread("C:\\C_C++ code\\Photo and video\\text007jpg");
    imshow("hog", image);
    if (image.empty())
    {
        cout << "read image failed" << endl;
    }
    // 1. 定义HOG对象
    HOGDescriptor hog(Size(48,96), Size(16, 16), Size(8, 8), Size(8, 8), 9);


    // 2. 设置SVM分类器
    hog.setSVMDetector(HOGDescriptor::getDaimlerPeopleDetector());   // 采用已经训练好的行人检测分类器

    // 3. 在测试图像上检测行人区域
    std::vector<cv::Rect> regions;
    hog.detectMultiScale(image, regions, 0, cv::Size(8, 8), cv::Size(32, 32), 1.05, 1);

    // 显示
    for (size_t i = 0; i < regions.size(); i++)
    {
        cv::rectangle(image, regions[i], cv::Scalar(0, 0, 255), 2);
    }

    cv::imshow("hog", image);
    cv::waitKey(0);

    return 0;
}


 1507
1507

 被折叠的 条评论
为什么被折叠?
被折叠的 条评论
为什么被折叠?
 到【灌水乐园】发言


