


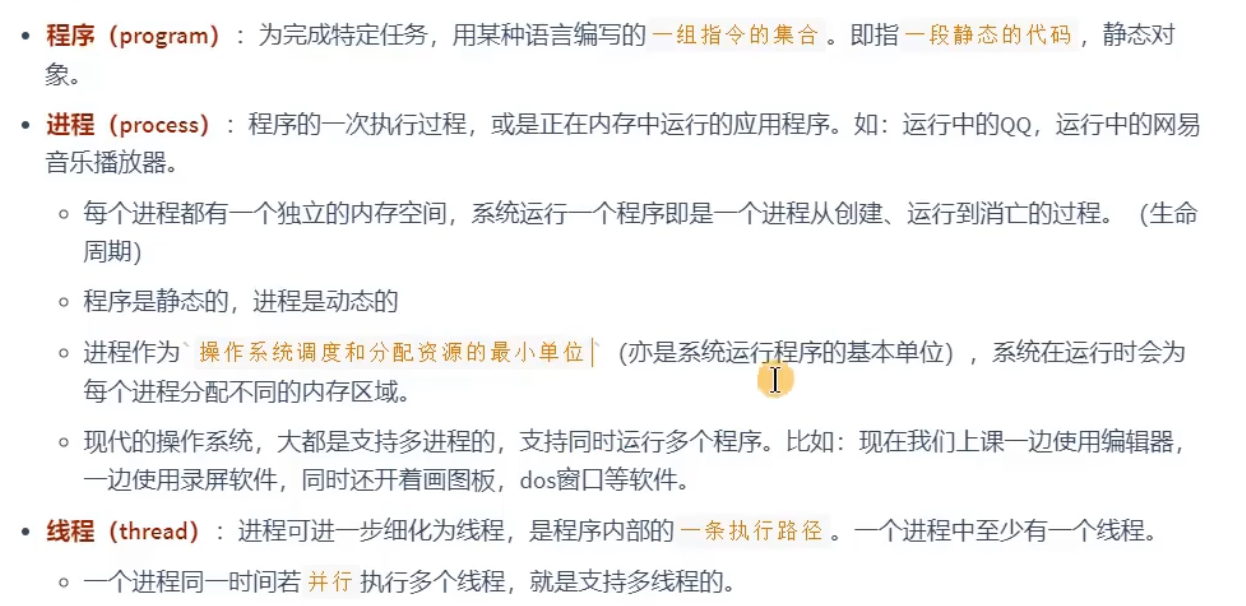
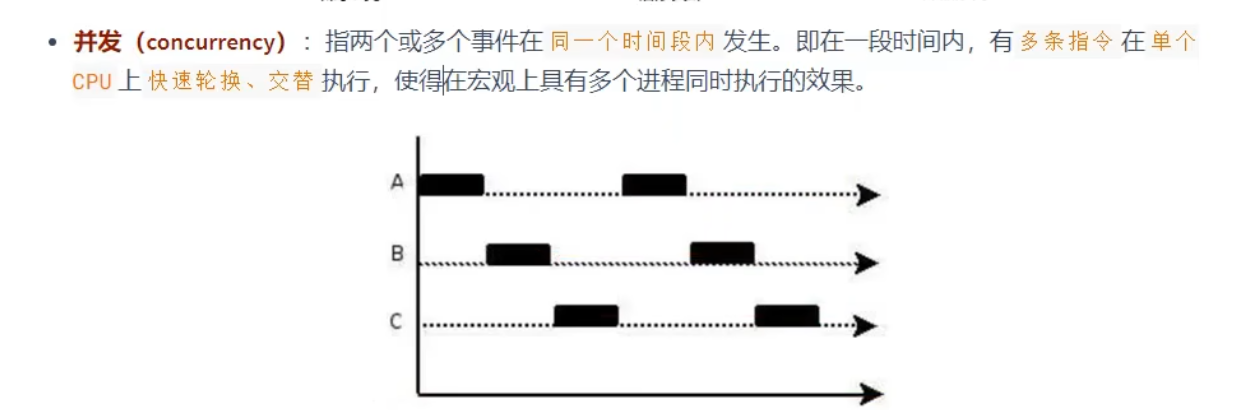
程序,进程,线程,与并行,并发的概念:

创建和启动线程:
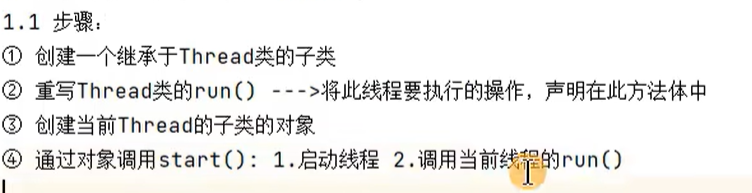
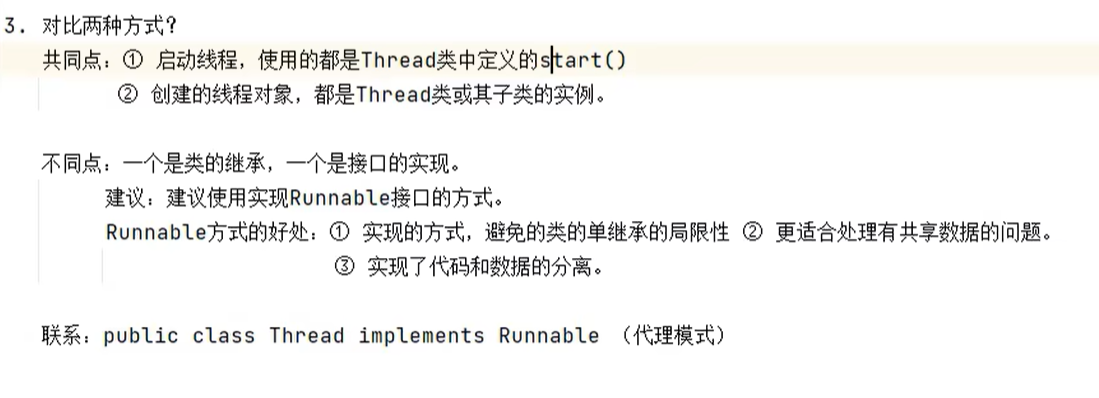
线程的创建方式之一:继承Thread类
例题:

public class Creat {
    //1.创建Thread的子类
    //2.重写Thread的run方法
    //3。创建当前子类的对象
    //4.调用start方法(此方法是Thread类里的)
    public static void main(String[] args) {
        PrintNumber p1 = new PrintNumber();
        p1.start();
    }
}

class PrintNumber extends Thread{
    @Override
    public void run() {
        for (int i = 0; i < 100; i++) {
            if (i % 2 == 0) {
                System.out.println(i);
        }
        }
    }
}
![]()
![]()
练习:
![]()
方式1:
public class Threadexer {
    public static void main(String[] args) {
        PrintNumber p1 = new PrintNumber();
        p1.start();
        PrintNumber1 p2 = new PrintNumber1();
        p2.start();

    }
}

class PrintNumber extends Thread {
    @Override
    public void run() {
        for (int i = 0; i <= 100; i++) {
            if (i % 2 == 0) {
                System.out.println(Thread.currentThread().getName() + ":" + i);
            }
        }
    }
}

class PrintNumber1 extends Thread {
    @Override
    public void run() {
        for (int i = 0; i <= 100; i++) {
            if (i % 2 != 0) {
                System.out.println(Thread.currentThread().getName() + ":" + i);
            }
        }
    }
}
方式2:
public class Threadexer {
    public static void main(String[] args) {
        new Thread(){
            @Override
            public void run() {
                for (int i = 0; i <= 100; i++) {
                    if (i % 2 == 0) {
                        System.out.println(Thread.currentThread().getName() + ":" + i);
                    }
                }
            }
        }.start();

        new Thread(){
            @Override
            public void run() {
                for (int i = 0; i < 100; i++) {
                    if(i % 2 != 0){
                        System.out.println(Thread.currentThread().getName() + ":" + i);
                    }
                }
            }
        }.start();
    }
}
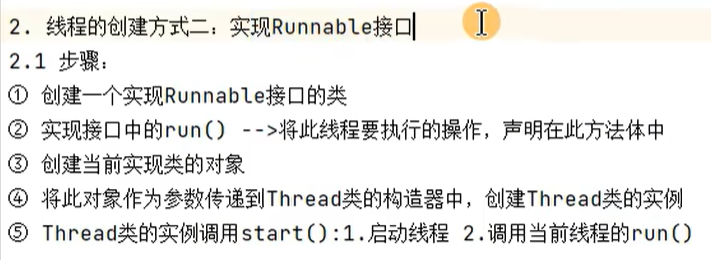
线程的创建方式之二:实现Runnable接口
public class Threadexer1 {
    //1.创建一个实现runable接口的实现类
    //2.实现接口中的run()方法,
    //3.创建当前实现类的对象
    //4.将此对象最为参数传到Thread的构造器中,创建Threa类的实例
    //5.Threa调用start方法
    public static void main(String[] args) {
     PrintNum p1 = new PrintNum();
     Thread t1 = new Thread(p1);
     t1.start();

     Thread t2 = new Thread(p1);
     t2.start();
    }
}
class PrintNum implements Runnable{
    @Override
    public void run() {
        for (int i = 0; i < 100; i++) {
            if (i % 2 == 0) {
                System.out.println(Thread.currentThread().getName() + ":" + i);
        }
        }
    }
}
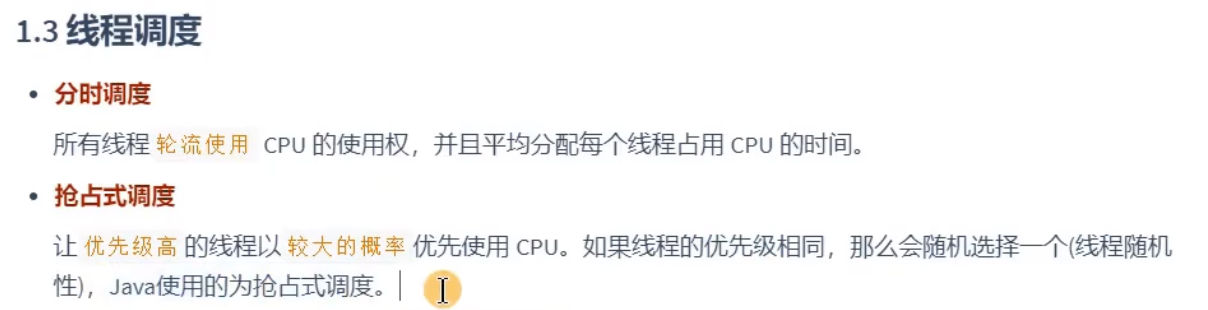
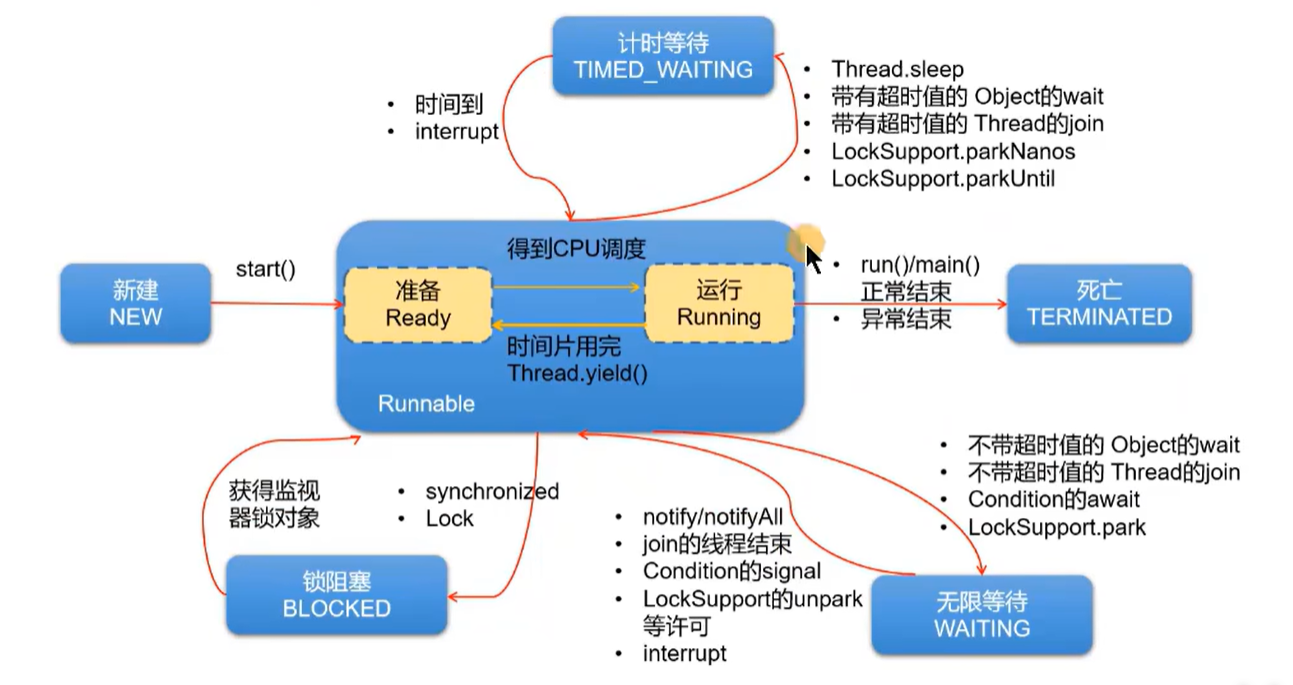
Thread类的常用方法和生命周期:
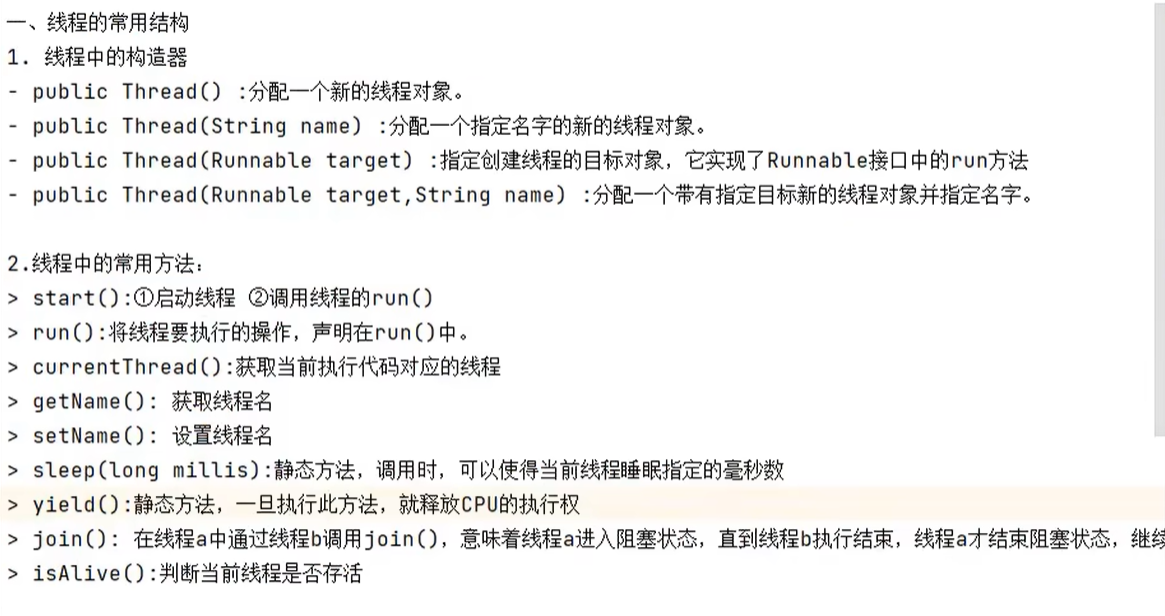
只是从概率上说,高优先级的会抢占低优先级的cpu,不是高优先级就一定比低优先级要先执行。
生命周期:
jdk5之前:
jdk5之后:
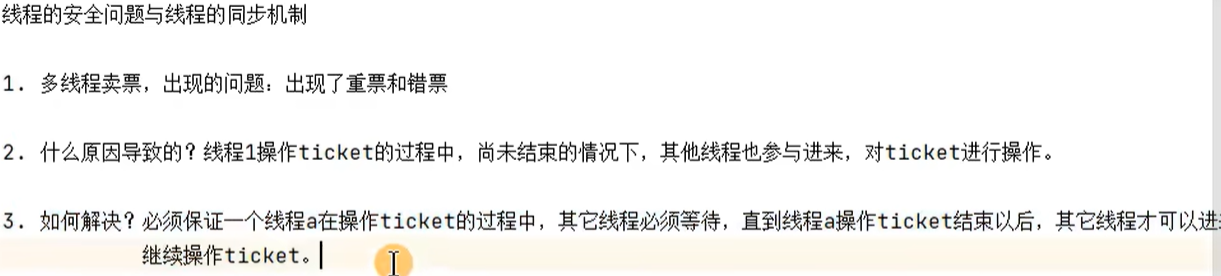
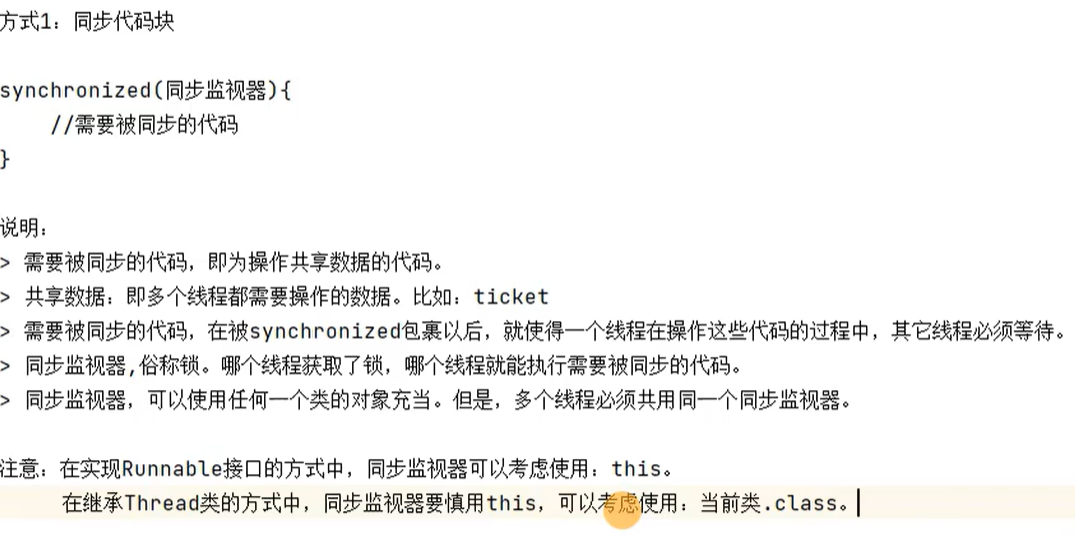
同步代码块解决线程安全问题:
例题:

方式一:
public class ThreadExer {
    public static void main(String[] args) {
        SaleTicket s1 = new SaleTicket();

        Thread t1 = new Thread(s1);
        Thread t2 = new Thread(s1);
        Thread t3 = new Thread(s1);

        t1.start();
        t2.start();
        t3.start();

    }


}

class SaleTicket implements Runnable {
    int tickect = 100;
    Thread obj = new Thread();

    @Override
    public void run() {
        while (true) {

            synchronized (obj) {
                if (tickect > 0) {
                    try {
                        Thread.sleep(10);
                    } catch (InterruptedException e) {
                        e.printStackTrace();
                    }
                    System.out.println(Thread.currentThread().getName() + "售票,票号为" + tickect);
                    tickect--;
                } else {
                    break;
                }
            }
        }
    }
}
方式二:
public class ThreadExer1 {
    public static void main(String[] args) {
        PrintTicket p1 = new PrintTicket();
        PrintTicket p2 = new PrintTicket();


        p1.start();
        p2.start();

    }
}

class PrintTicket extends Thread {
    static int  ticket = 100;
    static  Object object = new Object();

    @Override
    public void run() {
        while (true) {
            try {
                PrintTicket.sleep(5);
            }catch (InterruptedException e) {
                e.printStackTrace();
            }
            synchronized (Object) {
                if (ticket > 0) {
                    try {
                        Thread.sleep(5);
                    } catch (InterruptedException e) {
                        e.printStackTrace();
                    }

                    System.out.println(Thread.currentThread().getName() + "售票,票号为" + ticket);
                    ticket--;
                }
            }
        }
    }
}

实现类的用方式二就是把上面方式一中while()中的代码完全声明在一个方法中,然后再重写的run()方法中调用这个方法
()。(不过这个方法要记得用synchronized修饰)


练习1:

public class ThreadExer {
    public static void main(String[] args) {
        for (int i = 10; i >= 1; i--) {
            try {
                Thread.sleep(1000);
            } catch (InterruptedException e) {
                e.printStackTrace();
            }
            System.out.println(i);
        }
        System.out.println("新年快乐!");
    }

}
线程安全的懒汉式:
main方法和bank类:
public class BankTest {
    static Bank b1 = null;
    static Bank b2 = null;

    public synchronized static void main(String[] args) {
        Thread t1 = new Thread() {
            @Override
            public void run() {
                b1 = Bank.getInstance();
            }
        };
        t1.start();


        try {
            Thread.sleep(1000);
        } catch (InterruptedException e) {
            e.printStackTrace();
        }
        Thread t2 = new Thread() {
            @Override
            public void run() {
                b2 = Bank.getInstance();
            }
        };
        t2.start();

        try {
            Thread.sleep(1000);
        } catch (InterruptedException e) {
            e.printStackTrace();
        }


        System.out.println(b1);
        System.out.println(b2);
        System.out.println(b1 == b2);

    }
}

class Bank {
    public Bank() {
    }

    public static volatile  Bank instance = null;
实现线程安全的懒汉式:一共有三种方法:
方法一:
//实现线程安全的方法1
public static synchronized Bank getInstance() {//同步监视器,因为是static默认为bank.class
    if (instance == null) {

        try {
            Thread.sleep(1000);
        } catch (InterruptedException e) {
            e.printStackTrace();
        }
        instance = new Bank();
    }
    return  instance;
}
方法二:
//实现线程安全的方法2
//    public static Bank getInstance() {
//
//        synchronized (Bank.class) {
//            if (instance == null) {
//
//                try {
//                    Thread.sleep(1000);
//                } catch (InterruptedException e) {
//                    e.printStackTrace();
//                }
//                instance = new Bank();
//            }
//
//        }
//        return instance;
//    }
方式三(需关注):
//实现线程安全的方式三:相较于方式二和方式一,方式三的效率更高,为了避免出现指令重排,需要将instance声明为volatile
public static Bank getInstance() {
    if (instance == null) {
        synchronized (Bank.class) {
            if (instance == null) {

                try {
                    Thread.sleep(1000);
                } catch (InterruptedException e) {
                    e.printStackTrace();
                }
                instance = new Bank();
            }

        }

    }
    return instance;
}
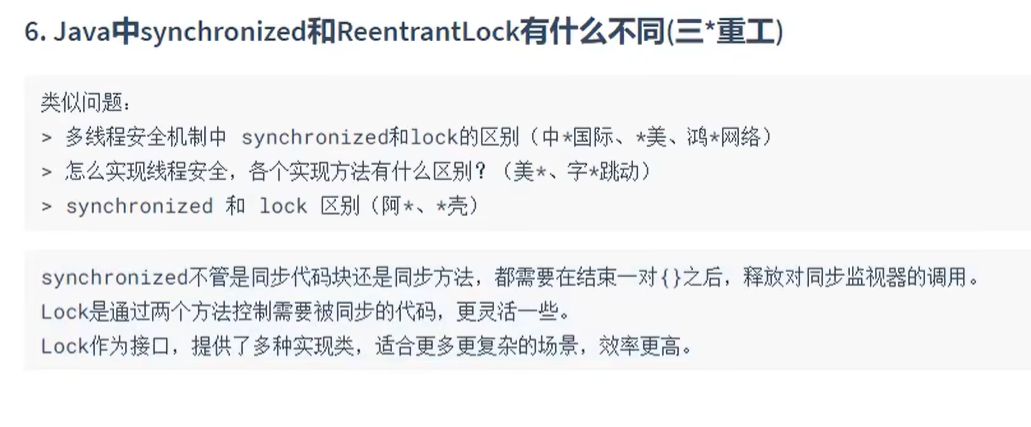
死锁:


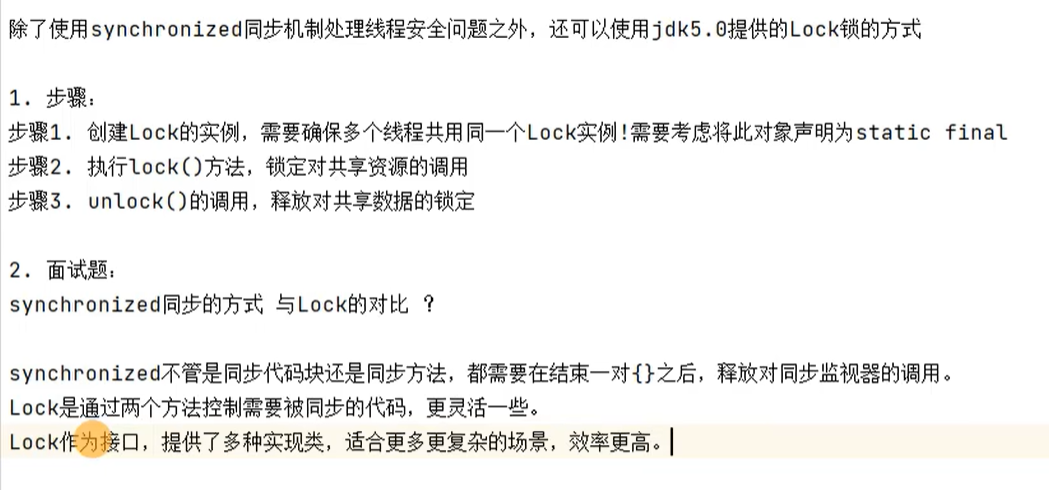
ReentrantLock的使用:
public class LockTest {
    public static void main(String[] args) {
        Window w1 = new Window();
        Window w2 = new Window();
        Thread t1 = new Thread(w1);
        Thread t2 = new Thread(w2);
        t1.start();
        t2.start();
    }
}

class Window extends Thread {
    private static int ticket = 100;
    private static Object obj = new Object();

    //创建lock实例,确保多个线程共用一个lock实例,将此对象声明为static
    private static ReentrantLock lock = new ReentrantLock();
    @Override
    public void run() {
        while (true) {

            //执行lock方法
            lock.lock();
            if (ticket > 0) {
                try {
                    Thread.sleep(10);
                } catch (InterruptedException e) {
                    e.printStackTrace();
                }
                System.out.println(Thread.currentThread().getName() + "售票,票号为:" + ticket);
                ticket--;
            } else {
                break;
            }

            //unlock方法的调用
            lock.unlock();
        }
    }
}
线程间的通信机制:
案例1:创建两个线程,让它们交替打印1-100的数字
自己写的:
public class PrintNumber {
    public static void main(String[] args) {
        PrintNum P1 = new PrintNum();

        Thread t1 = new Thread(P1, "线程1");
        Thread t2 = new Thread(P1, "线程2");

        t1.start();
        t2.start();

    }
}

class PrintNum implements Runnable {
    private int number = 1;

    @Override
    public void run() {
        while (true) {
            synchronized (this) {
                if (number <= 100) {
                    System.out.println(Thread.currentThread().getName() + ":" + number);
                    number++;
                } else {
                    break;
                }
            }
            try {
                Thread.sleep(10);
            } catch (InterruptedException e) {
                e.printStackTrace();
            }
        }

    }
}
答案:
public class PrintNumber {
    public static void main(String[] args) {
        PrintNum P1 = new PrintNum();

        Thread t1 = new Thread(P1, "线程1");
        Thread t2 = new Thread(P1, "线程2");

        t1.start();
        t2.start();
    }
}

class PrintNum implements Runnable {
    private int number = 1;

    @Override
    public void run() {
        while (true) {
            synchronized (this) {
                notify();
                if (number <= 100) {

                    try {
                        Thread.sleep(10);
                    } catch (InterruptedException e) {
                        e.printStackTrace();
                    }

                    System.out.println(Thread.currentThread().getName() + ":" + number);
                    number++;

                    try {
                        wait();
                    } catch (InterruptedException e) {
                        e.printStackTrace();
                    }

                } else {
                    break;
                }
            }
            try {
                Thread.sleep(10);
            } catch (InterruptedException e) {
                e.printStackTrace();
            }

        }
    }
}


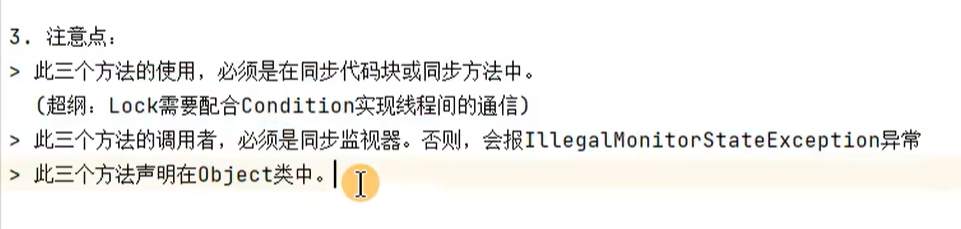
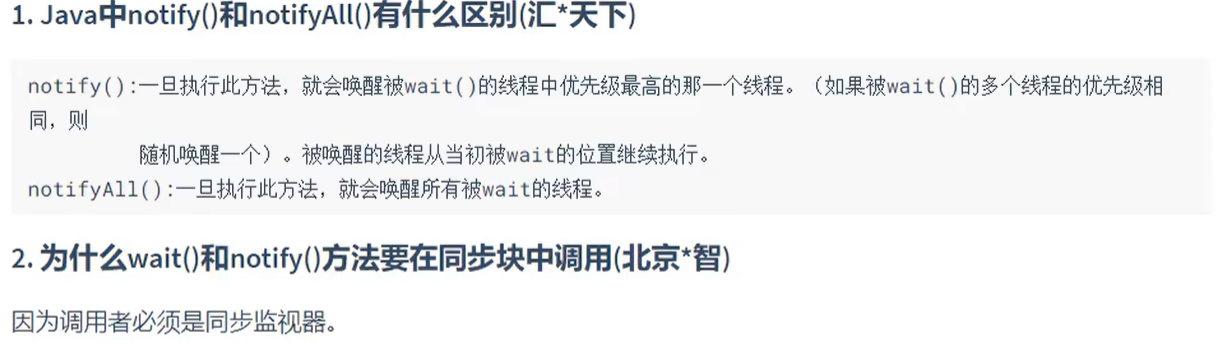
第一个注意点就是说三个方法都要在synchronized修饰的代码块或方法中使用
第二个注意点就是三个方法的调用者要和监视器一样(就是synchronized()括号里的)
第三个注意点就是任何对象都要可以调用这三个对象
案例2:生产者与消费者
public class ProducerConsumerTest {
    public static void main(String[] args) {
        Clerk clerk = new Clerk();
        Producer p1 = new Producer(clerk);
        Consumer c1 = new Consumer(clerk);
        Producer p2 = new Producer(clerk);
        Consumer c2 = new Consumer(clerk);

        p1.setName("生产者1");
        p2.setName("生产者2");
        c1.setName("消费者1");
        c2.setName("消费者2");

        p1.start();
        c1.start();
        p2.start();
        c2.start();

    }
}

class Clerk {
    private int number = 0;

    //增大产品数量的方法:
    public synchronized void add() {
       while (number >= 20) {
            try {
                wait();
            } catch (InterruptedException e) {
                e.printStackTrace();
            }
        }

        number++;
        System.out.println(Thread.currentThread().getName() + "生产了" + number + "个产品");

        notifyAll();
    }

    //减少产品数量的方法:
    public synchronized void minus() {
        while (number == 0) {
            try {
                wait();
            } catch (InterruptedException e) {
                e.printStackTrace();
            }
        }

        System.out.println(Thread.currentThread().getName() + "消耗了" + number + "个产品");
        number--;
        notifyAll();
    }


}

class Producer extends Thread {
    private Clerk clerk;

    public Producer(Clerk clerk) {
        this.clerk = clerk;
    }


    @Override
    public  void run() {
        while (true) {


            System.out.println("生产者开始生产……");
            try {
                Thread.sleep(1);
            } catch (InterruptedException e) {
                e.printStackTrace();
            }
            //生产
            clerk.add();

        }

    }
}

class Consumer extends Thread {

    private Clerk clerk;

    public Consumer(Clerk clerk) {
        this.clerk = clerk;
    }

    @Override
    public void run() {
        while (true) {

            System.out.println("消费者开始消耗……");
            //消耗
            clerk.minus();
            try {
                Thread.sleep(100);
            } catch (InterruptedException e) {
                e.printStackTrace();
            }
        }
    }
}
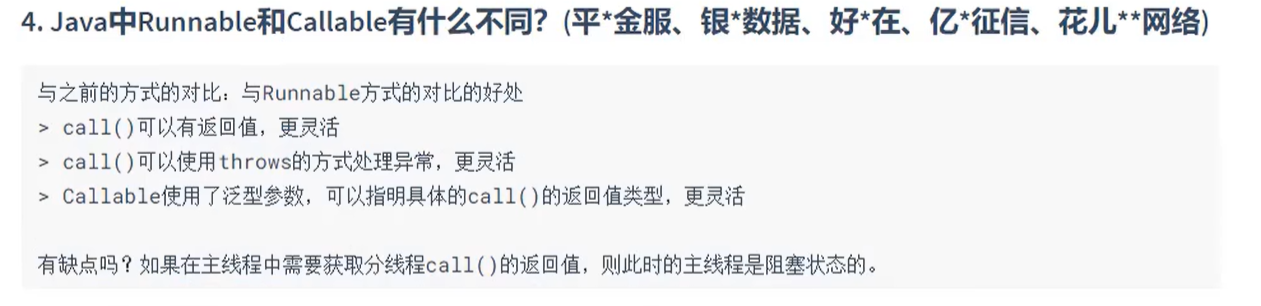
线程的创建方式:实现Callable和线程池:
基础阶段了解一下就好,到juc具体学
真题:
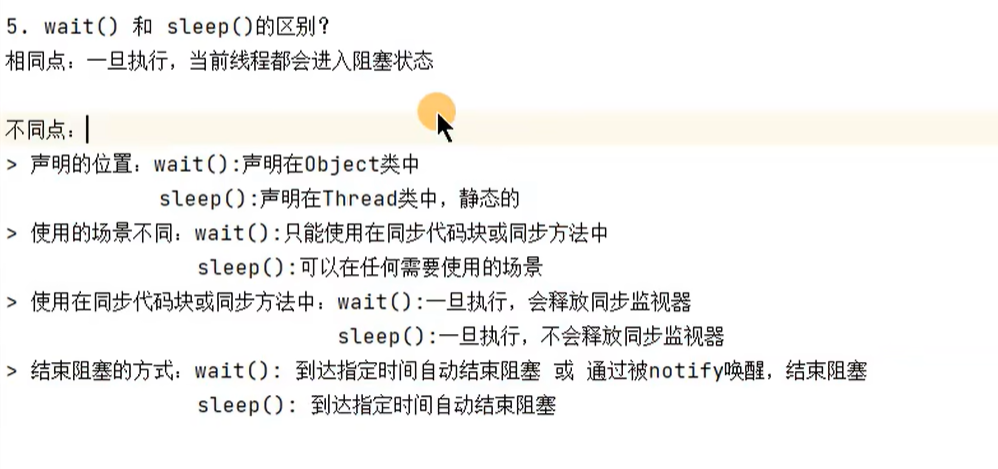
线程与进程的区别:
进程:对应一个运行中的程序
线程:运行中的进程的一条或多条执行路径
多线程的使用场景:
手机app应用的图片的下载
迅雷的下载
Thread类中的start()和run()有什么区别:
start:有两个作用:1:开启线程
2:调用线程的run方法


 808
808

 被折叠的 条评论
为什么被折叠?
被折叠的 条评论
为什么被折叠?
 到【灌水乐园】发言


