


设备准备
|
设备 |
JetPack版本 |
Sample Rootfs版本 |
|---|---|---|
| Jetson AGX Orin 64GB | 35.3.1 | 35.3.1 |
启动分析
启动顺序
执行apply_binaries.sh完成后进入rootfs目录中
查看/etc/systemd/system/default.target指向/lib/systemd/system/nv-oem-config.target,这表示系统会在启动时使用这个target与之对应的nv-oem-config.target.wants中包含了一些nv的服务,这些服务会在系统启动时加载,根据各服务的定义排序如下:
|
服务 |
启动脚本 |
作用 |
|---|---|---|
| nvfb-early.service | /etc/systemd/nvfb-early.sh | eraly firstboot脚本 |
| nvpower.service | /etc/systemd/nvpower.sh | 初始化电源设置 |
| nvfancontrol.service | /usr/sbin/nvfancontrol & | 风扇控制服务 |
| nvweston.service | /etc/systemd/nvweston.sh | 添加weston-launch用户组 |
| nvpmodel.service | /etc/systemd/nvpmodel.sh | 设置默认的powermodel |
| nv-oem-config.service |
/etc/systemd/nv-oem-config.sh /etc/systemd/nv-oem-config-post.sh | OEM配置服务 |
| nv-oem-config-gui.service |
/usr/sbin/nv-oem-config-firstboot | OEM的GUI配置模式 |
| nv-oem-config-debconf@.service | OEM的文本配置模式,与GUI配置模式冲突 |
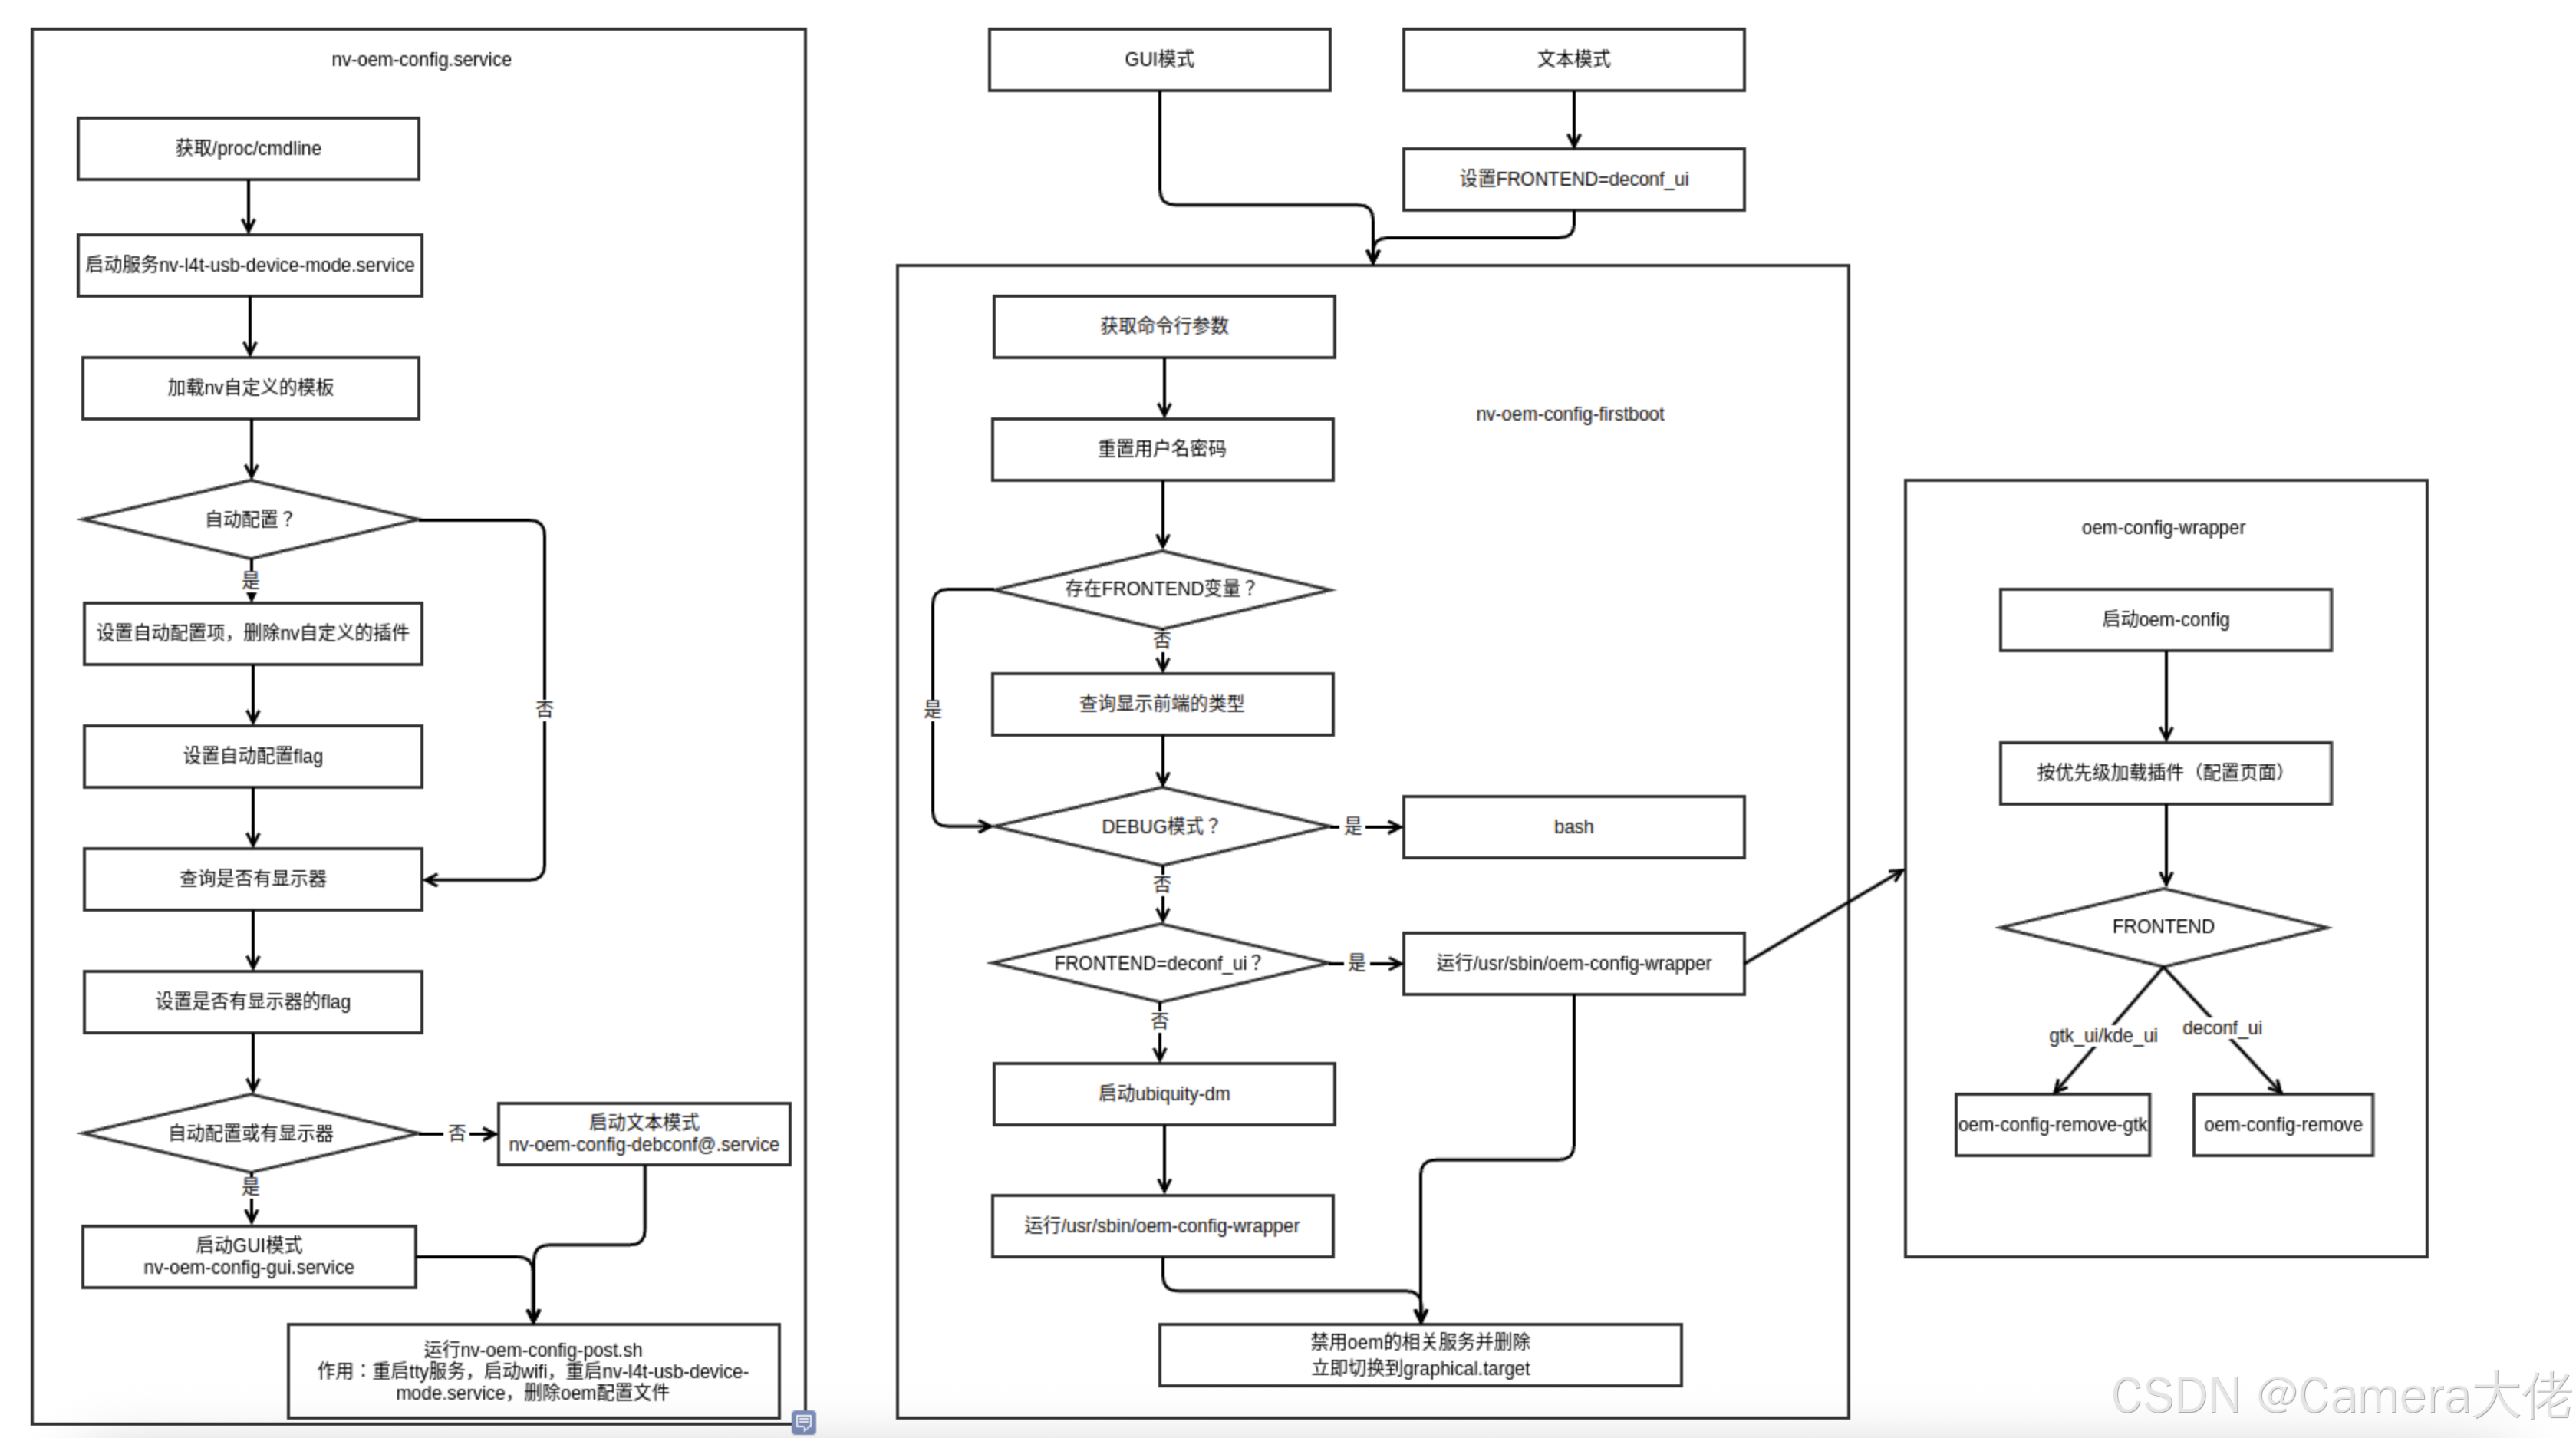
OEM流程图
各脚本详细运行过程
/etc/systemd/nvfb-early.sh
- 检查/etc/nv/nvfirstboot文件是否存在,若不存在则直接退出,实际用于检测是否为第一次启动
- 设置库路径:在update-alternatives中添加/etc/ld.so.conf.d/aarch64-linux-gnu_EGL.conf的/usr/lib/aarch64-linux-gnu/tegra-egl/ld.so.conf候选项
- 设置库路径:在update-alternatives中添加/etc/ld.so.conf.d/aarch64-linux-gnu_GL.conf的/usr/lib/aarch64-linux-gnu/tegra/ld.so.conf候选项
- 设置python:在update-alternatives中添加python程序的python2和python3两个候选
- 给NANO/TX2NX/XAVIER添加LIB_DIR
- 运行ldconfig
- 获取内存大小,如果小于4G,则使用lightdm作为默认的图形管理器
- 设置任何用户都可启动X server
/etc/systemd/nvpower.sh
- 从/proc/device-tree/compatible获取soc等信息,确认模组
- 设置/sys/power/state权限为0666
- 根据模组确认电源模式配置文件,并链接到/etc/nvpmodel.conf
- 根据soc确认风扇的配置文件,并链接到/etc/nvfancontrol.conf
- xavier部分设备特殊处理了cpu6和cpu7
- CPU设置
- 验证xavier-nx上的电源模式配置文件
- 设置xavier系列和orin系列产品的硬件监控(采集样本数512,采集间隔430ms)
/etc/systemd/nvweston.sh
- 创建了weston-launch用户组
/etc/systemd/nvpmodel.sh
- 设置powermode(/usr/sbin/nvpmodel -f /etc/nvpmodel.conf)
/etc/systemd/nv-oem-config.sh
- 获取cmdline
- 启动服务nv-l4t-usb-device-mode.service
- 加载nvresizefs、nvswap、nvpmodel、nvqspi-update、nvqspi-update的模板到debconf
- 确保/var/cache/debconf/config.dat与/var/cache/debconf/templates.dat文件不被其他进程使用
- 查询cmdline中是否存在自动配置的字段nv-auto-config,如果有则使用/nv_preseed.cfg文件来进行自动配置,并且自动配置时需要删除/usr/lib/ubiquity/plugins/nv*.py,因为oem-config中无法自动配置自定义的插件
- 在虚拟终端7上使用X server查询是否有显示器连接
- 如果有显示器连接则启动nv-oem-config-gui.service
- 如果没有显示器连接则从/etc/nv-oem-config.conf文件中获取串口设备号,设置串口并启动nv-oem-config-debconf@.service
nv-oem-config-debconf@.service中的脚本
- 运行/usr/lib/nvidia/license/nvlicense-templates.sh用于设置license
- 加载nvlicense的模板到deconf
- 以debconf_ui为前端显示启动nv-oem-config-firstboot
nv-oem-config-firstboot
- 删除/var/lib/kdm/kdmsts并重置用户名密码
- 如果是KDE桌面,需要在/etc/sddm.conf中添加#original_oem_version
- 运行deconf中配置的oem-config/early_command
- 非debug模式下,如果前端显示为debconf_ui,直接运行/usr/sbin/oem-config-wrapper
- 如果连接了显示器,则在虚拟终端7上启动/usr/bin/ubiquity-dm用于启动桌面环境,并运行/usr/sbin/oem-config-wrapper
- 如果配置了删除命令(oem-config/remove,默认是true),删除用于配置的oem用户
- 设置默认的target到graphical.target
- 禁用服务nv-oem-config-debconf.service、nv-oem-config-gui.service、nv-oem-config.service、nv-oem-config.target并删除
- 停止所有与graphical.target有冲突的服务并立即切换到graphical.target
- debug模式则调出bash
/usr/sbin/oem-config-wrapper
- 运行oem-config,这里的oem-config其实是个软连接,实际运行了ubiquity
- ubiquity根据插件的优先级和顺序依次展示需要配置的页面
- 根据前端显示类型调用oem-config-remove或oem-config-remove-gtk,作用是删除ubiquity、ubiquity-casper、ubiquity-ubuntu-artwork、ubiquity-slideshow-*、oem-config-slideshow-*等安装包并删除/etc/systemd/system/ubiquity.service服务
/etc/systemd/nv-oem-config-post.sh
- 切换target完成后,重启tty服务
- 如果设置了wifi,启动wifi网络
- 重启nv-l4t-usb-device-mode.service
- 删除配置文件/lib/systemd/system/nv-oem-config*.* 、/usr/sbin/nv-oem-config-firstboot、/etc/systemd/nv-oem-config*.sh、rm -f /etc/nv-oem-config.conf.*
启动对比
启动过程对比
主要对比启动时使用到的nv相关的服务
|
Jetson AGX Orin首次启动 |
Jetson AGX Orin常规启动 |
订制rootfs首次启动 |
订制rootfs常规启动 |
|---|---|---|---|
|
nvpower.service |
nvfb.service |
nvfb-udev.service |
nvfb-udev.service |
可以看到在常规启动时两者服务几乎一致,有出入的服务为nv-l4t-usb-device-mode-runtime.service和nv.service
- nv-l4t-usb-device-mode-runtime.service和nv-l4t-usb-device-mode.service这两个服务运行的脚本是一致的
- nv.service中的脚本运行一次和多次是没有影响的,所以开机启动也没问题
首次启动时,相差的服务即为nv-oem-config-gui.service,订制的rootfs中已经集成了一部分,与开发板还有一些不同:
- 开发板可设置APP分区的大小
- 开发板可设置是否安装chromium browser
- 开发板在运行oem完成后会删除ubiquity、ubiquity-casper、ubiquity-ubuntu-artwork、ubiquity-slideshow-*、oem-config-slideshow-*等安装包


 875
875

 被折叠的 条评论
为什么被折叠?
被折叠的 条评论
为什么被折叠?
 到【灌水乐园】发言


