Generating PDF Content
1、通过UIGraphicsBeginPDFContex
2、通过UIGrapicsBeginPDFPage函数打开或者创建PDF的新一页,关闭之前的一页(如果之前一页被打开)
3、绘制内容
4、通过UIGraphicsEndPDFContext函数结束绘制
Creating and Configuring the PDF Context
创建一个PDF context的函数有两个:
UIGraphicsBeginPDFContex
UIGraphicsBeginPDFContex
不同的是UIGraphicsBeginPDFPage函数创建一个默认大小的page;
而UIGraphicsBeginPDFPageWi
Drawing PDF Pages
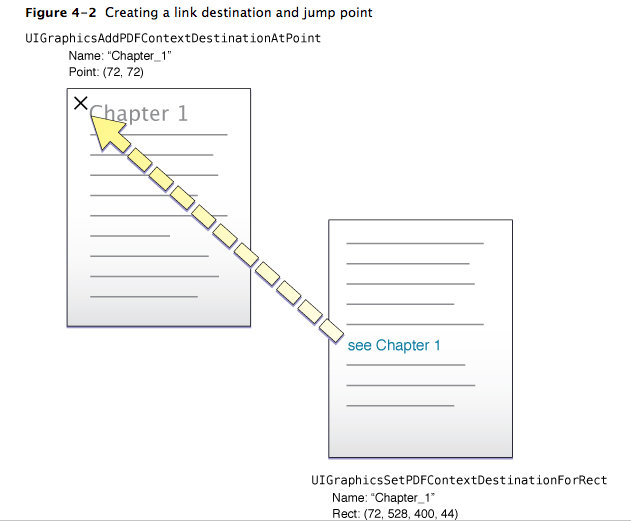
Creating Links Within Your PDF Content

针对Image的操作与PDF类似,有兴趣可以参考官方文档。 Print部分,暂时本人用不到,不再进行翻译,需要的评优可以参考官方文档:https://developer.apple.com/library/ios/#documentation/2DDrawing/Conceptual/DrawingPrintingiOS/Printing/Printing.html#//apple_ref/doc/uid/TP40010156-CH12-SW1
1、通过UIGraphicsBeginPDFContex
2、通过UIGrapicsBeginPDFPage函数打开或者创建PDF的新一页,关闭之前的一页(如果之前一页被打开)
3、绘制内容
4、通过UIGraphicsEndPDFContext函数结束绘制
Creating and Configuring the PDF Context
创建一个PDF context的函数有两个:
UIGraphicsBeginPDFContex
UIGraphicsBeginPDFContex
不同的是UIGraphicsBeginPDFPage函数创建一个默认大小的page;
而UIGraphicsBeginPDFPageWi
Drawing PDF Pages
// Use Core Text to draw the text in a frame on the page. |
- (CFRange)renderPage:(NSInteger)pageNum withTextRange:(CFRange)currentRange |
andFramesetter:(CTFramesetterRef)framesetter |
{ |
// Get the graphics context. |
CGContextRef currentContext = UIGraphicsGetCurrentCont |
// Put the text matrix into a known state. This ensures |
// that no old scaling factors are left in place. |
CGContextSetTextMatrix(context, CGAffineTransformIdentit |
// Create a path object to enclose the text. Use 72 point |
// margins all around the text. |
CGRect frameRect = CGRectMake(72, 72, 468, 648); |
CGMutablePathRef framePath = CGPathCreateMutable(); |
CGPathAddRect(framePath, NULL, frameRect); |
// Get the frame that will do the rendering. |
// The currentRange variable specifies only the starting point. The framesetter |
// lays out as much text as will fit into the frame. |
CTFrameRef frameRef = CTFramesetterCreateFrame |
CGPathRelease(framePath); |
// Core Text draws from the bottom-left corner up, so flip |
// the current transform prior to drawing. |
CGContextTranslateCTM(currentContext, 0, 792); |
CGContextScaleCTM(currentContext, 1.0, -1.0); |
// Draw the frame. |
CTFrameDraw(frameRef, currentContext); |
// Update the current range based on what was drawn. |
currentRange = CTFrameGetVisibleStringR |
currentRange.location += currentRange.length; |
currentRange.length = 0; |
CFRelease(frameRef); |
return currentRange; |
} |
- (void)drawPageNumber:(NSInteger)pageNum |
{ |
NSString* pageString = [NSString stringWithFormat:@"Page %d", pageNum]; |
UIFont* theFont = [UIFont systemFontOfSize:12]; |
CGSize maxSize = CGSizeMake(612, 72); |
CGSize pageStringSize = [pageString sizeWithFont:theFont |
constrainedToSize:maxSize |
lineBreakMode:UILineBreakModeClip]; |
CGRect stringRect = CGRectMake(((612.0 - pageStringSize.width) / 2.0), |
720.0 + ((72.0 - pageStringSize.height) / 2.0) , |
pageStringSize.width, |
pageStringSize.height); |
[pageString drawInRect:stringRect withFont:theFont]; |
} |

针对Image的操作与PDF类似,有兴趣可以参考官方文档。 Print部分,暂时本人用不到,不再进行翻译,需要的评优可以参考官方文档:https://developer.apple.com/library/ios/#documentation/2DDrawing/Conceptual/DrawingPrintingiOS/Printing/Printing.html#//apple_ref/doc/uid/TP40010156-CH12-SW1


 2048
2048

 被折叠的 条评论
为什么被折叠?


