Bezier Path Basics
按照之前说过的创建path的方法,创建线的步骤可以通过下面的代码演示:
UIBezierPath *path = [UIBezierPath bezierPath];
[path moveToPoint:ccp(100,0)];
[path addLineToPoint:ccp(200,40)];
[path addLineToPoint:ccp(160,140)];
[path addLineToPoint:ccp(40,140)];
[path addLineToPoint:ccp(0,40)];
[path closePath];
通过closePath函数完成path的闭合操作。
Adding Arcs to Your Path
创建弧的函数为类函数:bezierPathWithArcCenter:radius:startAngle: endAngle: clockwise:
这里便不再需要通过调用moveToPoint设置startPoint了。
Adding Curves To Your Path
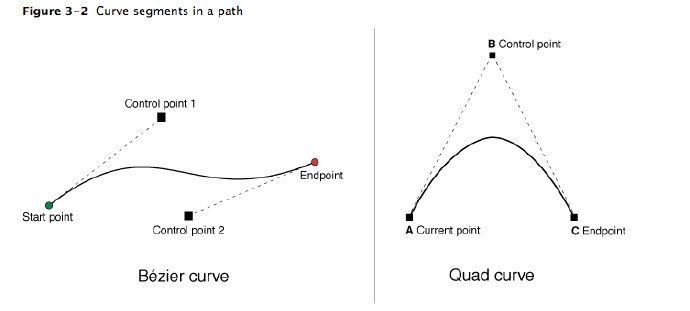
UIBezierPath提供了方法设置曲线(quad curve)和二次曲线(cubic curve)的路径。

quad curve:需要一个控制点,函数addCurveToPoint:controlPoint1:controlPoint2:
cubic curve:需要两个控制点,函数addQuadCurveToPoint:controlPoint:
Creating Oval and Rectangular Paths
椭圆形和举行都是常见的构成path的图形。在创建path的时候可以通过函数bezierPathWithRect:和 bezierPathWithOvalInRect
但是如果在一个已经有了的path上面添加一个椭圆形的时候最简单是通过这样的方法来实现,需要通过Core Graphics的方法来实现,这点可以参考 “Modifying the Path Using Core Graphics Functions.”
Modifying the Path Using Core Graphics Functions
CGMutablePathRef cgpath = CGPathCreateMutable();
CGPathAddEllipseInRect(cgpath,NULL,CGRectMake(0,0,300,100));
CGPathAddEllipseInRect(cgpath,NULL,CGRectMake(20,20,300,300));
UIBezierPath *path = [UIBezierPath bezierPath];
path.CGPath = cgpath;
CGPathRelease(cgpath);
2、绘图的时候采用混合的方式相对麻烦些,首先创建一个bezierPath,在用Core Graphics框架的时候,需要先通过CGPathMutableCopy()方法将UIBezierPath的CGPath对象进行复制,对复制后对象操作之后,将复制厚的对象赋值给之前的bezierPath对象。代码实例如下:
UIBezierPath *path = [UIBezierPath bezierPathWithOvalInRect
CGPathRef pathRef = path.CGPath;
CGPathRef newPathRef = CGPathMutableCopy(pathRef);
CGPathRelease(pahtRef);
CGPathAddEllipseInRect(newPathRef,NULL,CGRectMake(20,20,300,300));
path.CGPath = newPathRef;
CGPathRelease(newPathRef);
Rendering The Contents of a Bezier Path Object
stroke:描线
fill:填充
在设置path的描绘的时候有以下几个步骤:
1、通过UIColor的方法设置stroke和fill的color
2、设置path的位置,可以通过修改CTM修改
3、更新path的属性
另外值得注意的是:stroke一定要在fill之后,防止fill的color占据一般的线的宽度
Doing Hit-Detection on a Path
- (BOOL) containsPoint:(CGPoint)point onPath:(UIBezierPath*)path inFillArea:(BOOL)inFill
{
}
按照之前说过的创建path的方法,创建线的步骤可以通过下面的代码演示:
UIBezierPath *path = [UIBezierPath bezierPath];
[path moveToPoint:ccp(100,0)];
[path addLineToPoint:ccp(200,40)];
[path addLineToPoint:ccp(160,140)];
[path addLineToPoint:ccp(40,140)];
[path addLineToPoint:ccp(0,40)];
[path closePath];
通过closePath函数完成path的闭合操作。
Adding Arcs to Your Path
创建弧的函数为类函数:bezierPathWithArcCenter:radius:startAngle: endAngle: clockwise:
这里便不再需要通过调用moveToPoint设置startPoint了。
Adding Curves To Your Path
UIBezierPath提供了方法设置曲线(quad curve)和二次曲线(cubic curve)的路径。

quad curve:需要一个控制点,函数addCurveToPoint:controlPoint1:controlPoint2:
cubic curve:需要两个控制点,函数addQuadCurveToPoint:controlPoint:
Creating Oval and Rectangular Paths
椭圆形和举行都是常见的构成path的图形。在创建path的时候可以通过函数bezierPathWithRect:和 bezierPathWithOvalInRect
但是如果在一个已经有了的path上面添加一个椭圆形的时候最简单是通过这样的方法来实现,需要通过Core Graphics的方法来实现,这点可以参考 “Modifying the Path Using Core Graphics Functions.”
Modifying the Path Using Core Graphics Functions
CGMutablePathRef cgpath = CGPathCreateMutable();
CGPathAddEllipseInRect(cgpath,NULL,CGRectMake(0,0,300,100));
CGPathAddEllipseInRect(cgpath,NULL,CGRectMake(20,20,300,300));
UIBezierPath *path = [UIBezierPath bezierPath];
path.CGPath = cgpath;
CGPathRelease(cgpath);
2、绘图的时候采用混合的方式相对麻烦些,首先创建一个bezierPath,在用Core Graphics框架的时候,需要先通过CGPathMutableCopy()方法将UIBezierPath的CGPath对象进行复制,对复制后对象操作之后,将复制厚的对象赋值给之前的bezierPath对象。代码实例如下:
UIBezierPath *path = [UIBezierPath bezierPathWithOvalInRect
CGPathRef pathRef = path.CGPath;
CGPathRef newPathRef = CGPathMutableCopy(pathRef);
CGPathRelease(pahtRef);
CGPathAddEllipseInRect(newPathRef,NULL,CGRectMake(20,20,300,300));
path.CGPath = newPathRef;
CGPathRelease(newPathRef);
Rendering The Contents of a Bezier Path Object
stroke:描线
fill:填充
在设置path的描绘的时候有以下几个步骤:
1、通过UIColor的方法设置stroke和fill的color
2、设置path的位置,可以通过修改CTM修改
3、更新path的属性
另外值得注意的是:stroke一定要在fill之后,防止fill的color占据一般的线的宽度
Doing Hit-Detection on a Path
- (BOOL) containsPoint:(CGPoint)point onPath:(UIBezierPath*)path inFillArea:(BOOL)inFill
{
}


 本文详细介绍了UIBezierPath的使用方法,包括如何创建路径、添加线段、弧线、曲线及常见图形,如何利用Core Graphics函数修改路径,以及如何判断点是否在路径内。


 3174
3174

 被折叠的 条评论
为什么被折叠?


