


 博客展示了两段Android代码,一段是SystemServer类,另一段是已弃用的LauncherActivity类,该类继承自ListActivity,重写了onListItemClick方法以启动相应意图的活动。
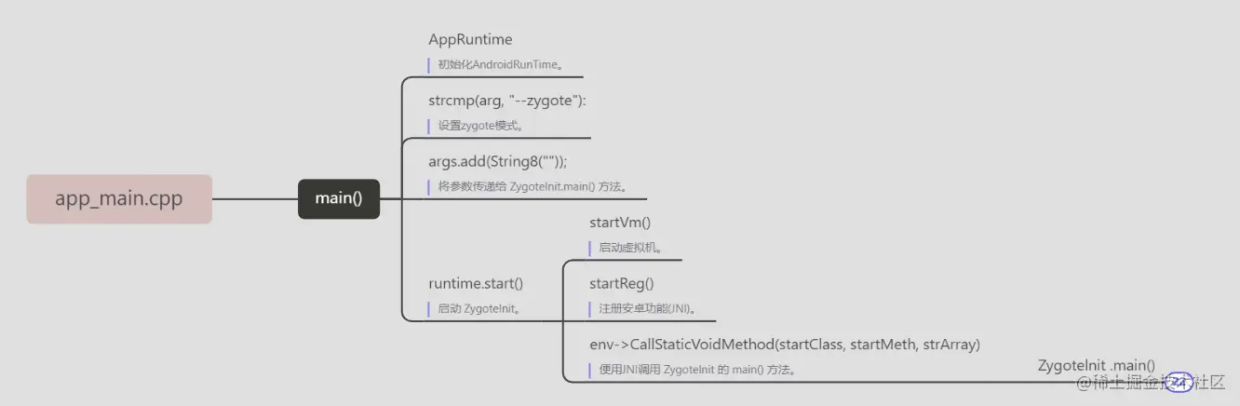
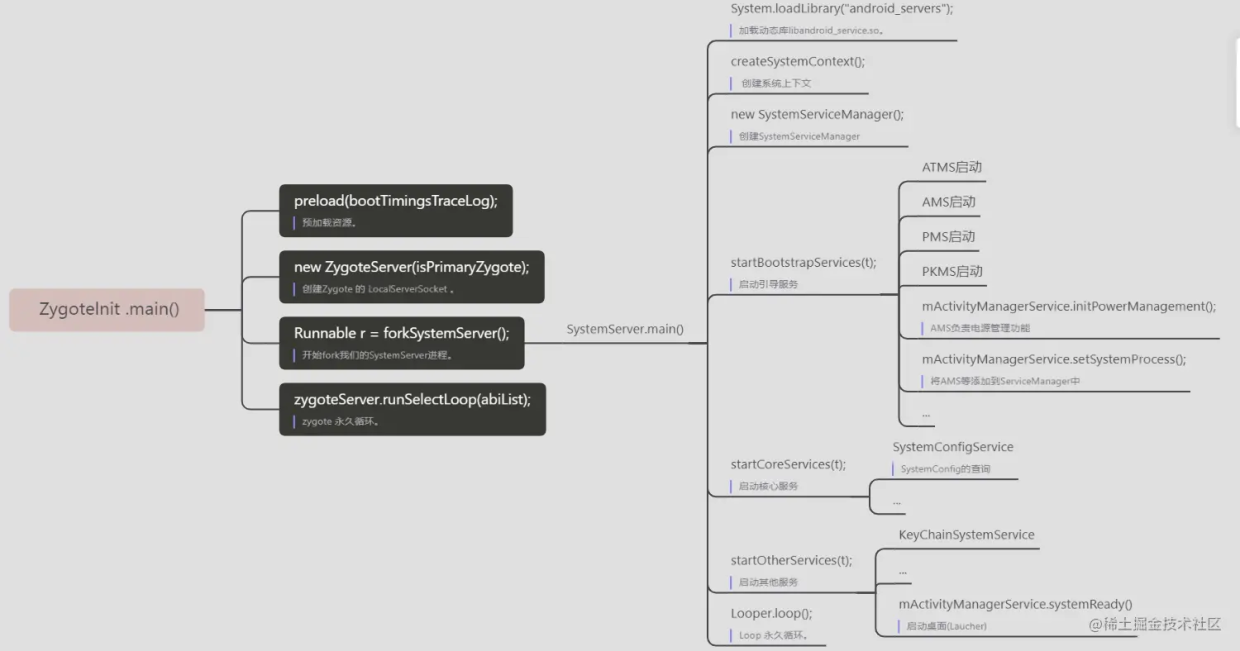
注释1:预加载资源。


注释2:创建Zygote 的 LocalServerSocket 。


注释3:开始 **fork** 我们的 SystemServer 进程。


注释4:zygote 永久循环。


这里咱们看看 forkSystemServer() ;


#### 1.3.2 forkSystemServer()
/**
 * Prepare the arguments and forks for the system server process.
 *
 * @return A {@code Runnable} that provides an entrypoint into system_server code in the child
 * process; {@code null} in the parent.
 */
private static Runnable forkSystemServer(String abiList, String socketName,
        ZygoteServer zygoteServer) {
    ...
    //命令行来启动SystemServer
    //ZygoteInit.main(String argv[])里面的argv 跟这个类似
    String[] args = {
            "--setuid=1000",
            "--setgid=1000",
            "--setgroups=1001,1002,1003,1004,1005,1006,1007,1008,1009,1010,1018,1021,1023,"
                    + "1024,1032,1065,3001,3002,3003,3006,3007,3009,3010,3011",
            "--capabilities=" + capabilities + "," + capabilities,
            "--nice-name=system_server",
            "--runtime-args",
            "--target-sdk-version=" + VMRuntime.SDK_VERSION_CUR_DEVELOPMENT,
            "com.android.server.SystemServer",
    };
    //处理与 zygote spawner 相关的 args 的参数解析。
    ZygoteArguments parsedArgs;
    int pid;
    try {
        ZygoteCommandBuffer commandBuffer = new ZygoteCommandBuffer(args);
        try {
            parsedArgs = ZygoteArguments.getInstance(commandBuffer);
        } catch (EOFException e) {
            throw new AssertionError("Unexpected argument error for forking system server", e);
        }
        commandBuffer.close();
        ...

        //请求 fork 系统服务器进程
        /* Request to fork the system server process */
        pid = Zygote.forkSystemServer(
                parsedArgs.mUid, parsedArgs.mGid,
                parsedArgs.mGids,
                parsedArgs.mRuntimeFlags,
                null,
                parsedArgs.mPermittedCapabilities,
                parsedArgs.mEffectiveCapabilities);
    } catch (IllegalArgumentException ex) {
        throw new RuntimeException(ex);
    }

    /* For child process */
    if (pid == 0) {
        if (hasSecondZygote(abiList)) {
            waitForSecondaryZygote(socketName);
        }

        zygoteServer.closeServerSocket();
        return handleSystemServerProcess(parsedArgs);
    }

    return null;
}
这里启动了一个 system server 。下面咱们就看看他。
## 2、SystemServer
system server 也就是 SystemServer。SystemServer也是一个进程,包括ActivityTaskManagerService、ActivityManagerService、PackageManagerService、WindowManagerService等92种服务。
Android Framework里面两大非常重要的进程:
* SystemServer进程。
* Zygote进程。
### 2.1 SystemServer.java
frameworks/base/services/java/com/android/server/SystemServer.java
public final class SystemServer {
…
}
#### 2.1.1 main()
/**
 * The main entry point from zygote.
 */
public static void main(String[] args) {
    new SystemServer().run();
}
public SystemServer() {
    // Check for factory test mode.
    mFactoryTestMode = FactoryTest.getMode();
    ...
}
下面 咱们看看 run () 里面都用什么?


#### 2.1.2 run()
private void run() {
    try {
        ...
        // 注释1:加载动态库libandroid_service.so。
        System.loadLibrary("android_servers");

        // 注释2:创建系统上下文。
        createSystemContext();

        // 调用每个进程的主线模块初始化。
        ActivityThread.initializeMainlineModules();

        // 注释3:创建 SystemServiceManager。
        mSystemServiceManager = new SystemServiceManager(mSystemContext);
        mSystemServiceManager.setStartInfo(mRuntimeRestart,
                mRuntimeStartElapsedTime, mRuntimeStartUptime);
        LocalServices.addService(SystemServiceManager.class, mSystemServiceManager);
        // 为可并行化的 init 任务准备线程池
        SystemServerInitThreadPool.start();
        ...
    } finally {

    }
    // 注释4:Start services。
    try {
        //下面咱们看看这个三个方法启动什么服务
        startBootstrapServices(t);
        startCoreServices(t);
        startOtherServices(t);
    } catch (Throwable ex) {
        ...
    } finally {
        t.traceEnd(); // StartServices
    }

    ...
    // 注释5:Loop 永久循环。
    Looper.loop();
    throw new RuntimeException("Main thread loop unexpectedly exited");
}
注释1:加载动态库libandroid\_service.so。


注释2:创建系统上下文。


注释3:创建 SystemServiceManager。


注释4:启动服务(startBootstrapServices、startCoreServices、startOtherServices)


注释5:Loop 永久循环。


#### 2.1.3 createSystemContext()
private void createSystemContext() {
    ActivityThread activityThread = ActivityThread.systemMain();
    mSystemContext = activityThread.getSystemContext();
    mSystemContext.setTheme(DEFAULT_SYSTEM_THEME);

    final Context systemUiContext = activityThread.getSystemUiContext();
    systemUiContext.setTheme(DEFAULT_SYSTEM_THEME);
}
初始化系统上下文对象mSystemContext,并设置默认的主题,mSystemContext实际上是一个Context(ContextImpl)对象。


调用ActivityThread.systemMain()的时候,会调用ActivityThread.attach(true),而在attach()里面,则创建了Application对象,并调用了Application.onCreate()。


#### 2.1.4 startBootstrapServices()
/**
 * 启动系统引导服务,因为这些服务之间有复杂的相互依赖关系,所以都放在了这个方法里面。
 */
private void startBootstrapServices(@NonNull TimingsTraceAndSlog t) {
    ...
    final String TAG_SYSTEM_CONFIG = "ReadingSystemConfig";
    SystemServerInitThreadPool.submit(SystemConfig::getInstance, TAG_SYSTEM_CONFIG);

    // PlatformCompat Service 由 ActivityManagerService, PackageManagerService 和 其他服务做使用
    PlatformCompat platformCompat = new PlatformCompat(mSystemContext);
    ServiceManager.addService(Context.PLATFORM_COMPAT_SERVICE, platformCompat);
    ServiceManager.addService(Context.PLATFORM_COMPAT_NATIVE_SERVICE,
            new PlatformCompatNative(platformCompat));
    AppCompatCallbacks.install(new long[0]);

    mSystemServiceManager.startService(FileIntegrityService.class);
    Installer installer = mSystemServiceManager.startService(Installer.class);
    mSystemServiceManager.startService(DeviceIdentifiersPolicyService.class);
    mSystemServiceManager.startService(UriGrantsManagerService.Lifecycle.class);
    startMemtrackProxyService();

    // StartActivityManager
    ActivityTaskManagerService atm = mSystemServiceManager.startService(
            ActivityTaskManagerService.Lifecycle.class).getService();
    //初始化 ActivityManagerService
    mActivityManagerService = ActivityManagerService.Lifecycle.startService(
            mSystemServiceManager, atm);
    mActivityManagerService.setSystemServiceManager(mSystemServiceManager);
    mActivityManagerService.setInstaller(installer);
    mWindowManagerGlobalLock = atm.getGlobalLock();

    mDataLoaderManagerService = mSystemServiceManager.startService(
            DataLoaderManagerService.class);

    mIncrementalServiceHandle = startIncrementalService();
    t.traceEnd();

    //初始化PowerManagerService(电源服务),需要提前启动,因为其他服务需要它。
    mPowerManagerService = mSystemServiceManager.startService(PowerManagerService.class);
    mSystemServiceManager.startService(ThermalManagerService.class);

    // 电源管理已经开启,ActivityManagerService负责电源管理功能
    mActivityManagerService.initPowerManagement();

    mSystemServiceManager.startService(RecoverySystemService.Lifecycle.class);
    ...

    mSystemServiceManager.startService(LightsService.class);

    // Package manager isn't started yet; need to use SysProp not hardware feature
    if (SystemProperties.getBoolean("config.enable_sidekick_graphics", false)) {
        mSystemServiceManager.startService(WEAR_SIDEKICK_SERVICE_CLASS);
    }

    // 初始化DisplayManagerService(显示管理器)
    mDisplayManagerService = mSystemServiceManager.startService(DisplayManagerService.class);

    mSystemServiceManager.startBootPhase(t, SystemService.PHASE_WAIT_FOR_DEFAULT_DISPLAY);

    // Start the package manager.
    try {
        mPackageManagerService = PackageManagerService.main(mSystemContext, installer,
                mFactoryTestMode != FactoryTest.FACTORY_TEST_OFF, mOnlyCore);
    } finally {

    }

    // 现在PackageManagerService已经启动,注册 dex 加载报告器来捕获系统服务加载的任何 dex 文件。
    // 这些 dex 文件将由 BackgroundDexOptService 优化。
    SystemServerDexLoadReporter.configureSystemServerDexReporter(mPackageManagerService);

    mFirstBoot = mPackageManagerService.isFirstBoot();
    mPackageManager = mSystemContext.getPackageManager();
    ...
    //将AMS等添加到ServiceManager中
    mActivityManagerService.setSystemProcess();
    if (!mOnlyCore) {
        boolean disableOtaDexopt = SystemProperties.getBoolean("config.disable_otadexopt",
                false);
        if (!disableOtaDexopt) {
            try {
                OtaDexoptService.main(mSystemContext, mPackageManagerService);
            } catch (Throwable e) {

            } finally {
            }
        }
    }

    ...
    mSensorServiceStart = SystemServerInitThreadPool.submit(() -> {
        TimingsTraceAndSlog traceLog = TimingsTraceAndSlog.newAsyncLog();
        startSensorService();
    }, START_SENSOR_SERVICE);

    // startBootstrapServices
}
改动比较大的地方:


* ActivityTaskManagerService(ATMS):负责管理除Activity和进程,包括生命周期和状态切换。
* ActivityManagerService(AMS):AMN的子类,负责管理三大组件(除Activity)和进程,包括生命周期和状态切换。AMS因为要和ui交互,所以极其复杂,涉及window。


ActivityTaskManagerService:把 Activity 相关的内容从 ActivityManagerService 剥离出来而产生的。


PowerManagerService(PMS):电源管理服务。


PackageManagerService(PKMS):包管理服务,不叫PMS是为了和电源管理服务区分开。


#### 2.1.5 startCoreServices()
/**
 * 启动核心服务。
 */
private void startCoreServices(@NonNull TimingsTraceAndSlog t) {
    // Service for system config
    mSystemServiceManager.startService(SystemConfigService.class);
    // Tracks the battery level.  Requires LightService.
    mSystemServiceManager.startService(BatteryService.class);
    ...
    mSystemServiceManager.startService(LooperStatsService.Lifecycle.class);

    mSystemServiceManager.startService(ROLLBACK_MANAGER_SERVICE_CLASS);

    mSystemServiceManager.startService(NativeTombstoneManagerService.class);

    mSystemServiceManager.startService(BugreportManagerService.class);

    mSystemServiceManager.startService(GpuService.class);

    // startCoreServices
}
#### 2.1.6 startOtherServices()
/**
 * 启动其他服务。
 */
private void startOtherServices(@NonNull TimingsTraceAndSlog t) {

    final Context context = mSystemContext;
    VibratorService vibrator = null;
    DynamicSystemService dynamicSystem = null;
    IStorageManager storageManager = null;
    NetworkManagementService networkManagement = null;
    IpSecService ipSecService = null;
    VpnManagerService vpnManager = null;
    VcnManagementService vcnManagement = null;
    NetworkStatsService networkStats = null;
    NetworkPolicyManagerService networkPolicy = null;
    NsdService serviceDiscovery = null;
    WindowManagerService wm = null;
    SerialService serial = null;
    NetworkTimeUpdateService networkTimeUpdater = null;
    InputManagerService inputManager = null;
    TelephonyRegistry telephonyRegistry = null;
    ConsumerIrService consumerIr = null;
    MmsServiceBroker mmsService = null;
    HardwarePropertiesManagerService hardwarePropertiesService = null;
    PacProxyService pacProxyService = null;
    ...
    // 现在便可以开始启动三方APP应用(如Launcher启动桌面)
    mActivityManagerService.systemReady(() -> {
    ...
     }, t);
    // startOtherServices
}
经过上面这些步骤,我们调用调用createSystemContext()创建系统上下文的时候,也已经完成了mSystemContext和ActivityThread的创建。
ATMS、AMS、WMS、PKMS等对象已经创建好了,并且完成了成员变量初始化。
>
> 注意:这是系统进程开启时的流程,在这之后,会开启系统的 Launcher程序,完成系统界面的加载与显示。
>
>
>
在Android的框架设计中,服务器端指的就是所有App共用的系统服务,比如我们这里提到的ATMS、AMS、WMS、PKMS等等,这些基础的系统服务是被所有的App公用的。
## 3、Launcher是什么
在Android系统中,应用程序是由Launcher启动起来的,其实,**Launcher本身也是一个应用程序**,其它的应用程序安装后,就会Launcher的界面上出现一个相应的图标,点击这个图标时,Launcher就会对应的应用程序启动起来。
当然也可以在 其他应用 启动应用。但是本质上都是调用startActivity()。
### 3.1 LauncherActivity.java
frameworks/base/core/java/android/app/LauncherActivity.java
/**
- Displays a list of all activities which can be performed
- for a given intent. Launches when clicked.
- @deprecated Applications can implement this UI themselves using
- {@link androidx.recyclerview.widget.RecyclerView} and
- {@link android.content.pm.PackageManager#queryIntentActivities(Intent, int)}
*/
@Deprecated
public abstract class LauncherActivity extends ListActivity {
…
@Override
protected void onListItemClick(ListView l, View v, int position, long id) {
Intent intent = intentForPosition(position);
startActivity(intent);
}
}
---
>
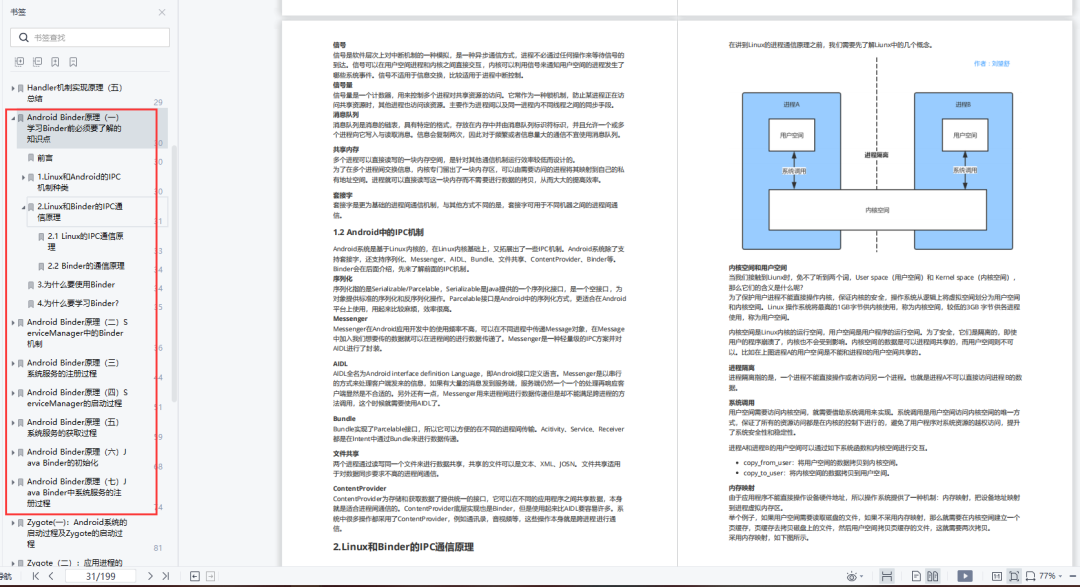
> **所以为了帮助到大家更好的了解Android Framework框架中的知识点,这边查阅大量的素材,整理了一下的 [Android Framework 核心知识点手册]( ),里面记录了:有Handler、Binder、AMS、WMS、PMS、事件分发机制、UI绘制……等等,几乎把更Framework相关的知识点全都记录在册了**
>
>
>
#### **《Framework 核心知识点汇总手册》**:[`https://qr18.cn/AQpN4J`]( )
**Handler 机制实现原理部分:**
1.宏观理论分析与Message源码分析
2.MessageQueue的源码分析
3.Looper的源码分析
4.handler的源码分析
5.总结

**Binder 原理:**
1.学习Binder前必须要了解的知识点
2.ServiceManager中的Binder机制
3.系统服务的注册过程
4.ServiceManager的启动过程
5.系统服务的获取过程
6.Java Binder的初始化
7.Java Binder中系统服务的注册过程
**Zygote :**
1. Android系统的启动过程及Zygote的启动过程
2. 应用进程的启动过程
### 最后
感觉现在好多人都在说什么安卓快凉了,工作越来越难找了。又是说什么程序员中年危机啥的,为啥我这年近30的老农根本没有这种感觉,反倒觉得那些贩卖焦虑的都是瞎j8扯谈。当然,职业危机意识确实是要有的,但根本没到那种草木皆兵的地步好吗?
Android凉了都是弱者的借口和说辞。虽然 Android 没有前几年火热了,已经过去了会四大组件就能找到高薪职位的时代了。这只能说明 Android 中级以下的岗位饱和了,现在高级工程师还是比较缺少的,很多高级职位给的薪资真的特别高(钱多也不一定能找到合适的),所以努力让自己成为高级工程师才是最重要的。
所以,最后这里放上我耗时两个月,将自己8年Android开发的知识笔记整理成的Android开发者必知必会系统学习资料笔记,上述知识点在笔记中都有详细的解读,里面还包含了腾讯、字节跳动、阿里、百度2019-2021面试真题解析,并且把每个技术点整理成了视频和PDF(知识脉络 + 诸多细节)。
以上全套学习笔记面试宝典,吃透一半保你可以吊打面试官,只有自己真正强大了,有核心竞争力,你才有拒绝offer的权力,所以,奋斗吧!骚年们!千里之行,始于足下。种下一颗树最好的时间是十年前,其次,就是现在。
最后,赠与大家一句诗,共勉!
> 不驰于空想,不骛于虚声。不忘初心,方得始终。
**网上学习资料一大堆,但如果学到的知识不成体系,遇到问题时只是浅尝辄止,不再深入研究,那么很难做到真正的技术提升。**
**[需要这份系统化学习资料的朋友,可以戳这里获取](https://bbs.youkuaiyun.com/topics/618156601)**
**一个人可以走的很快,但一群人才能走的更远!不论你是正从事IT行业的老鸟或是对IT行业感兴趣的新人,都欢迎加入我们的的圈子(技术交流、学习资源、职场吐槽、大厂内推、面试辅导),让我们一起学习成长!**
oid开发者必知必会系统学习资料笔记,上述知识点在笔记中都有详细的解读,里面还包含了腾讯、字节跳动、阿里、百度2019-2021面试真题解析,并且把每个技术点整理成了视频和PDF(知识脉络 + 诸多细节)。
[外链图片转存中...(img-cNKxb74D-1714191880209)]
以上全套学习笔记面试宝典,吃透一半保你可以吊打面试官,只有自己真正强大了,有核心竞争力,你才有拒绝offer的权力,所以,奋斗吧!骚年们!千里之行,始于足下。种下一颗树最好的时间是十年前,其次,就是现在。
最后,赠与大家一句诗,共勉!
> 不驰于空想,不骛于虚声。不忘初心,方得始终。
**网上学习资料一大堆,但如果学到的知识不成体系,遇到问题时只是浅尝辄止,不再深入研究,那么很难做到真正的技术提升。**
**[需要这份系统化学习资料的朋友,可以戳这里获取](https://bbs.youkuaiyun.com/topics/618156601)**
**一个人可以走的很快,但一群人才能走的更远!不论你是正从事IT行业的老鸟或是对IT行业感兴趣的新人,都欢迎加入我们的的圈子(技术交流、学习资源、职场吐槽、大厂内推、面试辅导),让我们一起学习成长!**


 1925
1925


 到【灌水乐园】发言


