


 本文介绍如何使用Vagrant和VirtualBox搭建CentOS7的虚拟开发环境,包括安装流程、配置步骤及常见问题解决方法。
我 改成装 centos7就行了。。。 《Vagrant Development Environment Introduction centos7成功版本》
brew install vagrant
brew install virtualbox-extension-pack
brew install virtualbox
其他版本可以参考vagrant官网
Install | Vagrant | HashiCorp Developer
git clone GitHub - spdk/spdk: Storage Performance Development Kit
cd spdk
git submodule update --init
cd spdk/scripts/vagrant
vagrant plugin install vagrant-proxyconf
sudo mkdir -p /var/lib/libvirt/images
sudo chmod -R 777 /var/lib/libvirt
./scripts/vagrant/create_vbox.s -h 看下有哪些可以安装
distro = <centos7 | centos8| ubuntu1604 | ubuntu1804 | ubuntu2004 | fedora33 |
            fedora34 | fedora35 | freebsd11 | freebsd12 | arch | clearlinux>
./scripts/vagrant/create_vbox.sh ubuntu1804
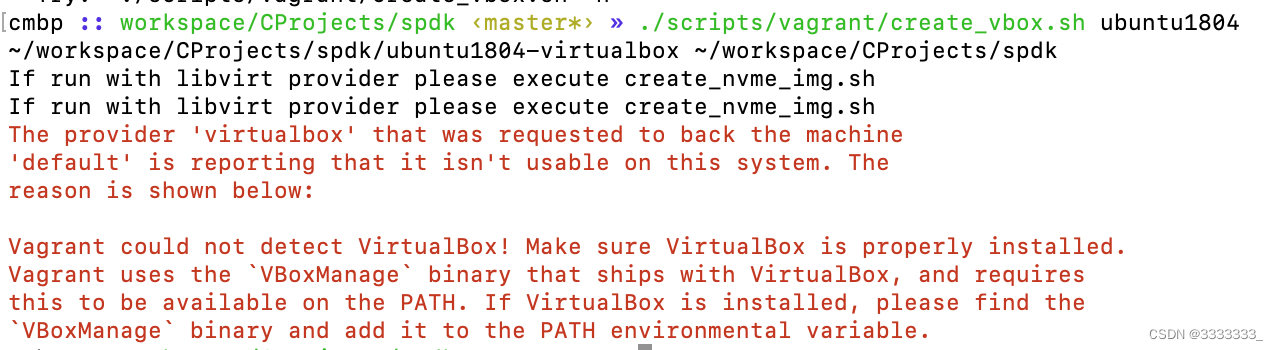
下载virtualbox Downloads – Oracle VM VirtualBox
之后安装就行
再次执行
./scripts/vagrant/create_vbox.sh ubuntu1804
> ./create_vbox.sh ubuntu1804                                                               master [58701cc4c] modified
~/workspace/CProjects/spdk/scripts/vagrant/ubuntu1804-virtualbox ~/workspace/CProjects/spdk/scripts/vagrant
Bringing machine 'default' up with 'virtualbox' provider...
==> default: Importing base box 'peru/ubuntu-18.04-server-amd64'...
==> default: Matching MAC address for NAT networking...
==> default: Setting the name of the VM: ubuntu1804-virtualbox_default_1641972615882_32696
==> default: Clearing any previously set network interfaces...
==> default: Preparing network interfaces based on configuration...
    default: Adapter 1: nat
==> default: Forwarding ports...
    default: 22 (guest) => 2222 (host) (adapter 1)
==> default: Running 'pre-boot' VM customizations...
==> default: Booting VM...
==> default: Waiting for machine to boot. This may take a few minutes...
    default: SSH address: 127.0.0.1:2222
    default: SSH username: vagrant
    default: SSH auth method: private key
    default:
    default: Vagrant insecure key detected. Vagrant will automatically replace
    default: this with a newly generated keypair for better security.
    default:
    default: Inserting generated public key within guest...
    default: Removing insecure key from the guest if it's present...
    default: Key inserted! Disconnecting and reconnecting using new SSH key...
==> default: Machine booted and ready!
==> default: Checking for guest additions in VM...
    default: The guest additions on this VM do not match the installed version of
    default: VirtualBox! In most cases this is fine, but in rare cases it can
    default: prevent things such as shared folders from working properly. If you see
    default: shared folder errors, please make sure the guest additions within the
    default: virtual machine match the version of VirtualBox you have installed on
    default: your host and reload your VM.
    default:
    default: Guest Additions Version: 5.2.42
    default: VirtualBox Version: 6.1
==> default: Configuring proxy for Apt...
==> default: Configuring proxy environment variables...
==> default: Rsyncing folder: /Users/xxx/workspace/CProjects/spdk/ => /home/vagrant/spdk_repo/spdk
==> default: Running provisioner: file...
    default: ~/.gitconfig => .gitconfig

  SUCCESS!

  cd to /Users/xxx/workspace/CProjects/spdk/scripts/vagrant/ubuntu1804-virtualbox and type "vagrant ssh" to use.
  Use vagrant "suspend" and vagrant "resume" to stop and start.
  Use vagrant "destroy" followed by "rm -rf /Users/xxx/workspace/CProjects/spdk/scripts/vagrant/ubuntu1804-virtualbox" to destroy all trace of vm.
关闭虚机后,重启步骤:打开virtual box 然后 进入到虚机目录 执行 vagrant up
cd /Users/xxx/workspace/CProjects/spdk/scripts/vagrant/ubuntu1804-virtualbox
vagrant ssh 或者通过用户名密码登录,都是 vagrant ssh -p2222 vagrant@127.0.0.1
删除 只需要执行 rm -rf /Users/xxx/workspace/CProjects/spdk/scripts/vagrant/ubuntu1804-virtualbox 就行了
lspci | grep "Non-Volatile" 这里本次测试是没任何结果的,跟官网不一样
cd ~/spdk_repo/spdk
sudo apt update
sudo scripts/pkgdep.sh
./configure
make
sudo ./scripts/setup.sh 没反应
script -c 'sudo ./scripts/vagrant/update.sh' update.log
/home/vagrant/spdk_repo/spdk/scripts/pkgdep/common.sh: line 99: hash: bundler: not found
Fetching: bundler-2.3.4.gem (100%)
Successfully installed bundler-2.3.4
Parsing documentation for bundler-2.3.4
Installing ri documentation for bundler-2.3.4
Done installing documentation for bundler after 0 seconds
1 gem installed
mdl 0.11.0 built to pkg/mdl-0.11.0.gem.
rake aborted!
Running `gem install /usr/src/markdownlint/pkg/mdl-0.11.0.gem` failed with the following output:

ERROR:  Error installing /usr/src/markdownlint/pkg/mdl-0.11.0.gem:
	The last version of chef-utils (>= 0) to support your Ruby & RubyGems was 16.6.14. Try installing it with `gem install chef-utils -v 16.6.14` and then running the current command again
	chef-utils requires Ruby version >= 2.6. The current ruby version is 2.5.0.
Successfully installed concurrent-ruby-1.1.9

/var/lib/gems/2.5.0/gems/bundler-2.3.4/lib/bundler/gem_helper.rb:211:in `sh'
/var/lib/gems/2.5.0/gems/bundler-2.3.4/lib/bundler/gem_helper.rb:101:in `install_gem'
/var/lib/gems/2.5.0/gems/bundler-2.3.4/lib/bundler/gem_helper.rb:57:in `block in install'
Tasks: TOP => install
(See full trace by running task with --trace)
Script done, file is update.log
sudo apt-get install software-properties-common
sudo add-apt-repository ppa:brightbox/ruby-ng
sudo apt-get update
sudo apt-get purge --auto-remove ruby
sudo apt-get install ruby2.6 ruby2.6-dev
靠 按着官方 装Ubuntu 不行。
我 改成装 centos7就行了。。。


 1472
1472

 被折叠的 条评论
为什么被折叠?
被折叠的 条评论
为什么被折叠?
 到【灌水乐园】发言


